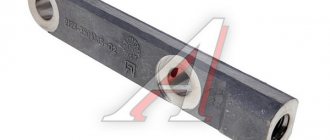
Working principle of the brake wheel cylinder
The brake fluid coming from the main one under pressure acts on both pistons in the working cylinder, which, in turn, compress or expand the brake pads, which leads to braking. The front brake circuit is disc, while the rear brake circuit in many cars is drum type.
- Front calipers.
- Pipe supplying hydraulic fluid to the front wheels.
- Rear pipeline.
- Rear wheel rollers.
- Tank.
- Main roller
- One of the pistons.
- Stock.
- Pedal.
Where is the brake cylinder of the VAZ 2106
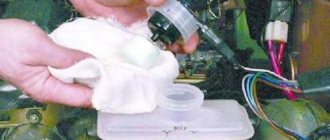
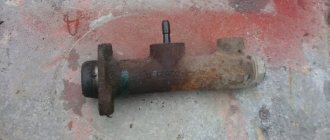
The brake master cylinder is installed in the engine compartment of the VAZ 2106, above the engine. The device is located about half a meter from the driver. Just above the cylinder there is a small expansion tank into which brake fluid is poured.
The cylinder has an oblong shape. The body is made of high quality steel.
The housing has several threaded holes for screwing in contour brake pipes. This device is screwed directly to the brake booster using two 8mm bolts.
Main function of the cylinder
In short, the function of the master brake cylinder is reduced to the timely redistribution of brake fluid between several brake circuits. There are three such circuits on the “six”.
There is one circuit for each front wheel, plus a circuit for servicing the two rear wheels. It is from the master brake cylinder that the fluid comes, which then begins to put pressure on the wheel cylinders, forcing them to tightly compress the brake pads and stop the car. In addition, the master cylinder performs two additional functions:
- abductor function. If the brake fluid has not been completely used by the working cylinders, then the remainder goes back into the reservoir until the next braking;
- return function. When the driver stops braking and removes his foot from the pedal, the pedal rises to its original position under the action of the master cylinder.
How the cylinder works and how it works
The VAZ 2106 drive cylinder has a lot of small parts, so at first glance the device seems very complex. Nevertheless, there is nothing complicated about it. Let's list the main elements.
- The case is steel with two internal chambers.
- Washer fixing the main fitting.
- Brake fluid drain fitting (it connects directly to the expansion tank).
- Union seal.
- Washer for the limit screw.
- Stopper screw for brake piston.
- Return spring.
- Support cap.
- Compensator spring.
- O-ring for the brake piston (there are 4 such rings in the cylinder).
- Spacer washer.
- Rear brake circuit piston.
- Small spacer washer.
- Front brake piston.
A steel plug is installed at one end of the cylinder body. The second end is equipped with a flange with mounting holes. And the master cylinder works as follows:
- Before pressing the pedal, the pistons stand in the cylinder body at the walls of their chambers. Each spacer ring is restrained by its own limiting screw, and the chambers themselves are filled with brake fluid;
- after the driver, by pressing the pedal, releases the entire free play of this pedal (this is approximately 7–8 mm), the pusher in the cylinder begins to put pressure on the main piston, moving it to the opposite wall of the chamber. At the same time, a special cuff blocks the hole through which the brake fluid goes into the reservoir;
- when the main piston reaches the opposite wall of the chamber and squeezes out all the liquid into the hoses, an additional piston is activated, which is responsible for increasing the pressure in the rear circuit. As a result, the pressure in all brake circuits increases almost simultaneously, which allows the driver to use both front and rear pads for braking;
- As soon as the driver releases the brakes, the springs return the pistons back to their starting point. If the pressure in the cylinder was too high and not all of the liquid was consumed, then its remains are drained into the tank through the outlet hose.
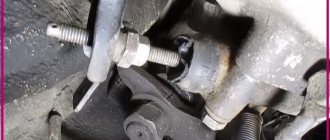
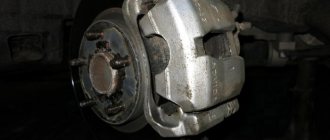
The device of the working brake cylinder
The design of the front caliper and the rear brake cylinder of a VAZ car differ in the appearance of the body and main parts. The disc brake device consists of the following main parts: 1 - Piston. 2 - Boot. 3 - Sealing collar. 4 - Caliper body. 6 - Air fitting. 7 - Springs that press the pads. 12 - Pads.
The following parts are used in the drum brake device: 2 - Bleeding fitting. 3, 11 - Anther. 4, 10 - Piston. 6, 9 — Piston seal. 7 - Housing.
What is needed for replacement
To replace the brake cylinder, you need to take care of preparing some tools and materials:
- set of wrenches;
- screwdriver;
- pliers;
- dry rags;
- metal brush;
- WD-40 (if things don't go according to plan);
- jack;
- brake cylinder;
- balloon wrench.
Tools for replacing the rear brake cylinder
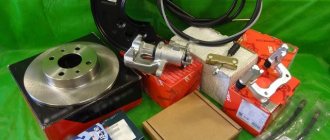
Before replacing, it is advisable to purchase a set of brake pads, since they still need to be changed periodically, and the disassembled rear of the car will allow you to do this without any problems. The work needs to be done in a spacious room or outside, so that there is somewhere to put the spare parts after dismantling. It is important to remember not only the sequence of their removal, but also the method of removal . Once everything is ready, you can begin repair work.
Brake cylinder puller
Diagnostics of the working brake cylinder
The following signs will tell the motorist that repair of the brake wheel cylinder is approaching:
- Uneven operation of the wheels when braking, which can result in the car skidding. This is a sign of a stuck piston, which can cause the use of low-quality fluid or air entering the system.
- The indicator light is triggered when the fluid in the tank is critically low, or this is detected during a visual inspection, which indicates a possible leak of hydraulic fluid from worn cuffs or leaky pipes.
- The pedal is pressed with great effort, this can happen for all the reasons described above.
A stuck piston and a stiff pedal are not yet indicators for repairing and replacing working cylinders. You should pay attention to the thickness of the pads; if their wear has reached its maximum, this can cause the pistons to jam, since they practically do not work.
Initially, completely replacing the hydraulic fluid or bleeding the brake system may also help correct these problems. If these actions do not lead to a positive result, it is necessary to repair the working brake cylinder; fortunately, there is a repair kit for the working brake cylinder on sale, the set of which, depending on the make of the car, includes: cuffs, piston, boot and other components.
Symptoms of a malfunctioning TTS
What symptoms may indicate the need to replace a brake cylinder? Let's consider the main ones:
- reduced efficiency of the braking system (the pedal is activated only at the end of the stroke);
- the appearance of traces of liquid leakage on the surface of the drum;
- a noticeable decrease in brake fluid in the reservoir.
Signs of a faulty rear brake cylinder
All of these symptoms often occur due to various causative factors. The most common of them include:
- the pads were heavily worn, which in turn led to the pistons being squeezed out;
- low quality of the cylinder itself;
- the cuffs are corroded by the brake fluid (this is possible when mixing different types);
- natural wear of the brake cylinder.
Rear brake cylinder failure
Drivers often encounter jammed pistons inside the housing. In this case, the car constantly brakes, which causes the drum to overheat. You cannot ignore such a malfunction; you need to urgently take the car in for repairs.
Rear brake cylinder wear
Repair work
Disassembling, replacing or repairing the brake cylinder of a VAZ car is not particularly difficult. Having purchased the necessary repair kit for the working brake cylinder, unscrew the wheel and, having disconnected the pipes, remove the faulty cylinder (the dismantling diagram will be described in more detail below). For convenience, by holding the body in a vice and removing the boot, we gain access to the retaining ring that secures the piston, after removing which we remove all the working parts.
After disassembling the housing, you need to rinse everything with brake fluid and inspect the housing mirror for mechanical damage.
If no damage is found, then open the repair kit for the working brake cylinder and replace the faulty parts.
A prerequisite, regardless of their condition, is the replacement of all rubber parts included in the repair kit for the working brake cylinder. This list includes: boot, cuff, etc.
Instructions
The brake fluid level in the reservoir must be sufficient (above the middle or up to the MAX mark). If there is insufficient amount of fluid, the brake system will become airy, which will significantly complicate the work, because in addition to replacing the brake pump, it will be necessary to pump the system. Below are step-by-step instructions for replacing the brake cylinder on the rear wheel using the example of a VAZ 2101-07 car.
Replacing the rear brake cylinder
Step 1 . Raise the rear wheel with a jack and hang the wheel.
Jacking up the rear wheel
Step 2 . Place a reliable support under the car. Do not carry out repair work on the jack, even if it looks strong and reliable.
Installing a reliable support under the car
Step 3 . Remove the car from the handbrake.
Removing the handbrake
Step 4: Place something under the front wheels. This will allow you to securely secure the vehicle.
Fixing car wheels
Step 5: Remove the rear wheel.
Removing the rear wheel
Step 6 . Unscrew the two wheel guides and remove the brake drum.
Removing the brake drum
Step 7: Disconnect the brake pipe from the cylinder. It is advisable to do this with a special key so as not to tear off the edges on the fitting.
Brake Line Disconnect Tools
Step 8: Be careful when unscrewing the fitting. It can rotate along with the tube and then you will also have to change the tube.
Unscrewing the fitting
Step 9 . Remove the cap from the bleeder fitting. It is needed to prevent fluid from leaking out of the brake pipe.
Removing the cap from the bleeder fitting
Step 10 . Place the rubber cap on the brake pipe. It will also protect the tube from dirt sticking to it.
Protecting the brake pipe with a rubber cap
Step 11. Remove the two bolts securing the brake cylinder to the support plate.
Unscrewing the brake cylinder mounting bolts
Step 12: Remove the brake cylinder from the vehicle.
Removing the rear brake cylinder
Note! If the pads are not filled with brake fluid and do not need to be replaced, then there is no need to remove them.
Step 13 . Place some special lubricant under the boots of new cylinders. It is needed to protect the part from corrosion.
Applying lubricant under cylinder boots
Step 14 . This is what the old and new brake cylinder looks like. By visually comparing parts, signs of wear can be identified.
Visual inspection of the brake cylinder
Step 15. Install the new gearbox in place. Since its pistons are separated, there should be no problems with installation.
Installation of a new ZTZ
Step 16 . Tighten the bolts securing the cylinder to the support plate.
Attaching the cylinder to the support panel
Step 17 . Remove the rubber plug from the cylinder. It is advisable to remove the plug at the very last moment to avoid dirt getting into the part.
Removing the plug from the cylinder
Step 18 . Attach the brake pipe to the cylinder.
Connecting the brake pipe to the cylinder
Step 19 . Thoroughly clean the axle shaft and drum from dirt and corrosion.
Cleaning the drum from dirt and corrosion
Step 20 . Apply some high-temperature lubricant to the contact areas of the parts. Any book on repairing VAZ cars says this, but, unfortunately, now people don’t like to read.
Application of high temperature grease
Step 21 . Reinstall the drum and tighten the two wheel guides.
Brake drum installation
Step 22 . Replace the removed wheel and, removing the support from under the car, lower it from the jack. Don't forget to take back what you put under the front wheels. At this point, the replacement of the rear brake cylinder can be considered complete.
Installing a wheel on a car
Replacing a faulty brake cylinder
The replacement scheme in the VAZ family is almost the same for cylinders of both circuits with minor differences.
Initially, you need to prepare the necessary keys and plugs suitable for the size of the pipes. After removing the wheel and unscrewing the pipes, we put plugs on them to prevent fluid leakage. Having unscrewed the corresponding nuts, we dismantle the old cylinder and put a new one in its place, reassembling it in the reverse order. If, after replacing or assembling the wheel, the pads are too far apart, you can file the ends of the pads, but do not overdo it, this may affect the operation of the handbrake. After any manipulations with the brake system, it must be bled according to the diagram.
Checking after replacing the fuel pump
As soon as the new part is installed, you need to check its functionality. The brake pads are checked (whether they are separated at the place where the brake parts are replaced), as well as the system itself for leaks. Experienced motorists check even before installing the wheel, but this requires an assistant. However, there is no way to bleed the brake system yourself.
Check after replacing the rear brake cylinder
Check the rear brake cylinder as follows:
- the assistant sits in the driver’s seat and, pressing the brake pedal, fixes it in this position;
- the second diagnostic participant turns the brake drum with his hands;
- the same second participant looks to see if there are any traces of liquid;
- If there are no leaks, the wheel is installed in its place.
Checking the brake system after repair
On a note! If, when the brake is pressed, the drum rotates or traces of fluid appear, this indicates a faulty brake cylinder. Even if the part is new, it must be replaced.
Replacing the front brake cylinder
The following calipers are installed on the front wheels of VAZ cars:
- in a VAZ classic car, two front brake cylinders (FTC) are attached to the caliper brackets;
- on VAZ 2108-15 models, one PTC is installed on each side of the front axle.
Replacing the front cylinder 2109 is not difficult, it is also easy to do yourself:
- we put the car on a flat area (the work can be done without a pit and a lift), we put tackles under the rear wheels;
- jack up the car, take off the front wheel;
- unscrew the two caliper fasteners with a hexagon;
- loosen the brake hose nut;
- bend the locking washers on the upper and lower bolts, unscrew the cylinder fastenings to the caliper bracket
- we move the PTC to the side along with the bracket;
- disconnect the cylinder from the bracket, then from the hose so that the brake fluid does not leak; after disconnecting the PTC, it is better to immediately direct the hose upward;
- we install another, new spare part, and perform the assembly.
Replacing brake cylinder 2107
If the replacement operation on a VAZ classic is not performed on a car lift, it is more convenient to do the work sequentially - first on one side, then on the other side of the rear wheel. To perform the work, the vehicle must be placed on a level surface, then proceed as follows:
- We turn off the engine, set the car to speed, and put chocks under the front wheels. Don’t forget to fully release the handbrake;
- loosen the wheel nuts of the rear wheel, jack up the car and remove the wheel;
- To prevent the car from going anywhere, it is advisable to place a “tragus” next to the jack;
- remove the brake drum - use a 12 mm combination wrench to unscrew the two guides;
- the drum usually comes off tightly, so it should be tapped from behind with a hammer through a piece of wood. You cannot hit the part with an iron hammer; the drum can split;
- unscrew the brake pipe from behind the cylinder, also 2 ten bolts securing the RTC itself;
- pull out the cylinder, freeing it from the pads;
- We install the part prepared for replacement (it is important to get the pads into the slots on the RTC pistons, we fasten all the removed parts in their places;
After the work has been done, it is necessary to top up the fuel injection system reservoir and bleed the brakes.