- We are finalizing the factory version
- We make it from scratch
- We create acoustic podiums
- Useful video
Having a hatchback body, the VAZ 2114 is distinguished by an impressive trunk, which covers the entire rear part of the car. It is separated from the interior by a seat and a removable shelf.
The shelf has bending points provided by the design, along which it folds, increasing the volume of the luggage compartment. This design does not cause any complaints, especially if the presence of music is not important, but if music means a lot to the owner, a “surprise” awaits him - there are no places for mounting an audio system in the design of the VAZ 2114.
The standard shelf is thin and light, any speaker will make it heavier, which will lead to its incorrect fixation, the shelf will rattle a lot, the audio system will resonate with the pits and the rumble from behind will be simply unbearable, the presence of such “music” is very doubtful pleasure. Later, the sides will also become loose, and then it will become completely unbearable.
The problem is solved in three ways:
- The shelf is removed, there are no rear speakers, there is nothing to rattle, but there is no music either.
- Acoustic shelf VAZ 2114 is inexpensive to buy, but it will improve the situation significantly.
- Make an acoustic shelf yourself.
In addition to eliminating third-party noise, the acoustic shelf will solve the problem of trunk structural rigidity, provide the acoustic system with a reliable frame, and eliminate the negative impact of acoustic vibrations on the mechanical joints of the rear door and trunk as a whole.
We are finalizing the factory version
If the VAZ 2114 acoustic shelf is expensive for you, but you don’t want to make it yourself from scratch, then you can modify the factory shelf.
To do this you need the following tools and materials:
- Plywood.
- Putty.
- Upholstery.
- Self-tapping screws.
- Epoxy adhesive.
- Jigsaw.
- Knife.
- Emery (sandpaper).
- Stapler.
The shelf is easy to modify; for a good result, the steps are performed in the following order:
- We draw a template on cardboard, use it to draw places for the speakers on the shelf, and cut them out with a jigsaw.
- We use the shelf as a template, draw what we need on the plywood, and cut out what we need on the plywood.
- Using epoxy glue, we glue the shelf to a piece of plywood cut out for it.
- We cover (glue) the finished result with carpet (another fabric), not forgetting about the plywood ends.
Such a shelf, due to its rigidity, will significantly improve the sound, but in addition, you can soundproof the trunk and the shelf itself, this will make the music even better.
For soundproofing the following will be useful:
- Bitomast and Vibroplast (1 sheet each).
- Smoothing tool (usually a roller).
- Construction hairdryer.
Due to the fact that vibroplast perfectly dampens vibrations, it is enough to cover 2/3 of the trunk with it. Bitomast is applied to the shelf itself; it is a noise-absorbing material, it improves the sound and removes vibration echoes and unnecessary sounds. To apply, the materials are laid out on the desired surface, then heated with a hairdryer and rolled out over it.
Carefully monitor the quality of rolling; if there are bubbles under the material, the results of your work will very quickly fail.
Tools and materials
First of all, you will need to stock up on materials and tools with which you can make a shelf. This list includes:
- Sheet of plywood - 2 pieces with a thickness of at least 5 millimeters;
- Cardboard sheet;
- Set of self-tapping screws;
- 2-3 furniture curtains;
- Electric jigsaw;
- Sandpaper;
- Marker;
- Shelf covering material;
- Roulette, ruler, etc.;
- Glue.
The design involves the creation of two main elements. They are combined into a single system - a podium for the speakers and a folding part with which you get access to the luggage compartment.
Manufacturing
The base will consist of two sheets of plywood. Their sizes and shapes are almost the same. But only the bottom sheet will have slightly smaller cutouts for the folding element. In the end, the task is to build a stepped ledge on the base. It will become a support for the folding element.
- Don't rush to remove the standard shelf. First, make a stencil using a piece of cardboard. The dimensions will be about 1.5 meters wide and at least 1 meter long.
- Some people find ready-made drawings on the Internet, but they may not always clearly correspond to your specific luggage compartment dimensions. This is due to the fact that even at the assembly stage of VAZ series cars, certain deviations are allowed.
- Place a sheet of cardboard on the factory shelf and make the necessary cuts. Pay special attention to the corners near the rear pillars.
- According to the markings, mark the areas through which the seat belts will extend.
- Creating a stencil will allow you to clearly determine the dimensions, dimensions and shapes of the future shelf.
- Based on the results obtained on the stencil, cut out the elements from plywood.
- Immediately check to ensure that the cut out elements comply with the dimensions of the vehicle’s interior. This way you can find mismatches, trim and fit the workpieces.
- Now you can dismantle the standard shelf, but leave the sides in place.
- On blanks from a sheet of plywood, make a cutout of the folding part, and cut holes for your speakers. Here it all depends on what kind of speakers you plan to install on your VAZ 2114.
- Using an electric jigsaw, a folding element of the podium is cut out on one of the blanks. To do this, you need to make a C-shaped base. The cut plywood element will become your folding element.
We make it from scratch
The acoustic shelf of the VAZ 2114 is easy to make with your own hands, you will have to spend a little on materials, and do not regret a little of your time.
The following “ingredients” will be useful:
- Centimeter chipboard or MDF.
- Carpet (other fabric).
- Glue.
- Self-tapping screws.
- Jigsaw.
- Drill.
- Grinding machine (emery, sandpaper).
- Stapler.
- Materials for the layout: cardboard, pencils, drawing supplies.
We will do it like this:
- We are preparing a template, then we will try it on the car, it should be a little larger.
- We cut out the shelf according to the template, remove the irregularities by grinding down the gap included in the template.
- We double-check its dimensions on the car, if everything matches the car and the size of the intended speakers, then the shelf is ready.
- We are preparing materials for covering (pasting), everything should be at hand.
- Apply glue to the plywood, apply fabric, and roll everything out to avoid bubbles.
- We fix the edges with a stapler.
- Let it dry for a day.
In order for the shelf to be foldable, you need to take care of the moving elements in advance and try on the hinges. It is better to do this before pasting with carpet, so the design will look much more aesthetically pleasing; the moving technical gap can be closed with a strip of “elastic” (elastic fabric), but not with carpet or other non-stretchy fabric.
Very often, people don’t want to fool themselves with jigsaws and glue, so they immediately buy ready-made ones. This solution has a significant advantage, because there are a great many modifications of shelves, both a regular “plastic shelf” and a solid “VAS 2114 acoustic shelf with sidewalls” are sold, all intermediate options are also present in the online assortment. Although the purchased version will be many times more expensive than the homemade one, laziness and the “pursuit of beauty” sometimes overpower common sense and the desire to save.
What to do?
There are three ways to solve this problem. The choice in favor of one option or another directly depends on your requirements, wishes and sometimes financial capabilities.
Solution option
Explanation
Completely dismantle the sides and shelf
Nothing will make noise in this situation, but you will deprive yourself of space to install an audio system. You can forget about high-quality sound inside the car
Purchase a ready-made podium for durable material with holes for speakers
A good option that requires certain financial costs. All you have to do is install it in place. Disadvantage - it is not always possible to find a shelf that is ideal for all parameters
Make a podium with your own hands
This option provides minimal financial costs and the opportunity to create a shelf that will meet your smallest requirements. The downside is that you have to do the work yourself, which not everyone can handle.
Having a stronger and thicker shelf not only eliminates noise, but also improves the sound quality of the audio system. The thick shelf acts as a highly efficient enclosure.
Today we will look at how you can create an acoustic podium with your own hands, which will be placed on factory sidewalls. You can also try to make an option with your own sidewalls, but it is much more complicated and extremely difficult for a beginner to cope with. Let's not make things difficult for you. The option with standard sidewalls is very good.
We create acoustic podiums
It doesn’t seem logical to change the shelf, investing effort, time and money into good sounding music, leaving the standard VAZ 2114 podiums, which are made of plastic and eliminates more than half of your work. Plastic does not dampen the vibration of the speakers at all; on the contrary, it enhances it, creating rattling and extraneous noise. Therefore, we will make new podiums, tougher, and making all the previous torment justified.
For the new holder you will need:
- Columns.
- Installation rings (included in the kit).
- Gloves and brush.
- Epoxy glue and hardener.
- Fiberglass and lycra.
If you start creating a podium from scratch, some skills in woodworking and other work with materials will come in handy, firstly, for an untrained person this is unrealistic, and secondly, people with such skills can imagine what exactly needs to be done without this article. Therefore, relying on the option that there are no such skills, as well as special equipment, on the basis of a standard podium we will carry out the procedure for strengthening it using the materials described above.
This procedure is done as follows:
- We cut off the mesh (part of it) from the podium and fix the installation ring; the structure should come out monolithic and rigid.
- We put lycra on the structure.
- Mix glue and hardener.
- We spread the resulting solution onto the lycra and, as in papier-mâché, glue the fiberglass (you need to stick 3-4 layers).
- Let the structure dry.
- We install.
The option of polyurethane foam is “not an option”: firstly, it causes corrosion of the body, and secondly, in addition to vibrations, foam also dampens sound.
What speakers are best to put in the front doors?
Speakers are placed in different places inside the car. To provide sound for the first row of seats, speakers are installed in the front doors. Depending on the technical capabilities and design of the car, the speakers in the front doors can be coaxial or component. Coaxial acoustics are two or three loudspeakers that are mounted in the center of one of them. The main one is a 6.5-inch low-frequency or wide-range loudspeaker, on which there is a mid-range driver and a tweeter for reproducing high frequencies. The decision on which 16 speakers to install in the front doors is often determined by the make and design of the car.
The coaxial audio system has good playback quality and is compact. The dimensions of the acoustics are determined by the dimensions of the main speaker. What is important for the car owner is the relatively low price of the design and ease of installation. Due to the fact that all acoustic devices are arranged in one place, it is impossible to set the relative position of the dynamic heads to obtain effective sound.
Component acoustics, designed for installation in the front doors of a car, consists of several dynamic heads, each of which is mounted in its own place. The entire reproduced audio range is divided into several bands, so component speakers are connected to a low-frequency amplifier through crossover filters or crossovers. The number of loudspeakers must be at least two, and high-quality sound reproduction devices require connecting acoustics with 4-5 loudspeakers per channel. This configuration increases the power and sound quality, the cost of the system and the complexity of installation.
Lada 2114 Turtle › Logbook › DIY rear shelf.
To begin with, I walked around and looked around the shops.
The shelves start at 1500 and go up. It won't work. The plywood turned up. There is a jigsaw. There is a warm garage. All conditions. This is what you need to take off with.
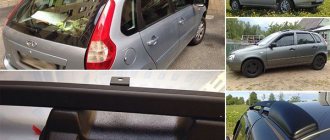
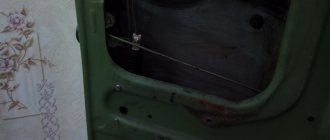
To begin with, I started dismantling the original shelf and sides. But in the photo they are nothing. They look.
I unscrewed the screws, the sides are in no hurry to fall off. I thought. The sidewall will still go to waste. I solved the problem with a jigsaw.
Machine without shelf. Nothing too.
I left the sides alone for a while. Shelf for long-term storage.
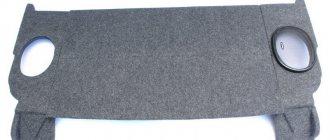
I decided to make the shelf in two parts of different widths. To make it easier to open. Cut it out and screwed the hinges on.
What has happened so far.
Further refinement with a file. Things slowly came to a close.
To begin with, I “carpeted” the turtle.
The most difficult part is the sides. I tightened it and screwed the speaker on.
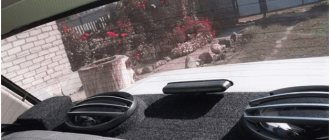
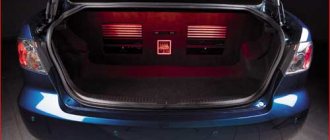
Upholstered and installed a shelf. What happened in the end?
I think it's good. All that remains is to carefully stick the register in the trunk and buy some adhesive tape to secure the shelf. She already fits well, but that’s for sure.
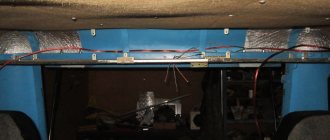
I threw in the wiring, soldered it, connected it, listened. The rear does not outplay the front, but only complements it. This makes me happy. But we need to change our heads.
What surprised me: the rear license plate began to rattle. With the trunk closed, you can only hear it when standing behind you, but with it open... it almost shouts over the music. Or is the ShVI bad or are the speakers good? You'll need to put something under it.
Source