Pump malfunctions
Malfunctions of the pump are manifested in significant play in its shaft, violation of the tightness of the seal, wear (corrosion or breakage) of the impeller.
All of these defects lead to the fact that the car’s water pump does not work properly, which is why the required pressure is not maintained in the engine cooling system, which, in turn, leads to an increase in the temperature of the coolant until it boils. You have to buy a new pump and install it in place of the old one.
Possible faults
Now let's look at the main malfunctions of the pump; all problems have their own signs, knowledge of them will allow us to make more competent diagnostics. So, most often drivers face the following reasons:
- Depressurization of a part
. In this case, the coolant leaves through the shaft seal or through the gasket. Here there is a decrease in the efficiency of the pump; part of the pressure is lost due to a leak. With such a malfunction, antifreeze drips are often observed, and it also quickly leaves the system; - Bearing wear
. The shaft on which the impeller is mounted has a bearing, which wears out over time and may fail. Bearing jamming, as already mentioned, on some engines can lead to a number of serious breakdowns. It is worth considering that this problem can manifest itself in different ways. Most often, the bearing begins to howl, this is due to the depletion of lubricant, as well as a high level of wear of the race. But sometimes a breakdown manifests itself as a knock. This happens when the bearing is completely or partially destroyed. Another possible malfunction is a jammed bearing, in which case the pump cannot be turned; - Impeller destruction
. This is a rare malfunction, but it does happen. The reason is the poor quality of the part. With such a breakdown, a strong roar is observed immediately after starting the engine, and the car quickly overheats.
Signs of a pump malfunction
There are only six main signs of a “dying” pump, by which one can judge that the pump is partially (or even completely) out of order and needs to be replaced. So, these symptoms include:
- Extraneous noise . Often, a partially faulty cooling system water pump produces “unhealthy” noisy or “howling” sounds when operating. They can be caused by significant wear of the bearing and/or the fact that the pump impeller touches the pump body when rotating. This also occurs due to partial bearing failure.
- Pump pulley play . It occurs due to damage or natural wear of its rotation bearing. Diagnostics in this case can be carried out quite simply, just shake the pump shaft from side to side with your fingers. If there is any play, it will be tactilely felt. Please note that the formation of play brings closer the moment when the pump seal will become leaky and will leak coolant.
- The appearance of a leak . So, antifreeze can leak both from the seal and from other places, for example, the housing and impeller. Antifreeze or antifreeze in this case can be seen on the pump body, its mounting location, some elements of the engine compartment under the pump (depending on the design of a particular car) or simply on the ground under the car.
- Antifreeze smell appears . In particular, it can be felt not only in the engine compartment (when the hood is opened), but also in the cabin, since its fumes will enter the cabin through the ventilation system. Antifreeze has a sweetish smell, sometimes with a taste of alcohol.
- Mounting misalignment . In particular, in relation to timing gears, as well as tension rollers. This can be seen visually, or by placing some flat object (for example, a ruler) in the same plane as the rollers and pump. In this case, a situation often arises when the belt eats up.
- Significant increase in engine temperature . And not only the engine, but also the coolant, as indicated by the warning light on the dashboard. In critical cases, a banal boiling of antifreeze occurs, and steam will come out of the radiator. However, this is critical and if it occurs, it is prohibited to use the car!
If at least one of the above signs of a car water pump malfunction appears, it is necessary to perform additional diagnostics of both the pump and cooling system malfunctions. When the first signs of a dying pump appear, you can still drive, but for how long is unknown, and it’s better not to tempt fate. In some cases, a car can last 500.1000 kilometers, while in others it won’t last even hundreds. In any case, the cooling system is not something to joke about, and it needs to be diagnosed and repaired on time and in full.
Depending on the brand and quality of the cooling system water pump, the regulations require its replacement after approximately 60 thousand kilometers (depends on each specific case, and is prescribed by the car manufacturer; the relevant information can be found in the manual).
Main reasons
Before talking about the signs of a dying pump that needs replacement or repair, you need to say a few words regarding the reasons for the failure of this device.
In total, there are several main factors that cause this to happen:
In most cases, it is the car owner himself who is to blame. Drivers are required to monitor the condition of the cooling system, periodically check the pump, and change the coolant on time.
We cannot exclude the problem of manufacturing defects, as well as simply low-quality and cheap pumps that are installed on budget cars or as part of repairs, thereby deceiving the client.
It is not surprising that the timing belt may then fail, the tension roller may rupture, the cylinder head gasket may break through, and other troubles that can cost a lot of money during repairs.
Problems with the water pump can occur on various cars:
- on Kalina;
- VAZ 2110;
- Lada Priora 16 valves;
- VAZ 2114;
- Lada Priora 8 valves;
- VAZ 2115;
- Daewoo Lanos;
- Niva Chevrolet;
- Daewoo Nexia;
- Lada Granta;
- Renault Logan;
- Chevrolet Aveo, etc.
Don’t think that this is a problem exclusively with cheap and budget cars, as well as simple engines like ZMZ 406.
The pump can also be used on more expensive cars. It all depends on how the owner monitors and maintains the car with his own hands, or in a car service center.
Causes of pump malfunction
What are the possible causes of pump failure? This question interests not only beginners, but also quite experienced car enthusiasts. The following are the main reasons, from the most common and frequently occurring to the “exotic”. Among them:
- Faulty bearing . This unit wears out for natural reasons as it is used. However, accelerated wear is possible due to additional negative factors. This, for example, is an incorrect (stronger) belt tension, which causes more force to be exerted on the bearing. Another reason for significant wear is the ingress of antifreeze onto the rubbing vapors due to depressurization of the gasket and leaks of coolant.
- Seal failure . The pump has two seals - an oil seal and a rubber cuff. And it is the oil seal (gasket) that most often fails. This happens for two reasons - natural wear and tear (tanning of rubber) and the use of low-quality cheap antifreeze without appropriate gentle additives, or even water. In the long term, these liquids “eat up” the gasket, it begins to leak, which leads, firstly, to a decrease in the level of coolant in the system, and secondly, antifreeze or water gets into the bearing, washing out the lubricant from it and the troubles described above.
- Mounting misalignment . This is possible for two reasons - incorrect installation and manufacturing defects. However, incorrect installation is a fairly rare occurrence, since the case has ready-made mounting holes, which are very difficult to miss. Another reason is uneven fit to the engine block (due to dirty, rusty or warped mating surfaces). But, unfortunately, factory defects, especially with budget pumps, are not such a rare phenomenon. Misalignment leads to the pulley rotating misaligned, which, in turn, leads to accelerated wear of the loaded part of the belt, as well as wear of the bearing. In the most critical cases, the belt may break and a collision of valves and pistons may occur. Sometimes misalignment occurs as a result of the car being involved in an accident, which resulted in the displacement of individual elements of the body and/or engine.
Symptoms of malfunction
- Pump noise when the engine is running. Extraneous noise is caused by bearing wear. It is recommended to replace the cooling system pump after one or every time replacement. If maintenance intervals are not observed, the rolling elements, inner and outer rings will wear, causing noise and whistling. Quite often, the cause of accelerated wear is antifreeze, which gets into friction pairs due to leakage of oil or rubber seals.
- Antifreeze leak. Like the pump bearing, the oil seal and rubber bushing have a limited service life. Play due to bearing wear will result in much less sealant leakage.
- Misalignment with respect to gears, shafts (pump is misaligned). Uneven stress distribution causes accelerated wear not only of the bearing, but also of the seal. Incorrect assembly or manufacturing defects, when the pulley rotates misaligned, leads to accelerated wear of the loaded part of the belt. Such a malfunction, even with low mileage, can break the timing belt and break valves with pistons.
- Engine overheating. When the impeller vanes break, the pump's performance drops, resulting in less coolant flow through the small circulation circuit.
A decrease in performance is often noticeable after applying sealant to repair a radiator leak. The mixture clogs the cooling system passages and sticks to the pump impeller.
Unless grease has clogged the body coolant drain, leaking sealant will not cause water pump failure. However, it is necessary to disassemble the pump and flush the system.
How to determine if your pump is faulty
Checking your car's engine water pump for faults is quite simple. The simplest method is to try by touch to see if there is any play or no play on the pump shaft. To do this, just grab the pump shaft with your fingers and pull it from side to side in a direction perpendicular to the shaft itself (that is, across). If the bearing is in order, then there should be no play. If even a slight play occurs, then the pump needs to be replaced.
However, a more thorough check without removing the pump is performed using the following algorithm:
- Warm up the engine to operating temperature. That is, so that the coolant temperature is around +90°C.
- With the engine running, hand pinch the thick coolant pipe that comes from the radiator.
- If the pump is working properly, then pressure should be felt in it. If there is no pressure or it is pulsating, then this means that the pump is partially or completely out of order. Most likely the pump impeller has turned.
Also, to check the pump, you need to visually inspect its seat. To do this, you need to dismantle the protective casing of the gas distribution mechanism in order to gain access directly to the pump (the design is different for different cars, so perhaps there will be no casing or it does not need to be removed). Next, carefully inspect the pump body, its seal and seat.
You definitely need to pay attention to the presence of antifreeze leaks from under the sealing gasket. Moreover, it does not have to be wet at the time of testing. If the seat and seal are dry, but there are dried (and fresh) traces of leaks in the mounting area, this means that at high pressure the seal still allows coolant to pass through. Traces of leaks have a reddish or brownish-brown color, in some cases gray (this depends on what color antifreeze was poured into the cooling system).
Before dismantling the pump for further diagnostics (checking the impeller and bearing), you need to make sure that the cooling system thermostat is working properly and that there is no air lock in the system itself. Otherwise, you need to troubleshoot the related problems.
If the pump is dismantled, then it is necessary to inspect the condition of the impeller. In particular, the integrity of the blades, as well as their shape.
You also need to inspect the location where the pump adheres to the engine block. Ideally, there should be no coolant leaks from the drain hole. However, if there are minor (namely minor...) leaks, then you can not change the pump, but temporarily try to get rid of them by replacing the seal and using sealant.
To check whether it is the pump bearing that is making the corresponding noise and whistle, just remove the belt from the pump pulley and unscrew it by hand, preferably as quickly as possible.
If the bearing is faulty, it will make a hum and roll with a noticeable rumble and unevenly. However, this method is suitable for those pumps whose pulley is rotated by a drive belt. If it is rotated by a timing belt, then for diagnosis it will be necessary to weaken its force and check its operation under such conditions.
What noise does a faulty pump make?
Many car enthusiasts are interested in the question of whether to repair the old pump, or replace it, buy and install a new pump. There cannot be a specific answer in this case, and it depends on the condition of the pump, its wear, quality, brand, and price. However, as practice shows, repairs are only possible by replacing the rubber gasket. In other cases, it is better to replace the pump with a new one, especially if it has been used for a long time. When replacing the pump, the antifreeze also changes.
Source
How to check the cooling system pump?
By checking the pump without removing it from the engine, we can only indirectly assess its efficiency. With a reduced volume of pumped coolant, the heating element begins to warm up poorly. But before disassembling the water pump to check the impeller, we recommend checking the thermostat and making sure there is no air blockage in the cooling system.
After disassembly, you should pay attention not only to the integrity of the blades and the impeller seat on the drive shaft, but also to the shape of the blades. For example, on the VAZ 2121 over many years of production, rotors of different diameters, numbers and shapes of blades were installed. Installing a less efficient pump in an engine with a higher thermal load will result in the cooling fan running more frequently and an increased risk of overheating.
Be sure to check the engine block in the housing area and the pump itself. Fogging or a slight coolant leak from the drain hole does not mean the pump needs to be replaced. If you find a significant leak, try to find it. If the leak is only in the area of the housing adjacent to the engine block, most likely it can be fixed without replacing the pump. Simply apply sealant and install a new gasket.
Risk of timing belt breakage
The danger of a misaligned water pump sprocket is when there are no obvious signs of trouble. The first thing you should pay attention to is the timing belt. If uneven wear is observed in any case, check the pump and shafts. The cause of misalignment may be a manufacturing defect, worn bearings, or uneven contact between the housing and the cylinder block (dirty, rusty seating surfaces). Sometimes the malfunction begins to appear after an accident, when parts of the body or installed equipment get into the pump pulley.
If you find misalignment, replace the damaged pump as soon as possible. Do not hesitate to also eliminate noise and whistling from the water pump. In case of critical wear, the bearing may fail, blocking the gear. A stuck pump will definitely break the timing belt. If the pistons in your car encounter valves when they break, repairing the damage will cost quite a lot of money.
Bearing check
The easiest way to check the pump is to ensure that the pulley is in an accessible place and can be turned by the drive belt. Just take the pulley in your hand and move it in different directions (watch the video). If it breaks, you will feel a lot of weakness. To determine whether the whistling noise when the engine is running is coming from the coolant pump, remove the drive belt and unwind the pulley by hand. A worn bearing with washed out lubricant will rotate and turn over with noticeable noise.
Checking the pump, the pulley of which rotates the timing belt, is a little more difficult. Once you overcome the belt tension, you can try moving the sprocket in different directions. But in order to fully check and evaluate the smoothness of rotation, the timing belt will still have to be loosened.
The main cause of breakdowns
If the seal or rubber flange leaks, the coolant washes the lubricant out of the bearings. The problem will get worse if you use cheap toluene or water instead of high-quality antifreeze. The lack of anti-corrosion additives and minimal lubricity will very quickly “kill” the pump bearing.
However, it is much more important to use a good quality antifreeze to ensure the long life of the sealant. At the point of contact with the drive shaft, it is necessary to lubricate the rubber seals, which cannot be said when using aggressive toluene or water.
Signs of a dying viburnum pump
- Registration
- Entrance
- To the beginning of the forum
- Forum Rules
- Old design
- FAQ
- Search
- Users
Apart from the pump, there doesn't seem to be anything humming there.
There are two types of pump failure: 1. play appears 2. the impeller flies off
1. accompanied by heat when cold (!) 2. if streams do not flow into the expansion tank from the steam exhaust hoses during gassing - then this is a sign of the second position
+1000 It is because of the tightening of the belt that they die, especially on the 2112 engine - the gear and belt are wider, they press harder, but the bearing is the same.
Don’t expect to easily determine the play; you still have to manage to “feel” it
If a slight backlash appears on the cold side, unpleasant sounds can be heard from the pump, but you just need to isolate them from the general noise.
you need to separate them from the general noise.
What is the frequency of pump replacement?
The first thing that comes to mind is that the pump can tell.
How to check the serviceability of the pump on a car
Timely diagnostics of the pump allows you to avoid costly repairs or problems with constant overheating of the engine. To answer the question of how to check the pump’s performance yourself, let’s consider diagnostic methods using the example of domestic VAZ cars (model 2109, 2110).
Let's start with the fact that the pump is a kind of “consumable”, which on cars with a pump driven by a timing belt is recommended to be changed every 60 thousand kilometers traveled or 48 months, whichever comes first. These are the regulatory requirements of many automakers.
In simple words, a good pump lasts as long as two timing belts last. It is also worth adding that using spare parts or low-quality antifreeze, mixing different types of coolant, etc. can lead to pump failure ahead of schedule. For this reason, it is advisable to check the pump regularly.
How to check the pump's operation
You should check the water pump on your car using a common method. For diagnostics on a VAZ and a large number of other cars, the engine should be warmed up until it reaches operating temperatures.
- After warming up, you need to hand pinch the upper pipe coming from the radiator. If the pump is working properly, then the coolant pressure created by the pump will be felt. This is the main answer to the question of how to check whether the pump is working or not without removing the pump from the car. During such a check, care must be taken, since the coolant in the system gets very hot. If the fluid pulsation is weak or absent, then you should proceed to a detailed inspection.
- To check, you need to remove the protective casing of the gas distribution mechanism, which will allow for a visual inspection. If the rubber seal (pump seal) in the area of the seat begins to leak, then drips of antifreeze or antifreeze will be visible. Also, leakage and problems with the pump will be indicated by deposits around the seat, which may have a reddish-brown or grayish color. If they are present, you need to drain the antifreeze and remove the pump for troubleshooting and replacement.
- If engine operation is accompanied by a characteristic “howling” sound, then the problem may be in the pump bearing. In this case, the pump is checked for play in the shaft area. To check by hand, you can rock the pump drive gear. In some cases, you can replace the worn bearing or immediately install a new pump.
Changing the pump on a Lada Kalina: diagnostics, replacement, recommendations
Domestic cars are always in constant demand in Russia. On the one hand, these are affordable means of transportation, on the other hand, their ease of maintenance allows you to carry out repairs on your own. One of the most serious breakdowns of the Lada Kalina can be considered pump defects. Indeed, if the pump is out of order, you cannot operate the car - there is a high probability of the motor jamming. Therefore, Kalina owners should pay special attention to the performance of the pump and the engine cooling system as a whole.
What is better, change the pump or repair it?
Please note that if there are no external signs of problems with the water pump, but the pump has not been changed for a long time or low-quality coolant has been used, then an inspection of the device from the inside is necessary. The fact is that the pump blades can be made of metal. As a result, corrosion forms on the blades. Also, the blades can be made of plastic or other materials, which leads to mechanical failure.
As for repairing the pump, it is possible to carry out this procedure, but it is extremely impractical due to the affordable cost of this unit for most cars of domestic and foreign production. It is also not recommended to repair the coolant pump on cars where it is driven by a timing belt, since the repaired part may be less reliable than a new pump.
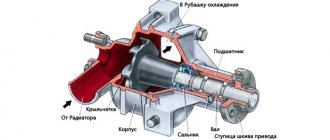
Why do you need a pump in a car?
The pump (or water pump) on the Lada Kalina is a device that circulates coolant. The pump starts working together with the power unit, that is, after the moment of ignition, the pump also starts working.
The circulation of antifreeze/antifreeze in the system is ensured by the rotation of the pump shaft on which the impeller is located . The impeller blades create the necessary fluid pressure, due to which the motor is cooled uninterruptedly. However, if there are any defects in the pump, antifreeze stops being supplied to the cylinder blocks, so the engine can “boil” and fail. Therefore, for high-quality and timely cooling of the engine, it is necessary to monitor the condition of the pump.
Original pump, which is installed on the Lada Kalina
Technical features
First, let's look at the main technical characteristics and features of the water pump; this will allow us not only to make a correct diagnosis, but also to understand why the breakdown occurred.
Antifreeze is pumped using an impeller, which is mounted on a shaft. The drive is carried out from the crankshaft of the motor; a belt drive is used for this. Here it is worth clarifying that in practice there are 2 drive methods used for the pump:
- Directly from the crankshaft
. This method is used on engines with a timing chain. Usually one belt drives the generator and pump, sometimes the power steering and air conditioning pump are also connected here; - Another option is timing belt drive.
There is one serious drawback here. When the bearing jams in the pump, the belt breaks, which leads to breakdown of the gas distribution system, and under certain conditions, to a complete overhaul of the engine. In this case, you should carefully monitor the condition of the pump.
The pump housing is usually located at the front of the motor. This allows for the most optimal pumping of coolant through the system. It is also precisely this approach that makes it possible to use the crankshaft pulley as a moving element. In addition, placing the part at the front makes it easier to access for repairs.
The main malfunctions of the pump are directly related to its technical features; accordingly, this must be taken into account when carrying out diagnostic actions. As a rule, all signs of a malfunction are completely related to the characteristics of the various elements that ensure the operation of your car's cooling system.
How to determine if the pump is faulty on Kalina
The first sign that the water pump on a car has started to work incorrectly can be considered extraneous noise in the engine compartment while driving.
Lada Kalina cars are equipped with water pumps with a strictly fixed service life - 60 thousand kilometers or 48 months of operation (whichever comes first). Therefore, when this period approaches, it is recommended to change the pump, even if there are no signs of malfunctions yet.
However, in some cases, the pump may fail earlier than stated. You can check the functionality of the water pump in the simplest way:
Warm up the engine to the optimal temperature. After warming up, use a gloved hand to pinch the upper pipe that comes from the radiator.
If the pump is working properly, you will immediately feel the fluid pressure in the nozzle. Accordingly, the pump works as coolant circulates through the system.
If pressure is felt, but weak, or not at all, it will be necessary to proceed to a detailed inspection of the pump.
You will have to remove the timing case and visually assess the external condition of the pump.
If there is a leak of antifreeze at the landing site, it means that the oil seal (seal) has failed.
If a roar is heard while driving, we can conclude that the pump shaft bearing has worn out. You can pump the drive part of the pump gear by hand. If there is play, the pump will not work correctly.
Loss of pump tightness leads to disruption of fluid circulation in the system
Thus, it is possible to identify pump malfunctions without removing it from the car. The procedure is quite simple and accessible even to a novice driver.
Pump Lubrication Procedure
When drivers talk about lubricating the pump, they mean lubricating the water pump bearings. There are two bearings installed on the shaft, which require a small amount of lubricant to operate correctly. Experienced drivers lubricate the pump without removing it from the car:
Remove the gas distribution casing.
Clean the pump mounting area and the pump housing itself from deposits, dust and dirt.
Apply Litol-24 or VNIINP-207 with your finger to the joints of the housing.
A better lubrication procedure will be carried out during pump repairs, when faulty parts are replaced. However, this procedure can also ensure a normal amount of lubricant in the bearings:
In principle, it is possible, but it is not convenient to remove the oil seal. Remove the oil seal and lubricate the cage with warm lithol, it covers the balls there but there are slots in it, so it will still get on the balls, although there may be lubricant there
A N
https://www.lkforum.ru/showthread.php?t=49205
How to fix the problem?
If a malfunction is identified, it should be eliminated as soon as possible. Here it is worth understanding that the pump is still a consumable, and in most cases it is easier to completely replace it.
If there is a leak through the gasket, simply remove the pump and replace the gasket. Please note that normal tightness is required here. Therefore, be sure to carefully tighten the fastening nuts. Many drivers lubricate the gasket with sealant; such a precaution will not be superfluous. This will significantly reduce the risk of leakage. After some time, you should check the tightness of the nuts; they may loosen due to engine vibration.
If the cause is the bearing or impeller, then the best solution is to replace the water pump. Repair in this case is complicated, but its effectiveness is low, so it is better to buy a new part and install it. Don’t forget to bleed the cooling system after replacing the pump; this will remove all air pockets, which will increase its efficiency.
conclusions
. The cooling system must operate at maximum efficiency, otherwise engine problems will occur. Therefore, it is simply necessary to know how to check the pump without removing it from the engine. This will avoid costly repairs to the power unit and save you a lot of money.
Replacing the pump on a Lada Kalina (8 valves)
On an 8-valve Kalina, you can change the water pump yourself. However, if the car owner does not have minimal experience in car maintenance, many questions may arise. For example, which pump to buy, how to choose the right tool, and is it worth draining the antifreeze from the system completely?
Which pump to choose
When the time comes to change the water pump, car owners begin to look at car dealerships for a worthy replacement. But which pump to choose so that it lasts as long as possible and does not cause problems for the owner?
It is important to choose original factory products. This is immediately evident from the packaging - an uncreased box, a warranty card, the date of manufacture and service life are indicated. Original pumps are necessarily packaged in protective film and have holographic stickers.
In contrast, it will not last long - after 10 thousand kilometers the pump will need to be changed again.
At AVTOVAZ, designers install a TZA water pump on the Kalina. It has a long service life; drivers often change the pump only after 100 thousand kilometers. As an alternative, you can install more expensive German-made Bosch pumps - they are also famous for their quality and durability.
Should I change antifreeze after replacing the pump?
A question for those who want to save money everywhere and on everything. If I answer this briefly, I can confidently say that yes, the coolant needs to be changed. Please also pay attention to the question regarding mixing antifreeze in the cooling system. It will be useful and important to know all the nuances.
If we talk about the necessity of replacement, then everything is extremely simple. To begin with, in the vast majority of cases it is impossible to replace and remove the pump without first draining the antifreeze from the system. But some people want to save money; they drain the coolant into a clean container, install a new pump, and then pour the old antifreeze back in.
A big mistake, since any water pumps for cooling systems are characterized by increased demands on the quality and purity of the liquid. Therefore, you should absolutely not use previously drained antifreeze, even if you just recently changed it, even before the pump failed. Do not attempt to filter or strain the coolant. Just buy a new can of quality antifreeze that is suitable for your car and fill it up. There simply cannot be any other options. Remember this. Otherwise, you will soon have to spend money on a new pump again.
To ensure that the water pump lasts as long and reliably as possible, make it a rule to use only high-quality compounds. As you remember, 90% of pump failures are related precisely to the quality of the coolant used. I think it will not be difficult to draw the appropriate conclusions.
Have you encountered a water pump failure and how early were you able to identify the presence of malfunctions?
Thanks to everyone who reads us! Don't forget to leave comments, ask questions and invite your friends to join us!
( 1 ratings, average: 5.00 out of 5)
Did you like the article?
Subscribe to updates and receive articles by email!
We guarantee: no spam, only new articles once a week!
Quite a lot of car owners are wondering how to check the pump without removing it from the engine. After all, it is highly not recommended to mess around with the cooling system, so it’s worth learning how to check it directly on the car. Please note that this will minimize repair time and also make it possible to avoid unnecessary costs for unnecessary components. Even a completely inexperienced driver can carry out such diagnostics, which will make his task easier, especially if the engine suddenly heats up. Do not delay carrying out diagnostic work; remember that overheating of the power plant leads to its rapid failure.
How to check the pump without removing it from the engine is actually a fairly simple question. There shouldn't be any problems with this. But, you need to know how this system works. Careful study of the work process will greatly simplify the diagnostic process. Another point that should not be forgotten is the ability to carry out such diagnostics at any convenient time. Even if you are on the road in a deserted area, you can conduct a check and decide on further movement.
How to connect an additional pump on the Lada Kalina
Most modern cars have two water pumps installed at once. This ensures the highest quality engine cooling in any operating conditions. You can also install a second (additional) pump on the Lada Kalina, and this work takes a little time and effort. The most difficult thing is to get to the place where the pump is fixed, since you will have to disassemble many engine compartment parts.
An additional pump is needed not only for high-quality engine cooling. Mostly, Russian car owners install a second pump to improve the operation of the heater in the cabin during the winter - the car warms up faster.
In order to install the second pump on the Kalina, you will need:
hoses of different lengths;
fasteners (depending on where exactly it will be easier and more convenient to screw the pump);
The essence of the work is to organize a small circle of coolant circulation throughout the system.
Doing the work yourself
The first step is to assemble the assembly itself from the materials that are at hand. The pump is connected to two hoses (the short one will provide fluid removal, and the long one will provide supply). The hoses are attached to the two ends of the pump with clamps. Then follow the following procedure:
- The coolant will need to be drained. You can simply empty the expansion tank without draining the entire volume of antifreeze.
- Near the bottom of the car, find two hoses (one leads the antifreeze to the stove, and the other takes it away from it). Disconnect the outlet hose and instead attach the assembled structure with an additional pump.
- After this, attach the pump to the gearbox housing. Depending on the availability of fasteners, you can place the device on brackets or secure the pump with metal clamps.
In this case, the hoses are connected with clamps, and the pump itself is mounted on a metal bracket
At the end of the work, you will need to plug all hoses and plugs and fill in new antifreeze.
Diagnostics of the engine pump without dismantling: 3 main malfunctions of the device
The pump is a key component of the cooling system. In terms of design, this is a rather primitive pump that drives coolant around the circuit. As soon as the transportation of the refrigerant stops, the motor overheats and critical wear of the components occurs. The motorist should know how to check the pump without removing it from the engine in order to avoid lengthy handicraft diagnostics followed by dismantling the components. The ability to navigate the fault markers will help minimize the number of necessary diagnostic procedures.
Replacing the water pump on VAZ 2108 and 2109
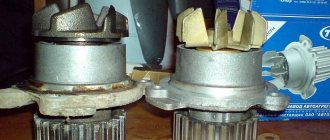
Even an inexperienced car enthusiast can repair and replace the pump on a VAZ 2108/09. You will need a standard set of tools - open-end and socket wrenches (10 and 17), screwdrivers, etc. If you plan to replace the pump, you should purchase a kit consisting of the pump assembly itself and a sealing gasket, and silicone sealant. In addition, for work you will need rags, acetone solvent and a canister of fresh antifreeze.
The repair kit for the water pump must contain a new gasket
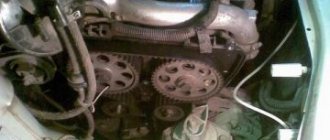
As already noted, the pump is built into the bore of the engine cylinder block. The pump drive pulley is rotated by the timing belt. Therefore, to dismantle the pump, you must first remove the belt protective cover and the belt itself. But before this you need to perform a number of preparatory operations.
- The negative terminal of the battery is disconnected.
The negative terminal of the battery is indicated by a pictogram on the lead contact
- The coolant is completely drained into a pre-prepared ten-liter container. In working condition, about 8 liters of antifreeze circulates in the cooling system of the VAZ 2108/09. If the fluid has been changed recently, it can be reused. It is prohibited to drain coolant onto the ground, as it is poisonous to plants and animals.
The drain hole is located at the bottom of the cylinder block
- The generator belt is removed. To do this, the fixing nut on the tension bar is loosened, and the generator is moved towards the engine. The belt sags and is easily removed.
- To ensure that the settings are not lost after removing the timing belt, the drive pulleys should be aligned to the marks. It is not difficult. The right front wheel is lifted with a jack. Then fifth gear is engaged. By slowly rotating the wheel, the mark on the camshaft pulley is aligned with the stationary mark on the engine.
- The timing belt tension roller becomes loose. To do this, the fastening screw is unscrewed and the roller is moved away from the belt gear.
The tension roller is loosened by unscrewing the fixing screw
After removing the belt, you can proceed directly to dismantling the pump. Using a 10mm wrench, unscrew the three mounting bolts and remove the pump. This is not always easy to do. The pump may “stick” to the landing site. In this case, you will need a chisel and a hammer, with the help of which the layer of old sealant in the socket is carefully torn off. After this, the pump can be easily removed.
The pump is secured with three bolts to the cylinder block body
It is impossible to completely remove the pump in the normal position of the car - the body gets in the way. You need to raise the motor slightly. To do this, the right side of the car is lifted on a jack - the engine is tilted.
If you have an assistant, you can do without hanging the body. One person forcefully pulls the motor in the direction opposite to the direction the pump exits the socket. Another person pulls out the pump at this time.
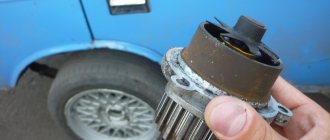
After removing the water pump, the impeller blades are inspected. They may break off or crack. This happens if the engine has been severely overheated, or the impeller is made of poor quality material. Small blade fragments usually fall out of the drain valve.
Chips on the impeller sharply reduce pump performance
To be completely sure that the cooling system is clean, it is recommended to flush it using the following algorithm.
- Remains of sealant, dust and debris are removed from the engine surface with a rag and solvent.
White spirit cleans the surface well from sealant residues
- The mounting bolts are cleaned of grease, rust and debris. Before installing the new pump, apply a thin layer of sealant to the threads.
- The gasket is lubricated with waterproof sealant and the new pump is carefully installed in place. Sometimes it may be necessary to press the pump using a wooden spacer.
- The bolts are tightened first by hand, then using wrenches. In this case, it is strictly forbidden to overtighten the threads - the pump housing may crack.
- Assembly is carried out in reverse order.
- Fresh (or previously drained) coolant is added.
- Air pockets are removed from the system.
- The engine starts and the cooling system is checked for leaks.
Professionals recommend replacing the tension roller along with the water pump. To check the serviceability of the roller, rotate it by hand. If the roller rotates with difficulty or a crunching sound is heard, it needs to be replaced.
It is generally accepted that the water pump should be changed every 90 thousand km of the car. However, this figure is conditional, depending on the operating conditions of the vehicle. Obviously, in the city cycle with constant traffic jams and limited speed, the cooling system will wear out faster than on the highway. Therefore, the need to replace the pump should be assessed based on its actual condition.
The main factor that destroys the bearing and oil seal of the water pump is an overtightened timing belt. If there is no key with a dynamometer, craftsmen use an ordinary steelyard. It is necessary to achieve such a belt tension at which the deflection of the rubber sheet in the middle between the pulleys is 10–15 mm. with a force of 10 kg. The steelyard hook clings to the belt and is tensioned to the 10 kg mark. The depth of belt deflection is measured.
Video: disassembling the water pump of a VAZ 2109/08 car
Checking the engine cooling system of VAZ 2108, 2109, 21099
We will check the engine cooling system of VAZ 2108, 2109, 21099 and their modifications independently, without the help of specialists and technicians. The reason for checking may be a constant decrease in the coolant level in the expansion tank, or overheating or not warming up the engine, etc.
Checking the engine cooling system of VAZ 2108, 2109, 21099
Checking the coolant level in the expansion tank
It should be 25-30 mm above the MIN mark printed on its side. The engine must be cold when checking. If the level is lower than required, add a little liquid similar to that poured into the cooling system (antifreeze, antifreeze).
MIN and MAX marks on the expansion tank of the cooling system
If the level in the expansion tank constantly drops, we establish the cause of the malfunction. In most cases, the location of the leak can be determined by visual inspection (see paragraphs below). For example, a loose clamp on a hose.
Checking the cooling system for coolant leaks
Checking for coolant leaks should be carried out both on a cold engine and after starting, during warm-up, since the leak may be periodic and temperature-dependent.
Checking the system drain holes in the radiator and cylinder block
We inspect them for coolant leaks. If necessary, pull it out of the plug (on the radiator by hand, on the block with the key set to “13”).
We check the tightness of the coolant temperature sensor and the fan switch sensor
We inspect their installation locations (under the distributor and in the left radiator tank), tighten them if necessary.
Checking the hoses and tubes of the engine cooling system
It is necessary to inspect the places where they fit on the pipes and fittings of the system elements, and the tightness of the clamps. In addition, the integrity of the hoses is checked by inspection and feeling by hand.
Loose clamps can be tightened with a screwdriver or a wrench (but without much zeal, since you can cut through the hose with the clamp). It is advisable to replace all unreliable clamps with proven, good quality ones.
Checking the radiator of the engine cooling system
We carry out a visual inspection of its tanks (they are installed on rubber gaskets, which over time begin to leak coolant) and the pipes on which the hoses are attached. In addition, we pay attention to contamination of the radiator. Heavily contaminated ones will have to be washed, as the engine may overheat.
Checking the expansion tank
There should be no cracks in it, the hoses going to it must be securely fastened and sealed.
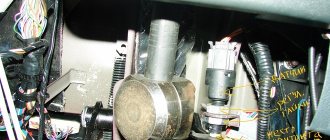
Checking the pump (coolant pump)
A coolant pump malfunction is almost invisible in its early stages. Signs of this may include dampness of the pump body and the front part of the pan. The gasket under the pump body or the oil seal on the axle may not be airtight (if the oil seal fails, coolant begins to ooze through the drainage hole in the bottom of the pump). You can also hear increased noise from the front of the engine when it is running. You can swing the pump axle by hand by its pulley (check the bearing). Strong play indicates wear of its parts.
Checking the heater radiator (“stove”)
Most often, signs of a leaky heater radiator or its tap are the appearance of dampness in the front passenger's feet and the sweetish smell of antifreeze in the cabin.
Checking the coolant supply pipe to the pump
A metal pipe is installed behind the engine and attached to the block. We inspect it for loss of tightness.
In addition to the above, coolant can escape through a “punched” head gasket or a crack in it or in the block. It is impossible to visually detect such a leak. There are only indirect signs here. For example, constant bubbling of coolant in the tank, wet spark plugs, white deposits on the oil filler cap and dipstick, antifreeze in the engine oil.
Checking the thermostat
We start the engine and watch the thermostat warm up. If it is working properly, then its upper part will warm up first (the small circle of the cooling system is working), then the lower part of the thermostat will warm up sharply (the large circle is working and liquid flows through the radiator). All this can be understood by touching the thermostat with your hand.
The upper part of the thermostat begins to heat up immediately after starting the engine, the lower part only after its thermal valve begins to open.
Replacing the VAZ-2109 pump
To carry out the replacement, it is necessary to remove the timing belt protective cover. It is held in place by 3 bolts - unscrew them with a 10 mm wrench. Next, the cover is dismantled and placed next to it, since there are marks on it that help set the TDC of the first cylinder.
Now, holding the crankshaft by the pulley, turn it until the notch on the camshaft gear coincides with the convex point located on its rear cover. Upon completion of the described manipulations, the casing is returned to its place, but not screwed, since you only need to make sure that the marks on it coincide with the position of the pulley.
It is also advisable to look into the inspection slot of the clutch housing - there the notches should similarly coincide. If this does not happen, you will have to turn the crankshaft some more.
At the next stage, arm yourself with a 17 mm wrench and use it to unscrew the nut holding the tension roller. The last element must be completely removed - be sure to check its functionality (unimpeded rotation and absence of play indicate serviceability).
Remove the transmission belt from the camshaft gear and throw it down. Now, using the same 17 mm wrench, remove the bolt holding the above-mentioned sprocket. To prevent it from spinning, wedge it with a screwdriver. Carefully remove the gear and be careful not to lose the locking key.
All that remains is to remove the nut and 3 more bolts that secure the rear camshaft cover - here you will need a ten key. After dismantling the named part, the pump can be removed quite easily - you just need to unscrew the elements that secure it.
Proceed to remove the pump - you will not be able to do this with your bare hands. First, it is pryed up with a screwdriver and torn from its place, and then a jack is placed under the engine (exactly where the failed unit is located). The 2109 engine is raised a little - this allows you to increase the gap between it and the fender liner, without which it is simply impossible to move the pump.
When the assembly is dismantled, the installation site should be cleaned, since often part of the old sealing gasket sticks and peels off. This can be done conveniently with a regular knife. Upon completion of the action, everything must be wiped thoroughly with a dry, clean cloth.
The new unit is mounted with the marking facing up (it is located at the end). Tighten the retaining bolts thoroughly, but be careful - they are screwed into the aluminum. Further work is performed in the reverse order to that described.