Procedure for cleaning and replacing rubber seals
It is best to remove the injectors from the fuel rail and blow and clean each of them, and at the same time inspect them for wear on the rings. This method has a huge advantage over using an additive, since you can visually check how well the restoration work was carried out.
What tool can you use to make repairs?
To dismantle and replace seals you will need:
- diamond key 8;
- carburetor cleaner;
- a can of compressed air;
- rubber hose (you can use a vacuum cleaner);
- syringe with outlet diameter 10 mm;
- wire approximately 2 meters long;
- standard set of rings for injectors (includes eight products);
- rubber seals for fuel lines.
The repair and cleaning process is as follows:
- Remove the rubber seal from the nozzle.
- Place the rubber hose on the tail part of the nozzle.
- Connect the wire to the battery (you can choose any terminal).
- On the reverse side of the hose, connect an aerosol tube through a syringe to flush the carburetor.
- Holding the entire structure with your hands, spray the cleaner several times until the jets emitted become uniform.
- After cleaning, it is recommended to use the same principle to blow out the injectors with air from a can.
- Next, it is recommended to immediately put new rings on the product, after moistening them with gasoline.
In the photo the nozzle is in critical condition
The injector repair procedure can be considered accessible to beginners and inexperienced drivers. The only difficulty is dismantling the fuel rail, since you will have to first relieve the pressure in the system. Cleaning and replacing the rings on the injectors with your own hands gives the driver the opportunity to carry out the highest quality repairs of these elements and be confident that repeating the procedure will not be necessary for a long time.
Procedure for removing oil injectors
Before you begin removing injectors from any car of the tenth VAZ family, you will need to relieve the pressure in the fuel system. Removing any element that is under pressure in any way can result in personal injury.
How to get rid of excess fuel
To relieve the existing fuel pressure, you need to turn off the fuel pump and exhaust the remaining gasoline:
- Fold down the cushion from the back row of seats.
- Below it is the fuel tank hatch.
- Unscrew the screws securing the hatch.
- Disconnect the wiring harness from the pump housing (the wires supply power).
After this, start the engine and wait until it stalls. It is recommended to turn the ignition on several times to ensure that there is no gasoline left in the system.
Next, you can begin to remove the injectors. It is recommended to prepare the necessary tools in advance:
- open-end wrench 17;
- a flat screwdriver with a narrow blade;
- Phillips screwdriver;
- hex key 6;
- rags.
All elements of the repair kit are usually at hand for any driver
How to remove parts from the engine
- Remove the air filter box (it will interfere with free access to the engine).
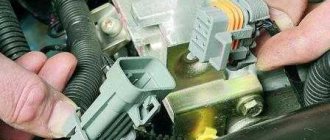
- Remove the wiring harnesses from the injectors.
- Then you will need to disconnect the wires from the idle speed control and from the throttle sensor.
- Next, remove the vacuum seal from the pressure regulator (it has a white braid).
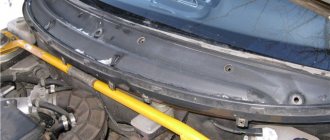
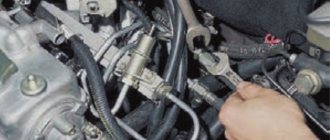
- Using a 17 key, unscrew the bolts that secure the fuel frame to the body. To make it more convenient, you can remove the gas cable.
- It is better to unscrew the fasteners of the plate with which the ramp is pressed using a hexagon.
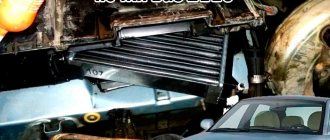
- The fuel rail must be removed very carefully, with the nozzles facing up.
- On a 16-valve engine, dismantling will take longer, since the ramp has a more complex structure and several types of fasteners.
- Next, you can remove the injectors themselves - to do this, disconnect the fastening brackets of the electrical connector with your finger, and then the injector bracket. During removal, gasoline may leak; it is recommended to place a cloth under the ramp.
To install a new injector, the socket is first thoroughly cleaned of dirt and fuel, and only then can the product be screwed in. It is better to drop a few drops of gasoline onto the rubber ring before installation - this will make the nozzle fit into the mounting hole more easily. All work is then carried out in reverse order.
Cleaning on removed injectors
Recommendations for changing engine oil yourself in Kia Rio cars
In order to clean the injectors, the first step is to remove them. How to quickly replace them is written in this article.
When the injectors are removed, you can proceed to cleaning them.
Connection diagram!
- Next, when everything is connected according to the diagram, we connect power to the injector, but leave the other end unpowered.
- Since cleaning will be done under pressure, take care to ensure that all connections are properly secured.
It is best to use hot melt glue. The pipe to the sprayer is fixed with hot-melt adhesive.
Injector cleaning technology
- First of all, remove the O-ring from the injector.
- We put a pre-prepared rubber tube on its shank.
The entire structure is assembled. - Since the injectors do not have polarity, we connect the end switches of the wires to the battery.
- Next, press the button in the cylinder and hold it until the pressure stabilizes and the hissing stops.
- When it has stabilized, point the nozzle to the side and press the power button.
The nozzle is cleaned and the lamp lights up. - We carry out steps 4 and 5 for each nozzle 2-3 times in a row.
- If the nozzles were heavily contaminated, then after the first blowing the type and quality of the jet escaping from the nozzle will change.
- After 2-3 cleaning attempts, inspect the spray state and if you are unable to achieve the desired result, continue spraying.
- After cleaning is complete, install new O-rings and lubricate them with a small amount of gasoline. This will protect them from cracking and wear.
We recommend: Replacing the low beam bulb on a Lada Priora: 3 best brands and step-by-step replacement technology
In total, you will need about 3 hours to complete such work.
The difference before and after cleaning.
Removing injectors VAZ 21124
We dismantle the fuel rail if it is necessary to remove the injector, as well as in other cases when repairing the engine.
Before performing the operation, read the safety rules when servicing and repairing the power system (see “Safety precautions when servicing and repairing the power system”).
1. Relieve the fuel pressure in the fuel line (see “Fuel line - pressure relief”).
2. Remove the intake pipe (see “Intake pipe of engine 21124 (1.6i 16V) - removal and installation, replacement of o-rings”).
3. Disconnect the wiring harness connectors from the injectors (the photo shows a view from the radiator side).
4. Cut the two clamps securing the wiring harness to the fuel rail and move the harness to the side.
5. 17 mm
Unscrew the fuel pipe fitting from the rail, holding the hex end of the fuel rail with a wrench of the same size.
6. Using a Phillips screwdriver, unscrew the screw securing the fuel pipe tube.
7. Remove the end of the fuel line tube from the fuel rail.
If the fuel pipe O-ring is damaged, it must be replaced.
8. Remove the rubber sealing ring from the fuel line tube.
5mm hex wrench
unscrew the two bolts securing the fuel rail to the cylinder head.
10. Remove the fuel rail assembly with injectors.
11. Remove the injector retainer from the fuel rail.
12. Remove the nozzle from the ramp.
13. Similarly, remove the three remaining injectors.
Assembly and installation
We assemble and install the fuel rail in the reverse order.
Before assembly, coat the rubber O-rings with a thin layer of engine oil.
Before installing the ramp, replace the lower injector rings.
Why did I start this? Everything is simple here. I began to feel that the car began to react very sharply when dropping the throttle, and at first speed it generally behaved aggressively, there was no smoothness. Therefore, I first changed the mesh in the fuel pump, and then I dared to carry out this procedure. At first I wanted to remove the injectors myself and take them for cleaning, but then vaser-x told me that clean them yourself then, everything is very simple
We begin cleaning using the technology described above.
We understand that one of the injectors does not close and is constantly working. We're going to get a new injector.
We sentence the old one to DEATH.
See BEFORE and AFTER cleaning the fan spray
We rejoice, we are putting everything back together. At the same time, I also changed the rollers, otherwise last time I limited myself to just replacing the belt:
Issue price:
bosch injector 0 280 158 022 = 770 rub. Carb Cleaner = 200 rub.
**Click “like” for the picture with “Sentencing the injector to death”
Replacing and removing injectors on a VAZ-2112 16 valves on your own
Troubleshooting
Diagnostics of injectors using a stand
After you remove the injectors, proceed to carefully inspect them. When the removal of the VAZ 2110 injectors is completed, you can see that one of them remains in the inner pipe of the engine. It will be necessary to replace its retainer and the rings responsible for the seal. In addition, injectors are also replaced when the rings lose the elasticity of their coating or when there are cracks.
Check how the injectors spray. Connect the harnesses and attach everything to the battery. Then place the nozzle in a glass container and turn on the starter to see if the gasoline is spraying correctly. Each nozzle must have at least 4 jets, in addition, the gasoline that is carried through them in containers must be at the same level. If the sprayer begins to leak, the nozzle needs to be replaced.
If it does not spray at all, you need to check whether the nozzle is receiving power. If it does not pass gasoline, disconnect the wires leading from the block and connect the battery directly with the ignition on. If it starts spraying gasoline, it means there is a problem in the electrical circuit. After the injectors have been replaced or cleaned, they will need to be reassembled, but before that, lubricate each ring with gasoline.
Ultrasound or chemicals for cleaning the injector?
So, it was decided that the injectors and injector needed to be cleaned. Which method should I choose? Common methods are washing the injector without removing the injectors or cleaning the injector on an ultrasonic bench. The cleaning efficiency of the second method is several orders of magnitude higher, but in this case, except for the nozzles, nothing else is cleaned. For VAZ cars, sometimes cleaning is not the right solution. It is much easier and cheaper to simply replace the injectors.
How to clean?
VAZ-2110/VAZ-2111/VAZ-2112
There are three ways to clean injector nozzles yourself. The first is the simplest, but can only help in case of minor contamination. You don't even need to remove the injectors from the engine. There is a special cleaner, which is a kind of fuel additive. This additive should be periodically added to the tank for preventive purposes. You can try to remove more serious contaminants in this way, but this may lead to the fact that, under the influence of the cleaning components, all the dirt will enter the injector fuel pump, as well as the fine fuel filter. This may cause additional problems for the engine.
It is filled with a special solvent that has extremely high cleaning power. The engine is started and this device begins to operate. The injector nozzles are completely cleaned after just twenty minutes of injector operation.
The most effective is the third method of cleaning injector nozzles. It requires a special ultrasonic cleaner. The injectors themselves will need to be removed from the engine. After this, they are placed in a special ultrasonic bath containing a solvent. Contaminants are affected simultaneously by both ultrasonic vibrations and the solvent. In this way, even the most serious contamination of the injector nozzles can be removed.
injector mesh from VAZ2110 for Hyundai Sonata EF
injector mesh from VAZ2110 for Hyundai Sonata EF
Message by Yanych » 21 Feb 2021, 19:18 » Message # 455176
injector mesh from VAZ2110 for Hyundai Sonata EF
Message by serj-89 » 21 Feb 2021, 19:25 » Message # 455177
injector mesh from VAZ2110 for Hyundai Sonata EF
Message by Yanych » 21 Feb 2021, 19:47 » Message # 455181
After using the liquid moth fuel additive, I started experiencing failures in acceleration and unstable speed at idle. Today I removed the entire fuel rail, removed the injectors, washed them, bought new rubber seals and nets from the VAZ 2110, am I thinking about installing nets or just blowing out the old ones?
Sent after 1 minute 36 seconds: and I would like to know whether the injector grids from the VAZ2110 are suitable or not?
What injectors are installed on VAZ 2110–2112 cars
The main advantage of injectors for VAZ cars of the tenth family is that they are interchangeable. There are only two types of sprayers - produced by Bosch and Siemens. And each of them, regardless of marking and year of manufacture, can be replaced with another.
Bosch injectors are traditionally manufactured in black housing
When selecting, there is only one limitation - engine size. 1.5 injectors are not suitable for 1.6 liter engines.
The Siemens injector has a blue tip
Both Bosch and Siemens injectors of any marking can be installed on 8-valve and 16-valve engines.
Table: how to select injectors for VAZ 2110–2112 by marking
| Siemens | Bosch |
| Injector DEKA VAZ 6238 | 0 280 150 996 and 0 280 158 110 |
| Injector DEKA VAZ 6393 | 0 280 158 502 |
| Injector DEKA VAZ 20734 | 0 280 158 017 |
| Injector DEKA VAZ 20735 | 0 280 158 022 |
| Injector DEKA VAZ short 20734 | 280158017 |
| Injector DEKA VAZ short 20735 | 0 280 158 022 |
Injector malfunctions
Among the most common causes of injector failure may be the following:
- The injector nozzle is coked - in this case, increased fuel consumption may be observed, vehicle dynamics will decrease, and engine starting will be difficult at subzero ambient temperatures. Otherwise there are no differences.
- The injector valve does not close hermetically (“the injector is snotty” - note) - here there may be increased fuel consumption, “tripleting” and increased detonation (about checking the knock sensor here), unstable idling.
- Valve sticking - engine troubles. In order to diagnose it, with the engine running, turn off the power supply to each injector in turn. With a non-working injector, no changes in engine operation will be observed, but with a working injector, the speed will drop.
How to extend the life of the sprayer?
To begin with, if the car's mileage is low, you can try using various fuel additives. Buying them is not a problem; they are sold at gas stations and stores. They are inexpensive. This method can be used, but regularity is important here. So, replacing injectors on a VAZ will not be needed any time soon. But not all car enthusiasts prefer to use chemicals, believing that the use of additives can lead to even more widespread clogging of the injector.
Cleaning the injectors on the VAZ 2114 is recommended every 40 thousand km. These services are provided in many service stations. Cleaning there is carried out on stands using ultrasound. Some argue that it is not very effective at the price they charge for it. Many car enthusiasts prefer to clean the injectors themselves. It is not difficult. Some people check the operation of nozzles and injectors on stands, but purchasing a stand to check it a couple of times a year is wasteful.
You can check the injectors and injector in a simpler way. If you suspect that the injectors are not working properly, you need to start the car and let the engine idle and run at high speeds. Next, you need to unscrew the caps on the injectors and then check their serviceability.
How to clean injectors
Most often, the problem with the operation of injectors is their banal contamination. Therefore, to restore their functionality and return the injector to its nominal performance, it is enough to clean it. This can be done in two ways - without removing it from the engine (by adding a special cleaner to the fuel) and in the removed state (passing the cleaner through a separate nozzle or using ultrasound). The following methods are used for cleaning:
- mechanical;
- ultrasonic;
- using chemical compounds.
In this article we will talk about only a few, since cleaning injectors often requires additional professional equipment. You will find detailed information about self-cleaning in another material. Here we will briefly touch on these methods.
Cleaning the nozzle at home
A separate nozzle can be cleaned using special chemical compounds. For example, the same additives that are added to fuel to clean the system or the so-called “Carburetor Cleaner”. In this case, it is necessary to act according to the following algorithm:
- prepare in advance “Carburetor Cleaner” (or its equivalent in the form of a spray can), a contact button without locking the closed position, a syringe with a volume of 5 ml or more, a tube to extend the neck of the syringe with a seal, an empty container, preferably of large volume (5-10 liters ), a mobile phone charger with a cut plug, contact wires with terminals;
- Next, you need to insert the test nozzle into the back of the syringe (as tightly as possible, with or without a rubber band);
- after that, connect the terminals through the button to the charger and plug it into the outlet;
- insert the tube into the cleaning agent sprayer, and unfold the back of the nozzle into the prepared empty container;
- after that, press the sprayer so that a certain amount of the substance enters the nozzle;
- press the contact button to activate the nozzle.
If the nozzle is working properly, detergent should come out from its reverse side under pressure. The purging procedure must be repeated several times to achieve the required degree of cleanliness.
In addition to the check methods listed above, you can also mention checking the toxicity of gases and smoke - a low level of CO during gas release is a sign of poor injector performance. This method is practiced at some service stations as a way to monitor engine operation. Since both certain knowledge and equipment are needed, we will not consider it as one of the options for self-diagnosis.
You also cannot ignore and not pay attention to checking the injectors for fuel supply correction and lambda, but here the situation is the same as with toxicity, you will need not only diagnostic equipment, but also be able to understand all the numbers that the diagnostics will show you
Timing device VAZ 2110 injector 8 valves
Many people are concerned about the question: Do the valves on the VAZ 2110 injection engine bend? No, it doesn’t bend, the 8-valve injector does not suffer from this defect. But this does not mean that you should not monitor the timing belt. Since loosening and subsequent jumping of the belt by a certain number of teeth will lead to inevitable problems
It is worth paying special attention if engine oil gets on the belt; an oiled belt will not last long. Below is a detailed image of the timing diagram of the 8-valve injection engine "tens"
See the photo below.
When replacing the timing belt on a VAZ-2110, it is necessary to clearly align the marks on the camshaft and crankshaft pulleys; without this, the engine will not operate normally. Another important point is that when the tension roller moves to its original state, the marks shift as the belt tension changes. Therefore, carefully check whether the timing marks are clearly aligned before putting on the cover covering the timing belt.
Installing an injector instead of a carburetor
We have already mentioned that replacing a carburetor with an injector in a VAZ 2110 requires great desire, knowledge and, of course, hands growing from the right place (preferably from the shoulders). Therefore, this instruction will contain only the key points of the repair, but all the nuances, if desired, you can watch on video.
Preparation
I suggest using a controller from BOSH model M 1.5.4 as an electronic control unit. This controller does not require the installation of a neutralizer and a lambda probe, which greatly simplifies installation, reduces costs and saves repair time.
Advice! Since when converting a VAZ 2110 carburetor to an injector, you will need spare parts that practically do not fail on production cars (intake manifold, receiver, fuel line, gas tank, air filter housing, and so on), I suggest looking for them at dismantling yards, markets and auto repair shops — the likelihood of purchasing defective components is small, but this will definitely help you save significant money.
Replacement
Fuel tank
So:
- We dry the new and washed fuel tank and install the VAZ fuel pump into it (the mark should point towards the trunk);
Mark on the fuel pump
- We check the operation of the fuel level sensor in the fuel tank - the movement of the float should be easy, without jamming, and it is advisable to cover the fuel tank itself with mastic or other anti-corrosion coating;
- We lay the fuel line;
Attention! When laying the fuel return line, there may be some difficulty in pushing it under the steering rack. In this case, ask a friend to use a pry bar (or similar tool) to press out the steering mechanism, having first unscrewed its fastenings on one side.
- We install the filter and fuel hoses.
Fuel filter with hoses
Knock sensor and ignition module bracket
Before drilling holes in the engine cylinder block, check to see if they have already been drilled at the factory. If they are not there, then be extremely careful not to drill through the cylinder block. Well, first of all:
- Drain the coolant;
- We dismantle the radiator;
- Remove the bumper and decorative radiator grille.
The depth of the hole for the knock sensor is 16 millimeters, the hole for the mounting bolt of the ignition module bracket (its top point) is no more than 20 millimeters.
VAZ 2110 conversion of carburetor to injector
Cooling system
So:
- In place of the old one, we install a fluid outlet pipe with a temperature sensor (with a sensor on the radiator, use your discretion);
- It is also advisable to replace the original thermostat with a more reliable one - 21082, which, in addition, combines two things - the thermostat itself and the pipe;
- You will also have to purchase a “tee” from the “tens” cooling system; it is necessary to connect the expansion tank.
VAZ 2110 conversion from carburetor to injector
Engine compartment
Since electrical injection equipment, unlike a conventional ignition system, consumes much more electricity, we need to prepare a mount for a new generator and V-belt.
Advice! It is better not to skimp on the generator and install a more powerful one. Any tricks like replacing a pulley will not solve the problem, but they will definitely help ruin the old generator.
- Drain the oil;
- We dismantle the pan, timing belt and toothed pulley.
Advice! If the conversion from a carburetor to an injector on a VAZ 2110 occurs on a new car, then it is better to reuse the original gaskets for the pan and oil pump, since finding new high-quality ones is somewhat problematic.
Next, we dismantle the entire carburetor “offal” and everything connected with it, namely:
- Air filter (assembled);
- Carburetor with intake manifold;
- Choke cable;
- The accelerator cable also needs to be replaced (on the injector it is slightly longer);
- Distributor (instead we install a plug with an o-ring/sealant);
- Fuel pump with all fuel lines and filter.
We also remove all the under-hood electrical wiring for the ignition system, the EPHH control unit, and the switch with the ignition coil.
Method for replacing injectors on 8- and 16-valve engines
Car owners cannot always diagnose faults in the fuel system. Often, failures in engine operation or unstable idle speed can be explained by completely different reasons, and not just interruptions in the fuel supply.
Symptoms of a problem
If all car systems are operating normally, then the following symptoms will directly indicate injector problems:
- failures in engine operation;
- increased fuel consumption;
- instability of idle speed;
- loss of power;
- black exhaust gas, etc.
Video: how to replace oil nozzles if they leak
Is it possible to determine the cause of the malfunction yourself?
Failure of injectors is often caused by clogged injectors. When using low-quality fuel, the injector nozzle becomes clogged with gasoline deposits over time, which is why its throughput gradually decreases. Accordingly, the engine no longer receives enough fuel, so the engine power sharply decreases and the car’s dynamics deteriorate.
In addition, the rubber seal or ring may lose its tightness. In this case, the nozzle will leak, due to which the necessary pressure will not form in the system.
It should be noted that the service life of injectors on the VAZ 2110–2112, set by the manufacturer, does not exceed 150 thousand kilometers.
The process of cleaning injectors on a VAZ-2110
Before cleaning, it is necessary to realize that the motorist knows the design and operating principle of the unit, as well as the degree of responsibility for all operations performed and their consequences. If you are not so sure, it is recommended to contact a car service.
Bosch injectors for VAZ-2110.
To begin with, it is necessary to dismantle the elements from the fuel line and completely remove them from the car. This was done for the convenience of transactions. So, let's start disassembling the unit and dismantling it:
- The engine has cooled down and operations can begin. De-energize the fuel pump. This can be done by turning off the fuse or removing the wire blocks from the power connector.
- We reduce the pressure in the fuel line.
Disconnect power from the fuel pump and relieve pressure.
Remove the battery terminal to remove the fuel rail.
Causes of malfunction of injection nozzles
Modern fuel injectors in gasoline engines come in two types: electromagnetic and mechanical. The first is a solenoid valve that is controlled by the vehicle's ECU system. When the appropriate signals are given, the valve opens to a certain angle, regulating the amount of fuel supplied to the cylinder. The second only supplies fuel to the channel. Its design includes a needle with a step. When there is enough pressure, the fuel overcomes the resistance of the spring and the needle rises. Accordingly, the nozzle opens and fuel is supplied to the chamber. Currently, electromagnetic injectors have gained wide popularity as they are more technologically advanced. Therefore, we will further consider checking and cleaning using their example.
There can be only a few malfunctions of the electromagnetic injector:
- lack of signal from the ECU;
- malfunction or complete failure of the winding;
- nozzle outlet is clogged.
As practice shows, it is the latter option that is the most common cause of complete or partial failure of the nozzle.
What injectors are installed on VAZ 2110–2112 cars
The main advantage of injectors for VAZ cars of the tenth family is that they are interchangeable. There are only two types of sprayers - produced by Bosch and Siemens. And each of them, regardless of marking and year of manufacture, can be replaced with another.
Bosch injectors are traditionally manufactured in black housing
When selecting, there is only one limitation - engine size. 1.5 injectors are not suitable for 1.6 liter engines.
The Siemens injector has a blue tip
Both Bosch and Siemens injectors of any marking can be installed on 8-valve and 16-valve engines.
Table: how to select injectors for VAZ 2110–2112 by marking
| Siemens | Bosch |
| Injector DEKA VAZ 6238 | 0 280 150 996 and 0 280 158 110 |
| Injector DEKA VAZ 6393 | 0 280 158 502 |
| Injector DEKA VAZ 20734 | 0 280 158 017 |
| Injector DEKA VAZ 20735 | 0 280 158 022 |
| Injector DEKA VAZ short 20734 | 280158017 |
| Injector DEKA VAZ short 20735 | 0 280 158 022 |
Repair
Before removing the injectors from the dismantled rack, it is advisable to check their functionality. To check you will need:
- four identical containers,
- tester,
- wires.
Functionality check
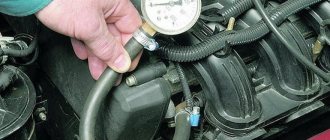
- Connect the gasoline supply and drain hoses and the power connector to the rail with injectors.
- Place the rack over the measuring cups.
- Crank the engine with the starter.
- Evaluate the performance of the sprayers. The shape of the cloud should be approximately the same for all nozzles. The amount of fuel in the measuring containers should not differ much. Significant differences indicate contamination and changes in performance. Coked with resinous deposits and clogged, they require cleaning. A complete lack of fuel at the nozzle outlet indicates a valve malfunction and the need for replacement.
- Turn off the ignition. Disconnect the power connectors from the injectors.
- Measure the electrical resistance of the winding of each part. Its nominal value is 11–15 ohms. Deviations from the norm indicate the presence of hidden problems in the solenoid valve, which indirectly affect the shape of the torch and performance. It is advisable to replace such an injector.
- Turn on the ignition. Make sure the injector valves are tight. If a part is leaking, it should be replaced or at least try to wash it and check its functionality again.
- It is difficult to check the injector for unstable valve hanging, since this malfunction can occur quite rarely. To identify, connect the electrical connector of the injector with separate wires to the battery. Periodically turning the voltage on and off, watch the spray pattern. The shape and intensity of the torch of a working injector is the same every time; periodic changes occur when the valve does not open completely. If the background sometimes “accidentally” does not work, it must be replaced.
After the war, Germany received a ban on the development of injectors for aircraft engines
And engineers began adapting direct injection systems for passenger cars, discovering another important advantage compared to carburetors - efficiency
Checking and replacing the injector
- The wire from the battery is disconnected;
- The gas tank, air filter, and intake pipe hose are removed;
- The hose is disconnected from the fuel pressure regulator;
- The block with wires from the throttle position sensor and the idle air control is disconnected;
- The harness block is detached from the wiring harness;
- Remove the bolts and screws securing the ramp and fuel pipe holder. The holder is removed, the ramp is carefully moved in the direction of the injector axis and removed under the receiver;
- The harness block and the wire to the battery terminal are put in place;
- By turning on the starter, you check how the injector sprays fuel;
- The ignition is turned off, the engine is inspected for leaks;
- The pressure of the fuel system is reduced by disconnecting the block from the fuel pump and cranking the engine with the starter until gasoline stops spraying;
- When replacing an injector, the block with wires is detached;
- The latch moves and the nozzle is removed;
- All O-rings are checked and lubricated with gasoline before installing the injector;
- The engine is installed on the VAZ 2110 in the reverse order from removal.
Compared to a carburetor, the injector is less amenable to self-repair, so if you are not sure of its feasibility, you should contact a service station, where specialists will carry out high-quality repairs and also give the necessary recommendations for its implementation.
Source
Cleaning the nozzle without removing it
In this case, cleaning can be carried out using several methods:
- Using special cleaning additives that are added to the fuel. They contain special cleaning agents that gently clean the injector openings.
- Cleaning using pressure. To do this, you need to accelerate the car to a speed of 110.130 km/h, and drive for 10.15 km (about 5.6 minutes) at high engine speeds. Due to the high load, natural cleaning will occur in the nozzles.
- Idling. This method is similar to the previous one. It is necessary to start the engine while the car is stationary and maintain the speed at 4.5 thousand for 3.4 minutes. This will also clean the injectors. However, the previous cleaning method is better because the load under its conditions is higher.
conclusions
Problems with the operation of the injectors are not a critical failure, but if they occur, we recommend that you do not delay checking and eliminating the malfunction. In most cases, repair work can be carried out independently using the methods described above. Timely checking and diagnostics of injectors will allow you to avoid problems with the operation of the machine. Prevention will cost you less than repair work on injectors or other engine components. We recommend that you clean the injectors every 30.35 thousand kilometers of your car, regardless of their condition.
A faulty injector (nozzle) has a negative impact on the operation of the vehicle engine. The sooner the car owner finds out the cause of the malfunction, the sooner he will eliminate it, saving a significant amount of time, nerves and money. Listed below are signs of an injector malfunction that indicate the need for repair and maintenance work.
Repair
Before removing the injectors from the dismantled rack, it is advisable to check their functionality. To check you will need:
- four identical containers,
- tester,
- wires.
Functionality check
- Connect the gasoline supply and drain hoses and the power connector to the rail with injectors.
- Place the rack over the measuring cups.
Place the rack over the measuring cups
The shape of the cloud should be approximately the same for all nozzles
Vladimir Berestenev
bvy.su
Table: problems with injectors
| Malfunction | Remedy |
| reduced performance | flushing, replacement if flushing fails |
| leakage | flushing, replacement if flushing fails |
| increased productivity | replacement |
| valve sticking | replacement |
| unstable valve sticking | flushing, replacement if flushing fails |
| overestimated or underestimated winding resistance | replacement |
In these cases, flushing is not a panacea. This method should be used taking into account the mileage and quality of service during operation.
During operation, the injector nozzles inevitably become coked and clogged with resinous deposits. The picture is aggravated by low-quality fuel, which can introduce additional pollutants.
For some time, fuel atomizers continue to operate without any visible changes, but sooner or later contaminants accumulate, changing the shape of the spray and reducing performance.
Injector life expectancy is limited even when using the cleanest fuel. Manufacturers recommend changing them every 100–120 thousand kilometers. Due to the fact that motorists use imperfect gasoline, and the one that can be bought at gas stations, the part has to be changed after 80-100 thousand km.
There is an opinion among motorists that “there is no need to interfere if everything works fine.” This opinion is justified, but only if the owner is ready to replace the nozzles with new ones approximately every 50 thousand kilometers.
The fact is that by getting rid of minor deposits as they accumulate, the owner extends the life of the consumable, since pollutants do not have time to cause irreparable damage.
Clogged injectors begin to interfere with normal operation after 30–50 thousand km. Initially, negative processes manifest themselves only in increased fuel consumption. Owners do not always associate the increased “appetite” of the engine with injectors, since there are many reasons for this phenomenon.
In the range of 50–80 thousand km, pollution, having accumulated, can cause interruptions in engine operation, which is no longer undetectable. It becomes clear that “you have to get into the injectors,” but cleaning them at this stage may be useless. When a clogged part is used for a long time, the diameter of the nozzle often increases. Flushing will remove contaminants, but the original parameters will not be restored.
To extend the life of trouble-free operation and delay replacement, you should regularly, after approximately 3-5 thousand kilometers, fill the tank with cleaning fluid for injectors or use it in another way recommended by the manufacturer.
Motorists' opinions about the effectiveness and safety of injection chemicals are contradictory. Many people fear that flushing without removing it from the engine will clog the cylinders.
Indeed, if the car owner has not touched the injectors for a long time, it is impossible to do without removing the rack. The chemicals in the tank can cause harm instead of benefit. If you use cleaners regularly, without waiting for characteristic malfunctions to appear, there will be no harm to the engine from the chemicals.
Although injection chemistry has a beneficial effect on slightly dirty injectors, its use does not guarantee that the atomizers will comfortably “live” the entire period “allotted” to them by the manufacturer. You can unsuccessfully fill the tank with “left” gasoline at almost any gas station.
To minimize the accumulation of deposits, manufacturers recommend additional preventive flushing with special products every 30 thousand kilometers.
Signs of injector contamination.
When the injectors of an injection engine of any vehicle become dirty, characteristic signs of malfunction arise, which necessitates the need to clean the engine injectors. Among these signs we note:
- Difficulty starting the engine, especially as the outside temperature drops and the engine is cold;
- Unstable engine operation at idle;
- Perceptible dips when sharply or smoothly pressing the accelerator pedal;
- Loss of acceleration dynamics and power by the motor;
- Increased gasoline consumption;
- Increased toxicity of CO-CH exhaust gases;
- A several-fold increase in detonation when accelerating, which is a consequence of an increase in temperature directly in the combustion chamber and a depletion of the air-fuel mixture;
- Misfires (ignition);
- Periodic, characteristic popping sounds directly in the exhaust system;
- Premature failure of sensors, including the catalytic converter, spark plugs and oxygen sensor (lambda probe).
It should be noted that even if all the problems listed above are present during the operation of your machine, this does not mean that the cause is clogged injectors. These problems can arise for a large number of reasons - from the failure of any sensor (air meter, throttle sensor, lambda probe, IAC) or a drop in pressure in the fuel system (RDT, fuel filter, fuel pump), to spark plugs.
Differences between fuel systems
Replacing a carburetor with an injector on a VAZ 2110 requires certain knowledge about the features and differences of these power systems. Although they are faced with the same task - supplying fuel to the combustion chamber of the engine, they perform it differently (see photo):
Replacing a carburetor with an injector VAZ 2110
In a carburetor-type fuel system, the air-fuel mixture is drawn into the combustion chamber due to the pressure difference between the intake manifold and the atmosphere, which in no way contributes to increasing engine power. In an internal combustion engine equipped with a fuel injection system, fuel is injected directly into the right place, at the right time, in the right quantity and is controlled electronically.
VAZ 2110 carburetor or injector
I consider it necessary to note that the first injection systems were developed already in 1894, that is, even before the advent of carburetors. However, due to difficulties in the manufacturing process, they remained unclaimed at that time and only in the 40s of the last century they found their purpose, first in aviation and then in the automotive industry.
Advantages and disadvantages
Injection system
- Compared to a carburetor (see Repairing a VAZ carburetor at home), the injector is an order of magnitude more environmentally friendly, the emission of harmful substances into the atmosphere is reduced by more than half (50-75%). Carburetor systems do not meet the requirements of environmental standards even EURO-3 in terms of their emissions. Agree, the reason for refusing to use them is more than significant;
- Again in comparison: precise dosage of fuel can significantly reduce fuel consumption compared to carburetors by up to 40%;
- The injection system responds significantly better to changes in loads, and this has a positive effect on dynamics;
- Due to the optimal ignition angle and geometry of the intake manifold, improved filling of the combustion chamber of the cylinders with the fuel-air mixture, engine power increases up to 10%;
- Ease of launch;
- Reliability of the entire injection system as a whole.
Unfortunately, in addition to its advantages, the injection system also has its disadvantages:
- The presence of complex electronics in the electronic control unit for maintenance and diagnostics requires special equipment and trained personnel, and the low maintainability of the components themselves and their price make the repair procedure a rather costly operation;
- Low-grade gasoline, which contains a large amount of resins and mechanical impurities, greatly clogs the injector, which leads to failure of the entire injection system.
- Unlike the one described above, the carburetor system is not so dependent on the quality of gasoline;
- The carburetor can be repaired with your own hands without any special equipment (as they say, sitting in the forest, on your knee), the price of spare parts is also pleasantly surprising.
Repair
Before removing the injectors from the dismantled rack, it is advisable to check their functionality. To check you will need:
- four identical containers,
- tester,
- wires.
Functionality check
- Connect the gasoline supply and drain hoses and the power connector to the rail with injectors.
- Place the rack over the measuring cups.
- Crank the engine with the starter.
- Evaluate the performance of the sprayers. The shape of the cloud should be approximately the same for all nozzles. The amount of fuel in the measuring containers should not differ much. Significant differences indicate contamination and changes in performance. Coked with resinous deposits and clogged, they require cleaning. A complete lack of fuel at the nozzle outlet indicates a valve malfunction and the need for replacement.
The shape of the cloud should be approximately the same for all nozzles
- Turn off the ignition. Disconnect the power connectors from the injectors.
- Measure the electrical resistance of the winding of each part. Its nominal value is 11–15 ohms. Deviations from the norm indicate the presence of hidden problems in the solenoid valve, which indirectly affect the shape of the torch and performance. It is advisable to replace such an injector.
- Turn on the ignition. Make sure the injector valves are tight. If a part is leaking, it should be replaced or at least try to wash it and check its functionality again.
- It is difficult to check the injector for unstable valve hanging, since this malfunction can occur quite rarely. To identify, connect the electrical connector of the injector with separate wires to the battery. Periodically turning the voltage on and off, watch the spray pattern. The shape and intensity of the torch of a working injector is the same every time; periodic changes occur when the valve does not open completely. If the background sometimes “accidentally” does not work, it must be replaced.
Do-it-yourself injector cleaning for VAZ 2110 |
When the car engine is running, the fuel system is exposed to various harmful influences and is contaminated with various particles. Washing the injectors of a VAZ 2110 with your own hands is a task subject not only to specialists, but also to car enthusiasts. It’s just worth noting that this is not as simple as it might seem at first.
What to expect from dirty injectors?
The specific power of the engine decreases. Detonation pops appear when the car accelerates. Engine idling is not stable, and over time, starting a car engine worsens and fuel consumption increases. Increases the likelihood of exhaust.
All these problems are determined during vehicle inspection and diagnostics.
When is it time to change injectors?
Many car enthusiasts are confident that it is necessary to clean the injector only within the period specified in the user manual. But the manufacturer, when indicating the mileage, did not take into account all the details. As a rule, not all of us fill in fuel that meets the requirements of the European standard, so the injection system in the car suffers, or more precisely, the nozzles in the injector. Replacing the injectors will help save the situation.
Important! When dismantling the injectors, it may be necessary to replace the seals along with the ramp. This procedure is long and difficult
Methods for cleaning injectors
You can turn to the nearest car service center for help, where washing the injectors costs from 1000 to 1500 rubles. Cleaning injectors is possible in different ways. The most common is adding a detergent additive to the gas tank. Usually one bottle (0.5 l) is enough for 50-70 l of fuel. This method cleans all parts in the fuel system (fuel tank, injectors, fuel pump, pressure regulating mechanism).
Important! It is possible to wash the injectors in this way only for preventive purposes, because dirt and deposits washed out of the gas line and fuel tank can further damage the pressure regulator valve. Washing can also be carried out using installations that supply solvent
The procedure takes place with the engine running using a cleaning solvent. Important! When flushing with solvents, be prepared that the spark plugs may fail, so carry out the procedure together with replacing the spark plugs
Washing can also be carried out using installations that supply solvent. The procedure takes place with the engine running using a cleaning solvent.
Important! When flushing with solvents, be prepared that the spark plugs may fail, so carry out the procedure together with replacing the spark plugs
Another option is to flush the injector with high performance fluids that flow through the injector. With this method, special installations imitate the operation of an injector, only instead of fuel there is a special solvent. You can also use an ultrasonic bath.
Self-cleaning of the nozzle
Cleaning engine injectors with your own hands is also quite feasible. Some resort to using an injector with additives, while others add kerosene to the tank. Effective prevention is the use of fuel additives. Frequency of use – about 3000 km. Do-it-yourself washing of injectors on a VAZ 2110 is carried out in the same way as in other domestic cars. Avtosotka avtosotka.ru
Why change a carburetor engine to an injection engine, and is it necessary?
Some drivers ask: why is it necessary to replace a carburetor engine with an injection one? Basically, everyone does this to install 4th generation gas equipment, and 2-3rd generation gas installations will work much better than on a carburetor.
This is due to the fact that the injection will no longer go through two chokes, but through one. You can leave everything on the carburetor brains, but then you will have to forget about gasoline, because standard injectors will not work if the control unit is carburetor.
Another positive point is that in the design of the intake manifold, in any throttle position, both intake valves operate. There is also a difference in fuel consumption. But the consumption itself mainly depends on the car, gearbox, axle, etc. And the mandatory use of high-grade fuel in an injection engine will not save you money. The car starts up much better after the changes, in any frost.
Important! For normal operation of the injector, it is necessary to flush the system every 25 thousand kilometers.
A few words about the procedure for working with wiring
At the end of today’s article, we’ll look at exactly how you should proceed if you want to change the wiring. As an example, let's take standard models of the VAZ brand - 2110, 2109 and the like. So, to competently work with car data electronics you will need:
- First, prepare for repair procedures. The implementation of this goal lies through:
- Purchasing the required wiring and devices;
- Search for the necessary connection diagrams;
- Selection of auxiliary tools: harnesses, fasteners, gloves for work, etc.
- After this, acting according to the diagrams of the currently installed electronics, we completely remove it. Naturally, before this you need to turn off the engine, disconnect the battery and put on gloves;
- Then the actual replacement of the VAZ wiring begins. Here you also need to act taking into account the connection diagrams. First of all, we connect the injector wiring according to the principle “from the oldest element to the youngest”. Next, we connect the main wiring outputs (ECU contacts) with the current source, and at the end we connect other electronics.
Preparation for dismantling
Replacing injectors may not be necessary for much longer if you purchase special additives added to the fuel. Thanks to them, the injector stays clean longer. But you shouldn’t shift all the responsibility onto them, because with prolonged use, dirt and deposits formed create a kind of blockage for the passage of fuel, and this, in turn, causes irreparable damage to the engine.
To replace, you must purchase the goods that will be required for the job. First of all, this is a special product for cleaning the injector; it is sold in special aerosol cans. It is advisable to replace the rings on the injectors themselves. It would be useful to purchase any button, a light bulb whose power will not exceed 21 W, and a chip used to connect the wires to the injectors.
It is also necessary to pay attention to some features of dismantling. Before removing the injectors, be sure to check that the engine has cooled down.
Then it is necessary to completely de-energize the fuel pump. To do this, all wires responsible for power will need to be disconnected. Next, you need to reduce the pressure in the motor as much as possible. They simply start the engine and wait for the engine to stall. Repeat several times until the engine stops starting.
Procedure for removing oil injectors
Before you begin removing injectors from any car of the tenth VAZ family, you will need to relieve the pressure in the fuel system. Removing any element that is under pressure in any way can result in personal injury.
How to get rid of excess fuel
To relieve the existing fuel pressure, you need to turn off the fuel pump and exhaust the remaining gasoline:
- Fold down the cushion from the back row of seats.
- Below it is the fuel tank hatch.
- Unscrew the screws securing the hatch.
- Disconnect the wiring harness from the pump housing (the wires supply power).
After this, start the engine and wait until it stalls. It is recommended to turn the ignition on several times to ensure that there is no gasoline left in the system.
Next, you can begin to remove the injectors. It is recommended to prepare the necessary tools in advance:
- open-end wrench 17;
- a flat screwdriver with a narrow blade;
- Phillips screwdriver;
- hex key 6;
- rags.
All elements of the repair kit are usually at hand for any driver
How to remove parts from the engine
- Remove the air filter box (it will interfere with free access to the engine).
- Remove the wiring harnesses from the injectors.
- Then you will need to disconnect the wires from the idle speed control and from the throttle sensor.
- Next, remove the vacuum seal from the pressure regulator (it has a white braid).
- Using a 17 key, unscrew the bolts that secure the fuel frame to the body. To make it more convenient, you can remove the gas cable.
- It is better to unscrew the fasteners of the plate with which the ramp is pressed using a hexagon.
- The fuel rail must be removed very carefully, with the nozzles facing up.
- On a 16-valve engine, dismantling will take longer, since the ramp has a more complex structure and several types of fasteners.
- Next, you can remove the injectors themselves - to do this, disconnect the fastening brackets of the electrical connector with your finger, and then the injector bracket. During removal, gasoline may leak; it is recommended to place a cloth under the ramp.
To install a new injector, the socket is first thoroughly cleaned of dirt and fuel, and only then can the product be screwed in. It is better to drop a few drops of gasoline onto the rubber ring before installation - this will make the nozzle fit into the mounting hole more easily. All work is then carried out in reverse order.