Replacing the timing belt VAZ 2114
Replacing the VAZ 2114 timing belt involves some nuances, which will be discussed in this article.
Generally, the part will need to be replaced if there is excessive wear. If the car is equipped with an injection engine, then the problem will appear on the dashboard as a “phase sensor error” output. However, it is not recommended to wait until the belt breaks. Experienced motorists recommend replacing them almost every 40,000 kilometers. These conditions will allow you to reduce a possible malfunction to prevention. It should be noted that in some cases, a broken timing belt can lead to a major engine overhaul.
Basic recommendations for replacing the timing belt:
• When replacing a part, it is recommended to simultaneously update the tension roller. • Before installing the belt, it is also advisable to check for lubrication in the tension roller, the possibility of rotation in the pump, or play. • If there is no lubrication, carefully lubricate the roller on both sides. If there is play or free rotation in the said pump, replacement is recommended. • If, after replacing the timing belt, a whistle is heard during engine operation, then it is necessary to loosen the tension on the part.
Replacing the timing belt - step-by-step instructions:
1. It is necessary to set the car to the parking brake. 2. It is recommended to engage fourth or fifth gear. 3. Carefully remove the front timing belt cover. 4. It is necessary to loosen the tension on the generator drive belt. Now this part can be removed. 5. Next, the generator drive pulley sitting on the crankshaft must also be carefully removed. However, the bolt that secures the pulley must be put in place. 6. The gear lever should now be set to neutral. 7. The crankshaft must be rotated clockwise, observing the clutch housing hatch. Here you can see the flywheel and mark. The indicated mark should reach the middle division of the scale. 8. It is necessary to make sure that the mark on the camshaft pulley is opposite the installation mark, which is located on the rear cover. 9. You need to slightly unscrew the nut that secures the tension roller. 10. Using a tension roller, it is necessary to loosen the timing belt in order to make it easier to remove the part. 11. Now you can remove the timing belt. 12. Install a new belt on the camshaft pulley, tensioning both branches. 13. The left side of the belt must be placed behind the tension roller and carefully placed on the pump pulley, and then on the crankshaft pulley. 14. The belt must be tensioned using a tension roller, which should be turned counterclockwise. Here you need to pay attention to ensure that no strong kinks form on the belt. 15. You need to turn the crankshaft two turns. The marks should be in the same positions as described in steps No. 7 and No. 8. In cases where the labels do not match, it is recommended to start over. 16. Now you need to unscrew the bolt from the crankshaft and install the generator pulley back, which should be secured with the bolt. 17. Using the tension roller, you need to slowly tighten the timing belt, and put on the generator drive belt. The tension of the last part should also be adjusted.
Having completed all the above work, you can begin testing the timing belt. During testing, you can determine the need for additional tension or loosening of the part. In general, almost anyone can cope with the task, however, we should not forget that this work requires patience and certain skills.
Source
How to replace the tension roller on a VAZ 2113-VAZ 2115?
Removal: 1) At the beginning of the operation, install the entire timing mechanism according to the marks, detailed information in details and pictures on how to do this is explained in the article called “Setting the valve timing according to marks” so go to this article and do everything as described in it , by the way, just above we indicated in this article about the cover that will need to be removed in order to get to the timing mechanism, so read about how to remove this cover in the same article to which the link is given in this paragraph.
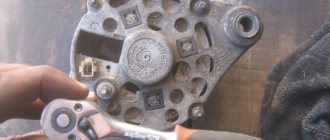
2) Go ahead and move on to point 2, now you will need to remove the tension roller itself from the car, but before removing it, remove the timing belt from the camshaft and from the tension roller itself, to do this, slightly loosen the nut that secures this roller (This nut in the photo above is indicated by a blue arrow, by the way, we’ll run straight ahead behind it, there will also be a washer located behind this nut, so don’t lose it when you completely unscrew the nut) and turn the roller by hand so that the belt loosens (the roller itself is made in the form of an oval, that’s why he regulates the belt tension, that is, at some point he strongly pulls the belt, and at some point he doesn’t pull it at all), after which remove the belt from the camshaft as shown in the photo below (Just do everything carefully), and well also remove it from the roller itself and let it hang (To completely remove the belt, you need to unscrew the bolt that secures the generator drive pulley, you also need to remove the belt itself from the generator, in general there are a lot of brands and so as not to completely remove it, just like we already indicated a little higher, remove it from the camshaft pulley, from the tension roller and let it hang from you).
3) Well, at the end of the operation, when the belt is no longer in the way, completely unscrew the nut that secures the tension roller, remove the nut and the washer located behind it, and then remove the roller itself along the shaft as shown in the photo below, after the roller will be removed, check its bearing, to do this, grab the central part of the roller with your hand and rotate the outer part of the roller, it should not jam and should spin normally, there should be no play, and grease should not leak from the bearing (B In this case, the roller will be contaminated with grease).
Note! When the roller is removed, a spacer ring will be installed behind it, which we also recommend that you remove and check for defects. If it is in good condition, that is, not crimped or cracked, then you can not replace this ring with a new one and install it on your place again, by the way, due to this ring, as you already understood, the fact how the tension roller will stand depends, for example, if the ring is installed large, then the roller will come out a little and the belt will not stand straight, but at an angle, so if The belt doesn’t eat you up, and if it doesn’t fly off while driving, then you don’t even have to touch this roller, since it does its job, as they say, with a bang!
Installation: The new roller is installed in its place in the same way as it was removed, but only the entire operation is performed in the reverse order of removal, in addition, the roller must also be installed in such a way that the two holes that are on it (see photo below) are directed not inwards, but outwards, by the way, if you look closely at the tension roller which is shown in the photo below, you can even notice with the naked eye that it is covered in lubricant, such a roller needs to be replaced and cannot be reused, because there is a possibility that it will soon time, the bearing will jam, but a jammed tension roller will not lead to good things (Either the timing belt will fly off in this case, or it will break), after you install the new roller and secure it with a nut, be sure to put on the timing belt and adjust it, in more detail For information on how to do this, read the article: “Replacing the timing belt,” point 1.
Additional video clip: We have attached a very interesting and visual video clip for you just below, so that you can watch it and see in more detail how the process of replacing this tension roller is carried out, so watch this video clip and delve into it.
- Electrical equipment
- Engine
- Brake system
- Other
- Steering
- Transmission
- Suspension
- Tuning
- VAZ 2110 Other
- Engine
- Steering
- Electrical equipment
- Transmission
- Brake system
- Suspension
- Tuning
- Electrical equipment
- Steering
- Video publications
- VAZ tuning photo stream
- Operation and repair manuals
Failed timing belt VAZ 2114
During the operational stage of the car, a moment arises when the VAZ 2114 injector timing belt needs to be replaced due to possible breakdowns associated with the end of its service life or its defects. The timing belt is a rubber product, made in the form of a ring with characteristic cuts along the inner circle, used for synchronous operation of the crankshaft and camshaft.
When is replacement necessary and what is needed for this?
During the depreciation period, the timing belt begins to peel, tear or slip. If a breakdown occurs while the engine is running, it stalls and becomes impossible to start. When operating a VAZ 2114 with an engine equipped with an injection device for supplying fuel, an indicator on the instrument panel will light up, notifying you of a phase sensor error.
If the car is equipped with a 1.5 liter, 8-valve power unit, then the repair itself will only require the purchase and replacement of a belt. If a 1.3 liter engine is installed, this breakdown will lead to damage to the entire gas distribution mechanism. Major renovations will be needed. The timing belt replacement on a VAZ should take place after 45 thousand km of vehicle operation. Constant monitoring of the mechanism is necessary for the purpose of prevention. The sequence of actions is as follows.
If you have simple plumbing tools, replacing the timing belt is possible at home. List of tools needed to repair the unit in question.
How to replace a VAZ timing belt?
Place the car on a horizontal platform. After this, release the handbrake. Engage 5th gear on the gearbox. Remove the front cover that protects the gas distribution mechanism using a 10mm wrench. Remember the location of the VAZ 2114 timing mark and unscrew one bolt on the side of the cover and one on the front. In order to weaken the tension force of the belt, it is necessary to rotate the crankshaft counterclockwise until the timing marks of the VAZ 2114 move to a distance of two gear teeth from the antenna of the rear cover.
Dismantle the generator belt drive. After removing the device pulley, install the bolt at the mounting location. Return the gearshift lever to neutral. While rotating the crankshaft, observe the VAZ 2114 timing mark appear opposite the center of the flywheel. The alignment mark must be in line with the mark mounted on the pulley. Having loosened the nut on the tensioning mechanism roller, we dismantle the timing belt.
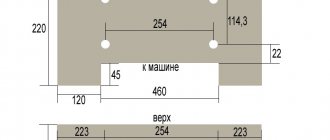
Camshaft drive diagram for VAZ 2114
After this, we install a new belt, pull it with the left side over the roller and put it on the pump pulley, and then on the crankshaft pulley. We carry out the tension in the opposite direction from the movement of the clock, taking into account the avoidance of kinks and kinks. Turn the shaft forward and set the timing marks of the VAZ 2114 in place before removing the belt. You have to do this yourself. If there is a discrepancy, carry out the entire process over again.
If the marks match, unscrew the bolt on the crankshaft and install the generator pulley in its original place. Tension the belt using a roller. In compliance with safety precautions, start the engine in operating condition. After 2-3 minutes, turn it off and make additional adjustments to the belt tension. Reinstall the previously removed timing cover.
The replacement process requires patience, calm, perseverance and the desire to gain repair experience. In the absence of such, contact the service department, where replacing the timing belt of a VAZ 2114 injector without taking into account the cost of the spare part will cost a hefty sum.
Removing the old belt
To remove the old belt, you will need to fix the crankshaft and prevent it from turning. It is necessary to remove the bolt located on the crankshaft pulley. You can do this in the following ways:
- Without removing the wheels, install the rear stops and release the handbrake. Climb under the car and use a 19" socket and ratchet to unscrew the bolt.
- After removing the wheel, you can place an assistant in the driver's seat. He presses the brake pedal to lock the drives. In this case, the crankshaft will also be locked.
It is undesirable to use other methods, since the likelihood of damage to the elements of the engine block, oil pump, and the belt drive itself increases. Replacing the VAZ-2114 timing belt with your own hands can be done in just a few minutes, but only if you have experience in carrying out this work.
After unscrewing the bolt on the crankshaft, it is necessary to remove the generator drive pulley by loosening the tension on its belt. Then, using a key set to “17”, unscrew the nut from the roller and completely remove the timing belt.
What is a timing belt for?
It is designed to combine the crankshaft with the camshaft, as well as synchronize the operation of these two elements. With the help of this belt, the cam shaft is constantly rotated, due to which it can perform its task normally. In addition, it activates the work of a number of other motor components.
In itself, it looks like an ordinary rubber product with teeth inside, which are designed to achieve synchronization in the operation of different parts, and also to avoid the risk of slipping, which could significantly worsen the performance of the VAZ-2114 engine.
The timing belt itself is located immediately under the hood, and it is quite easy to find. It is enough to pay attention to the camshaft and crankshaft, and you will be able to see this rubber part between them. To make sure you don't make a mistake, pay attention to the presence of teeth on the inside. It is worth noting that this element itself passes through a number of other components, which is why it is constantly exposed to thermal loads and wear during engine operation.
Instructions for replacing the VAZ 2114 timing belt
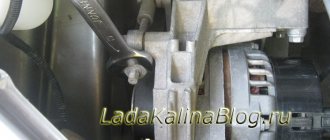
We unscrew and remove the cover (casing) of the timing belt; if I’m not mistaken, it is secured with three ten-key bolts.
We loosen the generator belt and remove it from the shaft together with the pulley and damper.
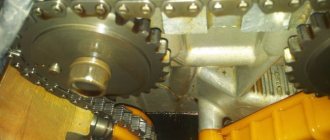
We set the top dead center. To do this, turn the engine as it rotates. We align the marks on the camshaft gear with the mark on its rear cover. In addition, at the same time you can replace the camshaft oil seal if there is an oil leak there.
Also, the mark on the crankshaft pulley must match the mark on the cover. We check another mark on the flywheel, it should also match. To do this, pull out the rubber plug on the clutch housing housing.
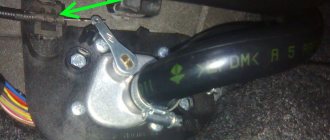
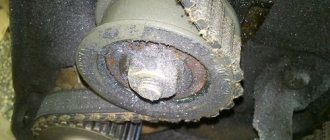
After this, we release the tension roller; it has an eccentric (with an offset center), so there is no need to unscrew it completely; we remove the belt.
If the roller is noisy or has a lot of play, it also needs to be replaced, especially if you have never changed it.
Attention! When installing a new belt, under no circumstances should you turn the engine or displace the marks previously installed.
We put on a new belt and tighten it using a roller while twisting it. We turn the engine of your “iron horse” a couple of revolutions and check the belt tension.
If everything is fine, put on the damper together with the generator belt and tighten it.
Close the gas distribution mechanism cover. We check our work, if you did everything correctly, start the engine, it should start without any problems.
With this all our work is completed, now you are probably convinced that you can change the belt yourself and pay only for spare parts.
To perform this work, you will need a timing belt tensioner.
a) It is necessary to remove the plug in the upper part of the clutch housing.
In this window, use a screwdriver to turn the crankshaft by the teeth of the flywheel ring until the mark on the camshaft pulley aligns with the protrusion of the rear timing belt cover. In this case, the mark on the flywheel should align with the center of the scale. If the relative position of the crankshaft and camshaft is disturbed, then turn the crankshaft until the mark aligns with the center of the scale. Loosen the belt tension and remove it from the camshaft pulley. Turn the camshaft until the mark on its pulley aligns with the protrusion on the rear cover. Without changing the relative position of the shafts, put the belt on the camshaft pulley and adjust the belt tension.
7. Use a 17 mm wrench to loosen the tension roller mounting nut. 8. By turning the roller with a special wrench, we adjust the belt tension and, holding the roller in this position, tighten the nut that secures it.
9. Check the belt tension (see above) and, if necessary, repeat the adjustment.
10. Finally tighten the roller fastening nut to a torque of 33.2–41.2
11. Reinstall the front belt cover and tighten its fastening bolts.
The timing belt (gas distribution mechanism) is used to synchronize the operation of the engine. The main task of the belt is to transmit rotating torque from the crankshaft to the engine camshaft with a decrease in speed. If the belt breaks or falls off, the car engine will stall.
Where is the timing belt located in the VAZ 2114
The timing belt is a fairly noticeable part, which is located immediately under the hood of the car. It passes through the crankshaft and camshaft of the engine. Therefore, if you need to replace the VAZ 2114 timing belt, it can be easily recognized by the teeth on the inside. The belt also passes through several other parts of the engine, leaving it constantly subject to wear and thermal stress.
How to find out that the belt has failed, the frequency of replacing the timing belt
By answering the question “Why does the timing belt eat on a VAZ 2114?” and replacing the damaged part, you can forget about this problem for a long time. For example, if the reason is the rollers, then the belt will “eat” on one side and eventually it will break. To avoid trouble, check the condition of the rollers regularly.
Why does he chew his belt?
The belt can chew for a number of reasons, which must be eliminated, because this affects the operation of the car. Main reasons:
If you notice that the timing belt is chewing, be sure to figure out the cause and, if necessary, replace it with a new one. Interesting fact!
Some motorists, faced with the problem of chewing their belt, solve it by selling the car. Therefore, be careful when buying a used vehicle.
Instructions for replacing the VAZ 2114 belt
In order to know how to change the timing belt 2114, you need to read the car's operating instructions and follow simple rules. First of all, you will need: a 10 mm socket wrench, 13 mm and 17 mm open-end wrenches, a large screwdriver, a wrench for tension rollers, a wheel wrench, a jack, and machine oil.
Replacing the timing belt on a VAZ 2114 is carried out as follows:
Next, we carry out the installation in the reverse order. You definitely need to have an idea of how to check the timing marks on a VAZ 2114, so that if they go wrong, you can install them back.
After changing the belt, start the car and listen for any extraneous sounds or noise. If the engine runs quietly, the replacement was carried out correctly.
Important!
If you hear a rustling or humming noise, it means the belt is too tight. You can release it using the tension roller by turning it to the left.
Execution Sequence
1. We prepare the car for work (see “Preparing the car for maintenance and repair”).
2. 10 mm
Unscrew the three bolts securing the front timing belt cover.
3. Lift the cover vertically upward and then remove it from the engine.
4. Rotating the crankshaft, we check the condition of the belt by external inspection.
Note: The crankshaft can be rotated with a 17 mm socket wrench (19 mm on some cars) by the bolt securing its pulley or with a large slotted screwdriver by the flywheel teeth. To do this, remove the rubber plug from the hole in the clutch housing (see “Timing Belt - Replacement”).
Signs of a faulty timing belt and their causes
During the production of the VAZ-2114, it was stated that the timing belt installed in it would not require replacement until the car had covered 50,000 km, and only then should one be interested in its condition.
Some experts say that belt replacement is required after approximately 75,000 km under standard vehicle operating conditions, or after 60,000 km under heavy-duty conditions. At the same time, experts often recommend periodically diagnosing the car anyway, since in fact, replacing it with a VAZ-2114 may be necessary earlier due to the following defects:
conclusions
Incorrect timing belt tension will lead to accelerated wear.
Accelerated wear of the timing belt due to incorrect tightening.
The engine on a VAZ-2114 does not bend the valve when the timing belt breaks, but still, there is a risk of getting up at night in a dark field in our big country. You will be lucky if the belt breaks at home or at work, and not on a long trip. To prevent this from happening, you need to set the timing belt correctly, as we wrote above!
Location of the timing belt on the VAZ 2114
Finding this important detail is not at all difficult, because when you open the hood of the car, it immediately catches your eye. This belt differs from others in its toothed inner surface, and also passes not only through the camshaft and crankshaft, but also connects several auxiliary parts, due to which it is subject to increased wear, so its replacement must be carried out in a timely manner.
Sooner or later, the timing belt may begin to “eat up”, slip or begin to tear. It often happens that this link connecting two shafts breaks directly during movement. In such cases, the car stalls and does not start, and in the injection versions 2114, the “phase sensor error” light comes on on the dashboard.
What threatens a broken timing belt on a VAZ 2114 engine?
For cars that have an eight-valve engine with a volume of 1.5 liters, such a break is unlikely to lead to serious consequences, however, if you drive a VAZ-2114 with a 1.3 liter engine, this can already result in serious damage to the valves and, as a result, breakdown of the entire motor system.
It is for this reason that many experts say that replacing this element in the VAZ-2114 should be carried out after a maximum of 45,000 km, and its condition must be monitored regularly even before this limit approaches.
Video.
Welcome, friends, to the DIY car repair website. The timing belt is one of the important parts of the car, without which your engine simply will not start.
Over time, the belt begins to burst, slip off the gears, and may even break completely. Therefore, timely replacement of the VAZ 2114 timing belt is simply necessary.
In general, you need to change the timing belt on time, as recommended, after 40-45 thousand kilometers, so that you don’t have to worry about it later on the road.
In what cases should the belt be changed:
How often to change the roller and belt
The recommended replacement rates for VAZ 2114 cars, determined by the manufacturer, define the replacement period as 60 thousand km, but this statement is only true for vehicles under five years old, otherwise this figure should be reduced by approximately 15 thousand km.
The replacement period is also affected by the performance of the liquid pump, with a maximum service life of 90 thousand km. You should not take the original pump under any circumstances, because it will quickly break on its own or “eat” the belt from the outside.
Also, do not forget about the need to replace the crankshaft seals, which also have similar wear measured at 40 thousand.
Therefore, taking into account the data described above, we can come to the conclusion that it is necessary to change the belt, adjustment roller and oil seal every 40 thousand km, and after one replacement, install a new pump along with them, if no unforeseen breakdowns have occurred.
Stages of work
Replacement is quite simple, you just need to remove the installed part and put a new one in its place, making sure that there are no defects on it that could interfere with normal operation. But both dismantling and replacing the strap with a new one must be carried out in strict accordance with the instructions.
Preparation
Before the replacement procedure itself is carried out in the VAZ-2114, you need to turn on the handbrake and also set the lever to fourth gear. This is done in order to ensure not only safe, but also convenient performance of all work, since otherwise carrying out all work will be quite difficult.
Removing the old timing belt
Install a new belt and tension it
Ultimately, after replacing the timing belt on a VAZ-2114 is completed, you need to start the engine to make sure there are no problems. In addition, based on the sound, you can approximately understand how well the belt is tightened.
If something remains unclear, you can watch the video instructions for performing this operation on a VAZ-2114:
Preparation process
This procedure is quite simple, but before you put the tags on the VAZ 2114 and for complete convenience, you will need an assistant and a little preparation.
So, for everything to go quickly you need to:
- We find a flat surface that allows us to easily fix the car so that it does not roll (put a shoe under the left rear wheel).
- We tear off the fastenings on the right wheel and lift the car with a jack so that the wheel can be removed freely.
IMPORTANT! Some believe that if you fix the position of the shafts when replacing the belt itself, then there is no need to make further adjustments; this is not entirely correct. A competent car enthusiast, along with the timing belt, also changes the tension-regulating roller along with the oil seal on the crankshaft. The first one tends to wear out quickly and leaves the possibility of breaking a completely new belt, and the second one is simply a disease of the entire VAZ family; over time it leaks and the car begins to “eat” oil.
Step-by-step instructions for replacing the timing belt on a VAZ 2114 with your own hands.
It is a closed rubber product used to synchronize the crankshaft and camshaft.
It is imperative to replace this part, because the consequences of its failure can be very different: from stopping the engine to immobilizing the entire car. In this case, as a rule, the replacement itself must be carried out in several stages. VAZ 2114 has two of them.
First stage.
1. To begin, you need to place the car on a flat surface and secure its position using the hand brake. The gearshift lever is set to 4th or 5th gear.
2. After this, remove the front timing cover.
3. The crankshaft is turned counterclockwise (the camshaft mark has moved from the rear cover antenna to a couple of teeth). This allows you to slightly loosen the belt tension. Now the latter can be removed from the generator drive.
4. The fastening bolt is put in place, and the generator drive pulley is removed from the crankshaft.
5. The gearshift lever is set to neutral.
6. Then turn the crankshaft again until a mark appears on the flywheel. When this mark is in the center, the rotation stops. The camshaft pulley mark is located opposite the installation mark, which is located on the rear cover.
6. Now the tension roller mounting nut is loosened and the old timing belt is removed.
7. Put a new belt on the camshaft pulley (we hook the left side of the belt to the roller and put it on the pump pulley and the crankshaft pulley) and tighten it - using a roller, which should be turned counterclockwise.
8. As the final action of the first stage, the crankshaft is turned several revolutions, returning the marks to their original places.
Installation process
The timing belt itself is a rubber product closed with teeth inward, which synchronizes the torque between the camshaft and crankshaft. Ignoring its wear will not lead to anything good, because in the best case, your engine will stall while driving, and in the worst case, the entire wheelbase will jam, which can lead to the most unpredictable incidents on the road.
The replacement and debugging itself is carried out in two stages, in the first stage the main repair and debugging work is carried out, and the second stage carries the function of monitoring the work done.
First stage
- The assistant gets into the car and puts 5th gear in the gearbox, and at this time you remove the front belt protection.
- Insert the ratchet into the place allocated for it and begin to turn the crankshaft, you need to do this until you see that the mark located on the camshaft has not moved to remove several teeth from the control antenna of the rear cover. (this action is necessary to reduce the degree of belt tension).
- We dismantle the drive pulley on the crankshaft and return the mounting bolt to its place.
- The assistant switches the gearbox to “neutral”.
- Again, we begin to carefully turn the crankshaft until the mark on the VAZ 2114 flywheel is in the central position.
Second stage (control-final)
- Before checking the timing marks on the VAZ 2114, you need to fix the pulley on the generator and tension the belt with a roller to the maximum.
- Now we check all the matches, if nothing is wrong anywhere, then we install the protection back and clean the workplace.
Looking under the hood of your car, with knowledge of this information, you will understand that there is nothing difficult in this procedure, but its success is quite dependent on the skill of the performer. Therefore, if something doesn’t work out the first time, just repeat the operation, you may even need to do it twice. Don’t be discouraged, because after the difficult first time it will only take you a few minutes, like a seasoned professional.