Information
Visitors in the Guests
, cannot be posted on this publication.
Video on the topic “Lada Granta. Removing the cigarette lighter, replacing the Granta backlight lamp"
Replacing the cigarette lighter on a Priora and its backlight lamp
Lada Granta - installing a socket instead of a cigarette lighter.
How to replace the cigarette lighter in Kalina, Priora, Grant. Installation of a convenient cigarette lighter.
Installing an additional 12V socket in a LADA car
In the interior of a modern car there is a 12 V outlet (cigarette lighter socket or USB port), which allows you to charge smartphones, connect a tire pump, heated seats or a refrigerator. A large number of gadgets forces you to install various splitters or additional sockets in the cabin and trunk. Let's look at the features of this modification.
The process of installing an additional cigarette lighter (12 V socket) is shown using the example of a Lada Vesta car. On other modern LADA cars (XRAY, Largus, Priora, Granta, Kalina, Lada 4×4) all actions are performed similarly. You will find examples of work on other LADA models in the comments.
You can buy a 12 V socket and a USB port:
Installation
As a rule, the process of installing a 12V outlet does not cause problems.
In the cabin
It is most convenient to place it on the central tunnel of the car. To do this, you need to remove it, cut a hole (use a utility knife) and secure the socket.
Installation process on video:
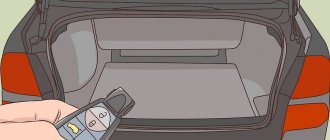
In the trunk
The 12 V socket is mounted on the casing. To strengthen it, use a piece of MDF or plywood. We cut the hole with a feather drill.
Installation process on video:
Connection
Two main schemes for connecting an additional 12 V socket (choose depending on the purpose):
In the second case, we route the plus from the engine compartment into the passenger compartment through the standard hole above the pedals. We pull it into the trunk under the plastic threshold on the left side.
The minus can be taken from any body bolt.
Have you ever had to install an additional 12V socket in your car? What connection scheme did you choose? Let us remind you that we previously told you how to install wireless charging for your phone inside a car.
Share on social networks:
Found an error? Select it and press Ctrl+Enter..
Source
12V socket Lada Granta for connecting additional consumers
Your request has been accepted!
You will receive a notification when the product goes on sale to your contacts.
Socket Lada Granta, Kalina 12V
- Lada Granta - all body types
- Lada Granta FL - all body types
- Lada Kalina 1, 2
- Lada Kalina Cross
A full 12V socket is a socket that is installed in a standard socket instead of a cigarette lighter and allows you to connect additional power consumers, because The standard cigarette lighter is short and does not have a reliable contact.
To install this socket instead of a cigarette lighter, you will additionally need to purchase a connector (art. RZM-2190-3725110-10).
The cartridge allows you to connect a phone charger, power a DVR using a temporary circuit, and other consumers with a power of up to 120 W.
Before installing the cartridge, remove the cigarette lighter fuse and disconnect the battery.
To install the cartridge, according to the car's operating manual, you need to remove the center console. However, there is another way:
- The tools you will need are a slotted screwdriver and an awl;
- remove the standard cigarette lighter by squeezing the fasteners using an awl;
- disconnect the cigarette lighter from the connector with wires;
- remove the plastic backlight ring, also squeezing the ring latches, then also disconnect the ring. The ring must be removed smoothly, without sudden movements, because it also has a connector that will need to be removed;
- after which, connect the socket to the plug and insert it into the standard hole formed instead of the cigarette lighter.
You can read more about the experience of replacing a cigarette lighter with a socket socket in the Niknnw BZ.
The price is for 1 socket (without connector)!
The connector for connecting the socket is presented on this page.
Source
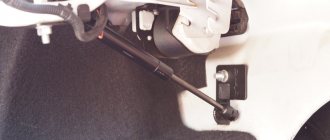
Ford Focus Hatchback 2.0 faithful friend › Logbook › Installing the cigarette lighter in the trunk
For a long time I had the idea of putting an additional cigarette lighter connector in the trunk. In the summer, I sometimes drive with a car refrigerator in my car; I had to power it from the armrest and place it in the back seat, since there is not enough wire to the trunk. The tire compressor was also not very convenient to handle, and the other day I needed to inflate a swimming pool, so the wire from the armrest was barely enough to reach the rear bumper. I didn’t like this whole situation and started looking for a solution. It was necessary to find a cigarette lighter socket, always with a plug. In terms of availability, there were no such options; through the Internet there were many options for ordering, but all of them cost more than a thousand. As a result, 3 options turned out to be optimal: Ford original (Italy) for 1200 rubles, Ford original (China) for 600 rubles and some kind of airline for 300 rubles. Therefore, the choice fell on... Ford China, of course. And this is not a collective farm version, because it comes from the factory to a station wagon and, apparently, to the 3rd generation.
What we need for installation:
— Cigarette lighter Ford 1712882
, 625 RUR; — Spade drill 26-27 mm, 75 rubles; — Terminal mother; — Round terminal for ground; — Bolt M6 (for 10mm head).
The socket will be on the right, since there is already a chip connected to it from the factory. We remove the right trunk trim, you will need to unscrew 2 self-tapping screws for 25 torx, unclip the right passenger's seat belt trim, and unclip the rear pillar trim from below (I removed it completely). Now the trunk trim can be removed by pulling it off the latches. Next, we fold back the carpet trim and find that same feature at the bottom.
Now let's try on the plastic part. I highly recommend inserting it first and locking it in place, and then clicking the metal part into it. Then the socket will hold tightly and will not dangle or fall out, and it will be easier to insert it without breaking the fixing latches. The metal part is inserted with only one side along the groove and also snaps into 2 grooves.
And immediately a question for the experts: what kind of mesh can you take in the trunk so that objects do not fly around it while driving? There are hooks, but God knows what will fit there, I saw a universal net in Auchan.
That's all for now, I will be glad to read your interesting improvements and comments) Bye!
Source
How does a cigarette lighter and its structure work?
The device circuit is simple. The cigarette lighter in a car consists of several parts:
The cigarette lighter is designed in such a way that when the car owner presses the button, the contacts are closed, to which alternating current is supplied. As a result, the element begins to heat up. When the maximum temperature is reached, the built-in thermal relay gives the command to snap off the device. If used correctly, the car cigarette lighter will work for a long time. However, there are reasons why the device fails earlier.
This is the connection of several powerful devices to one socket. The maximum permissible current value increases and the cigarette lighter fails. Therefore, car owners tend to install an additional device in their car.
Where is the cigarette lighter fuse located?
A common reason why a device stops working is a burnt-out protective element. The current strength in the circuit itself is precisely fixed, and its value should not exceed 15 amperes. When connecting powerful devices or a short circuit, the fuse blows, causing the VAZ cigarette lighter to stop working.
The fact that this particular element needs to be changed will be indicated by indirect reasons. The fuse is responsible for:
- sound signal;
- trunk lock;
- immobilizer, this means that if it fails, the owner will not start the car.
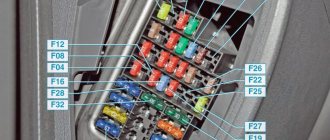
To change a non-working cigarette lighter fuse, you need to get to the mounting block. It is located in the cabin under the decorative panel, to the left of the steering column. The cigarette lighter fuse is held in place by five plastic clips.
- We disconnect them and get to the rear space.
- We take out the plug that attaches to the luggage compartment opening button. Now you can completely remove the panel.
- We gain access to the mounting block, where tweezers are also located, allowing you to quickly pull out the protective elements.
The Lada Granta model has two versions of the fuse box - old and new. If the car is from the first years of production, then you will need to replace the element number F20. The mounting block diagram of newer models of the cigarette lighter fuse differs from its predecessor. Here you should change element F27. The fuse must be rated 15 amps. When installing a protective element with high resistance, problems may arise. If the current in the circuit exceeds the maximum permissible value, the cables will melt, which can result in a short circuit or fire in the wiring and a blown fuse.
Reasons for failure of the cigarette lighter on the Lada Grant
A malfunction can occur due to various circumstances. Among the most common reasons why the cigarette lighter on a Lada Granta car does not work are:
- Blown fuse. This happens due to connecting a large number of devices to the connector. The total power of connected devices should not exceed 180 Watts (15*12=180). Otherwise the cigarette lighter fuse will blow. AvtoVAZ models have different protective elements (Granta - F20/F27, Kalina - F18, Priora - F13). The fuse rating must correspond to the value specified by the manufacturer.
- Poor contact. Over time, oxides or rust develop on the tendrils of the metal cartridge, resulting in a poor connection. To correct the situation, it is enough to remove the cigarette lighter, inspect the condition of its contacts, and treat them with a file to remove rust or oxides.
- Broken wiring. Three wires come to the device, the soldering of which disappears over time. To identify the malfunction, you will need a multitester.
Cigarette lighter installation tool
To professionally make a cut-in and connect the device, you will need to stock up on the necessary tools:
You will need to buy an additional plug-in cigarette lighter to connect it. The price of the device ranges from 300 to 1.5 thousand rubles (per Euro model), depending on the manufacturer. You need to buy original parts - they guarantee proper operation of the device. Cheap cigarette lighter options should be abandoned. The quality of the materials there is unsatisfactory and such elements will quickly fail.
Socket with cover for Lada Granta / Kalina / Datsun plug
- Description
- Reviews (2)
- Question answer
- Cost of delivery
Socket with cover for Lada Granta / Kalina / Datsun plug (socket for connecting an additional consumer with cover) 2190-3725110-10, also known under number 00001750487400.
For installation you will need this connector
How to find out the cost of delivery of goods? Very simple!
Place all the desired items in your cart (via the green “Add to cart” button) and click the “Place an order” button.
On the ordering page, enter your exact address, after which the site will show all possible delivery methods with prices and terms.
The cost of delivery by Russian Post starts from 180 rubles, depending on your address, the weight of the parcel and its cost.
The cost of delivery by transport companies starts from 200 rubles, depending on your address and the dimensions of the parcel.
We recommend watching
Euro cigarette lighter connector Lada Kalina / Granta / Priora, Datsun..
Source
Where and how to beautifully embed the cigarette lighter
It is worth determining the installation location of the device. You can install an additional cigarette lighter in your car in any convenient place. The owner must independently calculate the most convenient places. As a rule, this is the area of the rear seats (transmission tunnel between the rear row passengers) or the trunk (it is convenient to connect a compressor to inflate the wheels here). The main thing is to connect the device correctly and observe the polarity.
How to connect correctly
A three-pin plug fits a standard car cigarette lighter. Before installing an additional device, you need to understand how a car cigarette lighter works and learn the pinout.
The connection diagram looks like this.
Option to mount directly to the battery
There is a way to connect directly to the car battery. This scheme has advantages. You need to know how to connect the cigarette lighter directly to the battery. This will avoid interference with the wiring itself. The work will take less time; the positive wires should be brought directly to the battery, and the negative wire should be attached to the car body.
It is necessary to select the necessary spare parts. Initially, this concerns the wires. Each square millimeter of cross-section is designed for 5 - 10 amperes of current. You should take the wire with a reserve. A cross-section of 3–5 mm is quite sufficient to transmit the required voltage. Otherwise, the wires may burn, resulting in a risk of short circuit. The circuit should be routed through an additional fuse with a rating specified by the manufacturer.
How to improve a ready-made cigarette lighter
Many car enthusiasts purchase a special splitter unit that allows you to connect several devices to one connector (see photo). However, the design of the car's cigarette lighter, as well as the cross-section of the wires, does not allow it to be used as efficiently as possible.
Connecting several devices leads to excess voltage or current, causing the fuse to blow or the wires to burn out. Then the device needs to be repaired. You can improve the device by choosing thicker cables that fit the car cigarette lighter.
The millimeter of cross-section is designed for a current of about 5 - 10 amperes. If a device with a power of 300–500 watts is connected to the socket, then the power will reach 25–40 amperes. You will need wires with a cross section of 4 - 6 mm. Such a reinforced structure will work for a long time without causing problems. You can connect an additional socket according to the instructions described earlier.
Source
zubilomira › Blog › SAFE WIRING | RECONDITIONING THE CIGARET LIGHTER SOCKET
The other day I was preparing to redo the cigarette lighter, or rather, to remove it from my car and install a so-called Outlet socket. I raised this question publicly, you know, you’re sitting like this at work and suddenly you decide to share it with the team. So here it is. I realized that many (almost all) car enthusiasts do not know at all what a cigarette lighter is for and what an Outlet is. Let me explain. Almost all cars have been and still are equipped with cigarette lighter sockets. It's the cigarette lighter. That is, this nest is intended only for him. Did not know? Yes! This socket and its wiring are assembled ONLY AND ONLY for a short-term load of a maximum of several tens of watts (cigarette coil). Initially, this outlet is not designed to connect any other devices, and especially not for a long time. And “not designed” is putting it mildly. By the way, in the user manual of each car it is also written that the cigarette lighter socket is intended only for the cigarette lighter. You can argue endlessly with this only truth and claim that you have a smartphone charger installed in your cigarette lighter, and you also connect a pump there. But I will say this: you can tease a dog too. But not forever. Sooner or later, he will bite.
It is IMPOSSIBLE to connect anything other than the cigarette lighter itself to the cigarette lighter socket. At best, your fuse will blow. As practice shows, car enthusiasts put a fuse on this circuit that is stronger than intended. That is, in the worst case, the fuse will not work and the current strength, the long-term effect of which the cigarette lighter wires are not designed for, will melt the sheath of the wires, a short circuit will occur and... Why else might the fuse not work? Yes, because it has a maximum of 3.5-5 Amps. And your charger is no more than 3 Amps. This is a normal load for a fuse. Why should he melt? So, the entire load will fall on the wiring, the cross-section of which is designed, God forbid, to be 1.5 Amperes. Whether it’s a VAZ 2109 or a Mazda or Ford, it doesn’t matter at all. But! It still matters.
Interesting fact: Infinity cars and other brands of the same class have a smaller diameter cigarette lighter socket. You can't put anything else in there except the original cigarette lighter. Comfortable? Safely? Yes!
Frequent mistakes. 1. Owners of cars that have both a cigarette lighter socket and an outlet socket do not know about their difference. If suddenly the Outlet socket is busy charging a gadget, and a passenger asks to recharge his phone, the driver happily pulls out the cigarette lighter and offers to use the cigarette lighter socket, where he inserts a second charger. In 60% of cases nothing bad will happen, of course. In other cases, you can only hope for a slight melting of the wiring or a blown fuse. 2. Owners of domestic “ancient” cars generally insert chargers, pumps, and boilers into the cigarette lighter. There's not even anything to talk about anymore.
Causes of cigarette lighter malfunctions
So, everything is clear with the forms.
But how to choose a device whose use will definitely not burn anything? It is very important to pay attention to whether the maximum electrical load is indicated on the device and what its value is. It should not exceed the standard 15 amperes. Another noteworthy feature is the current strength of the USB connectors. It ranges from 500 milliamps to 2 amperes. It is better in this case to take the maximum. If the device seems too fragile and unreliable in appearance, it is better to refrain from purchasing it. The most meticulously worth inspecting is the connectors of the splitter themselves, those round ones. There should be no circuit board protruding from the bottom of the splitter sockets. The contact sleeve of the splitter should not be too thin. If it appears to be no thicker than foil, the device may be dangerous to operate.
Even when using a high-quality extension cord, remember that the Kalina cigarette lighter is a fire hazard; under no circumstances load the splitter to its full capacity. Don't count on the fuse, because you already understand how quickly it gives out. You also need to be careful with the splitter. On one of the Kalina station wagons, the fuse mentioned above failed when only an empty splitter was connected. This is precisely because of those ill-fated contacts. But after replacing the fuse everything worked again.
How to properly connect the cigarette lighter
The cigarette lighter is an essential attribute of any car. Often there is a need for an additional cigarette lighter, located in the trunk or on the panel, next to the main one. Through a splitter you can connect up to 3 different devices to one cigarette lighter. The additional cigarette lighter is connected directly to the battery. After reading the article, you will learn how to connect the cigarette lighter in your car correctly without harming your car.
How does a cigarette lighter work?
A car cigarette lighter is two devices - a heating element and a connector (plug) in a convenient housing. It can be directly connected to the battery, so the device works even if the ignition switch is turned off. In addition to its main purpose, the plug is often used as a 12/24 volt outlet to which a splitter is connected to provide power to a laptop, phone or other devices. A splitter is also connected to it, so you can simultaneously charge a laptop, phone, or use a DVR. The power splitter or power supplies of these devices are inserted into a plug that provides a reliable connection to the cigarette lighter socket contacts.
Replacing the cigarette lighter with a USB socket
Due to the design features of the liftback, some difficulties arise with the cigarette lighter.
The short body does not provide reliable fixation, which is why connected devices may turn off. Therefore, many owners install a 12-volt socket instead of a car cigarette lighter. For this procedure, standard AvtoVAZ sockets for Gazelle, Vesta or XRay are suitable. Part number 118.3725 SOATE. The price of the device is 150 – 200 rubles.
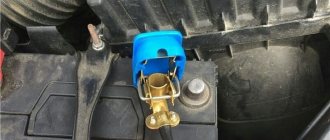
- We de-energize the car by removing the negative terminal from the battery or pulling out the corresponding fuse.
- We take out the metal cartridge.
- We bend the fixing antennae.
- We dismantle the internal part of the car cigarette lighter.
- Disconnect the wire block.
- We connect the plug to the socket socket.
- We mount it in the cigarette lighter hole.
The disadvantage of this procedure is that the device will stop working as intended. The socket will not be illuminated due to the removal of the filter. However, all connected devices are securely fixed in the socket. You can learn more about the installation procedure from the video.
How to install a cigarette lighter
Before starting work, be sure to disconnect the negative terminal of the battery, and also make sure that the ignition switch is in the “off” position.
There is no single method for inserting this device, because cigarette lighters vary in length, size and shape of the case, as well as the method of fastening. The easiest way is to insert this device into a standard hole of a suitable size. If there is no such place and you could not find a suitable crown, mark the contours of the opening, then very densely drill holes with a diameter of 2–3 mm around the perimeter. After this, use side cutters to carefully cut the jumpers between the holes, and then level the seat with a file. Insert the cigarette lighter to ensure the area is prepared correctly. If necessary, correct the hole.
Do not install the plug on curved or corrugated surfaces because you will not be able to secure it properly. Remember, the distance from the bottom of the cigarette lighter body to any body part must be at least 2 cm.
Having prepared the seat, proceed to selecting the wire and fuse. A plug directly connected to the battery can easily transmit current up to 30–40 amperes, so the load power limitation depends on the thickness of the wire and the fuse rating. Each millimeter of cross-section of a stranded wire is capable of transmitting 5–10 amperes of current to the plug. If you are going to connect a load with a power of 300-500 watts, then the current will be 25-40 amperes. The cross-section of the wire for such a current will be 4–6 mm. An attempt to pass such current through a wire of a smaller cross-section will lead to its melting or fire. Consider a path for the wire that will directly connect the plug and battery. It is advisable to lay it through the technological holes of the body next to the standard wiring.
Remove the interior floor and trunk trim, then carefully inspect the selected path for the wire. If you can get it through the finished holes, then do it. If not, drill new ones. At your local auto store, purchase rubber seals that will protect the wires from the sharp edges of the hole in the body. Drill holes, focusing on the diameter of the seal, and process their edges first with a file, then with anti-corrosion materials. Attach the wire to the body or standard wiring bus using plastic clamps.
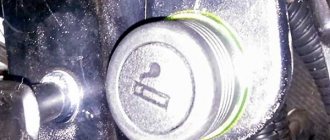
How to properly remove the cigarette lighter on a Lada Granta
The presented photo report will show how to remove the cigarette lighter on a Lada Granta in order to replace or repair it. You will also find out why the cigarette lighter fails.
Why does the cigarette lighter on the Lada Grant fail?
One of the main reasons for the failure of the Lada Grant's cigarette lighter is a short circuit, which can occur due to a failure in the vehicle's on-board network or due to wear of internal elements. Also, removing the cigarette lighter on the Grant is also necessary to replace a burnt-out diode (light bulb) for lighting the socket.
Which cigarette lighter to buy
If you are unable to find an original Granta cigarette lighter , then an excellent alternative would be a spare part manufactured by catalog number DA5100F0109
How to remove the cigarette lighter on a Grant
First of all, as when working with any component of a car's electrical equipment, you need to turn off the power to the battery and only then proceed to remove the cigarette lighter. Carefully bend the edges so that the plastic protrusions do not interfere, and release the metal cylinder. Then you need to remove the center console of the torpedo.
Video of removing the Granta center console
In the first car models, the device was used directly for lighting cigarettes, but with the development of technology its use has expanded significantly. Currently, all external electronic devices are connected through it: vacuum cleaners, navigators, chargers, radar detectors, mobile phones.
Today, the 12-volt socket of a car has become indispensable; its breakdown immediately causes a number of inconveniences.
Typical faults
The reasons why the cigarette lighter does not work can be different. One of them is a blown fuse. It may burn out due to connected devices, such as a compressor or splitter. To eliminate the problem, you need to open the mounting block, remove the burnt fuse and insert a new one. A regular 15 or 20 Amp fuse will do.
The second no less popular malfunction is the antenna contacts that are bent inside the device. If you use the charger frequently, the metal tendrils will unbend over time. To return the device to functionality, the antennae should be slightly bent using a flat-head screwdriver (video author: Andrei Che).
Repair and replacement instructions
If the reason is not the fuse and the antenna, then the device may not work. In this case, it needs to be replaced. Replacement is complicated by dismantling the plastic floor tunnel.
The replacement procedure for the Lada Kalan and Lada Granta Liftback is similar and consists of a sequence of actions:
- First of all, you need to remove the battery terminal.
- Then unscrew the three mounting bolts that hold the plastic handbrake lining.
- Next you need to unscrew the handbrake switch.
- At the back of the tunnel there is a self-tapping screw, which we unscrew in the next step.
- Then we unscrew the fastenings of the floor tunnel from the side.
- Next, remove the cover from the gear shift knob.
- Now you can lift the tunnel and begin replacing the cigarette lighter.
- Before replacing, you must disconnect the power.
- Next, press the latches that hold the cigarette lighter, and you can remove it.
- We insert a new part and perform the reverse assembly steps.
Replacing a broken cigarette lighter is simple; any car enthusiast can handle this procedure.
Video “Replacing the cigarette lighter fuse”
This video describes how to replace the fuse of a 12-volt outlet on a Lada Granta (video author - remgar).
Connecting the cigarette lighter
Never connect the cigarette lighter to the ignition switch. The ignition system will not withstand such a load. Having laid the wire in the engine compartment, bring it to the positive terminal of the battery, connect the fuse and then attach it to the terminal. If for some reason you cannot do this, run a wire with a fuse to the starter and attach it to the positive terminal of the relay. Strip the end of the wire at a distance of 1 cm, place it on the terminal, then crimp it using pliers. Be sure to secure the wire so that it does not dangle anywhere. To attach the wire to the cigarette lighter, use a soldering iron or an appropriate terminal, depending on the device model. Install a fuse and a switch next to the cigarette lighter, this will increase the safety of using this device.
Do not confuse the arrangement of parts of the diagram:
The switch must be designed for a current of 1.5 times the maximum load. If there is no such switch, attach a relay next to it that is suitable for the current. Some drivers place a switch and relay next to the ignition switch. Connect the switch to the control contact of the relay, and the cigarette lighter to the power one. To do this, place heat-shrink tubing on the exposed ends of the wire, then push and crimp the terminals. Adjust the tube so that it completely covers the junction of the terminal and the wire, then heat it with a match or lighter. You can also install a regular cable splitter (220 volts), which is sold in hardware stores. Find the nearest ground connection location (the wire is bolted directly to the body). Unscrew the bolt, clean the contact pads of the terminal and body. Route a piece of wire from the relay and cigarette lighter to the ground hole to determine the length, then cut and strip the ends.
Make a splitter - take a piece of wire of a suitable length, strip both ends. Then solder the ends of the long and short wires to each other so that they both point in the same direction. Protect the connection with heat shrink tubing, then attach the connection terminal to the negative of the cigarette lighter. Position the tube so that it completely covers the contact point. Place heat shrink tubing on the other end of the short wire and attach the terminal. Or use a regular cable splitter, which must be rigidly attached to the body.
Installation check
Check all connections carefully. The relay and splitter must be securely attached to the housing. After making sure that everything is in order, check that the ignition switch is turned to the off position and connect the battery. Using a tester, measure the voltage on the unconnected battery. Place the negative terminal on the corresponding battery terminal and measure the voltage again. If it hasn't changed, then everything is fine. If it drops by at least 0.5 volts, turn all electrical appliances on and off, including the ignition system. If the voltage does not rise, disconnect the battery and look for a short circuit. If everything is fine, turn on the switch and measure the voltage on the battery again. After making sure that everything is correct, measure the voltage at the cigarette lighter contacts. If everything is in order, you have successfully completed the job.
Source
How to properly remove the cigarette lighter on a Lada Granta - Motorist's Guide
The presented photo report will show how to remove the cigarette lighter on a Lada Granta in order to replace or repair it. You will also find out why the cigarette lighter fails.
Why does the cigarette lighter on the Lada Grant fail?
One of the main reasons for the failure of the Lada Grant's cigarette lighter is a short circuit, which can occur due to a failure in the vehicle's on-board network or due to wear of internal elements. Also, removing the cigarette lighter on the Grant is also necessary to replace a burnt-out diode (light bulb) for lighting the socket.
Which cigarette lighter to buy
If you are unable to find an original Granta cigarette lighter , then an excellent alternative would be a spare part manufactured by catalog number DA5100F0109
How to remove the cigarette lighter on a Grant
First of all, as when working with any component of a car's electrical equipment, you need to turn off the power to the battery and only then proceed to remove the cigarette lighter. Carefully bend the edges so that the plastic protrusions do not interfere, and release the metal cylinder. Then you need to remove the center console of the torpedo.
Video of removing the Granta center console
How to properly remove the cigarette lighter on a Lada Granta