04/20/2021 6,425 Starter
Author: Victor
One of the main components of the ignition system is the starter. If problems arise in the operation of this mechanism, the car owner may encounter difficulty starting the engine or the impossibility of starting it at all. For what reasons does the starter not click or turn, what to do in such cases? The answers to these and other questions are given below.
[Hide]
The design of the starter and the principle of its operation
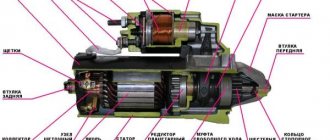
Structurally, the starter unit on a car includes the following elements:
- The device body or the electric motor itself. Made in the form of a cylindrical mechanism. Excitation windings and cores are installed inside the electric motor.
- Anchor device. This element is made in the form of an axis made of alloy steel. A core is installed on the anchor device, as well as collector plates.
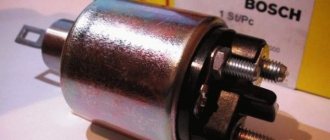
- Traction relay. Used to supply voltage to the electric motor of the starter assembly from the ignition switch. The traction relay is also designed to push out the overrunning clutch. This element is equipped with power contacts, as well as a movable jumper.
- Bendix or overrunning clutch with drive gear. It is made in the form of a roller device that transmits torque to the flywheel crown through a meshing gear. When the engine is started, Bendix disconnects the drive gear, as well as the crown, which helps preserve the starter assembly.
- Brush device. Used to supply current to the collector plate elements of the anchor mechanism. Brushes are used to increase the power of an electric motor when the starter assembly performs its main operating cycle.
On most starter devices, the design is similar; all units, without exception, are equipped with the elements described above. The differences are usually minor and relate to the mechanism for automatically releasing the gears. In addition, on vehicles with automatic transmission, the starter unit is equipped with additional windings. They are used to prevent the powertrain from starting when the transmission lever is in any mode other than neutral or park.
Components of the starter assembly
The entire operating process of the device goes through several stages:
- Connecting the drive gear to the ring gear.
- Starting the starter mechanism.
- Disabling the flywheel and drive gear.
The entire operating cycle of the car starter device is short-term; this unit is not used when the car is driving, but is used only for starting the internal combustion engine.
The operating principle of the starter mechanism looks like this in more detail:
- The driver turns the key in the ignition switch to the start position. Current transfer begins from the battery to the lock, and then to the solenoid relay.
- The Bendix drive gear meshes with the flywheel.
- The gear engages, which leads to the closure of the electrical circuit and the supply of voltage to the electric motor.
- The power unit is started. At the moment when the revolutions of the latter are higher than the revolutions of the starter unit, the overrunning clutch will disconnect the drive gear from the shaft of the electric motor.
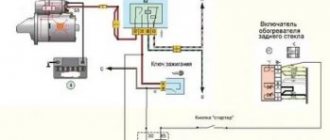
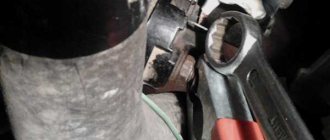
Connection diagram of the starter mechanism using the example of a VAZ 2101
Starter
There are several reasons for this behavior. In order to understand the reasons in more detail, you need to know the starter design and operating principle. It consists of an electric motor, on the shaft of which an overrunning clutch with a drive gear is installed. In everyday life, the clutch and gear are called bendix. The design also includes a starting relay with a solenoid. This design is called a “traction relay”. It is connected to the clutch by the starter activation lever.
This design works as follows
. When turned on, the electric motor begins to rotate the bendix. At the same time, the traction relay, having activated, moves the overrunning clutch forward using a lever.
As a result, the gear meshes with the teeth of the flywheel and spins the engine. After the engine starts, the overrunning clutch is activated. This protects the starter from damage. When the power supply to the device is turned off, the relay stops working and the starter bendix returns to its original position. Passenger car starters usually use a roller-type overrunning clutch.
There is only one reason for the grinding noise at startup. For some reason the Bendix cannot fully engage the flywheel. Therefore, when starting the starter, a grinding sound of skipping teeth occurs. This problem needs to be fixed as quickly as possible. Otherwise, the flywheel and starter gears may be damaged. You need to check the following points:
- First, check the starter mounting. Sometimes vibration can cause the mounting bolts to come loose. In this case, the starter becomes warped and the gear loses full contact with the flywheel. In any case, remove the starter and check the condition of the bendix;
- Sometimes the problem can be caused by gear wear. In this case, the starter's performance decreases. When starting the engine, you will hear the grinding sound of the bendix moving around. Over time, the starter will not be able to turn the flywheel at all. After removing the part from the machine, you can see the gear wear with the naked eye;
- Sometimes the Bendix does not move well along the shaft and simply does not reach the flywheel. In this case, remove it. You need to coat the shaft with any motor oil (5w30 or 5w40 or whatever you have on hand). Also check the operation of the traction relay.
These are the main causes of a grinding noise at startup associated with this particular part. Most often you will find the problem somewhere in the starter.
A crackling sound when starting can also occur due to problems with the starter's power supply. It appears when the positive wire is loosened. If there is poor contact, a spark discharge occurs, which is what produces a crackling sound. Check the wire. Tighten it if necessary.
Flywheel
. The cause of the grinding noise may be in the engine. If the flywheel teeth are worn too much, they cannot form full contact with the starter gear. As a result, you can hear an unpleasant grinding noise. It is advisable to replace the flywheel. Otherwise, wear on the bendix will increase and you will have to change it regularly.
Since we're talking about the flywheel, read our two materials on this topic:
- “Pros and cons of a lightweight flywheel”;
- “Independent replacement of a dual-mass flywheel with a single-mass one.”
Roller mounting bolt (timing)
. Sometimes the timing drive pulley may come loose. At the very beginning of this process, a grinding noise is observed immediately after the engine starts. After warming up everything goes away. It is recommended to tighten the bolt properly. This problem often occurs on the tenth VAZ family.
Conclusion
. A faulty motor can make a variety of sounds. Therefore, it is important to know the main causes of these phenomena. At the same time, drivers are often frightened by the simplest things and ask why crackling and grinding noises are heard when starting the engine. The answer to this question is quite simple. In most cases, the cause of these unpleasant sounds is the starter, or rather its elements.
Source
Why doesn't the starter turn?
The rotation of the motor shaft comes from the starter, which is a DC electric motor. If it does not work, then you need to find out the cause of the breakdown of the starting system.
Low battery
The most common situation that car owners encounter is a low battery charge. When the voltage source is discharged or breaks down, the starter does not turn, the retractor does not click, which does not allow the engine to start.
When the charge is low, the starter does not work and the following symptoms appear:
- Turning the key does not start the engine. The starter unit does not make clicks or other sounds, and the device does not spin up. To diagnose the battery, you can try to activate another energy consumer. We are talking about optics, a car radio, a stove or interior lighting.
- The indicator lights on the control panel go out after turning on the ignition. Clicking sounds are also heard indicating that the starter relay is activated.
- The starter unit makes several clicks, and the indicator lights on the control panel go out or their brightness decreases.
Diagnostics of battery operation can be carried out using a tester or a load plug, an example of testing with a multimeter:
- The ignition is turned off and the hood of the car opens. The terminals must be cleaned, as poor current transmission may be due to oxidation of the contacts. For cleaning, it is better to use a toothbrush or fine-grained sandpaper. You must act carefully so as not to damage the top layer on the clamps.
- The clamps are disconnected. Wrenches are used to loosen the nuts on the contacts.
- A visual check of the battery housing is carried out. Battery malfunctions are often caused by damage to the case and leakage of electrolytic solution from the battery.
- If there is no damage, unscrew the caps on the battery banks. The presence of liquid inside the device is checked. If the electrolyte does not completely cover the jars, you need to add distilled water to the battery.
- The next step is to directly diagnose the battery voltage. The multimeter probes are connected to the battery terminals. When the engine is not running, the operating voltage parameter should be from 12.5 to 13 volts. You can diagnose the battery with the power unit running - it should be from 13.5 to 14 volts.
The battery technician spoke in detail about diagnosing a car battery using a multimeter.
If the battery voltage is more than 14.2 volts, then the battery is discharged and the generator device has to operate in enhanced mode.
To restore charge, the battery must be charged, and it is important to maintain the load current on the device. The charging procedure is carried out using starting-charging equipment; the task usually takes at least eight hours to complete.
Alarm problems
Sometimes it is impossible to start the car, the starter does not turn on, the battery is charged, the electrical circuit is fine. There is a possibility of malfunction of the immobilizer and alarm system. The nature of the breakdown does not depend on the make of the car and the year of its manufacture. In this case, you need to find out which model of anti-theft system is installed on the car.
This is interesting: Antifreeze leaked: causes, diagnosis, solutions
A characteristic sign of a problem in the immobilizer is that the starter does not rotate, the engine does not start, and there are no relay clicks. Sometimes it happens like this - the car starts up, but immediately stalls. The engine may not respond to starting from the key fob or key. If at least one of these signs is present, then the starting system is blocked by the alarm.
Starter failure
It is not often that there is a problem with starting a car engine due to a malfunction of the starter itself. It is impossible to see the breakdown from the outside and you cannot do without a full inspection. Identifying the problem and fixing it usually takes a lot of time, money and effort.
Here is a list of the main breakdowns that occur in a starter device that has been in use for more than 15 years:
- Identification of a short circuit that caused the failure of the coils. A sign of a problem is smoke from the housing, the smell of burnt wires.
- Wear of the retractor relay parts, disruption of the bendix action. The starter does not connect to the engine flywheel and does not start it.
- Complete wear or breakage of the bendix teeth. The device is unable to start the engine.
- Burnout of electrical connections in the starter housing.
In many cases, it is not possible to repair the starter yourself. To do this you will have to contact the experts. But repairs will be carried out in the workshop if the bendix or solenoid relay is faulty. If the winding burns out, you will be advised to purchase a new starter.
But often starter breakdowns can be solved yourself. For example, drivers sometimes mistake a broken ignition switch for a faulty starter and buy a new one. Therefore, before repairing, you need to carefully check everything and find the exact cause.
Modern cars use special monitoring systems, making it difficult to check and find faults yourself. The operation of the starter is controlled by an electronic unit, so if it breaks down, it is recommended to contact a specialized service center.
The starter armature is jammed.
The author of the article has encountered such a malfunction several times, but, as a rule, the brushes immediately become unusable and, without analysis, you will not be able to distinguish between armature jamming and brush wear.
If, by some miracle, the brushes hold up, then when you turn the key to the start position, you will hear a very loud click, and then, for a while, all the devices will go out (you may feel a specific smell)! Burning out of the mass manifests itself in exactly the same way!
In any case, the car will not go anywhere on its own. It is necessary to carry out diagnostics and use a tow truck/tug to proceed to the repair or parking area.
The starter brushes are worn.
The malfunction manifests itself in the same way as burning of the contact coins (loud clicks when turning the ignition key), the only difference is that when the brushes wear out, the starter will never rotate.
It is checked in the same way when bridging the contacts of the solenoid relay with a screwdriver.
The ignition switch is faulty
If the ignition switch does not work, this can be determined by the following symptoms:
- The starter unit is not functioning. The device does not make clicks and the relay does not operate. This problem is caused by a lack of power that must pass through the switch device.
- The electrical equipment installed in the machine does not function. Electrical appliances may not be connected to each other, for example, a stove and interior lighting. But activation of the equipment occurs as a result of the functioning contact component of the ignition switch.
- If the driver moves the key in the lock, some electrical equipment and devices may turn on at a certain position of the key. This indicates that the contact elements have closed and the power supply to the equipment has been restored.
All causes of malfunctions in the operation of the ignition switch can be divided into two groups - mechanical and electrical. Malfunctions in the operation of the lock always occur as a result of its incorrect installation or rapid wear of the components.
Malfunction of electrical components
Electrical problems usually occur due to overload of devices and equipment installed in the machine, the contact component breaks. With additional installation of lighting devices and other consumers, the ignition switch may not be able to withstand the increased load. Due to the increase in load, carbon deposits form on the contact component and appear on the metal part.
To prevent overload of the switching device, additional electrical equipment must be connected to the electrical circuit via a relay. The presence of this element will relieve part of the load. Problems in the electrical component of the lock may be caused by a short circuit in the electrical circuit. This malfunction is typical for all domestically produced cars; it is considered their “disease”.
The Auto Electrician HF channel spoke about diagnosing the ignition switch, checking electrical faults and ringing the device.
Mechanical failure
Mechanical malfunctions of the ignition switch include wear of the contact tracks or the contact elements themselves. The problem may be physical damage to one of the component components of the device. Also, the cause is often considered to be overheating of the contact elements and the plastic case; melting leads to the inoperability of the mechanism. To determine mechanical problems with the ignition switch, you will need to dismantle the device.
Diagnostics of the switching device is carried out using a multimeter or voltmeter:
- The negative cable is disconnected from the battery; a key is used to disconnect the wire from the clamp.
- The plastic upholstery around the steering column of the car is being dismantled. Depending on the car model, the dismantling procedure will be different. Usually, to remove the trim, it is enough to unscrew the bolts connecting the two parts of the trim to each other.
- The plug connected to the device is disconnected from the machine's power supply. The wiring harness is removed from under the control panel.
- The key is installed in the switch. It is necessary to rotate the control element to all available positions. You need to stop in each of them to use a tester to diagnose the resistance between the contact elements of the wiring. To check, the multimeter is switched to ohmmeter mode.
- If the test shows that the resistance value is 0, this indicates that the contact elements of the lock are working properly. When the operating resistance parameter corresponds to infinity, the contact components are non-working and must be replaced. If the resistance value is measured in numbers, this indicates burning of the contact elements.
- To diagnose the functionality of the backlight, you need to apply a direct current of 12 volts to the contacts. The example is considered on a Lada car, so current is supplied to components numbered 2 and 6 located on the connector. If the indicator light does not light up as a result of the action, this indicates a fault in the wiring or damage to the cable.
- If diagnostics show that some of the contact elements are faulty, it is necessary to completely replace the contact component.
This is interesting: What to do if the cigarette lighter in the car does not work
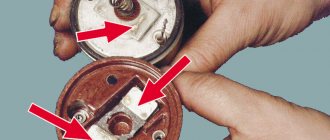
Solenoid relay malfunction
When the battery is sufficiently charged and the alarm is turned off, but the engine does not start, the starter is faulty. If you hear metallic clicks when you try to start, then this is the work of the solenoid relay. It is faulty because it makes a knocking sound, the flywheel and bendix do not engage with each other and do not start the engine. You can check this failure of the solenoid relay and start the engine by closing two relay contacts with a screwdriver or wrench.
Attention! Before the procedure, you need to put the gearshift lever in the neutral position.
If the engine starts, then it is necessary to repair or replace the solenoid relay. The contacts, which are made in the shape of nickels, can burn in it. Drivers often believe that they cannot be repaired and can only be replaced. But temporarily the nickels can be restored. To do this, they are cleaned with sandpaper and installed in place. However, they have a protective coating that is removed by sanding. Therefore, after some time the procedure will need to be repeated.
Other reasons
There are other reasons for starter failure; here are some of the most common ones.
- Brush wear. Because of them, starting the motor is impossible, or operation will not always occur.
- Short circuit of windings.
- The rotor shaft is jammed due to bearing wear.
- Bendix teeth wear.
- Freewheel slipping. The device drive needs to be replaced.
- The drive moves along the shaft thread with great force. To fix the breakdown, you need to disassemble the starter, wash and lubricate the threads with engine oil.
- The stator has permanent magnets that can come off. To resolve the issue, you will need to disassemble and glue the magnets into place.
- The return spring on the retractor relay has slipped.
- Broken or deformed bendix fork. The repair consists of replacing the fork or bendix assembly.
Slow rotation of the crankshaft can occur for the following reasons:
- Engine oil is too thick. This happens in severe frost. The lubricant needs to be replaced to match the temperature.
- The battery is low. There is not enough energy to rotate at the required speed. More often this happens in winter, and the battery needs to be charged or replaced with a new one.
Sometimes the problem is that when the engine is hot, the starter does not operate, but when the engine cools down, everything is fine. This is due to the installation of the wrong size bushings. Their diameter is chosen smaller than required. When heated, the bushing holes become smaller and the starter shaft jams.
Common starter problems
The main problems, as practice shows, lie not in mechanical failures, but in electrical ones.
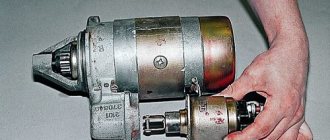
Disassembled starter
- If the car does not start, then the battery . The starter is powered only from this electrical device. When the battery does not produce the specified voltage, you may not even hear clicks. If there is a tester in the car, the battery charge is monitored. In this case, the multimeter can be replaced by simply turning on the headlights; an experienced driver will understand the approximate state of charge of the battery by their brightness. Especially if when the headlights are on and the ignition is cranked, the brightness noticeably decreases, then the battery will be to a greater extent the fault. You can twist the contact wires on the battery terminals to slightly scratch the oxide film if problems arise from low voltage.
- The traction relay is checked . In addition to direct failure of this element, there may be a problem with the control cable. You can test the element by directly connecting the “positive” terminal from the battery to the starter terminal; by default, a cable with a smaller diameter is attached to it. The operating state of such a connection will indicate that the “weak link” should be looked for in other areas, for example, in the relay, ignition switch contacts or supply cables.
- Poor contact at the connections does not allow sufficient current to flow through the electrical circuit, so it is necessary to check all connections, especially on the power cable. For uninterrupted operation of the starter, a current of about 200A is required. Smaller values will allow you to start only the retractor winding, which causes clicks, but the engine still does not start.
How to start a car - the starter does not turn
If the starter is faulty due to the solenoid relay, then the car engine can be started if the contacts are closed forcibly. This is an emergency measure, but it is sometimes used when there is an emergency.
Let's look at an example of how to start the engine of a VAZ-2110 car.
- Place the gearshift lever in neutral position.
- Pull out the handbrake handle.
- Turn the ignition key and open the hood.
- Remove the air cleaner from its seat and move it to the side to provide access to the starter.
- Disconnect the plug from the contacts.
- Connect the two contacts of the pull-in relay together with a metal object or thick wire.
- If the other components are working properly, the engine should start.
Install the air filter and connect the wires. In many cases, the engine then starts without problems using the ignition key. But the problem has not disappeared, so you need to contact a workshop soon.
There is another method that is suitable for an urgent emergency start. It can only be used for cars with front-wheel drive and manual transmission.
Procedure:
- Raise the car with a jack so that one of the front wheels is suspended.
- Turn the raised wheel all the way.
- Wrap a rope or cable around the tire 3 turns, leaving an end 2 meters long.
- Turn on third speed.
- Turn on the ignition by turning the key.
- Pull the cable sharply, spinning the wheel and running away.
- After starting the engine, place the gearbox lever in the neutral position. You don't have to press the clutch pedal to do this. Wait for the wheel to stop.
- Use a jack to lower the car to the ground.
Attention! The described method requires caution and safety measures. Otherwise, you may damage the vehicle and injure yourself.
This method is similar to starting with a handle on old cars, for example, Moskvich-412, or VAZ-2101. The raised wheel powers the gearbox and then the engine.
Close the starter directly
An example of a launch is considered on a VAZ 2110 car:
- The transmission lever in the cabin is set to the neutral speed position. The parking brake lever is raised.
- The ignition system is activated by turning the key in the switch. The engine compartment of the car is opened, the following steps are performed under the hood.
- The air filter device is being dismantled. It is retracted to the side so that the driver can gain access to the contact elements of the starter assembly.
- The chip that goes to the contact component is turned off.
- Using any metal product, for example, a screwdriver, the contact components of the starter assembly terminals are short-circuited. You can use a piece of cable.
- After closing the contacts, the starter mechanism should begin to rotate, which will lead to the engine starting. It is important that the battery is charged when performing this task.
After completing the action, the chip is put back in place, and the filter device is mounted back. Such steps will allow you to start the power unit in the future. But since the problem remains, it will still have to be solved.
Wheel spin
The implementation of this method is only possible on front-wheel drive vehicles equipped with a manual transmission:
- The car is placed on a jack, one of the front wheels must be suspended.
- The suspended wheel is turned outward until it stops. If it is the left wheel, then it turns to the left, the right wheel, respectively, to the right.
- A cable is wound around the surface of the tire, which is used for towing. If it is not available, a strong rope may be used. It is necessary to wind 3-4 layers, while at least one meter of rope or cable must remain free.
- The gearshift lever is moved to the third speed position.
- The key turns in the ignition switch.
- Then you need to strongly pull the end of the rope or cable, this is done to unwind the wheel. It is not recommended to perform this task while standing in one place; you should take a short run-up.
- If the vehicle's power unit starts, the neutral speed is activated. To do this, it is not necessary to depress the clutch pedal. You have to wait until the car wheel stops.
- Then the jack is loosened and the wheel is lowered to the surface of the ground.
This is interesting: Tightening the cylinder head bolts: order, force
From the pusher
The implementation of the “old-fashioned” method from the “pusher” is performed as follows:
- An assistant will be needed to complete the task. You can act on your own if the car is on a descent.
- The parking brake handle is lowered.
- The key is turned to the ignition mode, the transmission selector is set to the third gear position.
- Then the car must be pushed. If there is an assistant, the driver sits in the cabin and waits until the speed is at least 10-30 km/h. The clutch pedal on the car must be depressed.
- After increasing the speed, the pedal is carefully lowered, while the driver presses on the gas. When the engine starts, you can put the gear in neutral and stop to wait for it to warm up.
Fuses and relays: the main cause of rattling noise
As a rule, a crackling noise under the panel when the ignition is turned on is heard in the area of the car radio or slightly lower. The noise occurs intermittently as soon as the ignition is turned on. The crackling noise can continue even when the engine is running.
The first doubt falls immediately on the electrical equipment inside the instrument panel. Apparently, there are a lot of unnecessary, unnecessary consumers who waste energy.
The car owner is recommended to first check the fusible fuses or, as they are also called, disposable fuses. Then test the thermal fuses, which can be easily reset with a screwdriver.
Next, if the fuses are OK, the relay is checked. You need to touch the relay, shake it in different directions. It is possible that the contacts inside the device are noisy, and wiggling the relay will help restore its operation.
In general, a “black box,” as experienced drivers call the mounting block, requires careful diagnosis during such a problem. It is removed after the positive terminal is disconnected from the battery (this is recommended to do for safety reasons). Then you need to unscrew the self-tapping screw that secures the “black box” to the body and disconnect all connectors from it.
Advice. It would be a plus to mark the connectors with varnish so that during reassembly it would be easy to put everything back together, although the connections were initially made in different shapes precisely for ease of assembly and to avoid incorrect switching.
After the unit has already been removed and freed from the connectors, you should carefully remove all the protective elements. It is important to draw on paper the initial exposure of the protective elements, sketching their amperage and sequence.
Disassembly of the unit is carried out carefully. Use a sharp knife to cut off the corners of the body. After that, pry up the top cover with a screwdriver and remove it.
Attention. Extreme care when working with a “black box” definitely won’t hurt. When removing the cover, strip contacts can easily fall out. If this happens, then their location will have to be determined when assembling the gradations of the dusty areas of the block where they left their mark.
So, the main task of disassembling the unit is to remove dust. Then the elements need to be moved from the black cover to the 3-layer pad.
It is also recommended to pay attention to the shock-absorbing characteristics of the adjacent contacts of the 2-sided lamella. They get upset over time, and due to the non-compact layout, sparking begins, which causes a crackling noise under the hood when the ignition is turned on. It is important to be able to restore the previous, reliable contact. What will it take? Take pliers and remove each lamella in turn, crimping on both sides.
The lamellas can also be heavily oxidized. In this case, they will need to be replaced with unused slats from the same block. You just need to identify the lamellas that do not have fuses and replace them.
It is important to focus on reassembly. The pad with 3 layers must fit into the mounting sockets of the top cover of the “black box” without much effort on the part of the repairman, with light pressure. You also need to make sure that each contact is in its proper place.
Attention. If the contact does not fit into place, then it is likely that the plastic is warped. Due to the short circuit and sparking, it melted. It is necessary to re-clean the plastic bead on the top cover so that the contacts easily fall into place.
After this, you should turn over the typesetting field with the top cover already inserted, adjust the contacts and seat the bottom cover. It can be considered fully dressed only after a click, indicating that the connector seats are in place.
What to do if the starter turns, but the car does not start
Now let's figure out what the reasons are and what to do if the starter is functioning, but the car does not start.
- The fuel pump is faulty. If you cannot hear the fuel pump operating when you turn on the ignition, it means it is faulty. In the cabin, the driver can always hear its sound when turned on. You need to check the fuse, if it is working, then the motor has burned out.
- The engine air filter is clogged and clogged. You need to remove the filter element and inspect it for contamination, and replace it if necessary.
- The carburetor does not work. It forms a poor-quality fuel mixture. In this case, the carburetor must be cleaned and the position of the jets adjusted.
- There is no spark at the spark plugs. Check the ignition to see if there is a spark at the spark plugs. If not, you need to check the high-voltage wires, the ignition distributor or replace the spark plugs.
- The fuel filter is clogged. If it has not been changed for a long time, and you have filled in with suspicious fuel, then it is better to replace the filter.
- The timing marks are set incorrectly. Sometimes when replacing a timing belt, the marks are set incorrectly. It is necessary to check their installation, adjust if necessary, and inspect the condition of the belt.
- The crankshaft sensor has failed. Its wire connector may make poor contact, which prevents the engine from starting. Clean or blow out the contacts in the block or replace it.
The starter is a simple but important device, so its failure leads to a critical situation and prevents the engine from starting. Often problems appear in wires or contacts. Therefore, first you need to check the ignition switch, ground wire, and contacts.
Clicking sounds are heard, but the starter does not turn due to the windings or brush assembly
If the battery, ignition switch, contacts, wiring and starter relay are checked, but it still does not rotate when you turn the ignition key, then the problem is directly in the starter.
In such a situation, you will have to completely remove it from the car, disassemble it and evaluate the possibility of repairs. You can also simply replace the starter with a new one. If you decide to repair the starter yourself, know that the problem with it refusing to rotate under load may be due to:
- Faulty winding, which has a characteristic burnt color and smell;
- A faulty brush assembly, the wear of which is easily determined visually.
Starters are rarely repaired, and such a step should only be taken as a last resort. If it is possible to replace the starter, then it is better to do this than to bother with repairing the winding or brush assembly.
( 408 votes, average: 4.57 out of 5)
Related Posts
Oil in the air filter: why it gets there and what to do
Car cigarette lighter does not work
Inspection and repair
As stated above, a mechanism can break down for various reasons. Therefore, repairs to the car starter must be carried out in accordance with the diagnostic results. Before you repair the starter, you need to stock up on all the necessary tools and a repair kit. A starter repair kit can be purchased at any automotive store. If you don’t know how to disassemble the starter, try using the car’s service manual, but usually there’s nothing complicated about it.
Relay
First of all, car starter repair includes relay diagnostics. When voltage is applied to the positive terminal of the winding, a click should be heard - that sound will indicate that the relay is working, and the bendix of the assembly should move. The connected ohmmeter screen will show the contact closure. If this does not happen, then repairing the car starter comes down to unscrewing the bolts and replacing the relay.
New solenoid relay for cars
Brushes
Repair of truck starters or for passenger cars can come down to replacing the brushes. Replacing the starter brushes is carried out by dismantling the back cover, and even if the brush assembly is not worn out, experts still advise changing it. Disassembling the starter will show that the brushes are located at the rear of the motor, and if one of them breaks, this will lead to the inoperability of the unit as a whole. To dismantle it is necessary to unscrew the terminals and remove the springs.
Stator
Overhauling the starter includes checking the stator; using an ohmmeter, it is necessary to diagnose it for breakdown, and the obtained indicators must be at least 10 kOhm. If the readings obtained are different, then repair of starters of foreign or domestic cars consists of replacing the stator. In some cases, if the car uses a gear mechanism, it may be necessary to replace the starter assembly, since the design features of such a device do not allow it to be repaired.
Rotor
You can repair the starter by replacing the rotor; to get to it, you will need to unscrew the studs that secure the two parts of the electric motor. Having done this, you can completely dismantle the assembly by first removing the retaining ring with the washer. Before replacing the rotor, you need to take the time to check the windings; if there are traces of soot on them, you need to replace the armature. Also check the commutator - there may be a small coating on it, but sometimes a large layer of it makes it impossible to start the mechanism. Do-it-yourself starter repair in this case will involve cleaning the collector using sandpaper.
Next, the mechanical component is checked. If you miss something, it could cause a more serious problem later, so if you are not confident in your abilities, then the only thing that can help you is to replace the starter. In some cases, replacing the starter bushings will help localize the problem. This need rarely arises, but sometimes replacing the starter bushing really helps solve the problem.
Sources
- https://seite1.ru/remontiruem-sami/osnovnye-prichiny-neispravnosti-startera/.html
- https://nahybride.ru/dvigatel/ne-zavoditsya-mashina-starter-ne-krutit
- https://avtozam.com/elektronika/pusk/starter-ne-krutit-vtyagivayushhee/
- https://russia-avto.ru/remont/pochemu-ne-rabotaet/pochemu-ne-rabotaet-starter
- https://life-with-cars.ru/ekspluatatsiya-avtomobilya/sovety-voditelej/starter-shhelkaet-no-ne-krutit-v-chem-prichina/
[collapse]
Troubleshooting
The main load in the operation of the starter falls on the relay. Therefore, when they say that the starter does not click or turn, they mean the operation of the traction relay, which makes characteristic clicking sounds.
These symptoms occur in the following situations:
- the stator or rotor windings are short-circuited;
- the electric motor shaft or bushing is jammed and does not rotate;
- The “mass” of the rotor touches the positive charge of the stator.
Without removing the housing from this electrical appliance, it will not be possible to identify these breakdowns.
The sound heard by the driver is created by the movement of the core between the windings. One of them retracts for fixation, and the second holds the core in a given position. If the tension on the holding one is insufficient, then it returns to its original position. Therefore, each click most often indicates that the core made an unsuccessful attempt to fixate. It is in such a situation that the starter solenoid relay clicks, the starter does not turn, and it is impossible to move away.
You need to know that if the car starter does not start the first time, this does not mean it is broken; perhaps not all systems have “warmed up” to the fullest extent. You must try to turn the key in the ignition again.
Problems other than the traction relay can arise either from burnt contacts, which can be indicated by a characteristic smell, or from a poor-quality connection of the wiring to ground or a discharged battery. “Treatment” is provided individually in each case.