The standard Chevrolet Niva knock sensor is designed to determine the moment of improper ignition of the fuel mixture in the engine. To put it simply, on the Shnivy, the sensor tells the ECU when the mixture is not ignited in a timely manner in the cylinders, which significantly affects the stability of the engine during active operation.
On a VAZ 2131 with an injector, the part is permanently mounted. Carburetor modifications do not have the element.
What are the main elements it consists of?
The detonation controller is a complex assembly containing the following elements:
- connector where the power cable is connected;
- threaded connection to the block;
- sensitive element.
The sensor is made in a closed housing and cannot be repaired if it breaks. If there are any problems, the entire part should be replaced.
Replacing the sensor
If a malfunction is detected in the operation of the knock sensor, the owner of the Niva-21214 must begin repairing or replacing the device. You can perform the procedure yourself by deciding where the sensor is located and preparing the necessary tools before starting work. These include:
- screwdriver;
- wrench;
- 13 mm head.
You will also need to stock up on a new knock sensor.
The procedure for replacing the DD is as follows:
- The car owner places the vehicle in a convenient position for work.
- Turns off the engine and disconnects the terminals from the battery. This is necessary for the safety of further work.
- After this, you will need to remove the wire from the sensor and unscrew the bolt that secures it to the engine. The procedure is performed using previously prepared instruments.
After the procedure for replacing the knock sensor is completed, the owner of the Niva-21214 will need to start the engine several times to check the functionality of the sensor and the entire car as a whole.
First of all, you should pay attention to the symptoms of breakdown that were indicated above. Naturally they shouldn't exist
Based on this, we can conclude that the process described above is not complicated, and to replace the sensor it is not at all necessary to contact a service station. However, in order to protect yourself from possible malfunctions, you should regularly diagnose and maintain all components of the car.
Knock Sensor Errors
From time to time, during diagnostics on a Niva, an error like k0327 may appear. The coding indicates a low signal level from the device. In fact, the problem may arise due to reasons.
- Damage to wiring. The sensor wires are located in close proximity to the motor. Periodically, the braid wears out, which leads to loss of impulse or short circuit.
- Worn or oxidized pads. The sensor connectors may become corroded. A simple cleaning of the terminals with a naphtha or sandpaper will help here. It also wouldn't hurt to additionally crimp the joints.
- Damage to the sensor itself. Everything is simple here - the damaged part is replaced with a new one.
- Program system error. In this case, you will need the help of a qualified technician.
Replacing the sensor
The procedure for replacing the knock sensor on a Chevrolet Niva is quite simple. You need to adhere to the following sequence:
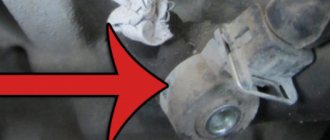
- Find the location of the element on the engine block. And it is located in the middle part of the block; a wire made of a corrugated tube is connected to it.
- Prepare your tools. A 13mm wrench and a screwdriver will be enough.
- For convenience, you need to unscrew the bolt securing the front tube strut in the gun. After carrying out the necessary manipulations, this spacer must be moved to the side.
- Press the latch to disconnect the block from the sensor.
- Using a 13mm wrench, unscrew the bolt that secures the sensor to the engine block.
- Install the new element in reverse order.
It is advisable to check the integrity of the electrical wiring before installing a new sensor to ensure that it is working correctly. Depending on where the knock sensor on the Chevrolet Niva is purchased, its price may vary between 450-650 rubles.
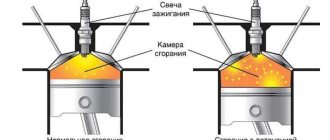
Engine operation is often accompanied by various types of failures. One of these failures is detonation, which involves prolonged engine operation when the ignition is turned off. From the technical side, this occurs as a result of explosive ignition of the combustible mixture in the engine cylinders.
Knock Sensor Circuit Low Signal
1. When a combustible mixture enters the cylinder, it ignites when the piston does not reach top dead center by several degrees. Complete combustion of the mixture is completed when the piston reaches the top point. This is how the normal operation of any internal combustion engine is carried out. 2. The phenomenon of detonation occurs when the piston reaches the middle of the compression stroke. At this moment, the piston receives a counterforce, resulting in reduced engine power.
Problems with engine detonation on a Chevrolet Niva car
If a malfunction is detected in the operation of the knock sensor, the owner of the Niva-21214 must begin repairing or replacing the device. You can perform the procedure yourself by deciding where the sensor is located and preparing the necessary tools before starting work. These include:
- screwdriver;
- wrench;
- 13 mm head.
You will also need to stock up on a new knock sensor.
The procedure for replacing the DD is as follows:
- The car owner places the vehicle in a convenient position for work.
- Turns off the engine and disconnects the terminals from the battery. This is necessary for the safety of further work.
- After this, you will need to remove the wire from the sensor and unscrew the bolt that secures it to the engine. The procedure is performed using previously prepared instruments.
Once this is done, you can replace the old knock sensor with a new one. It will also need to be secured with a bolt (no need to tighten it too much) and a terminal attached.
The final step involves reassembling the car structure in reverse order.
After the procedure for replacing the knock sensor is completed, the owner of the Niva-21214 will need to start the engine several times to check the functionality of the sensor and the entire car as a whole.
First of all, you should pay attention to the symptoms of breakdown that were indicated above. Naturally they shouldn't exist
Based on this, we can conclude that the process described above is not complicated, and to replace the sensor it is not at all necessary to contact a service station. However, in order to protect yourself from possible malfunctions, you should regularly diagnose and maintain all components of the car.
It is advisable to check the integrity of the electrical wiring before installing a new sensor to ensure that it is working correctly. Depending on where the knock sensor on the Chevrolet Niva is purchased, its price may vary between 450-650 rubles.
Sensor check
To check with a multimeter, just follow a simple procedure.
- Remove the sensor from the engine.
- Set the tester to DC voltage meter mode.
- Connect the terminals of the devices in the standard sequence.
- Tap the sensor body with moderate force with a screwdriver or other object.
- During the master’s manipulations, the readings on the device should change (the device is working). If the signal is static, the part is damaged and requires replacement.
Symptoms of sensor failure
As already noted, damage can be determined visually. If the knock sensor is faulty, it will affect the performance of the entire vehicle.
Among the most common symptoms indicating a breakdown in the knock sensor are:
- Reduced engine power. Compared to ordinary situations, it will be quite noticeable. So, for example, when operating a car when transporting goods or passengers, the movement of the vehicle will be difficult, the engine will practically stop responding to the accelerator pedal.
- Increasing the length of acceleration. Basically, this symptom is considered a consequence of the previous point.
- Increased fuel consumption. This is explained by the fact that the engine control unit ceases to control the ignition angle level.
- Smoky exhaust. A large amount of smoke from the car's exhaust pipe can signal a problem. However, such a symptom may not always be associated with a malfunction of the knock sensor.
- The occurrence of detonation effect in the internal combustion engine. A fairly striking sign that should serve as a signal to the car owner about the necessary replacement.
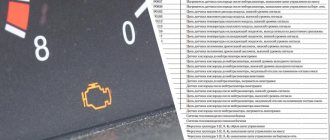
Also, symptoms of a motor failure include a lighted indicator on the dashboard. The “Check-engine” icon can indicate several types of breakdowns, but it is recommended to check the knock sensor first.
What to do in case of malfunctions
Due to the fact that the on-board wiring on the car suffers from low reliability. The DD check must be performed in stages. In the event of a malfunction, you should walk along the entire line, including the sensor, and visually assess its condition. If individual sections of the chain have apparently lost their integrity, they are replaced.
If replacing the wiring does not help, you need to dismantle and check the sensor.
Removing the sensor
Dismantling the device is quite simple. This does not require special tools or deep knowledge of mechanics. The part has one contact group and is attached to the engine block using a bolt with a No. 10 head. To remove it, you need to disconnect the wires and unscrew the fixing screw.
DIY replacement
To install another DD with and without air conditioning, an identical procedure should be followed.
- Place the machine on a level surface.
- Remove the terminals from the battery.
- Allowing the machine to cool down will make the work more comfortable.
- Disconnect the power terminal from the sensor. If the group is worn out or heavily oxidized, it is better to change it along with the sensor.
- Unscrew the fastening bolt and use a screwdriver to remove the damaged part.
- Place a new DD in the seat and reassemble the chain in the reverse order.
There is also a video in Russian on how to change a problematic sensor.
Knock sensor Niva 21214: where is it located, replacement - AutoExpert
...disconnect the sensor connector.
Using a 13mm spanner, unscrew the bolt securing the sensor to the cylinder block...
- ...and remove the sensor.
- In photos 1–3, the exhaust pipe and air filter housing have been removed for clarity.
- Before installing the sensor, clean the surface of its contact on the cylinder block.
Install the sensor in reverse order. The tightening torque of the sensor mounting bolt is 20–25 Nm.
The knock sensor is removed for replacement or when repairing the engine.
- Where is DT located?
- — It is installed in the upper part of the cylinder block, on the right side, in the area of the 2nd and 3rd cylinders (more about this sensor)
- Turning off the ignition...
...disconnect the sensor connector.
Using a 13mm spanner, unscrew the bolt securing the sensor to the cylinder block...
...and remove the sensor.
Before installing the sensor, clean the sensor contact surface on the cylinder block.
How to check the sensor
Connect a tester connected in voltage measurement mode to the sensor terminals. Tap the sensor body against a solid, massive object (for example, a hammer).
In this case, the voltage should change. If the voltage remains constant, the sensor is faulty and needs to be replaced. (More accurately, the serviceability of the sensor can be checked while the engine is running using the DST-2 diagnostic tool.)
In photos 1–3, the exhaust pipe and air filter housing have been removed for clarity.
Before installing the sensor, clean the surface of its contact on the cylinder block.
Install the sensor in reverse order. The tightening torque of the sensor mounting bolt is 20–25 N.m.
1200 rub. for the photo report
We pay for photo reports on car repairs. Earnings from 10,000 rubles/month.
Write:
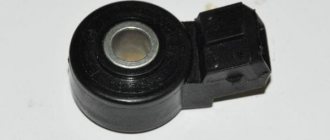
The knock sensor (DS) is designed to detect the occurrence of detonation in the cylinders of gasoline piston engines.
The piezoceramic element of the knock sensor, reacting to vibrations of the cylinder block, sends a signal to the controller.
Lada Kalina ground wire
The controller (ECM), in turn, processes this signal and, in the event of detonation, reduces the ignition timing. In this case, the ignition timing changes for each cylinder separately. This is due to the fact that the temperature of the cylinders, when arranged in a row, is different. The coldest is the first, the hotter is the fourth or last, then the second and the hottest is the third.
From the driver’s point of view, the presence of a detonation elimination system makes it possible, if necessary, to use low-octane gasoline (keep in mind, the controller will assume that you have A-95).
Another advantage is maximum efficiency and excellent dynamic properties when using gas-cylinder equipment.
Indeed, in this case, you can safely set the maximum acceptable ignition timing for starting, without the risk of running into “knock of fingers” (the popular name for the sound that occurs during detonation).
The sensor is mounted on the cylinder block (see photo).
1 — knock sensor on engines 21126, 11194
Knock sensor on engine 21214.
Replacing the knock sensor
Removal
- To replace the knock sensor, first turn off the ignition.
- Then remove the wiring harness block by first pressing the latch.
- Unscrew the fastening bolt with a replaceable head x13 or an appropriate wrench (the head is preferable to prevent “licking the edges”).
Installation
Install the sensor in place so that the connection block is directed towards the free space.
Touching hot engine parts may damage the insulation of the wiring harness. Touching cold elements is a point of chafing due to the natural vibration of the engine in relation to the body.
Try to keep the block “looking” down in case of water ingress. Make sure the pad is clean and dry - the fastening bolt is wrapped in a block and thus connected to ground. Contact between the bolt and the pad through a layer of dirt that has been exposed to oil or water will lead to engine malfunctions.
The fastening bolt must be tightened using a torque wrench with a replaceable head of 13. The tightening torque is 15. 24 N.m. In this case, the correct tightening torque affects the sensitivity of the sensor to engine vibrations. Incorrect tightening leads to malfunction of the motor.
Knock sensor malfunction
The most common fault is “low signal level” code 0327 . With the ignition off, the integrity of the circuits from the sensor block to the controller, and from the block to the sensor, is checked. It’s a good idea to check the tightening torque. If the torque was insufficient and it was necessary, you can restore it and test for the absence of code 0327.
If the circuits are serviceable, the serviceability of the knock sensor is determined. Here are a couple of methods for checking the sensor itself without using special diagnostic tools.
- With the engine idling and the wiring harness block disconnected, connect a voltmeter to the sensor contacts in AC mode. The presence of a signal on the DD contacts indicates serviceability.
- The second method is to remove the DD from the engine. Then a bolt is installed in the sensor hole and a voltmeter is connected to the contacts. By lightly tapping the head of the bolt, the presence of a reaction to vibration is determined by the deflection of the voltmeter needle.
If the circuits and DD are working properly, the fault relates to the controller. When a breakdown of the knock sensor is determined, many drivers recommend using the Bosch sensor from the injection Volga as a replacement.
Source:
Sensors and the nuances of replacing them with your own hands on the famous Niva
Elements such as the VAZ 21214 speed sensor can be replaced without much difficulty. It seems possible to quickly change this and other system parameter determinants and regulators with your own hands. You will learn how to do this from our article.
https://www.youtube.com/watch?v=Ghzz6V5Ht3k
On products of the domestic automotive industry such as UAZ and Niva, various sensors are needed to transmit information to the dashboard. Also, some of them perform additional functions. And each has its own characteristics of dismantling and installation.
Detonation
Knock detector and wire terminal
The phenomenon of detonation is the explosive combustion of fuel in an engine due to glow ignition. SUVs like the Niva suffer from this problem quite often.
A piezoceramic element is installed in the area of the cylinder block - this is the knock sensor. Its function is to transmit a signal to the controller, which will automatically adjust the ignition timing. Thanks to this, the phenomenon will be eliminated. Also, thanks to the sensor, the controller provides a light indication of an emergency situation on the instrument panel.
The Niva knock sensor can be removed using only a screwdriver and a 13mm wrench. Remove the block by pressing the lock, then unscrew the bolt with a wrench.
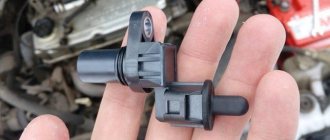
Camshaft
This part is required to determine the angular position of the timing mechanism in accordance with the crankshaft. Information from it enters the engine control system. It is used to regulate fuel injection and ignition.
Experts recommend changing this part every 100 thousand km or 5 years. This is due to the fact that it is subject to constant temperature changes, which negatively affects the operation of the sensor. Unfortunately, it is quite difficult to independently determine its malfunction; this requires an oscilloscope and other equipment.
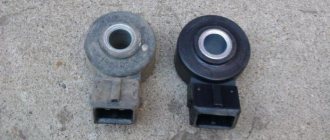
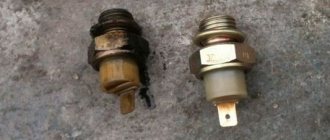
1. Broken knock detector 2. Installation of knock detector 3. Speed detector
Speeds
The Niva 21214 has an electronic, also known as cableless, speed sensor . Its main function is to transmit information about the vehicle speed to the speedometer. You will find this parameter finder on the gearbox, on the rear transfer case cover.
To replace it, you will need to get to the car from below, using a hole or other method.
- Squeeze out the plastic clip and remove the terminal with wires.
- Then use a wrench to unscrew the device. If it doesn't come off, there's no need to pull. The problem is corrosion; WD-40 solvent will help to cope with it; you need to apply it to the connection and wait.
- Install the new part in the reverse order.
Idle move
RXX Niva
The idle speed sensor, also known as the regulator (IAC), is located on the throttle valve.
- A block with wires is connected to it, which is removed by releasing the latch. Then you need to unscrew the two bolts using a Phillips screwdriver.
- Then you can simply pull out the sensor.
- When installing, perform the same steps in reverse order.
Fuel level
This sensor is required to display information about how much gas you have left. In some cases, it becomes unusable and needs to be replaced.
First, you'll need to remove the floor mats and rear seat to gain access to the hatch where the gas tank is hidden. The hatch is a sheet secured with 12 screws. Unscrew them and remove the hatch completely by lifting it up and sliding it forward.
Now you can see the gas tank and fuel pump. Remove the connector from the latter by placing a rag under the draining gasoline. It is better to dismantle by draining 5-7 liters from the tank if it is full.
The sensor is installed in a recess at the top of the gas tank. Disconnect the wire block by pressing the plug, and then remove the sensor itself. Install in reverse order.
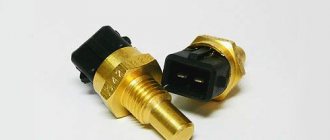
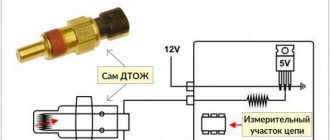
DTOZH
Installation of DTOZH
This sensor is used to determine the coolant temperature. Also, it is its readings that are used automatically to turn on the fan. Thus, the DTOZH and the fan switching sensor are one and the same thing on Niva cars. But on other machines these may be two different parts.
You will find it on the cylinder block. To remove, first drain the coolant. Then, disconnect the wire. The sensor itself is unscrewed with a spanner set to “21”. When installing a new regulator, lubricate its threads with sealant and perform all steps in reverse order.
“VAZ phase sensor replacement”
This video talks about replacing the phase determinant (the author of the video is Ivan Vasilyevich).
Source:
Knock sensor VAZ 21214 injector where is it located
Lada 4x4 (VAZ-21214): Removing the knock sensor
We remove the knock sensor to replace it and when repairing the engine. Disconnect the rubber air supply hose from the throttle body pipes and the air filter housing cover.
Using a spanner wrench or a 13mm socket, unscrew the bolt securing the sensor to the cylinder block.
. and remove the sensor with the bolt. Before installing the sensor, clean the sensor contact surface on the cylinder block.
https://www.youtube.com/watch?v=cjxQwpvtGqk
Install the knock sensor in reverse order. The tightening torque of the sensor mounting bolt is 20-25 N*m.
Source: https://nissan-modus.ru/starter/datchik-detonatsii-niva-21214-gde-nahoditsya-zamena.html