LADA - installation of a rear view camera
Parking camera LADA Priora
Installing a rear view camera on a Lada Priora car
(photo example and connection description)
How to find a connector for connecting a camera?
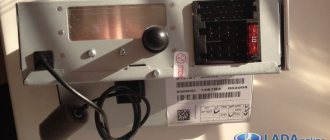
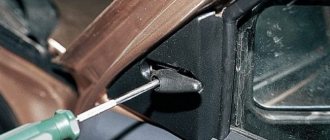
In order to connect a rear view camera, we will need to dismantle the factory radio and find a connector for connecting a rear view camera.
We connect the camera cable to the found connector (marked with an arrow in the photo), and check the PAL NTSC color system to make sure that we have selected the camera correctly.
If you bought the right option, then the image on the standard monitor should be bright and colorful.
How to properly install and configure the camera?
After we have checked the connection, we check the camera's automatic switching function and set up the parking lines.
If the installation is correct, the rear view image is activated automatically, provided that reverse gear is engaged (moving the manual transmission lever to position R).
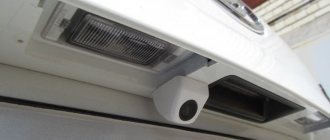
Next, we install the camera itself on the decorative trim of the trunk lid, because In this case, we have a LADA PRIORA SE car in the “LUX” configuration, so we use a chrome-painted camera.
For a car with a different color, you can use a camera to match the color of the body itself.
The rear view camera (parking camera) is connected and installed in the same way on other models of the Lada family: Priora, Kalina, Largus, Granta, etc.
In Novosibirsk, you can buy and install a rear view camera on a LADA car at our technical center “AvanCar”.
For residents of other regions of Siberia and Kazakhstan, there is the opportunity to order and buy through our online store:
Additionally at your service: installation of an alarm system for a Lada car, high-quality car audio, acoustic podiums, acoustic shelves, mechanical locks and anti-theft systems and much more.
SERVICES AND PRODUCTS ARE CERTIFIED!
(retains dealer warranty)
Sincerely, AvanCar Electronics Novosibirsk,
On the AVANCAR website you can always get very detailed information about the new StarLine anti-theft systems, about the various types of services we provide, find useful information in the form of articles and tests, reviews of new car electronics, security systems, and comfort. Where is the high-quality installation of car alarms in Novosibirsk? Read reviews about us and the products we offer. Buy Starline at a discount. Anti-theft system for a car - install an anti-theft system in Novosibirsk Black Bug
Source
How to set up a rear view camera and avoid parking problems
Every driver should know how to set up a rear view camera correctly, because this is the only way he can fully experience all its benefits. The main function of this gadget is to help maneuver the car when reversing in conditions of limited visibility. It turns out that the correct setting also affects the driver’s safety while driving. Well, and, of course, the rear view camera allows you to maintain the integrity of the car’s appearance, preventing unnecessary collisions with obstacles.
Setting up standard MMS
No firmware is required for the radio; you just need to activate the rear view camera. To do this, download the program (To download files you need to log in to the site) and copy it to removable media (USB Flash).
- Go to the desktop (WinCE). On the radio screen, hold down the “Settings” button, then “Exit” and “Desktop”.
- Let's launch the program. My device – USB disk – Folder with the program – Run the CamOnOff file.
- We allow you to use the camera. Click on the corresponding button. We close the program, it and the flash drive will no longer be needed.
By the way, the whole process is also shown in the video:
We check the operation of the rear view camera, including reverse gear.
Let us remind you that some motorists prefer to use parking sensors instead of a camera.
Installing a rear view camera hatchback
How to set up a camera on a radio?
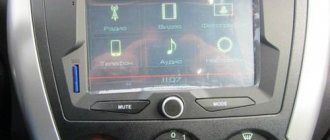
The parameters of the video gadget are adjusted after it has been successfully connected:
- Start the car, turn on the car radio and move the gearbox lever to reverse mode;
- A mirror image of objects behind the machine should appear on the monitor;
- Open the “Settings” block in the audio system menu, find the “Camera” section inside, look for the “Back” sub-item;
- If the picture is upside down or not mirrored, activate the “MIR” or “FLP” options;
- Adjust the eyepiece settings. You need to adjust the car's rear view camera so that the image is as clear and correct as possible;
- Next, adjust the rear view camera on the car according to the angle of the eye. Your goal is to achieve the widest possible picture while allowing for minimal distance distortion;
- The next point is setting up the parking lines of the rear view camera on the car, determining the correct distance from the peephole to each sector of the marking. To do this you will need a wooden beam and a tape measure. By the way, we have a detailed article on this topic;
- Finally, you should adjust the image parameters: contrast, brightness, as well as auxiliary options.
Using this algorithm, you can configure any rear view camera, including a Chinese Android radio. The names of the sections and their location may, of course, differ, but not radically.
Camera installation, connection diagram
For each car model, the work is individual. But there are also a fair number of common actions.
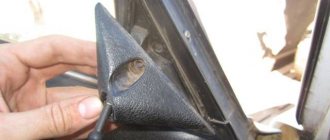
The peephole has already been installed, now you need to run the wiring from the camera to the luggage compartment. The black negative wire is connected to the vehicle ground. Any bolt in the machine body will do for this. It is better to connect the positive wiring to the cable going to the rear light. This will allow you to turn on the camera only when reversing.
Now the wires need to be stretched around the cabin and connected to the monitor. In this case, many will say that a wireless camera is better, but the manufacturer took care and included a sufficient amount of wiring in the package with the video device. Using special connectors, the cable is connected to the camera and display. The screen may have several inputs, so the connection must be made using the appropriate color shade.
Some cars have a special socket in the radio for connection.
How to set up a device on a mirror?
If you purchased a camera kit with a rearview mirror (or with an overhead panel), then the image from the peephole will be displayed on it when moving backwards.
It turns out that the mirror serves as a monitor to display the signal from the camera. If the latter is in sleep mode, it usually plays the role of a reflector.
Let's look at how to properly set up a rear view camera on a car mirror:
- And again, the first step is to make the correct connection according to the diagram from the instructions;
- Look at the mirror. There should be a row of buttons on the bottom or side bar. Typically, “ON/OFF”, joystick (up/down/OK), “Menu”;
- Start the car and put the car in reverse gear. An image with parking lines should appear on the display in the mirror. They should be calibrated or, at least, determined that the distances to the stripes on the screen correspond to real distances;
- Often in such gadgets the optical device is combined with a DVR. Accordingly, in the device menu you can configure the parameters of both devices. The set of options is usually minimal and standard. Just follow the list and set the modes that are right for you (language, date, auto power off, sound, parking monitor, layout, exposure, contrast, brightness, white balance, etc.
How to set up a camera connected to another device?
Well, above we told you how to properly configure the rear view camera on the radio or on the rear view mirror. In fact, the very first thing you must do for this is to connect the device correctly. Well, then find the section with settings in the menu and set your parameters.
Adjusting the rear view camera in a car, as you understand, is not difficult. If your gadget comes with its own monitor or you connect it to a tablet or smartphone, the picture is adjusted directly through them. And again, first, it is important to make the correct connection. Once the image appears on the screen, half the job is done! Next, go to the menu and explore the available functionality.
Your goals are a clear video signal without interference or ripples, display in the correct format (mirrored, not flipped), and correctly calibrated markings.
Source
Installation
Required:
- rear view camera, see AliExpress catalog.
- mini ISO connector (blue block and tulip).
- several meters of wire.
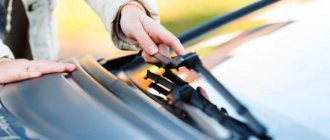
Most often, the rear view camera is placed above the license plate (on an overlay called “saber”). This location is the most favorable from a viewing point of view; the camera is not noticeable and there is no need to remove the bumper. First, remove the trunk lid trim, and then the saber, which is held on by 6 M8 screws.
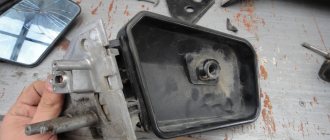
We determine the most suitable place for the camera and drill a hole there. We secure the accessory on the reverse side with a nut.
We route the wires from the camera into the trunk through standard corrugations.
It is more convenient to route the wiring to the front of the car under the rubber seal of the headliner. Then we drag it under the dashboard to the back of the radio. To remove the MMC, you will first need to dismantle the panel cladding.
Choosing a rear view camera for the Priora sedan
In a certain way, the life of a car owner can be made easier by the factory equipment of his iron horse. The thing is that the Lada Priora Lux already includes parking sensors and a multimedia device with an LCD screen for displaying video. In another situation, you will have to purchase them separately: the monitor is mandatory, and the sensors are optional.
The rear view camera is:
- universal, suggesting installation on a number of cars of various brands and body types (sedan, liftback, hatchback, station wagon, etc.);
- oriented to a specific car model, where it is clearly indicated where this device is installed.
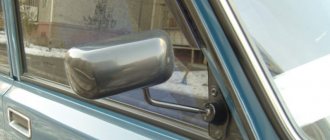
The rear view camera on the Priora sedan can be either black and white or color. Although the b/w option may seem outdated to some, here you can see several clear advantages. This is a lower price and increased picture contrast in gloomy or gloomy weather on the road.
Rear view camera Lada Priora
One camera also differs from another in the resolution of the image displayed on the screen. Resolution is not indicated in pixels in length and width, but in the TVL parameter, a video broadcasting standard that determines the number of horizontal lines from which the picture is constructed. For a car video camera, 400-420 TVL is more than enough.
see also
Comments 42
Does your camera only work in automatic mode? Or can you also watch what’s behind you manually from the radio?
For now it’s automatic, but there are thoughts to try to implement it via a button and a relay
It doesn’t work for me either, only in the automatic when the reverse gear is engaged, but I would like it to be possible in manual too. I haven’t yet found in our radios where the camera’s power is switched minus or plus...
how lovely! and what is it like in operation? doesn't show off?
Well, I’ve only been traveling with her for two days so far - the flight is normal! Very comfortably!
fak. Now I want one for myself too))
Well, that’s right, but for 500 rubles it’s actually a gift, although you’ll have to wait, in our stores they are 3 times more expensive ((
Useful thing) Well done)
I also received the camera and it also lasted 35 days compared to the rest that I ordered from Ali, which took so long. I didn’t take this one, but the one that’s shiny and screws onto the saber, but you need to drill a hole there. Yesterday I installed it, I carefully cut the current for pulling the wire through the lampshade itself with a grinder and cut out the backing for the lampshade from raw rubber and everything became tight. I hadn’t pulled the wires yet, it was already getting dark and there was no garage. I plan to do it this weekend. But I’ll only pull the tulip a + from the reverse to the mashon to the tape recorder, I’ll take it from the bundle running near the right threshold so as not to pull two wires.
With the lampshade - an interesting idea, I also have slight doubts about this sealant, and the wire turns out to be very pinched... And how can you find the reverse wire near the threshold, according to the diagram?
Read also: Toyota Auris automatic owner reviews
Well, anyway, from the camera itself, hook the wire + and - somewhere near the rear light, I’ll see what color it is and then I’ll connect it somewhere closer to the front seat, but in general today I’ll try to dig around according to the diagram, maybe I’ll understand something better there, although I’m an electrician kinda dumb, but somehow I was able to figure it out a couple of times
With the lampshade - an interesting idea, I also have slight doubts about this sealant, and the wire turns out to be very pinched... And how can you find the reverse wire near the threshold, according to the diagram?
Moreover, I’ll tell you a secret, it’s impossible to find a sealing gum for the rear lamp, unless it’s disassembled, so if you redo it, don’t rush to throw it away (I lost mine and couldn’t find it either in the markets or in auto stores) the lamps are sold without rubber bands. So I made it out of raw rubber and it didn’t seem to work. Moreover, I immediately applied double-sided tape along the edge of the saber (I didn’t remove the film from the side adjacent to the door so that it wouldn’t stick) otherwise, because of the saffron milk caps, I had to repaint the back door
Many motorists, in addition to parking sensors, install parking video devices. They allow you to park or reverse without the help of mirrors. An image of the space behind the car is displayed on the monitor or LCD screen of the standard multimedia system (MMS). Most often, a rear view camera is installed on a Priora independently. To do this, you need to purchase either a parking kit or a separate video camera and, if necessary, a monitor.
How to install a rear view camera on a Lada Priora sedan. General tips.
If you have decided on choosing a product, it’s time to find out what difficulties its installation and other installation tips may cause. Advanced offerings stand out because they can transmit information via a Bluetooth wireless network, for example. At a higher price point, they relieve the driver of the burden of running wiring through the rear trunk and vehicle interior. Undoubtedly, this is convenient, but there is a high probability that the camera you buy will be wired.
Installing a rear view camera on a Priora sedan. A short practical guide.
The installation will take place in several stages. In our specific case, it will also be necessary to take into account the presence of the Spark 4-V control module and parking sensors for it, thus the instructions offered below should be the most complete and capacious on the issue under review:
- 1. It is necessary to decide on the installation location depending on the design features of the camera and recommendations for its installation. Very often, the camera is mounted in the bottom under the bumper, on a “saber” (protrusion above the license plate on a Lada Priora sedan) or directly crashes into the bumper.
- 2. The rear bumper of the Priora is removed. In the places indicated in the installation instructions, holes are drilled for the left and right parking sensors and for the rear view camera (it can also be installed under the bumper). When installing sensors, do not forget about the “UP” marker on their body and the recommended tilt angle.
- 3. For routing electrical wiring, a special hole is provided on the left side of the rear apron of the car under the bumpers, closed with a rubber plug.
- 4. The control module with which your rear view camera is equipped can be mounted in a convenient place in the trunk of the car. You route the wiring under the trim along the ceiling through the rubber seal of the lining, through the windshield and rear window pillars and through the dashboard.
- 5. The electrical connection diagram is carried out according to the instructions supplied with the camera. Usually the camera is initialized together with the reversing lights, so the module and camera are powered from them.
- 6. A standard multimedia device Lada Priora sedan will also require an additional CAM ON OFF program installed via USB
Source
Which camera to choose
The appearance of the car after installing the parking device is of great importance. It is influenced by the design of the camera. By type of execution they are divided into:
- Regular ones. The video device is installed in a special place prepared by the manufacturer. It is easy to install.
- Mortise. Mounted in the hole prepared on the bumper.
- Universal. Can be attached anywhere.
- For license plate frame. Unnoticeable and easy to install.
Read also: Chery amulet a15 2007
In most cases, universal models are used. They are easier to install on the Priora hatchback.
The quality of the video device is affected by:
- weather;
- installation location;
- illumination
The device must operate flawlessly in all weather conditions. Precipitation should not affect image quality. On sedans, cameras are installed above the license plate. This arrangement prevents dirt from getting on the lens. The use of products with black and white images gives a clearer picture in low light and is cheaper than with color.