October 23, 2015 Lada.Online 199 657 37
It's hard to imagine a modern car without a rear view camera. If your car does not have this option from the factory, then you can install the camera yourself. The “Lux” configurations of Lada Granta, Kalina 2, Priora cars have similar multimedia systems (MMS), so the process of connecting and setting up the camera is identical. During installation of the camera, there may be differences depending on the type of body (hatchback, station wagon, sedan, liftback), but they are insignificant.
Installation
Required:
- rear view camera, see AliExpress catalog.
- mini ISO connector (blue block and tulip).
- several meters of wire.
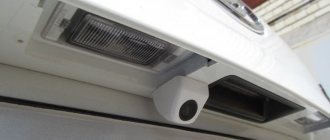
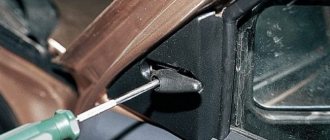
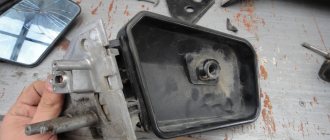
Most often, the rear view camera is placed above the license plate (on an overlay called “saber”). This location is the most favorable from a viewing point of view; the camera is not noticeable and there is no need to remove the bumper. First, remove the trunk lid trim, and then the saber, which is held on by 6 M8 screws.
We determine the most suitable place for the camera and drill a hole there. We secure the accessory on the reverse side with a nut.
We route the wires from the camera into the trunk through standard corrugations.
It is more convenient to route the wiring to the front of the car under the rubber seal of the headliner. Then we drag it under the dashboard to the back of the radio. To remove the MMC, you will first need to dismantle the panel cladding.
Dismantling some parts
- First of all, you should inspect the trunk and find the best entry points for the wires from the device into the car interior. For this purpose, most cars have special additional plugs and can be used for this function. But it is better to run the wires with the wiring already present.
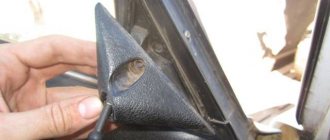
- Next, we decide on the location for installing the “eye” of the video camera. Typically this device is mounted in the license plate light or directly in the bumper. Choose where to connect the rear view camera that is most convenient for you. Sometimes for these purposes it is necessary to thoroughly dismantle the bumper, but you can limit yourself to minimal alterations. For example, remove the plastic strip from the license plate light. In addition, this device can be installed in the license plate frame, because most manufacturers of these parts add special grooves for mounting such devices.
- You will also have to disassemble some parts located in the front part of the car. In order to get access to the electrical wiring and connect the camera to the monitor, you will need to dismantle the bottom of the dashboard, as well as the dashboard. In addition, you have to remove the car radio.
After completing these preparatory work, you can proceed to the next stage of installation of this device.
Connection
General diagram for connecting a rear view camera:
In the trunk we connect the camera to the rear light wiring:
- +12V to green wire (reverse)
- "mass" to black
We connect the miniISO connector to the radio, the location of the wires in the blue block is as follows:
- Ground (outer part of the tulip) of the connector to pin 16.
- Plus (central part) of the connector to pin 19.
It is worth noting that if the MMC was installed on a car in the “norm” or “standard” configuration, then you will need to additionally supply +12V from reverse to pin No. 1 of connector A1 of the radio.
The process is also shown in the video:
Video instruction
A parking camera allows you to park your car more accurately. This technical tool is important for inexperienced drivers to use, so they can control the space behind the car. However, such a camera is standardly installed on premium models, or on some luxury cars. If the car does not have a camera installed, many drivers install the device themselves. However, this process has its own nuances that must be taken into account when installing a parking camera.
Setting up standard MMS
No firmware is required for the radio; you just need to activate the rear view camera. To do this, download the program (To download files you need to log in to the site) and copy it to removable media (USB Flash).
- Go to the desktop (WinCE). On the radio screen, hold down the “Settings” button, then “Exit” and “Desktop”.
- Let's launch the program. My device - USB disk - Folder with the program - Run the CamOnOff file.
- We allow you to use the camera. Click on the corresponding button. We close the program, it and the flash drive will no longer be needed.
By the way, the whole process is also shown in the video:
We check the operation of the rear view camera, including reverse gear.
Let us remind you that some motorists prefer to use parking sensors instead of a camera.
Connecting the rear view camera to the standard MMC display
Car enthusiasts visiting the Lada Granta specialized forum were still able to find the opportunity to install a camera and other devices.
You need to solder to the contacts on the microcircuit, just like the guys who developed the first firmware did. They removed the jumper to connect to the computer. So, on the back of the MMC there will now be a blue adapter - this is the mini ISO input. The deluxe version of the radio already has a blue connector, so you just need a cable with a “tulip” connector, regular terminals and properly growing hands in order to save on assembling the plug. The contacts should be connected like this: “minus” on the tulip to contact C16 from the radio pinout
“plus” on the tulip to pin C19 from the radio pinout
Rear view camera for Lada Granta
A rear view camera is not standardly installed on the Lada Granta, but the manufacturer has made the installation procedure for this option as convenient, simple and cheap as possible.
There is an opinion that a rear view camera is necessary exclusively for beginners who do not yet know how to properly park in reverse. In fact, even experienced drivers cause collisions when reversing, simply because there are areas behind them that are not visible through any car mirror.
Today, installing a rear view camera is quite simple, and the price of the equipment and the installation itself will pleasantly surprise you. Moreover, you can save on work by installing the camera yourself.
Preparation for installation
Before installing a rear view camera on a car, you will need to remove several trim elements of your vehicle. You should start working only if you have at least basic knowledge of electrical wiring. It is especially important to remain calm when working with plastic elements, because haste in this matter can lead to unpleasant consequences.
First of all, you should inspect the “front of work” and install all the latching points, as well as locate all the fasteners. This will allow you to quickly and easily prepare the car for installation of this device using ordinary screwdrivers. In addition, it should be remembered that any work on the vehicle’s electrical wiring must be carried out after the battery has been completely disconnected.
Installing a rear view camera
First of all, we collect all the necessary components:
- Rear view camera (Chinese stores offer a wide range, costing from 500 rubles and above);
- mini ISO connector (with blue block and tulip);
- Several meters of wire.
Next, you need to select a location to install the camera. Much will depend on what type of mount the camera itself will have, but on a Grant, the camera is most often installed in the bumper (above the license plate), if it is an old-style sedan, or in the “saber” (also above the license plate), if it is a liftback, 2021 station wagon, hatchback or sedan. In all cases, the fastening scheme is identical.
Let's consider installing the camera in the trim above the license plate (saber), since in this case the camera is located quite high, it gets dirty less, gives a better overview, and the installation process is as simple as possible, because you do not need to remove the rear bumper.
1) Remove the trunk trim;
2) Remove the “saber”, it is held on by 6 M8 screws;
3) Mark the most favorable place for the camera and drill a hole;
4) Place the camera in place and secure it with a lock nut;
5) We first lay the cable from the camera to the MMC through the standard corrugation of the trunk door (the extra wire fits there with great difficulty), and then we lead it through the cabin.
There are options here, since the cable can be routed along the floor or over the doors. In the first case, it can be passed past the instrument panel, in the second case through the right front pillar. As a result, the wires should reach the back of the multimedia system. But before connecting, you will need to dismantle the cladding, and then the MMC itself, in order to make connecting the cable as easy as possible.
Installation process
After completing the preparatory work, you can proceed directly to installing the parking camera. To carry out installation you must have:
- Drill.
- Screwdrivers.
- Soldering iron, solder and wires.
The whole process can be carried out in three stages. The first step will be to install the camera eye. If the vehicle is equipped with standard installation locations, then you need to remove the plastic plugs and install the device. If there are no places for mounting, then use a drill to drill a hole in the bumper and install the camera there. To fix the device, it is secured with glue.
The second stage involves the laying of “communications”. The wires are “running” through the trunk. Initially, the negative cable is connected to the car body (it can be attached with a small bolt). However, in order for the contact to be good, the attachment site must be cleaned of rust and dirt. The "positive" cable attaches to the taillight wire. This will automatically turn on the rear view camera when using reverse gear. Next, the cable is routed to the front of the cabin. If necessary, the wire is extended. Afterwards, it needs to be secured under the firmware.
The third step will be connecting the camera cables to the monitor, navigator or radio. This operation is performed using adapters. The monitor itself can be secured using double-sided tape. Also, after connecting, you should check the operation of the camera and configure it properly.
Important! All actions to install the camera are carried out with the battery turned off.
Connecting a rear view camera
For Grant, Kalina and Priora cars, the rear view camera connection diagram is as follows:
Explanation. In the trunk:
- Black wire to ground;
- We connect the red wire to the +12V green reversing light.
We connect the miniISO connector to the radio, but we must first connect our “tulip” to it:
- Ground (outer tulip contact) of the connector to pin 16;
- The positive (inner pin) of the connector to pin 19.
If your car was purchased with a standard MMC, then no additional actions will be required at this stage. But for those who independently equipped their car with a multimedia system (it is not available in the “Standard” and “Norma” trim levels), it is necessary to additionally supply +12V from reverse to pin No. 1 of connector A1 of the radio.
How to install and connect
Installing the camera on a car is carried out in several stages. First of all, the installation location is determined. It should provide maximum visibility without distortion. It is better to place the video device in the middle of the selected surface. A shift to one side or the other affects the symmetry of the image.
Most often, the location chosen for installation is under the chrome trim above the license plate. The wires into the trunk are passed through the hole for the license plate light or drilled separately. The connection of the camera on the Priora (+12 V) is carried out from the reversing light chip.
The wires to the monitor are laid under the roof trim or along the bottom of the cabin. Due to the fact that the Priora 2 Lux has a standard MMC, the connection is made through contacts 16 and 19 of the blue chip of the head unit. The video output of the camera is connected to the standard socket of the car radio.
To activate the installed video device, you must download the CAM ON OFF program.
Malfunctions and repairs
In most cases, camera defects are caused by moisture getting inside the case. The malfunction is expressed in loss of image clarity or its absence. In some cases, the device does not turn on. This is often encountered by drivers who have installed products in the bumper.
To repair the video device, you must remove it and check for moisture. If there is fogging on the lens, the product must be disassembled, the water removed and dried. Before installation, the camera body must be treated with sealant. Some experts believe that with such a defect the element needs to be replaced.
If the video device is under warranty, repairs are carried out in a specialized workshop. Otherwise, the warranty will be void.
source
Setting up MMS Lada for rear view camera
Standard MMC does not require additional firmware for the reverse camera. It is enough to activate this function using a special CAM on/off .
1) We write the program to a flash drive using a computer and connect it to the MMC; 2) On the radio screen, hold down the “Settings” button, then click “Exit” and “Desktop”. After this you are taken to the desktop of the WinCE operating system; 3) Go to the “My Device” folder, then “USB disk” and go to the folder with the program; 4) Launch the CamOnOff program file, allow the camera to be used by clicking on the corresponding button; 5) Close the program and desktop;
More details about the process in the video:
6) Engage reverse gear and check the operation of the rear view camera.
Lada Granta Liftback anti-pedestrian grenade › Logbook › Idea! Rear and front cameras
Even during the test drive I noticed that there was NO visibility when moving backwards!
It is extremely difficult to estimate the actual distance to the obstacle! The front bumper is also not doing well. Maybe I’m not used to the size of the car yet, but this doesn’t make the danger of curbs, curbs and other reinforced-concrete-brick-stone elevations any less. It's a shame about the bumper! Parktronic is certainly a good thing, but I don’t have it, and besides, I don’t trust it. I was driving around in a car with tronics and almost got stuck. And again, it’s a shame to drill a new bumper. The idea of installing rear and front view cameras excites me from day one.
Installing a rear view camera only is easy. My “Lux” configuration already has a plug in the radio, but it has no contacts,
ordering a pair of contacts N 103 358 07 on www.exist.ru/ is not difficult,
The cord with “tulips” is left in every house from the old VCR or there is a spare one lying around idle
making an adapter is not difficult.
And the sound fades out when you engage reverse gear, which means that a control signal is already connected to the radio. There is more than one article on the Internet devoted to this, a search will help. And my comrades at DRIVE2.RU have already implemented everything, I looked at the logs of my teammates and learned a lot of useful things!
The essence of my idea is to connect the front and rear view cameras, and turn on the “parking mode” with a button on the panel; for this I bought a foglight button and a block. I think you can take another button, it needs to be turned on)
In theory, when you press the button, “parking mode” and the front camera will turn on, and when you turn on the rear camera (reverse), switch to the rear camera, and when you turn off the rear camera, switch to the front camera again. The “packing mode” will be turned off by turning off the button.
All I have to do is buy narrow male and female terminals, buy additional wires, heat shrink, find cameras, and assemble a switching circuit. It remains to be seen that it is more difficult to come up with a scheme or find cameras. I've already looked in 3 places in the city, only rear cameras. You'll probably have to order from China and wait.
P.S. if you have an idea for a scheme, write, we will think together
source
Video
Another option for installing a rear view camera in the Lada Granta bumper, with wiring on the floor and through the instrument panel:
Did you find the article useful and interesting? Be sure to share it on social networks and join our groups to be the first to receive even more information.
Other useful articles on Grant are already on our website in a special section.
The article uses photos from the Lada Granta Liftback White Cloud logbook.
Preparing for installation
Once the installation location has been selected, it is necessary to prepare the vehicle for installation. You need to remove the luggage compartment trim and find plugs that will allow you to carefully lay the cable into the vehicle interior. It is also worth understanding that installing a rear view camera involves removing some interior elements, as well as partially disassembling the front panel. In some cases, you will have to dismantle the multimedia system in order to install and configure the rear view camera.
Installing and connecting a rear view camera to a standard MMC grants
Summer 2013
I decided to buy and
leave a rear view camera on the car.
It’s not that I really need it, parking sensors are enough for me, but since there is an MMS with a display that supports this function, my hands are itching to do something, my head sits confidently on my shoulders, why not!?
Actually, I bought a rear view camera (I’ll get ahead of myself and say that I ordered a camera with parking lines through Internet. But the camera arrived without parking lines.. The support service suggested I send it to them, then they’ll sort it out and send a new one.. but I didn’t want to stand in line at the Post Office, so I decided to put this one up).
Actually. There is nothing complicated. Previously, I studied the Internet on the topic of installing the camera and began: - downloaded the software and activated the CAMERA ON function on the MMC at the software level (after the reverse speed is turned on, the image on the screen goes dark - i.e. video output paging is turned on);
— prepared the wiring. I took the contacts for the MMC block from the “3.5” disk drive from the computer;
— disassembled the panel to have access to the connection;
— collected all the wiring, and temporarily, for testing, connected the rear view camera (hereinafter referred to as the RVC) to the MMC. I turn on the reverse speed, the video from the camera is displayed on the display. HOORAY! This means you did everything correctly, and you can install;
— prepared the bumper for drilling (made markings). I drilled the bumper with the included drill and installed the camera. in place. I didn’t put it “tightly”, but in such a way that later I could finally set its position.
- ran the wiring. This can be done without removing the bumper; on the left side under the bumper there is a plug through which I ran the wires into the trunk. Next, I laid the wires along the right side of the car, under the thresholds, and then, securing the wiring in the glove compartment area, led it to the MMC.
— I took power to the camera from the wire that goes to the reverse lamp. I screwed the mass next to the taillight.
- all the wire connections (which I made) - camera wiring connection, connection to the power cable, etc. I filled it in with a glue gun.
— the final stage is assembling everything in place (panel, interior trim, trunk).
That's all.
Costs: 1000 rub.
(cost of the camera) 1.5 - 2 hours of leisurely work for everything.
The camera is working properly. Shows the picture wonderfully. Makes parking easier and helps you see what or who is behind the car while moving backwards.
Required tools and materials
Just buying a camera is not always enough. Connecting a rear view camera with your own hands requires additional tools and some materials.
First of all, many car owners forget that before installation, the car and especially the mounting area must be thoroughly cleaned. You can use professional cleaning services or remove dust and dirt yourself. If you skip this step, the mount may not secure properly.
Also, depending on the type of fastening and installation method, you need to clarify what additional parts you will need. It can be:
- self-tapping screws;
- cables;
- adapters;
- cords;
- power supplies, etc.
It is necessary to clarify specifically for the selected rear view camera model. Some manufacturers provide complete kits with all the parts for self-assembly.
Device selection
When choosing a view camera for the Lada Liftback, you need to consider the following characteristics:
- Design. The camera can be installed on the rear bumper or built into the trunk lock cylinder. In rare cases, the device is placed behind the rear window. This installation method may affect the viewing quality.
- A method of connecting to a device that receives information. The rear view camera can display an image on a monitor located on the dashboard or built into the mirror.
- Signal transmission method. It can be carried out via a cable stretched through the car interior or using radio waves. The latter method does not require removing the casing, but the signal quality may decrease.
- Optical system parameters. The viewing angle should be 120…170°. At higher values, the image may be distorted.
- Matrix type. CCD devices provide better visibility at night, but they are slower to read information. CMOS matrices are fast, but they cannot function in complete darkness.
- Color system. All cameras transmit color images. At the output it is converted to PAL or NTSC color index. It is recommended to choose cameras that support both standards.
- Possibility of mirroring. This parameter ensures the correct perception of the image. The function is disabled in most devices.
- Dust and moisture protection. There are 3 degrees of protection, depending on which the device can withstand short-term or long-term immersion in water.
- Photosensitivity. This parameter reflects the ability to work in the dark, it is measured in lux.
- Availability of parking lines. A good camera should overlay a rectangular grid over the image. This helps you better navigate when reversing.
Where to install?
Most often, a rear view camera is installed either on the car’s bumper or in the license plate light. However, depending on the type of camera, it can be installed on some body parts and even mounted in the license plate frame.
Standard cameras, which can be purchased for installation on a specific car model, are already “equipped” with a mounting mechanism. The driver can only secure the device tightly and make the necessary settings. If for some reason it was not possible to purchase a standard device, then you can install a mortise or universal camera. They are attached to the bumper or license plate light. Their advantages include ease of installation, but the disadvantage is the need to drill holes in the body or in the bumper of the vehicle.
Typically, a universal camera is quite noticeable, especially if mounted on the trunk lid. When installing this way, you must remember that the parking camera can be stolen. It is recommended to install the camera in inconspicuous places so that it does not become easy prey for intruders .
Also, some drivers, in order to protect the camera from negative environmental factors, or to protect against thieves, install it in the car interior and attach it to the rear window. This type of fastening cannot be considered effective, since the information displayed on the monitor will be incomplete, which reduces the feasibility of using such a camera to zero .
Where and how to install
The video system installation procedure includes the following steps:
- Choosing a place to fix the monitor. If the owner does not want to display information on the radio, use a folded monitor installed in a random area. The head unit is mounted in the trunk.
- Preparing tools. To install the camera you will need screwdrivers with different heads, sockets with cables and standard adapters.
- Dismantling works. Before installing the camera on the Lada sedan, remove the door sills on the left side, fold the rear seats and remove the trunk trim.
- Wiring. Cables from the central part of the console to the trunk are pulled through the standard place of the radio, the lower part of the dashboard, sills and rear door pillars.
- Parking sensor fixation. You can install the camera on the spoiler; this is done by drilling a hole. The video sensor can also be installed on the license plate.
How to connect
After the camera is installed on the Lada Liftback, you need to make a connection. This is done like this:
- the black cable in the trunk is connected to ground;
- the red wire is connected to the reversing light;
- a standard ISO connector is connected to the radio (a “tulip” is pre-installed on the connector);
- The outer contact of the connector is connected to pin 16, the inner one to terminal 19.
If the car has a built-in multimedia system, no auxiliary work needs to be performed at the connection stage. If the MMC is not included in the package, you need to additionally connect the wire from reverse to the first contact of the car radio connector.
Connecting the camera to the monitor
At this stage, we will look at how to route the cable from the video camera to the monitor through the interior of the car. Most often, this device is equipped with a wire of the optimal length, so it is quite possible that you will find the most aesthetic connection path. Don't forget to secure the wire to the body in several places using electrical tape. This will allow you not to worry about accidental damage to the cable or its getting under the fasteners.
Connecting this wire to a video camera and display will not be difficult, because it is equipped with a “tulip” - a special connector provided for this case.
All that remains is to connect the monitor to the electrical wiring, after which you can install it on the dashboard. To do this, connect the cable with a negative charge (black) to the ground of the machine. This can be done in any convenient place. And connect the positive one to the wire responsible for the operation of the rear light. You can find it under the dashboard, near the gearshift lever. The device display can be attached to the control panel using screws, but it is better to use double-sided tape for these purposes.
Settings
The standard multimedia system does not require firmware. It is enough to launch the rear video review function using a special program. If the car owner installed the view camera with his own hands, you will have to perform the following steps:
- The CAM on/off program is downloaded to a USB flash drive by connecting to a computer. The drive is inserted into the USB connector of the radio.
- On the car radio screen, press the “Settings” button, and then go to the desktop. This provides the user with access to the WinCE operating system.
- Going to the “My devices” folder, find the “USB drive” item. By pressing the select button you go to the folder with the program.
- Run the installation file, allowing the use of the camera. The settings menu is closed.
- Engage reverse gear and check that the video system is installed correctly. Using the appropriate controls, adjust the required parameters.
If the machine is under warranty, the installation of the video system should be entrusted to specialists.
Sources:
https://xn--80aal0a.xn--80asehdb/do-my-self/tuning/tuning-lada-granta/749-ustanovka-kamery-zadnego-vida-na-lada-granta-kalina-priora.html https ://lada-kalina2.ru/tuning/podkluchaem-kameru-zadnego-vida-k-shtatnomu-displeu-mms https://new-granta.ru/kamera-zadnego-vida/ https://www.lkforum. ru/blog.php?b=7922 https://autotuning.expert/parktronik/ustanovka-kamery-zadnego-vida-na-lada-granta.html