- Features of operating heated seats
- Basic principles of heating operation
- How to repair broken heated seats
The total duration of cold months in the Russian climate can reach six months or even more, so it is quite natural that such a thing as heated seats (at least the driver’s seat) inevitably ceased to be a luxury and appeared on domestic cars. However, like any electrical system, this option can fail over time, so if the VAZ 2114 heated seats do not work, you should take care of solving the problem as soon as possible.
Heated seats VAZ 2114
How to repair heated seats in a car? 3 causes of breakdown and repair methods
How to repair heated seats?
Surely many of us have asked a similar question. Usually it all starts with the fact that one fine day we accidentally come across this problem. It is quite unpleasant to encounter such a nuisance in the cold. The reasons for this breakdown can be completely different, including strong pressure on the seat cushion. To identify a breakdown, the first test can be carried out directly in the car, but as happens, if the problem is not in the fuse, you will have to disassemble the seat. So it will be much more convenient to remove the chair and move it to a place convenient for you, where you can sit comfortably and do business.
About the pros and cons of heating
The following can be added to the piggy bank with a positive effect:
- Combating occupational diseases of drivers, especially truckers. We are talking about chronic colds, kidney problems and hemorrhoids. Discomfort is especially felt when the driver sits on a cold seat covered with leather covers. This is during slight cold snaps. And if the car spends the night in the parking lot even in winter, one can only imagine the mood of the driver, who knows what awaits his butt!
- Interim conclusions can be summarized as follows: heated seats mean comfort and disease prevention.
Now about the negative. Medicine is not enthusiastic about heated seats and warns of possible negative consequences. The luminaries focus users' attention on possible diseases such as:
It is recommended not to abuse this function. Drivers whose seats are covered with fabric may suffer most from excessive use of heating. In addition, doctors and specialists strongly recommend using an additional sensor to prevent excessive heating. He must independently turn off the system after a certain period of time.
Content
How to repair heated seats? It is absolutely clear to all of us that not every owner of a heated car has the time and desire to troubleshoot problems. Many, faced with this problem, simply let it take its course, and with the onset of cold weather, they scold themselves for the lack of desire to fix the breakdown in a timely manner. It's good if the car is still relatively new. Then we just need to take it to a service center under warranty, where everything will be quickly fixed.
What to do if the car ages?
Or is heating simply not provided for your car, but was installed as an addition by a person long forgotten by you? In this case, it is enough to find an understanding electrician. Perhaps it will be your neighbor, relative, or a specialist at one of the service stations.
Anyone who understands this matter will be able to quickly identify and fix the problem, while charging a relatively small fee.
Let's look at the main reasons for this breakdown.
Fuse
We place our main hopes on it, since replacing it will not be difficult. First, you need to be firmly convinced that this is where the problem lies. To know the truth, just look at him. Most often, in modern cars, fuses are made of transparent plastic. Looking through it, you will see a thin wire, which melts when broken and this is clearly visible to the naked eye. It will be enough to select a suitable fuse and replace the burnt one with it.
Switch
This is a fairly common problem. The first step is to remove the connector from it (a slight wiggle and pull down is enough), then you need to press out the stoppers that are interfering with us with a screwdriver and the switch will be released. We measure the indicators between the extreme contacts. If the resistance is the same, you will have to disassemble it, this will not be difficult.
Inside we will see a board with contacts; a “slider” will move along them and close the necessary ones. This is what provides different resistance. Most likely, it will be enough to clean them from contamination
and work will resume.
To check if the worst thing has happened, you need to remove the heating connectors. This can be done either without removing the chair, or by removing it and all the upholstery that is in the way. Here everyone comes up with a more preferable option for themselves. How to repair heated seats yourself in this case? In my opinion, it’s easier to disassemble the seat and calmly get down to business, but I don’t want to stress so much without being 100% sure.
To do this, you need to remove the connectors themselves from the gap between the back and the pillow (by sticking your hand in there). When the connectors are outside, be sure to “ring” them. If there is no resistance, it means there is a break. Only after this we remove all the upholstery and look for the problem area.
Causes of malfunction
Heating of car seats is carried out from electric heaters, which are built into its structure (in technical foam rubber).
The nickel heating element with a cross section of 1.5 mm is not covered with reinforcing braiding (it has only one), which under some circumstances leads to its malfunction.
Common causes of failure of the seat heating system:
- Excessive load on the side surfaces of the seats (lower part), leading to deformation and rupture of the heating element.
- Damage to the wiring from the outer frame of the seat. This is due to defects in the design of the seats by the manufacturer.
- The heating system fuse has blown. The cause of the malfunction may be a voltage drop in the network.
- Output from standing temperature sensor relay. A possible reason is a manufacturing defect.
- Malfunction of the heating system power supply. The problem may occur due to a manufacturing defect.
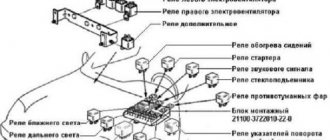
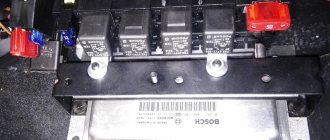
Fuses under the hood
There are 2 fuse blocks in the engine compartment. One is on the battery, the second is next to it. See the video for more details.
Main block with fuses
General scheme
Designation (for 1st generation)
| F10 - 30A | Components of the electronic control system for a gasoline engine: ignition coils, solenoid valves, oxygen concentration sensors, injectors, heating system elements, fuel pump, electronic thermostat; diesel engine: solenoid valves, heating system elements |
| F20 - 10A | Electronic thermostat, fuel control solenoid valves, turbocharger pressure control solenoid valve (diesel engine), coolant level sensor (diesel engine) |
| F19 - 15A | Oil vapor heater (1.4 l 16V and 1.6 l VTi 16V), canister solenoid valve (1.4 l 16V and 1.6 l VTi 16V), oxygen concentration sensors (petrol engine), air cooling system solenoid valves ( diesel engine) |
| F18 - 15A | Right headlight (low beam) |
| F17 - 15A | Left headlight (low beam) |
| F16 - 10A | Left headlight (high beam) |
| F15 - 10A | Right headlight (high beam) |
| F4 - 20A | headlight washer |
| F2 - 15A | Sound signal |
| F10 - 10A | Diagnostic connector, directional headlights, air flow sensor (diesel engine), particulate filter additive pump (diesel engine) |
| F21 - 10A | Vehicle speed sensor circuit, ABS/ESP ECU |
| F7 - 5A | Engine cooling fan relay power supply, Valvetronic relay switch (1.4L 16V and 1.6L VTi 16V), turbo cooling (1.6L THP 16V), air flow sensor (1.6L HDI 16V) |
| F12 - 10A | Power steering ECU, automatic transmission, coolant level sensor |
| F8 - 30A | Low/high speed windshield wiper |
| F14 - 25A | Starter switch |
| F3 - 30A | Turbo pressure solenoid valve |
| F13 - 10A | Peugeot 308 front and rear window washer fuse |
| F11 - 40A | Power supply to the intelligent switching unit (“+” from the ignition switch) |
| F1 - 40A | Air conditioning fan |
| F5 - 20A | Power supply to the engine ECU, unit injector solenoid valves and EGR exhaust gas recirculation system (on the 2.0 L HDI 16V engine), injectors (on the 2.0 L HDI 16V engine) |
| F6 - 15A | Canister solenoid valves, electric pressure reducing valve (1.6 L THP 16V engine), oil vapor heater (1.6 L THP 16V), diesel fuel heater (1.6 L HDI 16V) |
Designation (for 2nd generation)
- F1 Power supply to the engine ECU, pump injector solenoid valves and EGR exhaust gas recirculation system (on a 2L HDI 16V engine), injectors (on a 2L HDI 16V engine) - 20 A
- F2 Sound signal - 15 A
- F3 Windshield washer - 10 A
- F4 Headlight washer - 20 A
- F5 Canister solenoid valves, electric pressure reduction valve of the turbocharging system, oil vapor heater, diesel fuel heater (on a 1.6 l HDI 16V engine) - 15 A
- F6 Vehicle speed sensor circuit, ABS/ESP ECU - 10 A
- F7 Power steering ECU, automatic transmission, coolant level sensor - 10 A
- F8 Starter switch - 25 A
- F9 Diagnostic connector, adaptive headlights, air flow sensor (on diesel), pump for supplying additive to the particulate filter (on diesel), exterior mirror drives - 10 A
- F10 Electronic engine control system components (gasoline: ignition coils, solenoid valves, oxygen sensors, injectors, heating system elements, fuel pump, electronic thermostat; diesel: solenoid valves, heating system elements) - 30 A
- F11 Air conditioning fan - 40 A
- F12 Low/high speed windshield wiper - 30 A
- F13 Power supply of the intelligent switching unit (“+” from the ignition switch) - 40 A
- F14 Peugeot 308/308 SWTurbocharge pressure solenoid valve - 30 A (Peugeot 308 CC Not used)
- F15 Right high beam headlight - 10 A
- F16 Left high beam headlight - 10 A
- F17 Left high beam headlight - 15 A
- F18 Right high beam headlight - 15 A
- F19 Oil vapor heater (1.6 l VTI 16V), canister discharge solenoid valve (1.6 l VTI 16V), oxygen sensors (on gasoline engines), air cooling system solenoid valves (diesel) -15 A
- F20 Electronic thermostat, fuel control system solenoid valves, turbocharger pressure control system solenoid valve (diesel), coolant level sensor (diesel) - 10 A
- F21 Power supply for engine cooling fan relay, Valvetronic relay control (1.6 L 16V), turbo cooling (1.6 L TFIP 16V), air flow sensor (1.6 L FIDI 16V) - 5 A
Battery cover block
Description for 1st generation
Scheme
Purpose of fuses
| F1 - 15A | Transmission (sequential or automatic) |
| F2 - 15A | Diagnostic connector, daytime running lights |
| F3 - 5A | Dual function brake contactor |
| F4 | Reserve |
| F10 - 80A | Electric power steering pump |
| F9 - 70A | Heating control unit (diesel engine) |
| F8 - 100A | Switch and protection system block |
| F7 | Reserve |
| F6 - 30A | Electric pump for sequential gearbox |
| F5 | Valvetronic electric motor (1.6 l THP 16V) |
Maxi fuses
Description for 2nd generation
Scheme
Purpose
F1 - Not used. F2 - 5 A Dual function brake contactor. F3 - 5 A Battery charging circuit processor. F4 - 25 A ABS/ESP solenoid valves. F5 - Not used. F6 - 15 A Transmission (manual or automatic)
Maxi fuses
| MF1* | Not used |
| MF2* | 30A Trailer Switching Box |
| MF3* | 50A Electrical fuse box in the passenger compartment |
| MF4* | 80A Intelligent Switching Box |
| MF5* | 80A Intelligent Switching Box |
| MF6* | Not used |
| MF7* | 30A Heated seats |
| MF8* | 20A Headlight washer |
Removing chairs
In each car and model, this procedure is carried out taking into account the design of the vehicle. Dismantling is mandatory and is explained by the need for correct diagnosis and the quality of subsequent repairs.
- heating switch buttons;
- electrical relays and heating unit;
- heating element.
The procedure for removing the seat (with classic fastening with 4 bolts to the floor):
- The chair moves to the rearmost position.
- The plugs (2 pcs.) are removed from the front parts of the guide rails.
- The bolts under them are unscrewed (2 pcs.).
- The seat moves to the extreme forward position.
- Remove the plugs from the rear parts of the guides (2 pcs.).
- The bolts under them are unscrewed (2 pcs.).
- The seat is removed or the backrest is tilted forward to carry out a “diagnosis” of the contacts of the tens.
- In order to remove the driver's seat, you need to tilt it onto its back in the cabin and disconnect all the connectors going to it (from the Airbag, seat belt sensors, etc.).
- Next, the seat is removed from the car through the front door.
The seat heating does not work, what should I do?
If everything is fine with the switch and the seats are not heated, you need to:
- Check the fuse for integrity; most likely it is located in the interior block.
- Under the seat, check the wiring in the connector for a break.
- Check if power is coming to the seat heating contacts.
If the power comes in, but the heating does not work, then most likely the heating filament has burned out; in almost all cars, the heating mat is divided into the seat itself and the back of the chair, so there will be two connectors.
Next, removing the car seat
- Remove the seat. To do this, you need to roll the chair back as far as possible and unscrew the front fastening of the slide, and vice versa, move the chair forward and unscrew the rear parts of the slide.
- Find the place where the upholstery is attached and remove it. Usually the mount is located at the bottom or side.
- Remove the heating mat (it is attached to the foam rubber with an adhesive backing).
- Glue the new heating element.
- Reassemble and secure the seat in the reverse order.
At first glance, everything is simple. However, this is not so, you need to remove the seats and disassemble it, which is not so easy, and it is possible to repair the failed unit.
The device is complex and is unlikely to be repaired on your own. It is better to entrust the problem and its elimination to the service center technicians - this is one option.
Diagnostic work
- The chips (contact plugs) going from the power supply to the heating elements (2 pcs.) open.
- Use a multimeter (or ammeter) to check the voltage supply to the heaters when the heating button is turned on.
- If there is voltage, then the power button and power supply are working.
- “Ringing” two chips from the upper and lower parts of the seat.
- If one of them does not have a signal indicating the integrity of the circuit, then there has been a violation of the heating element in it.
- If the heaters are working properly, then you need to check the temperature sensor that controls the heating shutdown when the desired temperature is reached.
Repair work
They are carried out in a garage or in a comfortable room with good ventilation and sufficient lighting.
Repair procedure for heated seats:
- All plastic is removed from the seat shell. In some models it is attached to squeezing clamps, in others it needs to be unscrewed using a screwdriver.
- The casing folds back neatly. If it is attached with rings, then you can cut them with pliers or pliers.
- Removing the casing and inspecting the heating element (wire).
- If a burnt or burned-out wire is detected, it must be extended by soldering on both sides into the circuit.
- The spliced section is laid in thermal insulation and then in its place.
- Determining the cause of a wire break. If this happened due to pressure from the seat frame, then the contact point should be made as thin as possible using sandpaper or a file. It is recommended to place a thin gasket (rubber or plastic) on top of the wire and secure it with rubber glue.
- The seat is assembled in the reverse order. Instead of rings removed with pliers, you need to use plastic clamps.
Heated seats do not work: how to fix the problem
With the arrival of winter, all vehicle functions related to heating become especially important. It is difficult to imagine a driver who would enjoy the touch of his back to a cold seat. In such a situation, the surface will take a long time to gain temperature, not to mention the enormous harm to health.
Everything is easier with heated seats. It takes no more than a minute to warm up the surface, after which the pleasant warmth penetrates through clothing and reaches the human body. With this option, winter driving causes fewer problems, including for the health of internal organs. But what to do if seat heating is provided, but for some reason does not work? In such a situation, the only correct solution is to repair the faulty unit.
How to repair a heated seat: all methods
Knowing the reasons for the malfunction is already half the success. To avoid wasting time, figure out why the heated driver's seat is not working. There are several main reasons:
- Burnout of the fuse insert.
- Broken circuit inside the heating tape.
- Damage to the switch or control panel. The first one is usually mounted under the car seat.
The problem with heated seats in many cars is their low level of reliability. For the most part, this applies to budget cars, whose manufacturers save on additional options. It is enough to rest your knee on the chair for the seat heating circuit to be damaged. The result is that the device does not work.
As for expensive cars, such problems occur less frequently. The reason is the use of high-quality and mechanically resistant heating tapes. But even in these cases, malfunctions are possible.
Checking fuses
The efficiency of seat heating depends on the correct operation of the on-board network. That is why, before carrying out the main activities, it is worth starting with the fuse. Please note that the failure of the latter can be determined by another sign - the absence of light on the switch bulbs. Otherwise, we can draw a conclusion about the serviceability of the part.
So, if the heated seats do not work, remove fuse F33 (rated at -15 Amperes). The fusible insert is located in a block located at the bottom of the dashboard (on the right side). If the bulbs do not light up, replace the fuse.
Where is the best place to start repairing?
A breakdown of the driver's seat heating system is a serious problem, so be prepared for the need to dismantle and disassemble the seat. In the simplest cases, you can do without this, for example, in case of cable damage.
If suspicion falls on the switch, then it will have to be removed. Theoretically, this is possible without dismantling the seat, but, in practice, it is better to remove the seat from the cabin. The recommendation is due to the fact that approaches to the switch are difficult. That is why, when removing a part from a fixed chair, you can damage not only the casing, but also the switch itself.
In a situation where the switching device is not working and needs to be replaced, start by removing the connector. To do this, rock the part from side to side while pulling it down. If it does not give way, do not use excessive force. Some manufacturers provide a special type of fastening that provides an individual approach to separation. Do the following - take a screwdriver, get inside the casing and create a little pressure. Now pull the part until it disengages.
There will be three contacts before your eyes. Between left and right, measure the resistance (the contact in the center is responsible for the light bulb). Please note that the switch contains the following elements - a contact group, a board and a slider. The latter's task is to close the contacts using a resistor.
If, when changing the position of the adjusting wheel, the resistance does not change, check the contacts. It happens that heated seats do not work due to grease getting on them. To solve the problem, just clean the contact group (everything should work).
Checking the heating tape for serviceability
If the described recommendations are followed, but the heated driver's seat still does not work, check the heating element for serviceability. The advantage is that you don’t need to dismantle the chair to do the work - just a little knowledge and skill is enough. The algorithm of actions is as follows:
- Tilt the seat back to its maximum angle.
- Insert your hand into the resulting opening and try to find the fastening of the upholstery in the backrest. As a rule, there are three of them - two in the center (left and right) and one at the bottom.
- Remove the upholstery fasteners.
Once the above work is completed, remove the pair of non-functional heating connectors. If necessary, remove all three devices (do not forget to “unfasten” the latches). Afterwards, check them for serviceability. In the diagnostic process, resistance does not play a key role. The main thing is that it, in principle, exists. During the verification process, pay attention to the following contacts:
- Two on the edges and two in the middle.
- Four per pillow.
- A pair of contacts on the back.
About problems with heated seats
Like all electrical circuits, heating devices have a fuse, and this model has two. One is installed in the mounting block, this is F16
, and the second is suspended under the instrument panel. If the control lights do not light up when you press the heating button, the problem must be looked for in the fuses.
The heating elements are directly switched on by an electromagnetic relay, which is also located under the instrument panel. After it operates, you should use a voltmeter to check the presence of voltage at terminal number 87. If it does not operate, check the relay winding with an ohmmeter, these are terminals numbered 86 and 86, or by installing a new one.
Next, check the presence of power, with the switch on, at the connectors under the chairs; to do this, they are disconnected from the heater wires. The black wire is connected to the ground of the car, and the second wire should have 12 Volts of the on-board network. At the same time, use an ohmmeter to check the resistance of the heating element windings. Most often the problems are located there. Windings and supply wires break or burn.
In some cases, they can be restored, but to do this you will have to remove and disassemble the seat cushions. Of course, these are not all possible reasons why heated seats do not work on the VAZ 2114 and 2115. The article gives directions for finding possible problems in the heating systems, and then you will need the experience and skill of the driver with the electrical equipment of the car.
Do-it-yourself seat heating repair
When winter comes, the issue of heated seats not working comes to the fore. No driver wants to sit on an icy seat and wait for it to warm up from the heat of the human body.
When the seat heating is on, a minute is enough to feel the warmth coming from the heating elements from under the upholstery. But one small breakdown calls into question the driver’s comfort during winter trips.
Before you begin repairing heated seats, you should be aware of the reasons that can cause this malfunction. In general, there can be only three reasons causing heating burnout:
- faulty fuse;
- breakage of the heating tape inside the structure;
- control panel or switch located on the seat.
Unfortunately, in some car models, heated seats are extremely unreliable. This usually applies to budget cars - just step on the seat with your knee and a break occurs. Of course, expensive cars like Jaguar or Lexus are free from such defects, but low-budget Citroens and Renaults often have unreliable heating bands.
Checking the fuses
The normal functioning of heated seats depends on how the vehicle's on-board network works. Therefore, before diagnosing the device itself, you need to check the fuse.
The standard F33 is rated at 15 amps. This device is mounted in a block, which in most cases is installed at the bottom of the panel where the driver’s seat is. If the bulbs do not work, you will need to replace them.
Where to start restoration work
So, be prepared for the fact that the chair will have to be taken out of the car and disassembled. Of course, there are cases when everything can be solved without complete disassembly, but if, for example, the cable fails, this procedure cannot be avoided.
We will repair heated seats that do not work using the example of a Citroën C4 Picasso.
To check the switch you need to remove it. Theoretically, this can be done without removing the chair. But in practice this is rarely possible to implement. The thing is that approaching the switch in many models is extremely difficult. Therefore, if you remove this spare part right in the cabin, you risk damaging the casing and the device itself.
To remove a heated seat switch that is not working, first remove the connector. In most car models, it is enough to wiggle the element a little and pull it down. But be careful, some car brands install unique types of mounts.
To release the stoppers you need to reach inside the casing with a screwdriver. Then apply some force to make the part come out. There will be three contacts here. You need to measure the resistance on the two side ones. The middle contact is responsible for the light bulb.
If the resistance is the same in all positions of the adjustment wheel, check the contacts. Perhaps they got grease on them. In this case, clean them and everything should work fine.
Checking the integrity of the heating tape
Very often, the reason why the heated driver's seat does not work is due to a break in the heating element. You can check the functionality of this part of the structure without removing the chair, but this will require thin and skillful fingers; the algorithm itself consists of the following stages:
- Recline your back as much as possible.
- You need to stick your hand into the gap between the back and the seat.
- Try to find the upholstery fasteners in the back by touch. There are usually these to the left and right of center and one more at the bottom.
- Remove the backrest trim fasteners.
After you complete these simple manipulations, you will need to remove two connectors for heated seats, which does not work. You can remove all three if you wish. Just press the latches first. To do this, just pull down.
Pull out the connectors and check them. In this context, the strength of the resistance itself is not so important. It is enough that it simply exists. During testing you will need to check the following pins:
- two contacts on the back;
- four per pillow;
- two extreme and two middle.
Where is the seat heating fuse located on the VAZ 2114?
The option of heated front seats is provided only in the maximum “four” configuration. If you wish, you can implement a seat heating system yourself. In some versions, wires are installed on the heating grid from the factory. It is enough to purchase the heating design itself and place the heating switch buttons in place of the plugs.
When there is a failure in the system or an increase in voltage in the circuit, the first thing that blows is the fuse. This is the simplest possible problem. To replace a blown fuse, you need to understand where it is located.
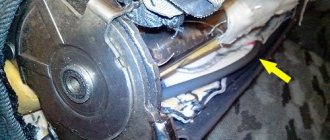
The photo below shows part of the heating grid wiring. The necessary fuse responsible for operation is located in the housing marked in the photo. This housing is located under the panel, next to the hood release handle.
Its power is 10 Amperes. To quickly repair faults, it is recommended to carry a pack of new fuses in the car. Because in the “four” several electrical appliances are connected to one fuse at once, its failure is not uncommon. Having understood where the VAZ 2114 seat heating fuse is located, you can replace it.
The main indicator that the cause of the malfunction is a burnt element is the absence of a signal when the heating button is turned on. During normal operation, the warning lamp should light up. The light bulb itself rarely fails, so this diagnostic method is considered reliable.
If, after checking the factory location, you cannot understand where the seat heating fuse is located on a VAZ 2114, check their presence inside the panel. When interfering with the structure, some place this element in a new place.
If the fuse is in normal condition, it is worth checking the wiring for a break. Due to the rather inconvenient location of all the wiring of the heating structure, its breakage occurs often. The area where all the wires are concentrated is where the driver's accessories are often stored. Over time, the wiring may fray or break completely. Wiring integrity can be checked using a multimeter. It is enough to connect the probes to the wiring and turn on the heating grid. If there is no change in the voltage readings, the problem is in the wiring.
Damage to the “cushion” itself with heating filaments rarely occurs. Because This element is located inside the seat and is hidden from the driver’s eyes; it is impossible to clearly see the damage. The problem is determined by diagnosing other components - circuit breakers and wires. You can also check the power buttons. Due to their location, dirt constantly gets into them, which is why they begin to stick.
How to repair heated seats
To repair heated seats yourself, you will need to remove the seats. In reality, it is not as difficult as it may seem at first. It is enough to unscrew the four bolts and disconnect the connector that secures the chair at the base.
The fact is that the seat belt is attached at one end to the seat, the heating of which does not work. You will have to make some effort to disconnect this device. To do this, it will need to be disassembled.
The plastic seat belt cover is secured with special Torx bolts. They have protrusions, so you will need a special screwdriver to remove them. It is in removing the cover that the main difficulty lies, and when this is done, simply carry out the following manipulations:
- remove the clamping bar;
- press the latch;
- pull out the belt buckle.
After this, remove the elements from the frame. Do everything as carefully as possible so as not to damage the design of the heated seats, which do not work.
To remove the pillow, unfasten the clips on the sides. The lumbar support handle for the heated seats will also have to be removed. Unfortunately, without this procedure the device is unlikely to work.
You also need to remove the handle responsible for tilting the backrest. Once you have separated the non-heating cushion from the chair, you can repair it. The process can be divided into the following stages:
- Remove the top right trim.
- Remove the plastic casing.
- Remove the armrest.
- Unhook the straps holding the backrest in place.
- Remove the headrest fasteners.
- Pull the backrest up.
After you have completed all of the above points, you can work directly with the damaged seat heating element.
After that, simply take the Teflon cable and replace the damaged section. First, do not forget to strip the ends of the wires and treat them with tin. Combine the resulting structure into a twist and put on a special cambric.
When the seat heating repair has been carried out, before reassembling, check that all contacts are working. Only then return the chair to its former appearance. For reassembly, you will need glue; you need to use it to connect the foam rubber.
Every driver can repair faulty heated seats. The main thing is to be patient and take time for diagnosis and dismantling. For a beginner, this procedure can take 5-6 hours, for a professional – about two.
The video shows how to repair the seat:
Why heated seats fail and how to fix it
The problem is as common as it is simple to solve. And in today’s post I propose to talk about the reasons for heating failure and ways to eliminate them. But first, a little theory.
Strictly speaking, the heated seat is a regular filament. Imagine a classic “old-mode” tungsten light bulb and you will understand the principle of operation. The only difference is that the thread is heated not in a vacuum, but in an air environment, but does not become red-hot. Fortunately. What happens when we press a button in the cabin. The circuit is closed to standard car 12 volts, and current flows through the heating filament built into the seat mats, heating it. To make it clearer what that same “thread” is, I will say it more simply - it is an ordinary thin wire in plastic insulation. But the total length and resistance of the chain are selected so that it heats up without burning through the casing, and at the same time, what we sit on it with. Typically, heating control is carried out in two stages. The first is a simple control unit built into the button/rocker/wheel itself, which we point at with our finger. It sets the initial current strength for the circuit, on which the degree of heating of the thread depends. And the second stage is a thermistor located in close proximity to the wiring, in the seat. Its resistance depends on the temperature of the thread passing nearby. Simply put, if the thread begins to heat up above the set value, then this element commands the block in the button to reduce the “pressure”. A kind of local climate control for heating. Now on to practice.