Among the models of the domestic automobile industry, the VAZ 2121 stands out somewhat from the general range not only due to its excellent cross-country ability, all-wheel drive and monocoque body, but also due to the fact that the Niva is the first independent VAZ development that has reached serial production. The car began serial production at the beginning of 1977 and immediately began to enjoy great success among the population not only in the Soviet Union, and later in Russia, but also in many countries both near and far abroad. In its class, an SUV from Russia is considered the most successful model. It found its consumers in France, Portugal, Spain and Canada. And although Niva cars equipped with the French Peugeot diesel engine are in great demand, cars with the domestic 1.6 are also selling quite well.
Body repair
Body repair of a VAZ 2121 consists of several types of work.
Restoration of paintwork
Small scratches and dents that appeared during the operation of the VAZ 2121 can be removed with your own hands and not even expensive. For example:
- scratches are eliminated by polishing the scratched surface, which is done using various abrasive pastes and materials that remove the top layer of varnish and paint, and this smoothes the scratched surface. In cases where the top layer of soil is not affected, complete removal of the scratch is almost guaranteed.
Advice! You shouldn’t be too zealous, since in this case we are removing, not removing, the paintwork, and if you polish one place for a long time and persistently, you can get to the metal itself, and this threatens to cost a lot of money, which will have to include the “car painting” column.
Restoring body geometry
Due to impacts, temperature changes and metal fatigue, the geometric dimensions of the car may differ slightly from those indicated in the operating instructions, which can create unnecessary stress in various connections and significantly reduce the service life of the car itself. Therefore, checking and restoring the geometry of the car is the main step in the overhaul of its body part.
Basic geometric dimensions of the VAZ 2121 body
If the result is negative, that is, when the actual dimensions differ from the reference ones, the geometry is restored by editing (stretching/compressing) the body and its elements.
Smoothing large irregularities and straightening metal
When individual elements are deformed, the metal is straightened by tapping and extruding it. There are two ways here:
- Without subsequent painting;
- With subsequent painting.
In the first case, the repair is based on the principle of metal elasticity. Since every object that has some kind of elasticity tends to return to its original position, this property can be used for your own purposes - the dent is squeezed out with a special tool and then polished.
Before and after renovation
Unfortunately, this method is only available to people with special tools and extensive experience. I'm afraid that do-it-yourself repairs in this case will smoothly lead us to the second type of repair.
- In the second case, the dent is tapped evenly with a hammer or mallet from the inside, while a “fulcrum” with a soft rubberized surface should be placed on the opposite side.
- If the damage has sharper edges or is a completely deep scratch, then the stand is no longer taken on an elastic basis, but like a rigid stand or even an anvil. Tapping is carried out with a nylon or wooden mallet, from the middle to the edges of the dent.
Attention! The damage should be tapped slowly and without using much effort. Strong impacts will only aggravate the situation, since the metal can be flattened and it will no longer be possible to return it to its original state using this method.
In cases where straightening the deformation using the above method is impossible, the damaged part is cut out and a patch is applied by welding or using solder or epoxy glue. Otherwise, the element must be replaced.
Advice! If you still want to tap the part and at the same time try to preserve the paintwork of the element, place several layers of soft fabric between its surface and the stand.
Getting rid of corrosion and rust
Before starting this stage of work, it is necessary to make sure that the end justifies the means. That is, if the part has already been practically eaten by rye, then, as they say: “It’s too late for Vasya to drink Borjomi when his kidneys have failed.” If everything is not so bad, then we choose one of two methods. Method one. We solder the corrosion areas using solder:
- Preparatory stage. We clean the surface of the body, remove traces of corrosion, treat the edges of the holes with flux;
- Tinning. The surfaces of the “wound” and the patch (if any) are covered with a small layer of solder;
When restoring the surface by soldering, the next step can be skipped
- Direct soldering. In order for the seam to be airtight and have maximum reliability, the surfaces being connected must have as large a contact area as possible.
Advice! In order to hide the soldered patch, it should be applied from the inside, then level the surface of the part with automotive putty and paint.
Method two. We seal the corrosion areas using epoxy resins:
- We process the restored surface with coarse sandpaper;
- We clean the surface from particles of abrasive materials, oil particles and dust, degrease;
- We cut out three patches from fiberglass according to a pre-prepared template.
Attention! The patches must cover each other, that is, the first is 25 mm larger than the damaged surface to be covered, the second is 45 mm, the third is 65 mm, respectively.
- The patches are impregnated with epoxy resin and glued one by one to the damaged area;
- The resulting patch is covered with cellophane and taped with tape for tightness (so that the resin does not leak out);
- The entire surface is rolled with a roller until it is given a general shape;
- After 24 hours, the hardened patch can be processed - sanded, primed and painted.
Of course, it is advisable to watch the body restoration work presented above in a video illustrating how to repair the body of a VAZ 2121 with your own hands, but I think the material presented clearly makes it clear the main stages of the repair.
Video 2
Regardless of whether you have chosen a budget or professional elevator, after final assembly it is necessary to conduct test runs . If there are flaws in the installation, or the dimensions are incorrect, it is better to check it away from public roads.
Tuning a Niva 2121 with your own hands, traditionally for the “classic” model range, is a relatively simple process. The result is the creation of exclusive modifications of the all-terrain vehicle, which in appearance, interior and technical characteristics are not inferior to foreign middle-class models. Do-it-yourself car tuning can be turned into a profitable business, and Niva 2121 will become a training ground and will allow you to gain the necessary knowledge and skills.
Major body repair
Due to the specifics of its operation and design, the VAZ 2121 requires increased attention, namely increased monitoring of the condition of the body. In general, if you are the owner of a used Niva, and you intend to use it for its intended purpose for at least another couple of years, carefully examine the condition of the VAZ 2121 body, the repair of which and the strengthening of its individual elements is more a necessity than a precaution. Problem areas that you should pay special attention to are:
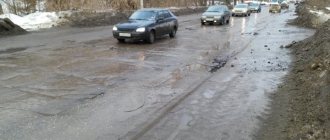
- The bottom, namely its corrosion and through holes in the floor (very often the car overcomes water obstacles without subsequent proper drying);
- Spars, namely for the presence of cracks (consequences of impacts with corresponding metal fatigue).
Cracks in side members usually occur in the area of the fastenings:
- Steering gear;
- Pendulum;
- Engine beams;
- Front shock absorber upper bracket;
- Rear shock absorber mountings;
- Long jet rods to the very bottom of the floor;
- “House” of “Ponara” traction.
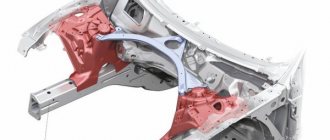
The photos below clearly show the repair of the body of a VAZ 2121, which was in use for only five years.
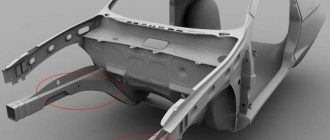
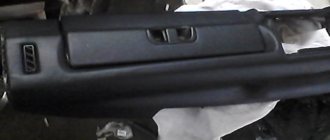
Restoration of the rear part of the front spar
Rear arch before repair
and after renovation
Front spar before repair
New, shiny - just like the real thing
In addition to this, you can expect some other “little things” on the body, namely:
Cracks in the most unexpected places
Complete loss of body parts
and car suspension elements
Since the work associated with restoring and strengthening the body is very labor-intensive and takes a lot of time and effort, the restoration of a car from an economic point of view can be considered profitable only when it is done with one’s own hands. This means that when buying a rotten car, even when its price is mere pennies, it is necessary to take into account the considerable future costs of restoring it. Reinforcement and replacement of parts of the floor and side members are usually carried out with patches of sheet metal 3-4 mm thick.
Ready-to-install spar patches/reinforcers
Ready-made car floor with reinforced side members
Instead of Ponar thrust
A - shaped lever
Preparing for painting
After all the main deformations have been corrected and the welding work has been completed, you can proceed to the final part of the VAZ 2121 body repair. We carefully inspect the body and its elements for dents and chips, which, after preliminary degreasing, are covered with putty. At the moment, the plane of the surface of the car body depends on the quality of the procedure, so it is considered one of the most important stages.
- After we have achieved the original condition of the body surface, we begin to grind and polish it. This process is carried out in stages - gradually replacing materials with large abrasive particles to finer processing with fine-grained sandpaper. Your task is to make the surface of the body completely smooth.
- Apply primer. Primer – leveler eliminates all transitions between putty and metal (fills all pores);
- The last stage of preparation for painting is blowing off dust from the car body, degreasing and drying it. By these actions we ensure maximum connection between the paint and the car body. All that remains is to choose the paint, paint and polish the car.
After perceiving the information presented in this article, it can no longer be argued that repairing the body of a VAZ 2121 and restoring its individual elements is an idle task. This procedure requires certain skills in many branches of plumbing, remarkable patience and ingenuity. This is due to the fact that, even despite all the available power and capabilities of modern technologies, most body restoration work is carried out manually. This is required by its specificity, which directly affects the cost of the work performed. Well, since we do everything with our own hands, we “can handle all mountains”!
Lada 4×4 3D › Logbook › Strengthening the rear of a Niva - part 1 - rotten
In connection with the purchase and the upcoming installation of wheels, I finally forced myself to work on the rear of the Niva. First, I dismantled the floor. He is already hyper tired. A couple of years ago I did the floors in the field, but I bypassed the trunk floor, TK was even then planning reinforcement, and decided that I would replace the trunk floor along with these works.
Secondly, I had long wanted to cut off all the skirts and pockets, they were already tired. That's why I sawed my skirt first
The main pain was the Panhard's house. Once upon a time, and for some reason, they welded linings on it, which rotted, you just had to pick at it with a screwdriver.
The most interesting thing is that the floor lining the lounge itself was still decent and alive, it’s not clear why they cooked this eburg.
Then he started cutting off the floor
Rubbish in one word. I scratched my head and realized that it was finally time to weld a new transverse member, which had been lying in the garage for many years and was left over from this work - www.drive2.ru/l/9245450/
I cut something figuratively with a chisel, it turned out to be very convenient.
Well, the most difficult thing (this is the moral moment) - I cut out part of the old transverse spar
I stupidly didn’t have time to cut out the remains of the spar, and not even a small grinder.
The plans are: 1. Carefully remove the remains of the spar 2. See what’s wrong with the arches, if necessary, weld 3mm steel sheets into the attachment points of the new spar. 3. Weld the beam itself. 4. Cover the bundle of longitudinal and transverse spars with 3mm steel. 5. Cover the trunk floor with 1.5mm steel 6. Weld the subframe, although I haven’t decided on the design yet. 7. Weld the Panhard house struts.
I’ll weld this Lorgeron. Factory.
If there are some not heavy, but really strong subframe structures, I’m ready to listen to advice and look at photos)))
Source
Replacement
ATTENTION! A completely simple way to reduce fuel consumption has been found! Don't believe me? An auto mechanic with 15 years of experience also didn’t believe it until he tried it. And now he saves 35,000 rubles a year on gasoline! Read more"
Today, various companies offer owners of universal all-terrain vehicles to purchase assembled or metal bodies. Accordingly, the price will differ. In addition, a wide selection of colors allows each owner to choose their favorite option.
For example, an assembled body on a Niva will cost about 300 thousand rubles, but a metal frame will cost almost half as much.
Niva bodies are sold in the following colors.
| Colors of VAZ Lada 4x4 3-door | |
| Color | Code |
| Jasper | 140 |
| Snow white | 202 |
| Glacial | 221 |
| Nessie | 368 |
| Baltika | 420 |
| Color range of VAZ Lada 4x4 5-door | |
| Color | Code |
| White cloud | 240 |
| Nice | 328 |
| Quartz | 630 |
| The Snow Queen | 690 |
How many?
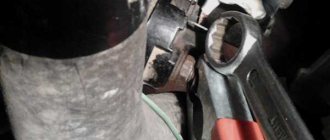
Together with the work on the body, replacing the rear part of the muffler, replacing the silent block of the lateral stability lever, everything came out to 13,150 rubles.
Strengthening the side members -
How much of this word). While repairing the body of the Niva, it was time to repair the front of the body. At first glance, the spars were in good condition.
That's all for now. Good luck to all!
Repair
Of course, minor defects that appear during operation of the 2121 are not at all a reason to replace the body. These defects can be easily eliminated with your own hands, saving on expensive specialist services.
Scratches, for example, can be easily and easily removed by polishing. Several types of grinding compounds and materials are used that effectively remove the top layer of paintwork and smooth out perfectly worn areas of the body.
Note. Complete elimination of the scratch in such cases is guaranteed, unless, of course, the outer layer of the paintwork is completely damaged. And in general, you shouldn’t overdo it during the polishing process either, because in this case you can achieve the opposite effect, which will lead to a mandatory painting procedure (more costs).
Body repair also includes geometry restoration. Curvature of the frame and its components occurs not only due to impact, but also due to temperature changes and metal aging.
However, it is highly recommended not to follow the operating instructions thoughtlessly. For example, if a book says that the body will last for so many years, you don’t need to believe it, since more active use, extra loads and poor quality of the road surface cause excessive tearing in individual joints, reducing the service life of the vehicle.
Note. Diagnostics and restoration of the geometry of the automobile frame is the main and mandatory phase in the course of a full repair.
It is recommended to restore the geometry by stretching or compressing the metal frame only in specialized car services equipped with advanced equipment (computer systems), machines, and so on. Unfortunately, it will not be possible to carry out competent editing on your own.
On the other hand, if after diagnostics it was possible to find out that only some elements of the body are deformed, then by tapping and squeezing everything can be quite effectively eliminated. And in this case, the work can be done in two ways: without painting or with it.
Let's take a closer look at both options:
- The first repair option is based on the properties of steel. For example, every element that has elasticity tends to straighten to its original position. This characteristic feature can be put to good use if you competently, using special tools and technologies, squeeze out the dent and polish it.
Note. Unfortunately, this repair method is available only to a select few - people with extensive experience and a set of special tools.
- The second method is less specific. In this case, it will be enough to evenly tap the part with a hammer from the wrong side, making sure to apply a soft stop on the reverse side.
Note. Tapping is a special technique that needs to be learned. You should not use strong blows, as the steel may flatten.
Another option for repairing the body surface 2121 involves cutting out the deformed surface. This is done in cases where it is not possible to straighten the element using the methods described above. As a result, the body element from 2121 is cut out and a patch is welded.
Finally, if this cannot be done, you can replace a specific body element entirely. For example, this could be a fender, bumper, front panel, and so on.
DIY chip tuning: instructions
Before starting work, you need to make sure whether you can do the work yourself, because one mistake can reset all factory settings and you will have to restore them. Experts advise doing chip tuning at car repair centers or dealerships. If the decision to carry out the work yourself is nevertheless made, then you need to carefully read the algorithm of actions, buy the necessary equipment and deal with it.
- high-quality firmware version;
- special programs for PC;
- microcircuit - ROM 27S256 or ROM 27S512;
- ECU programmer (you can buy, rent or make it yourself);
- K-Line adapter - needed when connecting a laptop to a car port.
Be careful: work can only be done on a working engine.
The procedure is as follows.
- Securely secure the laptop and connect the programmer to it.
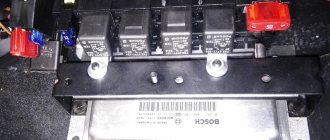
- Remove the ECU together with the bracket.
- Bend the fasteners and remove the block cover. There is a printed circuit board inside.
- The ROM chip can have symbols, but the number of outputs is 28. First you need to mark the first pin with a marker, then carefully press the top and remove the chip. Then you can install a new chip, without allowing any distortions.
- Close the cover and install the control unit in place.
- To reconfigure, connect the laptop to the diagnostic port.
- Turn on the ignition and install the engine calibration program in accordance with the instructions. This usually takes half an hour. Then turn off the ignition and all equipment.
- After five to ten minutes, start the engine. It started up calmly, which means everything was done correctly. If a failure occurs during the procedure, you must immediately turn off the ignition and wait 5 minutes. Then repeat everything again.
Tuning a VAZ 4×4 allows you to modify the car in different ways: from an off-road “monster” to a nice city car. This is an opportunity to make your vehicle unique and stand out among the monotonous stream. The main thing is that everything should be in moderation.
Body reinforcement 2121
To protect himself from problems, a caring driver uses preventative measures. These, in addition to anti-gravity treatment and other procedures, include strengthening.
All operations related to strengthening and restoration of the car body are very complex, take a lot of effort and time, but give an excellent result.
When it comes to upgrading the body, strengthening the side members comes first. It is often carried out using a steel sheet up to 3-4 mm thick. At the same time, the suspension fasteners are strengthened.
Let us immediately note that strengthening the side members in front is more important than ever if stiffer shock absorbers, springs and larger wheels are installed on the Niva. It is also recommended to do this after installing power bumpers and winches.
Algorithm for strengthening the side members on 2121
Here's what we recommend:
- First you need to provide access to the spar. To do this, the car is driven onto an overpass or lift, and the wheel is dismantled.
- Next, remove the caliper and unscrew the clamp from the top of the support.
- A knot is knocked out under the lever by hitting a hammer or using a machine.
- The shock absorber fasteners (upper and lower) become loose.
- The brake system cylinder is hung on the hoses.
- The upper arm is removed, as well as the cup and upper bump stop.
- The gearbox and steering pendulum are released.
This provides access to the spar:
- Next, the condition of the space for the shock absorbers is checked. If the part is not rusted, then it should be removed.
Note. In order to dismantle the “house” without any problems, you should drill the weld points. The drill is first loaded with a 5-number drill, and marks are made. Then, the weld spots are finally drilled out using a 10-number drill. And one more thing: you can see all the weld points only after a good cleaning of the metal.
- The “house” is removed, and then the entire surface of the spar is cleaned again for the purpose of diagnostics for possible minor defects.
- Thorough cleaning again, because it is the basis of everything.
It's time to make the overlay:
- The part is cut out according to a pattern from cardboard. Everything is precisely marked on paper, including the locations of bolts and fasteners.
- After the layout is ready, you need to put a sheet of 3 mm iron on it and cut it out with a grinder.
Note. It is very important to follow the rule: measure seven times. In addition, the lining must fit tightly to the spar.
- The required holes are drilled on the part and the spar.
- The cover fits onto the bolts and is firmly fixed.
- Then the part is welded semi-automatically around the entire perimeter.
- The “house” is put in place and also welded.
At the final stage of work, it is necessary to cover all working surfaces with anti-corrosion agent. In this case, mastic is ideal, as it dries in one day.
Lada 4×4 3D “Grandfather” › Logbook › Reinforcement of the rear part. Reinforcement of the rear and side members.
Time passed, “Grandfather” grew stronger and transformed. They painted it in a color that we really liked. (painting) We took a ride, let our souls go! (teaser of the project) And then we felt sorry if in the very first race, our “Grandfather”’s butt joint was torn off... ))
We decided not to leave the garage and start strengthening it. We had a 50x50x2.5 pipe and 3mm sheet metal available.
Initially, they planned to leave the factory side members and make the entire structure inside. Then weld the eye to the central jumper.
When they cut out the trunk floor sheet, we were able to see the right side member. He was finished. We bought new ones at the market. Sold in pairs only. Price 550 rub. We started trying them on, figuring out how we would weld in the new longis.
After some thought, we decided to completely abandon the replacement and make everything from a 50x50 profile pipe. We sat down at AutoCAD. Dimensions of blanks and design, on paper, it turned out like this
We cut out the rotten spars.
We didn't want to part with the back skirt. The rotten parts were cut out. We cut out square holes for the pipes on which the bumper will be attached.
We begin the assembly process. We insert the pipes with the bumper.
Restoring and strengthening the rear skirt
Assembled with jumpers. At the same time, the traction house was strengthened with overlays and gussets.
The structure begins to take shape. “The eyes are afraid, but the hands are doing!”
We tried it on, trimmed and welded the jibs.
In addition to welding the bumper pipes and the structure together, we additionally welded a corner. Was in stock.
Three gussets were welded on top. They will strengthen the entire structure. The pipes are connected to each other.
We took an acidic (etching) primer. Everything was handled well. We took body sealant. We went through all the seams.
It came down to the trunk floor. The sheet had to be modified. Close the recesses from the supports and add strips for welding in the car body.
They grabbed the sheet. Treated with acid primer. The seams were sealed with sealant.
View from below. Connection between the bumper pipe and the entire structure.
After drying, covered with bitumen mastic.
The bottom has been painted. We returned our “stinger” to its place.
In the future, we plan to weld the lugs on the outside of the car. It will be more convenient.
I came across this picture on the Internet. There is a place to be!
The matter is very labor-intensive. Welding, grinder, constant fittings and trimming, cleaning, took a lot of time. I'd like to think it was worth it!
They poured gunpowder into the flasks and stuffed berries into the buttocks of our “Grandfather”))
Good luck to everyone, strength and patience in useful improvements! I hope the post will be useful to someone!
Source
Long road of a long field
LONG ROAD OF LONG NIVA
LONG ROAD OF LONG NIVA
EDITORIAL VAZ 2131 WITH A MILEAGE OF 108,000 KM WAS THOROUGHLY STUDYED IN TOGLIATTI
TEXT / SERGEY KANUNIKOV,
PHOTO / VLADIMIR KNYAZEV, SERGEY MISHIN
In 1995, when a long Niva in the then fashionable “currency” color appeared in the editorial parking lot, such cars were still a rarity. Since then, the Steam Locomotive - this is the nickname given to the VAZ 2131 - has covered a little more than 108 thousand km, exceeding the resource declared by the plant - 90 thousand.
The car worked mainly in the city and on the highway; it almost never saw heavy off-road conditions. According to our observations, such operating conditions are rather typical for the VAZ 2131. The car is expensive, and due to its long wheelbase, the cross-country ability is lower than that of a regular Niva, so for residents of large cities, the 31st serves more as a roomy station wagon than an all-terrain vehicle.
The life history of the Steam Locomotive - almost all the malfunctions that occurred over 6 years and 108 thousand - are in the table. The Niva ended its long journey in its homeland, Tolyatti, where VAZ specialists dismantled and repaired the car.
Engine. The steam locomotive got a healthy heart (VAZ 21213 with a working volume of 1.7 liters). Oil consumption did not exceed the norm, fuel efficiency aroused envy even among owners of short Nivas. In my youth, with imported oil in the transmission, on “kind” tires, the 31st outside the city was 10.5 l/100 km, if you hold the speedometer needle between the “90” and “110” marks.
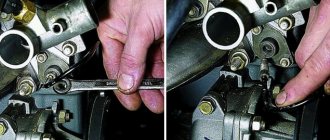
Carburetor repair and replacement of exhaust system parts are mandatory operations. The breaker cover, switch and high-voltage wires, as ordered, were sent to the official resource. The carburetor couldn't reach it. When jamming of the dampers and other failures became chronic, the device had to be replaced.
The engine required its first relatively serious intervention after 100 thousand (see table) - it was time to work on the camshaft drive. Unfortunately, the renovation was carried out contrary to the commandment “do no harm”... but more on that below.
A complete disassembly and examination of the engine at the 109th thousand showed that it was not completely healthy. Apparently, the Niva drank low-quality oil a couple of times: the piston rings became coked and their mobility decreased. A small wear appeared at the ends of the valves: apparently, they stopped rotating.
In my old age (102 thousand km), the engine was almost destroyed by an oversight by repairmen. The pieces of the damper broken by the extended chain were not removed from the pan, and they thoroughly clogged the oil receiver screen. In the last days of life, the emergency oil pressure light went out only when the tachometer needle exceeded 1000 rpm. The insidious plastic, having walked around the engine, left marks on the crankshaft main bearings. However, you don't have to change them for now.
Experts gave the cylinder-piston group a “C”. After thorough washing and replacement of the oil seals that have lost their elasticity, the engine would run another 30 thousand. According to factory statistics, 1.7-liter engines on the Niva with qualified maintenance run 100-150 thousand km. Our unit is a strong middle peasant.
The clutch worked clearly and for quite a long time. The first set (driven disk and release bearing) was changed at 48 thousand, the second set was used another 60 thousand. The original master and slave cylinders, as well as the drive disk, worked the entire mileage without any complaints.
An autopsy revealed a driven disk worn to the point of rivets and a release bearing deprived of lubrication. Both, of course, must be replaced. The “basket” leaves another 30 thousand - an excellent result. In general, the clutch of a short car works well on the five-door model 2131 - of course, when making such a conclusion, we will take into account gentle operation.
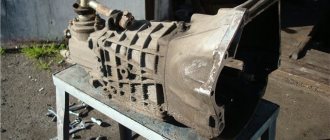
Transmission. Perhaps this unit caused the most trouble. Bearings, synchronizers, gears and shift forks had to be changed at the 48th thousand. At 75, the secondary shaft seal leaked, and soon the fourth gear disappeared again. We sinned: we drove, switching from III to V, and by 108 thousand it stopped turning on.
The plant compiled an impressive list of failed parts: the primary and secondary shafts (wear of the splines), gears and clutches of the third, fourth and fifth gear synchronizers (the ends of the teeth were knocked off), the spring ring of the primary shaft bearing (collapsed), the third, fourth and fourth shift forks fifth gear (maximum wear). After replacing these parts, the box lasts about 30 thousand, and then... it’s easier to buy a new box.
According to reviews of many Niva owners, the unit, which traces its lineage to the VAZ 2101 box, is rather weak for 4x4 vehicles, especially with an extended wheelbase. There are, of course, long-lived units that are lucky with the quality of parts and assembly. The Steam Locomotive Box is not one of them.
The transfer case worked better, although it was not without intervention - at the 48th thousand, the input shaft bearing separator fell apart. The intermediate shaft CV joint bolts were loosened twice. The malfunction does not seem to be serious, but it is unpleasant. The hinge is disconnected and the car can only be moved by a tow.
For the second half of its life, the “razdatka” did not create any problems. Disassembly showed: the unit is absolutely in good working order, except for the rear propeller shaft flange nut that has become loose due to vibrations. Having pulled it up, you can safely drive another 50 thousand.
How to change the thresholds of a VAZ 2110
- To avoid distortion of the car body, place the car on a flat surface.
- Remove the locker, doors (rear and front), driver and passenger seats, car fenders. Also remove seat belts, floor mats, and sound insulation from the floor.
- Protect your car windows with homemade curtains, which can be made from cardboard. This will be needed to prevent them from being damaged by sparks flying from the grinder. Otherwise, black spots will appear on the windows that cannot be removed.
- Remove fusible and plastic machine components from the work area.
- Disconnect the battery to prevent it from being affected by the welding machine.
- Mark the cut lines for the old thresholds. A series of holes with a diameter of at least 4 mm are drilled along these lines , located at a distance of 5-8 cm from each other.
- Using a grinder, cut off the old threshold, part of the bottom damaged by corrosion, as well as the threshold connector at the bottom and top of the VAZ threshold.
- When cutting off the outer sill panel, be sure to leave areas of metal at the front and rear fenders. The length of these sections is at least 5 cm; it is to them that the new panel will be welded later. You should also leave a small area of metal under the B-pillar.
- Continue the repair by scraping the surface where the new threshold will be located using a scrubbing brush, and then treat the surface with a corrosion neutralizer .
- Before carrying out welding work at the stage of installing a new part, first hang the doors to ensure correct installation.
- After installing the component on the car, be sure to treat the surface with an anti-corrosive agent or special primer.
The tool we need is:
- welding unit (the most convenient and simplest option would be semi-automatic welding);
- grinder and 3 discs for the grinder, a hard metal brush for the grinder;
- a set of new thresholds, amplifiers and connectors for the VAZ 2110;
- grinding tool;
- electric drill;
- metalworking tools;
- packaging of automotive mastic;
- 2 medium-sized paint brushes;
- can of primer;
- bottle of solvent.
Preliminary work
Before you begin repairing the side members, you need to do some preliminary work. It consists of preparing the work area and hanging the front of the machine on stands.
It is better to carry out work on strengthening the Niva's side members in an inspection pit or on a lift.
Before starting welding work, remove the floor covering and remove the sound insulation that is adjacent to the engine shield. This is where the pedals are installed.
To do this, you need to remove the plastic trim from the car sills and fold back the trim. In this way, it will be possible to control the absence of fire in the cabin. It is also necessary to release the upper suspension arm. To do this, you need to disconnect the ball joint from the steering knuckle. Subsequently, this will allow you to install the repair part on the spar.
Before work, it is necessary to clean the intended welding areas. This will make it possible to obtain good penetration and will help avoid fire of the polyurethane mastic.
Disadvantage of the design
The main disadvantage of this design is safety. This has been discussed many times in many forums. When struck in the forehead or frontal, the longis should crumple, dampening the force of the blow. With this design, as practice has already shown, the loungers are virtually not deformed and the driver gets hit in the chest or head with the steering wheel.
It is up to the end user to decide. My humble opinion is the following: if the Niva is operated outside the city limits (village, country roads, off-road), this design should definitely be implemented. If this is a clean city or highway (crossover mode), then you should think 10 times. Although my experience in dealing with accidents and personal observations led to the fact that the Niva is an inherently dangerous car.