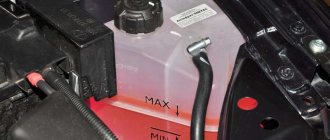
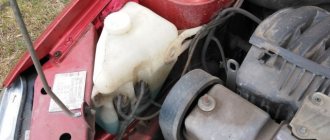
To avoid engine overheating, the owner of a Lada Kalina is recommended to constantly monitor the level of antifreeze in the cooling circuit. For this purpose, there are special marks on the body of the expansion tank. The level should not be below the minimum and above the maximum. If there is a gradual decrease in the amount of antifreeze, then there is a high probability that a fluid leak will appear. In Lada Kalina, such hot spots can be areas connecting pipes to the radiator, tank or thermostat, as well as the pump gasket. In this article we will talk about how to drain antifreeze, as well as how to replace coolant in a car.
Antifreeze and its volume
To fill the cooling circuit in the Lada Kalina with new fluid, a volume of approximately 8 liters will be required. Initially, the manufacturing plant uses the substance “Felix” with a red color. In order to practically replace the fluid, you will need to purchase a 10-liter container with the specified antifreeze or, as an alternative, two 5-liter canisters.
How to fill
- After successfully completing the first part, you can move on to the second.
- We screw the drain plugs back, as well as the plug from the radiator.
- Disconnect the hose from the tank by loosening the clamps.
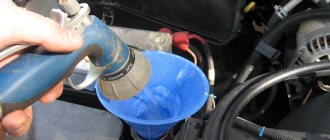
- Fill in the required amount of antifreeze.
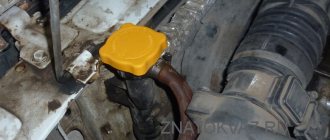
- Reconnect the hose and continue pouring until the liquid reaches the 3 cm mark below the “max”.
- We tighten the cap of the expansion tank.
- Reconnect the terminal.
- Turn on the engine and warm up until the fan turns on. Check the level.
We remove or restore the hoses in place
Done, the replacement in the Kalina car has been successfully completed.
Choices
When choosing, do not neglect the color of the liquid. The color is intended to indicate certain properties of the antifreeze, so replace it only with an option with an identical color.
Recommended brands of antifreeze include the following products:
- “AGA 003Z” (temperature minus 40 degrees), has a red color, costs approximately 1 thousand rubles. for a 10 liter container.
- “Professional Premium” belongs to the “G-12” category, and the cost of a similar “tank” reaches 700 rubles.
- “SINTEC LUX G-12” is also characterized by a red tint and costs from 1 thousand rubles. for a volume of 10 liters.
- “FELIX Carbox-40”, a canister of the same volume with red liquid will cost the owner from 950 rubles.
- "NIAGARA", substance "G12"; for a volume of 10 liters you will need to pay at least 800 rubles.
- “Arctic Circle”, a substance with similar parameters; A 10-liter container costs at least 700 rubles.
Antifreeze from the above-mentioned manufacturers has proven itself quite well, so you can purchase it without the slightest hint of doubt.
Lada Granta rack
How much does the new Lada Granta cost?
Armrest for Grant
Remove air lock Kalina
With the engine running, vigorously compress all the hoses of the cooling system several times in turn, this will help the antifreeze fill the system and expel air from it.
As the coolant level in the expansion tank drops, bring it to normal and screw on the tank cap. When the engine warms up, the outlet (lower) radiator hose should be cold for some time, and then quickly heat up, which will indicate the beginning of fluid circulation in a large circle. After waiting for the cooling system fan to turn on, stop the engine.
If the fluid level in the expansion tank is constantly decreasing, then there is most likely a leak in the cooling system. In this case, it is necessary to check the tightness of the cooling system and eliminate the malfunction (see “Cooling system”).
To avoid engine overheating, the owner of a Lada Kalina is recommended to constantly monitor the level of antifreeze in the cooling circuit. For this purpose, there are special marks on the body of the expansion tank. The level should not be below the minimum and above the maximum. If there is a gradual decrease in the amount of antifreeze, then there is a high probability that a fluid leak will appear. In Lada Kalina, such hot spots can be areas connecting pipes to the radiator, tank or thermostat, as well as the pump gasket. In this article we will talk about how to drain antifreeze, as well as how to replace coolant in a car.
What is needed when replacing?
- A suitable container in which about 8 liters will be collected.
- Socket head size "16".
- A socket-type wrench with dimension “13” for dismantling the starter in the 16-valve motor variation, does not touch the 8-valve motor.
Replacing antifreeze implies a cooled engine; before you begin, you need to know how to drain the antifreeze. Before starting the procedure, it is recommended to reset the pressure level in the circuit, which will require opening the cap on the neck of the expansion tank. For easy access to the drain hole, you will need to remove the crankcase protection.
Design of the Kalina engine cooling system
| The engine cooling system (ECS) is one of the main systems of a car. Is cold air blowing from the stove or is the engine on the LADA Kalina overheating? Then the inspection should begin with this system. In this article you will find all the information on the operation of the Lada Kalina cooling system. |
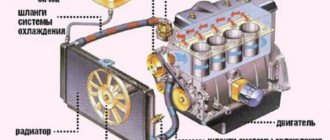
The LADA Kalina engine cooling system is liquid, closed type, with forced circulation. Consists of an engine cooling jacket, a radiator with an electric fan, a thermostat, a pump, an expansion tank and connecting hoses.
Design of the LADA Kalina cooling system
Cooling system: 1 — expansion tank; 2 — radiator outlet hose; 3 - inlet hose; 4 - radiator; 5 — steam exhaust hose; b — radiator supply hose; 7 — electric fan; 8 — electric fan casing; 9 — coolant temperature sensor; 10 — coolant temperature indicator sensor;
11 — throttle assembly; 12 — bracket for the coolant pump pipe; 13 — coolant pump; 14 — coolant pump pipe; 15 — heater radiator supply hose; 16 — heater radiator outlet hose; 17 — exhaust pipe; 18 — coolant pump pipe hose; 19 — thermostat housing
| Expansion tank. Coolant is poured into the system through the expansion tank. It is made of translucent polyethylene, which allows you to visually monitor the liquid level. To do this, the marks “MAX” and “MIN” are marked on the wall of the tank. In the upper part of the tank there is a pipe for connecting to the radiator steam exhaust hose, in the lower part there is a pipe for connecting to the inlet hose. |
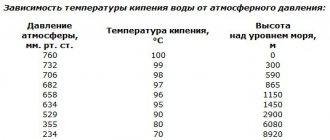
| Expansion tank cap with valves. The tightness of the system is ensured by the inlet and outlet valves in the expansion tank cap. The exhaust valve maintains increased (compared to atmospheric) pressure in the system on a hot engine (due to this, the boiling point of the liquid becomes higher, steam losses are reduced}. It begins to open at a pressure of at least 1.1 bar. The intake valve opens when the pressure drops to system relative to atmospheric pressure by 0.03-0.13 bar (on a cooling engine). |
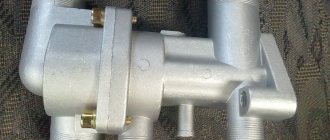
| The coolant pump is a vane, centrifugal type, driven from the crankshaft pulley by a timing belt. The pump housing is aluminum. The roller rotates in a double-row bearing. The bearing is lubricated for its entire service life. The outer ring of the bearing is locked with a screw. A toothed pulley is pressed onto the front end of the roller, and an impeller is pressed onto the rear end. A thrust ring made of a graphite-containing composition is pressed to the end of the impeller, behind which there is an oil seal. The pump housing has a control hole to detect fluid leakage when the pump fails. It is recommended to replace the pump as an assembly. The redistribution of liquid flows is controlled by a thermostat. |
The cooling system consists of two so-called circulation circles:
- The movement of liquid through the cooling jacket and radiator forms a large circulation circle.
- The movement of liquid through the engine cooling jacket, bypassing the radiator, is a small circle of circulation.
The cooling system also includes a heater radiator and a throttle body heating unit. Liquid circulates through them constantly and does not depend on the position of the thermostat valves.
| Thermostat. It has a solid temperature-sensitive element and two valves that redistribute the flow of coolant. On a cold engine, the main thermostat valve blocks the flow of fluid from the radiator and the fluid circulates only in a small circle, bypassing the radiator. At a temperature of (85±2) °C, the thermostat valves begin to move, allowing liquid flow into the radiator and closing the bypass channel. At a temperature of about (100±2) °C, the main valve opens completely and the bypass valve closes. Almost all the fluid circulates in a large circle through the engine radiator. |
| Coolant temperature sensor. To monitor the coolant temperature, a sensor is screwed into the engine cylinder head, connected to the temperature indicator in the instrument cluster. In the outlet pipe, next to the thermostat housing, there is a coolant temperature sensor that provides information to the controller. |
The heater radiator is built into the engine cooling system and is designed to heat the passenger compartment by circulating hot coolant through it.
| The radiator consists of two vertical plastic tanks (the left one with a baffle) and two horizontal rows of round aluminum tubes passing through the cooling plates. The tubes are connected to the tanks through a rubber gasket. The liquid is supplied through the upper pipe and discharged through the lower. Next to the inlet pipe there is a thin pipe for the steam removal hose. The radiator has a casing with an electric fan. There is a drain plug at the bottom of the right tank. |
The fan maintains the thermal operating mode of the engine and is switched on via a relay based on a signal from the controller.
Cooling system: 1 — coolant drain hose from the heater radiator; 2 — hose for supplying coolant to the heater radiator; 3 — coolant pump supply pipe hose; 4 — expansion tank hose; 5 - expansion tank; 6 — steam exhaust hose of the engine radiator;
7 — thermostat; 8 — hose for supplying fluid to the throttle assembly; 9 — hose for supplying fluid to the engine radiator; 10 hose for draining fluid from the engine radiator; 11 — engine radiator; 12 radiator drain plug; 13 electric radiator fan; 14 coolant pump; 15 supply pipe of the coolant pump; 16 coolant drain hose from the throttle body
| Temperature at which the main thermostat valve begins to open, °C | 85-89 |
| Full opening temperature of the main thermostat valve, °C | 102 |
| Opening pressure of the outlet valve of the expansion tank plug, kPa (bar) | 110-150 (1,1-1,5) |
| Opening pressure of the inlet valve of the expansion tank plug, kPa (bar) | 3-13 (0,1) |
| Coolant temperature in a warm engine at an ambient temperature of 20–30 °C and a fully loaded vehicle moving at a constant speed of 80 km/h, no more, °C | 95 |
| Resistance of additional resistor, Ohm | 0,23 |
| Volume of liquid in the engine cooling system, l | 7,8 |
| Coolant (mixing liquids of different brands is not allowed) | OZhK-KHT; OZh-40-ХТ; OZh-65-ХТ; OZH-K Antifreeze; OZh-40 Antifreeze; OZh-65 Antifreeze; OZh-40; OZh-65; OJK-KSK; OZh-40SK; OZh-65SK; Lada-A40; OZH-K Tosol-TS; OZh-40 Tosol-TS; OZh-65 Tosol-TS; Antifreeze G-48; AGIP Antifreeze Extra; GlysantinG03; GlysantinG913 |
Lada Kalina Hatchback 1.4 KALINVAGEN Logbook Muffler failure or sports exhaust Jean, please tell me, is it possible to bleed the same on a 16-valve model? I heard this option that there are some special features in the SOD..
Jean, explain: You pump only in a small circle to the cold one. But can’t the air remain in the large circle when the engine warms up and the air comes in from the large circle again?
Sorry for the modest question: where does the air go during closed pumping under pressure?
I have the same compressor
Ahhh ta ta it didn’t work out for me
CONDITIONALLY I'll take apart the Bugatti too
Hello, is it possible to drain the viburnum like this and expel the air on the 16 valve?
Hello, can you please tell me why after replacing the thermostat cover the car stopped heating up?
Please tell me where the air supplied by the compressor goes? If there is a plug in the heater radiator, will the air escape after bleeding using this method? Is there a possibility of pipe rupture due to the increased pressure in the system created by the compressor?
Well done. Simple and effective. Physics lessons.
We will tell you how best to flush the cooling system of the Lada Kalina-2 in the last chapter. There are several suitable options, but ideally a distillate (chemically pure water) is required. Now let's try to understand how the standard CO is designed and works, cooling VAZ 21116-21126 engines (27). So, in any cooling system there are two circuits - large and small.
This is how the Lada Kalina-2 engine is cooled
The large contour contains the radiator located behind the bumper. The small circuit, in turn, serves to supply coolant to the stove. A unit called “thermostat” is included in both circuits at once, but the valve located in the thermostat can close off the large circuit. In order for this valve to open slightly, it is necessary to heat the coolant to 85 C. An important conclusion follows from this.
The computer of the “second Kalina” learned to display the temperature of antifreeze not so long ago. Therefore, the previous advice will be doubly relevant. We are interested in how easier it is to drain antifreeze from the cooling system. It turns out that there are two screw plugs for this. One of them is screwed into the radiator tank, and the second closes the hole drilled in the engine cooling jacket.
Symptoms, the presence of which indicates deposits in the pipes or other elements of the cooling system, have been known for a long time:
- The cabin stove does not heat well;
- The engine often overheats (although the fan may be faulty);
- The coolant temperature changes over a wide range and does not remain approximately at the same level.
Deposits on the inner walls of the pipes, blockage of the radiator tubes
All tips on how to flush the cooling system of Kalina-2, Granta and any other car can be considered similar. It seems that it is enough to get rid of the old coolant in order to pour a cleaning solution into the system. Then, after starting the engine, you need to wait 20-30 minutes. When the engine has cooled, the solution is removed to replace it with antifreeze. The washing step is repeated several times if necessary.
Interference with vital vehicle systems will void the warranty. However, the warranty period for cars of the “berry” family is three years or 50 thousand km. And the replacement of antifreeze is carried out just after this period, unless it is associated with a breakdown. Use all of the above tips at your own risk.
Coolant replacement
Note that the technology for replacing the refrigerant in versions of LADA Kalina with an 8-valve engine is somewhat different from the sequence of work on variations of 16-valve engines. In the latter case, to provide access to the block drain plug, you will need to remove the starter fasteners. And before work, we’ll find out how to drain antifreeze correctly.
Procedure for 8-valve Kalinas
- We release the pressure in the previously indicated way.
- We dismantle the crankcase protection.
- We place the prepared container under the drain hole (located on the right side of the radiator).
- You can regulate the pressure of the drained stream of liquid by tightening or removing the plug on the tank. We carry out this manipulation, focusing on the situation.
- Having unscrewed the radiator cap, we wait for the liquid to completely drain.
- Now we move to the motor block.
- The drain plug is located under the ignition coil.
- To unscrew the specified plug, we use a 13-size wrench.
- We substitute the same container and collect the remaining liquid into it.
The antifreeze replacement is complete.
How much antifreeze does viburnum contain?
Preface. It looks like the coolant drain is different for 8 valve and 16 valve engines. On 16 valves it is necessary to remove the starter. Step-by-step instructions for 8 and 16 valves. (I have 16 cells, so it will also be useful for 8 cells when we flush the system at 21099).
Lada Kalina: instructions for replacing coolant AVTOVAZ recommends replacing the fluid in the cooling system of the Lada Kalina every 75 thousand km of the car or after five years, whichever comes first. Our illustrated step-by-step instructions will help you complete this procedure yourself.
It is more convenient to replace the coolant when the car is installed on an inspection ditch or overpass.
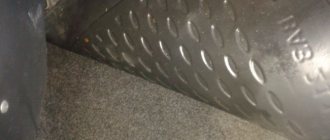
To access the drain holes from below, you must remove the middle mudguard of the engine compartment.
We place a wide container with a volume of at least 6 liters under the drain hole made in the lower part of the right radiator tank. To reduce the intensity of liquid drainage at the initial moment, the cap of the expansion tank should be tightly screwed on.
To increase the intensity of liquid drainage, unscrew the cap of the expansion tank.
Next, you need to drain the fluid from the cylinder block.
To drain the coolant from the cooling jacket of an 8-valve engine equipped with a traction drive gearbox, place a container under the drain hole located on the front side of the cylinder block below the ignition coil. (I came across a note that in order to avoid coolant getting on the ignition module in 8-valve engines, the module itself is removed out of harm’s way).
Therefore, the starter needs to be removed. Disconnect the wire terminal from the negative terminal of the battery. By pressing the latch of the wire block, disconnect the block from the traction relay connector. Remove the protective cap from the nut securing the tip of the wire connected to the positive cable of the battery.
We unscrew the plug and drain the coolant from the cylinder block.
We tighten the drain plugs of the radiator and cylinder block. The connection between the plug and the cylinder block uses a conical thread that does not require additional sealing. Tighten the drain plug of the cylinder block to a torque of 25–30 Nm. We pour the fluid recommended by the manufacturer into the engine cooling system through the expansion tank until it is full. Let's start the engine.
With the engine running, vigorously compress all the hoses of the cooling system several times in turn - this will help the fluid fill the system and displace air from it. As the coolant level in the expansion tank drops, bring it to normal and screw on the tank cap. When the engine warms up, the outlet (lower) radiator hose should be cold for some time, and then quickly heat up, which will indicate the beginning of fluid circulation in a large circle.
After waiting for the cooling system fan to turn on, stop the engine. After the engine has cooled, check the coolant level again and, if necessary, replenish the system.
Quite often, many novice owners are interested in questions such as: “how much gasoline will fit in the tank” or “how much oil to pour into the engine.” Since there are many such questions and every day at least 1000 people are looking for such information, it was decided to post expanded information on the main refueling volumes of the Lada Kalina on the blog.
Let's start with perhaps the most common questions, and we will list the less popular ones in order of priority.
How much oil to pour into Kalina engine
The manufacturer recommends pouring 3.5 liters of oil into the engine crankcase. It is this volume that is necessary for the normal operation and functioning of the car’s lubrication system. But if for some reason it is not possible to measure the volume, fill in engine oil until it is between the MIN and MAX marks on the dipstick.
Lack of lubrication in the engine can lead to oil starvation, which will have a very negative impact on the service life. If the level is too high, if it exceeds the maximum mark on the dipstick, it is possible to select some of it into the air filter bellows through the breather hose. From there it can get to the mass air flow sensor, which can lead to premature failure of this sensor.
How much oil to pour into the Kalina gearbox
The factory's recommendation for filling volume for a gearbox states that 3.1 liters of gear oil is required for the gearbox. But according to many manuals of official publications, you can read that it is best to exceed this volume by some value.
Here it’s the other way around, it’s better that the level on the dipstick is slightly higher than the maximum, about 5 mm. This is necessary so that the fifth gear gears are better lubricated. Accordingly, this advice will extend the life of the transmission, or fifth speed in particular.
Source: https://ravon-r2.ru/skolko-vhodit-antifriza-v-kalinu/
We change it to a 16-valve modification
As noted, to complete the procedure in full, you will need to dismantle the starter assembly. If this important manipulation is neglected, spilled liquid may penetrate into the starter unit through the open hole, causing its breakdown.
- We turn off the power supply to the LADA Kalina starter by disconnecting the block with cables from the solenoid relay on the unit body.
- On the positive terminal of the unit, remove the protective cap, then use a “13” key to unscrew the fixing nut, remove the terminal with the wire and move it to the side.
- Now you can use the same key to unscrew the 3 bolts that hold the unit to the block. We take out the starter.
- Next we move on to unscrewing the plug and dumping the refrigerant into the container.
- Having completed this stage of the process, screw the plug into its original place. The torque should not exceed 30 Nm.
- Using the previously indicated method, we drain the liquid from the radiator assembly.
After installing the plugs, we proceed to filling the system with the indicated liquid. We perform this action through the neck of the expansion tank. After this, we install the starter, start the power plant and, by pressing on the pipes, help the fluid begin circulating in the circuit faster. At the same time, we check the level using the marks on the tank. It should be located between the “Min” and “Max” marks. The antifreeze replacement has been successfully completed.
How to drain antifreeze on Lada Kalina 8 and 16 valves
The procedure for replacing coolant on Kalina is not much different from similar procedures on other VAZ injection models, since the engine used is actually the same. The only difference in the process of draining the fluid is that in engines with an 8-valve head and a rocker-type gearbox shift mechanism drive system, you do not need to remove the starter to drain the antifreeze from the cylinder block.
In engines with a twin-shaft head with 16 valves and a cable-driven gearbox, installation of a starter is necessary, since it will not be easy to get to the drain plug. In addition, there is a danger of antifreeze getting on the starter winding, which can lead to a short circuit in the windings.
In order to drain antifreeze from the radiator and cylinder block, you need to have access to the car from below, although it is also possible to drain without an overpass or inspection hole, but not so convenient. We carry out the work on a cooled engine and with the expansion tank cap open. First you need to remove the engine protection, for this you will need a 8-inch head. The engine protection mounting diagram is shown in the photo.
How to remove engine protection on Kalina
Now let's dismantle the protection
After dismantling the mud protection, you can begin to drain the old antifreeze. To do this we do this:
- We prepare a suitable container for used antifreeze with a capacity of 8-10 liters and lower it under the car. Carefully unscrew the plastic plug with the sealing ring on the lower can of the radiator on the right side as the car moves.
- Drain the fluid from the cylinder block, being careful.
Please note that the ignition module is located directly next to the drain plug. It is highly undesirable for antifreeze to get on it, as this will lead to failure of the device. - Using a socket wrench or a 13mm socket, unscrew the cone plug in the cylinder block and carefully drain the liquid.
- For engines with a 16-valve cylinder head and a cable-driven gearbox, remove the starter. Disconnect the negative terminal of the battery, disconnect the terminal block of the starter solenoid relay and unscrew the nut securing the positive terminal of the starter.
- Using a 13mm wrench, unscrew the three starter mounting bolts.
- Remove the starter from the engine.
- Using a 13 key, unscrew the plug and completely drain the antifreeze from the cylinder block.
How to fill antifreeze on Kalina correctly
After draining the fluid, screw both plugs into place, install the starter (for a 16-valve engine) and fill in new fluid. We start the engine and immediately monitor the temperature of the lower radiator pipe. It must be warmed up. We intensively squeeze all the hoses of the cooling system while the engine is warming up.
Check the antifreeze level again and tighten the tank cap
This will force air out of the system and prevent the formation of an air lock. After warming up the engine to operating temperature, check the antifreeze level again; if necessary, add just enough so that the liquid is between the minimum and maximum level marks in the expansion tank.
Hello, dear viewers of my channel, and fans of the Kalina car. The time has come to replace the coolant. This means that I was filled with this kind of liquid, antifreeze TS-40, well, I couldn’t find such antifreeze.
I found this one, it’s a Dzerzhinsky a40m, the freezing temperature is 40, I measured it with a tosolometer, a hydrometer, the temperature turns out to be even a little higher.
So I think it's quite normal. It happened to me, I was at a crossroads whether to fill it with antifreeze or antifreeze.
What is the difference between them?
Well, as far as I read on the Internet, antifreeze is purely a product of our Soviet Union, and antifreeze is a purely foreign product.
As for additives, well, given our economy and our control over the production of various products, both fuels and food, no one controls.
As you can see, there is no GOST, there is just a tag stuck on, and it is not clear what it represents. As the seller said, although you can also trust them every now and then, that he always buys it, everyone takes it, and no matter how problems there are.
I want to say right away that the replacement, I was prompted to replace it by what I had filmed before - showing the replacement of the pump, it was a big deal for me.
And yet the reason, I think, is due to the fact that I haven’t changed the antifreeze practically since 2009, but it needs to be changed, as the manufacturers write, once every two years, well, at least once every 3 years.
Because here on our Kalinovsky car there are no more lubricating parts that lubricate the antifreeze, mainly just the pump, and it is clear that the antifreeze has worn out and all the additives have gone to nothing.
Because here I was heating up the car, although I didn’t overheat it much, well, it was heating up because I had problems with the fan, with cooling the radiator. Because of this, the oil seal flew off, and everything went down the drain.
Naturally, I added water and drove it, well, I don’t remember, I drove it for about half a summer, as you can see, for some reason it turned reddish, although it was greenish, antifreeze. Well, initially it was greenish, the expansion tank was just painted. It turned into an unknown color.
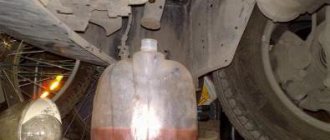
So, well, what do you need for this? You can, of course, unscrew it, there is one plug, I showed you when I removed it to replace the pump, and below, you see a plug on the radiator and a second one.\
You can, of course, unscrew it, take it out into the street, let it flow anywhere, well, I want to drain it normally, because it still has the ability and is possible.
In the future, I will use it to make water heating here in the garage and fill it with antifreeze. Or I’ll give it to my comrades who already have it all. Therefore, there is no point in throwing it away. And why litter the environment?
To get to this plug, to unscrew it, you see the distance is very small, of course you can try from below, well, we'll see.
We will, if necessary, then of course we will have to unscrew it here, on this side, because this nut, it is welded to this mount of the distributor, the so-called ignition coil.
Then you will have to film this, film this. Well, of course, the airbags will have to be removed. Naturally, engine protection, not protection, engine cover. Well, of the problems, not to say very much, well, there will be problems in order to get there and do it all.
For those who are too lazy, take them to a service station, pay the money and let them do it for you. Well, I’m done with the background, I’m done with the introductory part, we climb under the car and remove the protection. Well, the protection was removed, so I didn’t remove it, no problem, from below you can take a key with an extension and the plug can be unscrewed.
There are no special problems. You can unscrew it with less blood, no need to remove the air vent. This mount, the ignition coils, you don’t need to remove everything. That’s it, now we’ll cut the device out of a one and a half bottle and slowly drain it.
I warmed up the car before. But not to 90 degrees, it had already cooled down while I was poking around. But it’s even a little bit, we just continue one thing, at the same time look at the anthers on the CV joints, their integrity.
They have such a property of unexpectedly tearing, and you notice when it’s already too late to notice. Here are the indoor and outdoor ones. Well, and so, leakage, I pulled it out. It no longer oozes from the pan, but a little bit of it leaks into the oil here, the engine is clean.
Here is the plug, on this side, by the way, you can unscrew it from below, you see, it even reaches here, here you can even use a lever and you can unscrew this plug. So, on this side, here it is, here it is, the radiator cap, see?
It easily unscrews, the radiator button. So, well, let's get started. In the meantime, let's get started, first we'll probably salt it from the block, and then we'll drain it from the radiator. Well, if it works out, I'll take it off.
Of course, the process would have been simpler if I hadn’t been shooting at the same time. But, since I’ve already started doing it, then well, I need to share it with the people. Well, I cut it like this and it just fits there, and here I’ll put this container or this bucket over there.
Either this one or the bucket. And once again, if you want to preserve it and not screw it up too much, then this fastener needs to be removed. Without removing it, it will turn out... Well, of course, I screwed it up a little, but not much.
Otherwise, it would have been even better, when I changed the pump, you can watch the video, there were practically no losses at all.
So, you see what an expansion tank we have, mine, more precisely, is dirty. And inside we also see that it is full of all kinds of dirt. Therefore, it must be removed and washed.
It is attached, one point, a second, and there in the depths of a third. Everything is as always, 2 by 10, 1 by 8 nuts. Here, however, there is a bolt for 8. But the nuts that you need are for 10.
Still, I will try to briefly tell you what antifreeze and antifreeze are, so that you don’t have to go through the literature and poke around looking for information. I'll tell you all about it briefly. I already climbed and found it.
This means that antifreeze is the international name for coolant for the engine cooling system. Antifreeze is the same antifreeze, only domestically produced. Antifreeze.
This word was coined back in the Soviet Union and it means the abbreviation Technology of Organic Synthesis, abbreviated TOS, and OL is a member of the group of alcohols.
Antifreezes are divided into mineral, class G11, and organic, class G12, and labrid, class G12++, and G13. The difference between them is the application, well, the base used and the additives.
Antifreeze is a mineral antifreeze; it has a service life of 50,000 km, or 2 years. Organic antifreeze is, after all, G12, and can be used for up to 5 years and 250,000 km.
Labrid antifreezes are compatible with any other coolants. They can be safely added to new engines.
One of the points is that the canister says 10 kg, but this is not 10 liters. Don't confuse this. Because they usually buy 10, look at 10, then that’s 10 kilograms, well, of course, many people know that they often use it.
And those who will be confused for the first time. 10 kg is only 8.85 liters. And as I said, 7.85 liters are poured into the engine, this is not 7 kg. What they would also have, know and mean.
You can choose which is better, antifreeze or antifreeze, based on the coolant of the car. Since in different cars it consists of different materials.
Some brands use predominantly more copper and brass in the cooling system, while others use aluminum and its alloys. Thus, red antifreeze is suitable if there is more copper and brass in the car, green antifreeze is suitable if everything is made more of aluminum.
In most cases, antifreeze is suitable for domestic cars. Is it possible to mix antifreeze and antifreeze, and what happens if you mix them? Well, this is a rhetorical question, as they say.
If there is no control over production, this can lead to bad consequences. Therefore, this is all at your own peril and risk. Here's a pretty simple calculation you can do.
Well, that's it, today, I should have filled it yesterday. Well, since my expansion tank is incredibly dirty, I tried to wash it with soda, and here I came and started washing it with caustic soda, but it does not wash. I'll show you now.
The next moment means traffic jams, I told you, yes, about putting the faucet here. So, look right away, the faucet here that I wanted to put here, it doesn’t fit here in size. But there is no point in removing the gearbox to install the faucet, and there is no desire.
Why did I remove the so-called cover, or protection, which is decorative on top. So that when you pour antifreeze into the expansion tank, naturally there will be water, oh, air, and opening the cap and waiting for it to flow from there is wasteful.
For this there is this, it goes to the throttle valve tube, this is the throttle valve heating, this is what you remove. Well, I'll show you. Here you pry it with a screwdriver, because it’s a little difficult to remove, it won’t come off.
Of course you can rip it off, but why? Unscrew the clamp, pry it up with a screwdriver, and the air comes out until liquid appears. Well, it’s advisable to put a cloth here, because there is a connector here so that it doesn’t get flooded.
It is, after all, an aggressive liquid. There is ethylene glycol, which does not have a beneficial effect on human health, and, I think, on contacts. Well, that's it. Now we’ll clean out the tank and set it up, we’ll fill it.
Well, I put the expansion tank in place, but I couldn’t wash it perfectly, because these partitions, you can’t get into it with anything. I washed it with plain soda, soda ash, and shampoo.
You have to make physical efforts, well, that is, I washed here from below, you see, but here nothing happened. When you try to shuffle there, it rubs off.
Therefore, if someone has done this and was able to clean it, write in the comments. We will use it. And I proceeded from the fact that from an aesthetic point of view it is not beautiful, but I think that it does not affect the speed. There is no obvious dirt there, just a brown coating.
Let's continue. Both plugs are screwed in, this one is also screwed in, by the way, it screws in easily and unscrews easily, and it’s very good that it doesn’t let anything through. I screwed this up too. I’ll try to install a smaller faucet a second time, because the one I wanted is in the way.
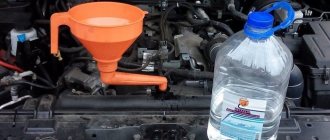
So, the expansion tank is standing, the funnel is standing, the antifreeze is ready. Now let's start filling. Well, I prepared it here too. Well, everything else you need, nothing else is needed. We unscrew it, no need to pound it, and fill it in.
So, we look, the plug is not leaking. It's still too early, of course. Normal there too. Here, you see, the antifreeze has gone. Well, it’s clear that antifreeze will not flow here for the simple reason that the level is higher.
Well, here it goes, the system fills up. You fill this belt, see? Minimum/maximum. There is no need to fill more, so that there is no excess later. Now he's leaving again. There are no leaks.
Just be careful not to tear the hose. That's it, it doesn't go away anymore. The air is out. So, well, now all that’s left is to start it and top it up to level. That's it, let's try now.
You can see the level is just a little bit, the antifreeze is not leaving, there are no leaks anywhere, there are no leaks, everything is fine here. The level should be up to this belt, it is just there somewhere. Look, you see how much is left, how much was, how much is left. Well, there was, well, maybe a liter left somewhere.
Instructions on how to replace antifreeze on a Lada Kalina station wagon, well, naturally, the level will need to be adjusted already after warming it up well.
Warm it up until the thermostat opens and all air pockets go away. Well, then we’ll talk specifically about how much coolant went into this.
Tips and tricks
If it is discovered that the cap on the designated reservoir is not sealing properly, it should be replaced immediately after replacing the coolant.
Product options:
- cover with code “2108 2108-1311065” in the “Autodevice” version; cost not less than 150 rubles;
- a product with the article number “2108 LUZAR LL 0108” at a price of about 100 rubles;
- lid made by "Chistopol" with code "2108-1311065" at a cost of 70 rubles.
Replacing the coolant in the Lada Kalina car is complete, and now check the circuit for leaks. If it is present, then replace the clamps that hold the joint sections of the pipes.
How to determine if the thermostat is working
The first sign that the water pump on a car has started to work incorrectly can be considered extraneous noise in the engine compartment while driving. However, in some cases, the pump may fail earlier than stated. You can check the functionality of the water pump in the simplest way:
- Warm up the engine to the optimal temperature. After warming up, use a gloved hand to pinch the upper pipe that comes from the radiator.
- If the pump is working properly, you will immediately feel the fluid pressure in the nozzle. Accordingly, the pump works as coolant circulates through the system.
- If pressure is felt, but weak, or not at all, it will be necessary to proceed to a detailed inspection of the pump.
- You will have to remove the timing case and visually assess the external condition of the pump.
- If there is a leak of antifreeze at the landing site, it means that the oil seal (seal) has failed.
- If a roar is heard while driving, we can conclude that the pump shaft bearing has worn out. You can pump the drive part of the pump gear by hand. If there is play, the pump will not work correctly.
Loss of pump tightness leads to disruption of fluid circulation in the system
Thus, it is possible to identify pump malfunctions without removing it from the car. The procedure is quite simple and accessible even to a novice driver.
When the engine warms up, touch the lower outlet pipe. It will be cool, and then should quickly heat up, which indicates that the coolant has begun to circulate in a large circle. Keep an eye on the fan, as soon as it turns on and brings down the temperature, turn off the engine and check the coolant level in the expansion tank.
This completes the antifreeze replacement.
During the operation of a Lada Kalina car, it may be necessary to replace the coolant. Today I would like to talk about how to do this.
Key to "13"
Screwdriver
Coolant
Empty container for draining old antifreeze
Let's proceed to replacing the tholos on the Lada Kalina
First, you should place the car on a flat, horizontal platform. If there is no such platform, then the front part must be higher than the back.
Disconnect the negative cable from the battery
Remove the engine splash guard
Now you need to unscrew the expansion tank cap.
Now you should install a pre-prepared container for the old coolant under the drain plug. Then you should unscrew the drain plug. Remember, if the car is warm, you need to be very careful, the coolant is very hot. After the fluid has been drained, any traces of it should be wiped off the cylinder block.
Now you need to drain the old fluid from the radiator. To do this, install a container for the old coolant under the radiator, unscrew the drain plug located on the radiator and wait until the antifreeze completely drains from the system.
After the coolant has drained, the drain plugs should be screwed into place.
Disconnect the throttle body hose and start pouring antifreeze into the expansion barrel until it begins to flow out of the throttle hose, at which point put it in place. Fill in coolant until the antifreeze level in the expansion tank is between the minimum and maximum marks.
Reinstall the battery negative
Now you should check everything, start the engine and let it warm up until the cooling fan turns on. After this, you should stop the engine and, if necessary, add coolant to the expansion tank.
Today, car maintenance with your own hands is not a novelty. First of all, this is a significant saving of your own time, effort and money. In order to efficiently replace the coolant on the Lada Granta and Kalina, you need to use special step-by-step instructions with a clear sequence of actions.
After warming up the LADA Kalina engine, carefully touch the lower outlet hose of the radiator assembly. Its heating will indicate the presence of refrigerant circulation in the so-called large circle. After the system fan turns off, removing heat from the radiator honeycombs, turn off the engine and note the level in the previously indicated tank.