- Stove design
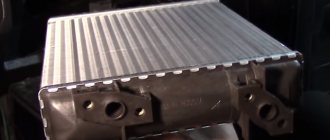
- Radiator
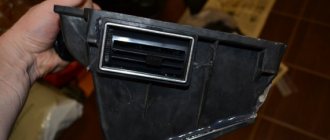
- SUAO and ceiling sensor
- Damper and gearmotor
- Diagram and explanations for it
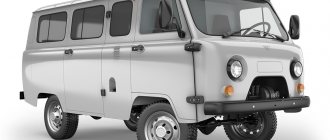
If you decide to repair your car yourself, you need to have a good knowledge of its components and be able to read drawings. Of course, such skills come with experience in operating and maintaining the VAZ 2110. This time we will study the operation of the heater in detail. If the heating system functions properly, then both the driver and his companions will be comfortable inside the “ten”. This material contains stove diagrams and descriptions for them. The instruction manual also contains this information, but we try to describe complex processes in simple language. Our task is to convey important information to beginners and experienced motorists.
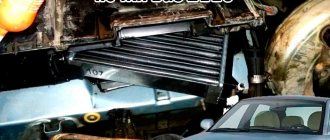
This is what the disassembled heating system of a VAZ 2110 car looks like
Heater (stove) control circuit for VAZ-2110, 2111 and 2112
Heater (stove) control circuit for VAZ-2110, 2111 and 2112
The VAZ-2110, 2111 and 2112 are equipped with an automatic heater control system (AHCS), which itself creates the temperature in the car set by the driver. A kind of climate control without air conditioning, winter version. The brains of the system are controller 3 on a diagram of type 13.3854 with two control knobs. With the left knob we adjust the temperature in the cabin (from 16 to 30 °C), with the right knob we adjust the fan: 0 - off; I - average rotation speed; II - low rotation speed; A - automatically. So, here is a breakdown of the VAZ-2110 heater circuit
1 — fan electric motor; 2 - additional resistor; 3 - controller; 4 — mounting block; 5 — ignition switch; 6 — cabin air temperature sensor; 7 — recirculation switch; 8 — recirculation valve; 9 — micromotor gearbox for heater damper drive; A - to the instrument lighting switch; B - to power supplies
If the heater motor stops working, you should check fuse F18 in the mounting block
SAUO controllers (automatic heater control system). The one on the left - with automatic mode - is a primitive climate (it is tied to a temperature sensor under the ceiling). On the right is the more common 4-speed. When connected, they are compatible with the standard wiring of the VAZ 2110, with the exception of the misalignment of the MMR sensor (you just need to transfer + - on it).
Stove design
This unit includes several devices. The radiator is the main element of the stove - it heats the air entering the cabin. It is located under the hood. The next component is the air distributor, equipped with special pipes that run through the cabin of the 2110.
If we compare the “ten” with previous models, an important innovation has appeared in its heating system - an evaporator (the diagram includes it in the list). The device is installed in an air conditioning system. Not all owners know about its existence, since it rarely fails.
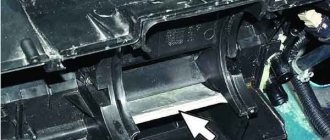
To control the operation of the heater, an SUAO unit is installed in the VAZ 2110 car, which is called a controller in the technical operating manual. The unit works in conjunction with a temperature sensor in the cabin; it is also called a ceiling sensor. The sensor reports the temperature to the unit, then this indicator is compared with the set temperature on the handle. If the indicators differ by more than 2°, warm or cooled air is supplied to the VAZ 2110 interior.
It’s worth taking a closer look at the handle, or more precisely at its extreme positions – MAX and MIN. If the heater knob is set to one of these indicators, heat is supplied without the operation of the temperature sensor in the cabin. The scheme includes all of the above elements.
The device of the “tens” heater includes another unit - a gearmotor, which is responsible for opening and closing the damper. The miniature electric motor performs an important task in the operation of the heating system, as evidenced by the diagram. If the gearmotor is faulty, the system will only produce cold or hot air. If the gearmotor fails when the damper is closed, the system will stop functioning. We have described the main components of the VAZ 2110 heater; the diagram contains a more detailed list.
Let us highlight the main components of the system:
- Radiator.
- Air distributor.
- SUAO block.
- Ceiling sensor.
- Lever.
- Damper.
- Gearmotor.
In the heating system, a radiator is installed for heating, which enters the VAZ 2110. It is also called a heat exchanger. Heating is carried out by the heat of the antifreeze. This component is connected to the engine cooling system by pipes and hoses. Antifreeze constantly circulates through the heat exchanger of the stove. The damper, based on the commands of the unit, directs the incoming air to the radiator or directly into the passenger compartment. If the heater damper is in an intermediate position, then one part passes through the heat exchanger, and the second bypasses the radiator. If we compare this part of the stove with previous generations of the VAZ, it has a number of useful improvements, as the diagram demonstrates.
SUAO and ceiling sensor
These components of the VAZ 2110 heater are connected and operate according to the following principle:
- The sensor determines the temperature inside the car;
- This data is sent to the SUAO block;
- The block compares the temperature with the position set on the handle of the VAZ 2110 stove;
- After comparison, the position of the damper changes or remains the same - it depends on the indicator;
- This way the temperature in the cabin is controlled;
- If the heater handle is set to MAX or MIN, then the data from the ceiling sensor is not taken into account.
Heater (stove) control circuit for VAZ-2110, 2111 and 2112
The VAZ-2110, 2111 and 2112 are equipped with an automatic heater control system (AHCS), which itself creates the temperature in the car set by the driver. A kind of climate control without air conditioning, winter version. The brains of the system are controller 3 on a diagram of type 13.3854 with two control knobs. With the left knob we adjust the temperature in the cabin (from 16 to 30 °C), with the right knob we adjust the fan: 0 - off; I - average rotation speed; II - low rotation speed; A - automatically. So, here is a breakdown of the VAZ-2110 heater circuit
- fan motor;
- additional resistor;
- controller;
- mounting block;
- ignition switch;
- cabin air temperature sensor;
- recirculation switch;
- recirculation valve;
- micromotor gearbox for heater damper drive;
A - to the instrument lighting switch;
B - to power supplies
If the heater motor stops working, you should check fuse F18 in the mounting block
SAUO controllers (automatic heater control system). The one on the left - with automatic mode - is a primitive climate (it is tied to a temperature sensor under the ceiling). On the right is the more common 4-speed. When connected, they are compatible with the standard wiring of the VAZ 2110, with the exception of the misalignment of the MMR sensor (you just need to transfer + - on it).
If you find an error, please select a piece of text and press Ctrl+Enter.
We recommend reading:
Privacy Overview
This website uses cookies to improve your experience while you navigate through the website. Out of these cookies, the cookies that are categorized as necessary are stored on your browser as they are as essential for the working of basic functionalities of the website. We also use third-party cookies that help us analyze and understand how you use this website. These cookies will be stored in your browser only with your consent. You also have the option to opt-out of these cookies. But opting out of some of these cookies may have an effect on your browsing experience.
Necessary cookies are absolutely essential for the website to function properly. This category only includes cookies that ensures basic functionalities and security features of the website. These cookies do not store any personal information.
Checking the automatic control system
Diagram of the automatic heater control system : 1 – fan electric motor;
2 – additional resistor; 3 – controller; 4 – mounting block; 5 – ignition switch; 6 – cabin air temperature sensor; 7 – recirculation switch; 8 – recirculation valve; 9 – micromotor gearbox for heater damper drive; A – to the instrument lighting switch; B – to power supplies Pinout of automatic control system :
The SAUO receives information from:
- – cabin air temperature sensor (No. 6), which has a built-in small-sized fan.
- – MMR (micromotor reducer) (No. 9), information about the position of the heater damper.
Damper control : Based on the received information and the set air temperature, the controller controls the position of the heater damper, sending appropriate signals to the damper drive micromotor.
Fan speed control : to obtain a low rotation speed (all but the last), an additional resistor (No. 2) is used, which has two spirals with resistance (0.23 and 0.82 Ohms). When both spirals are connected to the electric motor power supply circuit, the 1st fan rotation speed is ensured; if a spiral with a resistance of 0.23 Ohm is turned on, the 2nd speed is provided. When the electric motor is turned on without a resistor, the fan rotor rotates at the maximum 3rd speed (4100 min-1).
Electric stove motor VAZ 2107, connection diagram
On a VAZ 2107 car, under the interior heater radiator (“stove”), an electric fan is installed, consisting of an electric motor and an impeller.
Connection diagram for the electric motor of the interior heater fan (“stove”) of the VAZ 2107 car
Description of the scheme
— Electric current enters the circuit for switching on the electric motor of the fan (“stove”) from terminal “30” of the generator. Through the mounting block and ignition switch.
— The circuit is protected by fuse F01 (10A) in the main mounting block.
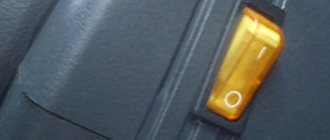
— The “stove” electric motor is turned on by pressing the heater switch button on the instrument panel. The switch is three-position. The first position of the key is off, the second is low fan speed, the second is high speed. Reducing the fan rotation speed is achieved by including an additional resistor in the circuit, which increases the resistance and thereby reduces the rotation speed of the electric motor armature.
Notes and additions
— The VAZ 2107 uses an ME-255 DC electric motor for the interior heater fan (heater) with excitation from permanent magnets. It is paired with an additional resistor with a resistance of 1.5 Ohms at 20°.
TWOKARBURATORS VK -More information on the topic in our VKontakte group
Source
Adjusting the automatic control system
Place a regular mercury thermometer near the temperature sensor on the ceiling. Turn on the heater controller and set the fan control knob to position “A”, and set the temperature dial to 2C higher than the air temperature in the cabin. If, with the doors and windows closed, after 15 minutes the temperature in the cabin does not correspond to the set temperature, then the heater control unit should be adjusted.
To adjust, pull out the SAUO block from the socket and rotate the regulator on the left side of the controller:
- turn clockwise to increase temperature.
- turn counterclockwise to decrease.
Check the operation of the heating system again by repeating the above steps.
Replacing self-propelled guns
Control units cannot be repaired - they are simply replaced with new ones. But first you need to make sure that this mechanism is the reason. Instead of a broken one, install a working control unit. Its price is about 1500 rubles. The element is very easy to dismantle: just remove the buttons installed nearby. And then you can remove the device. The handles are set to zero positions and then removed.
Then the glass and front cover snap off. Before removing the heater control unit on a VAZ-2110, unscrew two screws in the front and one in the back. The board can then be pulled out of the case and carefully inspected to ensure its integrity. If there is damage to the board tracks, they must be repaired. Subsequent assembly is performed in reverse order. If the temperature on the control unit is not regulated, then the entire board should be inspected. There will definitely be defects. But before you pull out the heater control unit on the VAZ-2110, you need to check the fuse box. Perhaps there is a bad connection there.
Design features of the VAZ-2110 stove control unit and the specifics of its DIY repair
High-quality operation of a car’s heater in winter is one of the main conditions for comfortable driving. In domestic vehicles, even in new models, the heater is one of the problematic elements that very often fails. And if in the summer you can turn a blind eye to this, then in cold weather you immediately have to take measures to eliminate the problem.
To eliminate the malfunction, it is first important to diagnose which element of the car’s heating system has failed and repair the non-functioning unit. The easiest way is to turn to specialists for help, but their services are not very cheap. Very often, vehicle owners troubleshoot and repair the heater on their own, since domestic cars are highly maintainable.
This article will talk about how to diagnose a malfunction of the VAZ-2110 heater control unit and repair it yourself.
Heating system elements
The stove diagram clearly shows the location of its main functional elements. It should be noted that the design of the stove on the VAZ-2108, 2109 and 21099 models is the same. Many car owners know that the heater in these models is not fully developed. As a result, the interior is not heated properly, so a decision is made to modify the stove with your own hands. Just in this case, it is important to know the design of the heater so as not to confuse anything.
Components:
The design of the stove of the VAZ-2109 car, whether it is a high panel or a low one, is absolutely identical. Therefore, the information presented will be useful to owners of this model with any instrument console.
Knowing the main points and what is located where, you can already try to independently deal with the problems that arise and fix the malfunctions that appear, while saving money and time on trips to the service station.
Design features of the VAZ-2110 stove control unit
One of the common heating system problems that VAZ-2110 owners encounter is the failure or malfunction of the heater control unit. Dozens of them are equipped from the factory with stoves, which are coordinated through an automatic heater control system. In short, the system is called the SAUO block. The main indicators of its malfunction are the operation of the heating system not in all modes. If one or more stove speeds do not work, then most often the problem is in the ACS unit. Thanks to the electronic module of the VAZ-2110, the temperature set by the driver is maintained in the car interior.
Before you begin repairing the VAZ-2110 heater, you need to find out what kind of heater is on your vehicle. Cars that were produced before September 2003 are equipped with old-style stoves. Accordingly, there are significant differences in the design, which are important to pay attention to during repairs.
The ACS unit consists of electronic elements, which are coordinated using handles on the central console of the machine.
The VAZ-2110 stove control unit is equipped with a controller with two handles. The right handle is responsible for turning on a certain fan speed. An additional resistor is directly responsible for switching its speeds. Old style stoves have resistors for two or three fan speeds. The new model stoves have a modified resistor RDO 2123–2118022. The unit for coordinating the operation of the improved stove model has four speeds and does not have an auto mode.
Components and processes of the VAZ-2112 heater
- electro-pneumatic valve;
- housing with the air intake of the heating system, consisting of front and rear parts;
- water-reflective air intake flap;
- valve for controlling the recirculation damper;
- recirculation damper on the air intake;
- damper on the stove channel;
- stove control damper;
- radiator and its casing;
- fittings on the steam exhaust and supply hoses;
- stove electric motor in the housing and fan;
- support platform for the lever from the heater control damper drive and the lever itself;
- micromotor gearbox with damper drive;
- resistor;
- cover from the stove casing.
The radiator is located horizontally under the instrument panel. It is housed in a plastic casing. The radiator design includes two plastic tanks and a pair of aluminum tubes with pressed plates on them. There is a steam outlet fitting on the left tank. The passage of intake air through the radiator depends on the position in which the dampers are located. If the dampers are in their extreme position, then the entire air flow may pass through the radiator or not at all.
Lack of tap - plus or minus?
If older VAZ models have a tap that can be used to shut off the flow of antifreeze to the radiator, the VAZ-2112 is not equipped with such an element. If the engine is running, the radiator will heat up regardless of the time of year. This design feature of the stove makes it possible to achieve a slight inertia, which is inherent in the system during start-up. In other words, the required temperature will be reached in a shorter time. In addition, the user will not encounter leaks that arise as a result of a leak in the faucet. The electronic control unit, which generates the necessary commands, is responsible for the ability to conveniently control the operation of the stove.
Diagnostics of serviceability and dismantling of the stove control unit
The SAUO module is located on the center console of the car and is responsible for proper heating of the interior. Repairing the VAZ-2110 stove control unit requires certain knowledge in electronics, so before you begin repairing the part, you need to determine whether the problem is really in the electronic module itself.
To do this, you must initially dismantle the unit and install a known-good part in its place. Take the SAUO unit from friends or at a service center to diagnose the heating system of your car.
Before performing any work on the vehicle that involves electronics or wiring, turn off power to the battery to avoid shorting or burning out the electronic components.
Then you can proceed directly to removing the unit through which the functionality of the stove is coordinated. To do this, the buttons that are located on the sides of the stove are initially dismantled. The heater controls must be switched to zero positions. Only then can the module be pulled out. This must be done very carefully, since the power plugs are connected to the back of the unit. As soon as you see them, they must be carefully disconnected so as not to damage the contacts. At this point, dismantling can be considered complete.
The working unit is installed on the standard seat, and the operation of the vehicle’s heating system is checked. If the stove functions correctly with the new unit, then the fault is in the ACS unit itself. Otherwise, it is necessary to diagnose other elements of the heating system.
SAUO repair
Before repairing the SAUO VAZ 2110 unit, you should make sure that the problems with the stove are associated with it. To do this, you should connect a known working heater control unit (borrow from a friend or from a store). If there are no problems with the stove with the working unit of the automatic control system, then we try to find out what the reason is. If the obviously working unit of the automatic control system did not help, then the problem with the stove is somewhere else.
Remove the buttons next to the SAUO block. We take out the stove control unit. Set the controls to position 0 and remove, and then remove the front cover and glass from the latches. Unscrew 2 screws in front and 1 in back.
We remove the board from the plastic case and check the integrity of all tracks, jumpers and resistors.
In this example, a broken jumper was found. We solder it on one side and the other. Reassemble in reverse order. Now all speeds of the SAUO block work .
DIY repair of the VAZ-2110 heater control unit
If during diagnostics it turns out that the problem is in the heater control module, then you need to try to repair it or install a new part. Since the price of new electronic units is quite high, the right decision would be to repair the control part, especially since this requires only basic knowledge of electronics, the ability to use a tester and a soldering iron if necessary.
Before you begin, you need to disassemble the heater control unit. To do this, the front cover with regulators is removed from the latches from the previously dismantled electronic module. Next, a special glass cover is detached. Using a screwdriver, unscrew two screws on the front panel of the unit and one on the rear wall. After this, the top cover of the module can be removed; this must be done very carefully so as not to damage the contacts inside the part.
Inside the module there are electronic tracks, contacts and resistors that are responsible for the high-quality functioning of the vehicle’s heating system controllers. It is necessary to inspect all contacts, electronic tracks on the board, resistors and jumpers. High operating temperatures can cause the board to become very hot, which will lead to disconnection of the contacts. Particular attention should be paid to the power supply points and the contacts should be cleaned. If there is visible damage to the electronic circuit, it is necessary to solder the damaged elements. In parallel, using a tester and an ohmmeter, the functionality of the electronic elements and resistors located on the board is checked. If necessary, non-functioning parts on the ACS module board are replaced.
After troubleshooting, the heater control unit is assembled in the reverse order and installed in its original place. Next, you need to connect the battery power and check the operation of the vehicle’s heating system; if necessary, adjust the heater controller.
Troubleshooting
Standard situation: the fan operates in all provided modes, but the heater only blows cold or hot air. In this case, you can conduct a fairly simple test. Turn on the ignition, turn off the heating fan and move the interior temperature control knob to the extreme left (minimum) or extreme right (maximum) position. In this case, you can determine by ear whether the micro-gearbox is working.
If it works, the heater fan is turned on at its fastest speed, and the temperature control is again moved to the far left and far right positions, allowing it to run in each of them for a few seconds. In this case, the sound of the air flow should change; if this is not the case, then this indicates a mechanical break in the connection between the electric motor and the damper or its jamming in one position. This will require further disassembly of the system and restoration of the functionality of the damper.
In a situation where during testing you cannot hear the operation of the micromotor-gearbox, you need to carry out other checks that will help you figure out why the stove temperature regulator is not working. Its handle must be set to the middle position. After this, remove it from its seat on the panel. Without disconnecting the pads, the controller should be turned towards you as much as possible.
We test the supply voltage to the control unit. To do this, you need to take a 12 V test lamp, connect one clamp contact in a small screwdriver, which is inserted into contact 3, with a black wire coming out of it. Insert the second contact into pin 6, which is located under pin 3 and the blue wire comes out of it. If the control lights up when the ignition is turned on, it means that power is supplied to the control unit, and the VAZ 2110 heater regulator stopped working for this reason. For diagnostics to proceed normally, the battery and on-board voltage must be at least 12.5 V.
If power is supplied to the controller, you need to turn off the ignition and disconnect the large X1 block with 13 connectors. Next, you need to take two conductors with contacts that can be connected to the controller plugs. One wire attaches to pin #2 in this connector, it will be the first one on the right in the top row when looking directly at the connector. The second end of the conductor is connected to the positive connector of the multimeter. The other wire connects to connector No. 8, which is located in the top row in 4th place, if you count from the right. The conductor is connected to the negative terminal of the multimeter.
To carry out further measurements, the multimeter is set to voltmeter mode at direct current, with measurement limits up to 20 V. We turn the controller towards ourselves and set the temperature regulator to the middle position. After this you need to turn on the ignition. Small readings in the range of hundredths of a volt may appear on the multimeter; these can be ignored.
The temperature control is turned to the extreme right position (maximum heat). A voltage in the range of 10-11 V should appear on the multimeter screen, which is applied for 10-14 s, after which it disappears.
After this, the regulator is moved to the extreme left position (minimum heat). The same readings should appear on the device in the range of 10-11 V, in the same time period, but with a minus sign. It indicates that the polarity of the connection at the output of the controller has been reversed.
When checking controller 13333854, where the temperature of the VAZ-2110-12 stove is adjusted automatically, you need to know that its polarity at the outputs will be the opposite. That is, in the extreme right position, the multimeter readings will have a minus sign, and in the extreme left position without a sign in front of the readings. Otherwise, its testing is similar.
If, during testing, the indicators on the device differ greatly from the normative ones, this means a breakdown of the controller. It is better to replace a failed stove regulator, since repairing microelectronics is simply unprofitable. But there is still no need to rush; installing a new electronic control unit is justified only when it becomes absolutely clear that other components of the control system are functioning normally. Particular attention should be paid to the condition of the wiring, etc.
Thus, repairing the VAZ-2110 stove regulator does not require special skills and tools, and the only complex equipment you will need is a multimeter, which many car enthusiasts have. You can check and troubleshoot problems yourself, including in cases where the damper jams, which will be signaled by one of the control system tests. If a sensor or micro-reducer fails, you can easily change them yourself, since access to them is quite simple. The only serious problem is the failure of the control unit itself, which is practically beyond repair, since it is based on an integrated circuit, so it is easier to replace.
Adjusting the stove controller
The manufacturing plant provides for heating the interior to the specified temperature in fifteen minutes with a deviation of up to two degrees. Use the controller knob to set a comfortable temperature in the car interior.
To check the proper functioning of the stove, use a regular mercury room thermometer. If after fifteen minutes the interior has not warmed up to the required temperature, the controller must be adjusted.
To do this, pull the heater control module back out and rotate the temperature regulator, first to the maximum value, then in the opposite direction. After carrying out such actions, install the unit in place and check the operation of the stove again.
At the same time, it is necessary to check the operation of the heater dampers. If there are extraneous sounds when switching temperature modes, then you need to check the condition of the dampers. If cold air flows well, but hot air hardly flows in, then the lower damper is faulty. If there is no normal flow of cold air but there is a good flow of hot air, there is a problem with the upper damper. The reason may be deformation of the dampers under the influence of air of different temperatures. In this case, it is better to replace the standard plastic dampers with aluminum analogues, which are more resistant to temperature changes.
After adjusting the controller, all heater elements are installed in their original places. Assembly is carried out in reverse order.
Let's sum it up
Malfunctions of the VAZ-2110 heater control unit can lead to both incorrect functioning of the vehicle’s heating system and complete failure of the heater. During the cold season, this will affect not only a comfortable stay in the car, but also safe driving for the driver of the vehicle.
Repairing the stove control unit can be done on your own if you have basic knowledge of electronics, a desire to work and improve your comfort.
High-quality repairs and timely regular inspections of the unit before the onset of cold weather will help you save money on stove repair services at service centers and the purchase of expensive heating system elements.