Procedure for replacing the container
It is advisable to perform the disassembly procedure on a cooled engine, since hot antifreeze will inevitably get on your hands and cause burns.
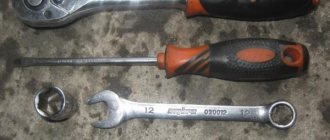
Special equipment and no special conditions are required, including an inspection ditch. For work, choose a lighted, flat area or a warm room if the replacement is being done in the middle of winter. From tools and additional materials you need to prepare:
- Phillips screwdriver;
- pliers;
- set of open-end wrenches;
- manual or foot pump with a pointed nozzle on an air hose;
- antifreeze basin;
- rags.
To work, you will need a simple set of tools available in every garage.
It is also recommended to stock up on new clamps to match the size of the pipes; it is better not to use old ones.
Instructions for disassembling and installing a new part
To change the container, you need to empty it of antifreeze. There is no need to completely empty the system; no more than 2 liters of liquid should be drained. This can be done in two ways:
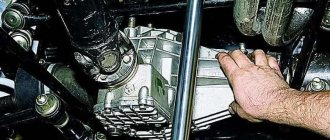
- Unscrew the protective boot under the radiator, place a basin and unscrew the lower plug of the main radiator a few turns. When the antifreeze leaves the reservoir, screw the cap back on.
The plug with a thumb for manual unscrewing is located at the bottom of the radiator
Then work in the following order:
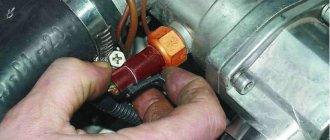
Causes of failure of VAZ 2110-2115 tanks
Inflates the coolant reservoir of the VAZ 2114.
The service life of this element is not limited by regulations. This means that the container should be changed as needed, and this occurs quite often. The most common reason for replacement is damage to the integrity of the plastic case during operation. The tank simply bursts and here's why:
- Clogged or damaged lid valve. The steam coming from the radiators increases the pressure inside the tank because it cannot escape through the plug. As a result, the wall of the container is destroyed.
- In VAZ 2110-12 cars, the side walls of the vessel are closely adjacent to the body elements - the glass and the partition. As the antifreeze temperature and pressure in the system increase, the plastic has nowhere to swell, causing the body to burst along the seam at the end (usually in the lower corner).
- In the event of a breakdown of the gasket between the cylinder head and the engine block, the cooling system is subjected to a series of water hammers created by the movement of the pistons. The plastic case also often bursts from such an impact.
- The reason may be the expansion tank itself, made from low-quality raw materials or in violation of plastic molding technology.
To avoid destruction of the expansion tank, it is recommended to check the functionality of the plug valve before each long trip. Practice shows that problems with the tank most often arise on the road, when it is hot outside, that is, in the summer. A sign of a malfunction is a sharp increase in coolant temperature and a puddle under the engine compartment on the driver’s side.
Location of expansion tank
A plastic reservoir for excess coolant is installed by the manufacturer in different places depending on the model of the “tenth” family:
- in cars of the VAZ 2110-12 series, the reservoir is located on the left side (in the direction of travel) between the pillar glass and the wall of the interior partition;
The expansion tank on VAZ 2110-12 models is installed in a narrow niche on the driver’s side
In cars of the 2114-2115 series, the tank is located in front of the pillar
The expansion tank is attached to the body elements with a clamp in the form of a flat rubber belt with a metal hook that hooks onto a protrusion on the side member. There are 3 hoses connected to the tank:
- A large diameter pipe leading from the thermostat is connected to the bottom.
- The upper tube of small diameter goes through the partition to the radiator of the cabin heater.
- The middle small tube connects the tank to the upper fitting of the main cooling radiator.
The reservoir compensates for the expansion of coolant and steam from three elements of the system - the cabin heater, the radiator and the main line near the thermostat
Each hose performs a separate function. The thick pipe serves to expand the coolant and fill the system while pouring antifreeze through the neck of the tank. Two thin tubes are designed to drain the steam-water mixture from the stove and the main radiator into the tank when heated to the maximum permissible antifreeze temperature of 95 ° C.
The expansion tank (item 1) is located at the highest point of the cooling system at the same level as the throttle valve
Replacing the expansion tank
Replacing coolant VAZ 2112
This simple operation is accessible to every self-respecting car enthusiast. To carry it out, it is enough to have the following devices on hand:
- Container for draining coolant.
- A rag or rag.
- Screwdrivers.
Work must be carried out on a cooled engine. This is necessary to avoid burns. First you need to drain the liquid from the tank. To do this, place the Priora on a flat surface. On the main radiator on the right side, along the direction of the car, there is a special lamb in the lower part. This is the drain hole. Place a container under it and unscrew the screw. After this, unscrew the cap from the tank. Only after unscrewing the plug, not before. This will simply allow you to regulate the pressure and maintain cleanliness. Well, it will reduce the loss of tasol.
When all the fluid has drained from the tank, the plug in the radiator can be returned to its place. The rest of the liquid will not interfere. And this will prevent the creation of air locks in the system.
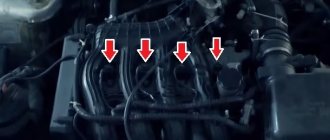
Now you can remove the tasol drive itself. To do this, use a screwdriver to loosen the clamps on the three incoming hoses and disconnect them. Pull the tank out of the mounting groove and insert a new one. Reassemble everything in reverse order. Fill in the drained coolant and warm up the Priora engine. That's all the replacement is.
An interesting option for checking the functionality of the lid. Very useful video:
The water cooling system of VAZ cars of the “tenth” family necessarily includes a plastic expansion tank. When the volume of antifreeze increases as a result of heating, its excess flows into this container. The second function of the element is to remove steam and excess pressure through a plug with a valve. The problem is that on “tens” tanks often fail and car owners have to change them. The replacement procedure is not complicated and can be easily done with your own hands.
Removing and replacing the expansion tank Lada Priora
It would seem, what is so important about such a device as an expansion tank for coolant (coolant). But if you take a closer look, it turns out that this part performs not only the function of storing antifreeze
It is believed that the Priora expansion tank simply stores excess tasol. However, this is not quite true. Cars equipped with “injectors” themselves are high-temperature.
In addition to the need for timely cooling, the system must maintain a certain pressure. Both the circulation of the coolant and the lower boiling point of antifreeze in the engine depend on this.
With proper pressure, the engine runs reliably at 105 degrees.
Important! This is why you should not use ordinary water to fill the cooling system of “injection” machines. After all, water already boils at 95 degrees
And the computer will turn on the fan only at 103 degrees!
Features of the expansion tank
This device has two main parts:
- The case is plastic.
- Cover with pressure valve.
The quality of the plastic used to make the case plays a special role. Maintaining the pressure required by the system depends 50% on its plasticity.
Attention! When purchasing a new expansion tank, you must carefully check the quality of the connections at the joints! It is in these places that antifreeze under pressure can break through
EXPANDER CONFIGURATION
It has four holes. The lower, large outlet is the pipe for the coolant to enter the line. Small tubes are used to return tasol from the area of the heater radiator and thermostat pipe. Well, and the main neck, which is closed with a special lid. But the remaining 50% is ensured by the correct operation of the valve in the expansion tank cap.
HOW THE EXPANSION RESERVOIR COVER WORKS
The principle of its operation is relatively simple. It is based on a soldier valve system. That is, in the system, pressure rises from heating and expansion of the coolant.
The spring in the cover is adjusted in such a way that when the optimal value is reached, the valve opens and releases excess air in the cooling system. In this case, air should flow freely in the opposite direction.
This allows the components to be preserved during cooling. For example, when the engine is turned off.
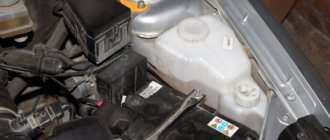
WHERE IS THE ANTIFREEZE EXPANSION TANK LOCATED?
In the engine compartment. Right behind the battery. Above the right side member of the Priora there is a plastic housing for this part. The three pipes listed above are suitable for it. One below, on the left. And two small ones at the top left. On the wide side facing the engine compartment.
Replacing the expansion tank
This simple operation is accessible to every self-respecting car enthusiast. To carry it out, it is enough to have the following devices on hand:
- Container for draining coolant.
- A rag or rag.
- Screwdrivers.
Attention! Work may be difficult if the spacer arches of the Priora struts are installed. But this is a separate question
Just remove the fasteners for this arc on the right side.
Work must be carried out on a cooled engine. This is necessary to avoid burns. First you need to drain the liquid from the tank. To do this, place the Priora on a flat surface.
On the main radiator on the right side, along the direction of the car, there is a special lamb in the lower part. This is the drain hole. Place a container under it and unscrew the screw. After this, unscrew the cap from the tank. Only after unscrewing the plug, not before.
This will simply allow you to regulate the pressure and maintain cleanliness. Well, it will reduce the loss of tasol.
When all the fluid has drained from the tank, the plug in the radiator can be returned to its place. The rest of the liquid will not interfere. And this will prevent the creation of air locks in the system.
Now you can remove the tasol drive itself. To do this, use a screwdriver to loosen the clamps on the three incoming hoses and disconnect them. Pull the tank out of the mounting groove and insert a new one. Reassemble everything in reverse order. Fill in the drained coolant and warm up the Priora engine. That's all the replacement is.
Possible problems
Coolant replacement
In fact, ruptures of plastic containers do not occur so often, so you should not be alarmed in advance when purchasing a used VAZ 2110.
Much more often, owners of this domestic car are faced with a breakdown of the valve cover of the tank. It is responsible for relieving excess pressure when the power unit overheats.
It is this lid that can jam, causing pressure to build up inside the container, which can ultimately lead to rupture of the plastic.
If such a problem catches you on the road, do not turn off the engine under any circumstances. You need to stop and wait for the cooling fan to turn on.
Preventive measures
As you understand, the expansion tank is directly connected to the radiator and fan, therefore maintaining the tank in working condition is the direct responsibility of every car owner.
Prevention includes the following activities:
- Periodically inspect the condition of the plastic container and its individual elements;
- If you find that the coolant level in the tank is too low, add the missing amount;
- If it soon becomes noticeably smaller again, check the tank for leaks. Most likely, liquid is leaking somewhere;
- Observe the condition of the tank neck. If there are traces of drips on it, that's good. This phenomenon indicates that the valve cover is triggered and relieves excess pressure. Hence the traces of coolant.
Replacing the expansion tank
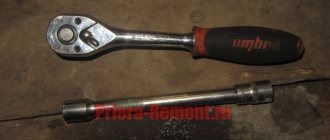
To replace the expansion tank, you will need a Phillips screwdriver and a container to drain the coolant.
To remove the expansion tank you will need a small Phillips screwdriver
Operating procedure
The replacement procedure is as follows.
Remove the plug located at the bottom of the tank on the right side.
Drain the entire volume of coolant from the resulting hole into a previously placed container.
After draining the coolant, replace the plug.
Remove the pipe from the tank fitting.
Use a Phillips screwdriver to loosen the clamp on the filling hose.
Remove the hose from the second tank fitting.
Install a new tank.
Connect the coolant supply hose first, then the steam exhaust hose. Secure the hoses with new clamps.
Pour antifreeze into the new expansion tank.
Expansion tank device
The manufacturer installs expansion tanks produced by Plastik LLC on the Lada Priora car. They are made of translucent white plastic. A scale showing the coolant level must be applied to the front wall of the tank.
The Max and Min marks show the level of antifreeze in the tank
The tank is closed with a lid, which simultaneously measures the antifreeze pressure in the cooling system. The lid is located on the neck at the top of the tank. It is made of plastic and, for its part, reliably seals the cooling system.
Expansion tanks made in Russia are distinguished by their strength and durability. Their cost depends on the design features of the case (from 300 rubles and above).
Lada Priora cars are equipped with the simplest domestic coolant tanks
Design features of the LADA Priora engine cooling system
The LADA Priora engine cooling system is liquid, closed type, with forced circulation. Consists of an engine cooling jacket, a radiator with an electric fan, a thermostat, a pump, an expansion tank and connecting hoses.
Design of the LADA Priora cooling system
Cooling system: 1 — expansion tank; 2 — radiator outlet hose; 3 - inlet hose; 4 - radiator; 5 — steam exhaust hose; b — radiator supply hose; 7 — electric fan; 8 — electric fan casing; 9 — coolant temperature sensor; 10 — coolant temperature indicator sensor; 11 — throttle assembly; 12 — bracket for the coolant pump pipe; 13 — coolant pump; 14 — coolant pump pipe; 15 — heater radiator supply hose; 16 — heater radiator outlet hose; 17 — exhaust pipe; 18 — coolant pump pipe hose; 19 — thermostat housing
| Expansion tank. Coolant is poured into the system through the expansion tank. It is made of translucent plastic, which allows you to visually monitor the liquid level. To do this, the marks “MAX” and “MIN” are marked on the wall of the tank. In the upper part of the tank there are two pipes for connecting the steam removal hoses of the cooling system radiator and the heater radiator, in the lower part there is a pipe for connecting the cooling system inlet hose |
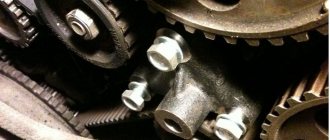
| Coolant pump - circulates coolant. It is bladed, centrifugal type, driven from the crankshaft pulley by a timing belt. It consists of a housing, a bearing assembly with a seal, an impeller and a toothed pulley. There is a control hole in the pump housing to detect fluid leakage when the pump seal fails. The pump should be replaced as an assembly. |
Comment
| Jamming of the pump pulley due to failure of its bearing assembly or due to freezing of highly diluted coolant will lead to breakage of the timing belt and, as a result, to expensive engine repairs. |
The liquid enters the pump through a supply pipe located on the rear wall of the cylinder block under the catenary collector. From the pump, liquid under pressure is supplied to the engine cooling jacket, and from there to the thermostat housing.
The cooling system consists of two so-called circulation circles:
- The small circle does not include the engine radiator, and the fluid washes only the cylinder block and cylinder head, and also flows through the throttle body channel and the heater core.
- When moving in a large circle, the coolant passes through the engine radiator, where it is cooled by the incoming air flow. The thermostat controls the direction of fluid flow in the engine cooling system.
Thermostat. Two thermostat valves - main and bypass - redistribute fluid flows in the cooling system. You will find the thermostat opening and closing temperatures below.
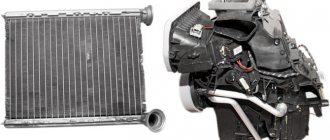
The heater radiator is built into the engine cooling system and is designed to heat the passenger compartment by circulating hot coolant through it.
| The radiator consists of two vertical plastic tanks (the left one with a baffle) and two horizontal rows of round aluminum tubes passing through the cooling plates. The bases of the tubes are connected to the tanks through rubber gaskets. The liquid is supplied through the upper pipe and discharged through the lower. Above the inlet pipe there is a thin pipe for the steam removal hose. There is a drain plug at the bottom of the right tank. A plastic casing with an electric fan is attached to the radiator. |
| The fan maintains the thermal operating mode of the engine and is switched on via a relay based on a signal from the engine control system controller. To monitor the coolant temperature, a temperature gauge sensor is screwed into the engine cylinder head in the instrument cluster. |
Replacement
It would seem, what is so important about such a device as an expansion tank for coolant (coolant). But if you take a closer look, it turns out that this part performs not only the function of storing antifreeze
It is believed that the Priora expansion tank simply stores excess tasol. However, this is not quite true. Cars equipped with “injectors” themselves are high-temperature. In addition to the need for timely cooling, the system must maintain a certain pressure. Both the circulation of the coolant and the lower boiling point of antifreeze in the engine depend on this. With proper pressure, the engine runs reliably at 105 degrees.
This simple operation is accessible to every self-respecting car enthusiast. To carry it out, it is enough to have the following devices on hand:
- Container for draining coolant.
- A rag or rag.
- Screwdrivers.
When all the fluid has drained from the tank, the plug in the radiator can be returned to its place. The rest of the liquid will not interfere. And this will prevent the creation of air locks in the system.
Now you can remove the tasol drive itself. To do this, use a screwdriver to loosen the clamps on the three incoming hoses and disconnect them. Pull the tank out of the mounting groove and insert a new one. Reassemble everything in reverse order. Fill in the drained coolant and warm up the Priora engine. That's all the replacement is.
To remove and install the expansion tank in the Lada Priora, follow the step-by-step instructions:
You will need a Phillips head screwdriver. First remove the reservoir cap. To make the lid easy to manipulate, turn the drain plug located at the bottom of the radiator tank on the right. Next, drain all the liquid
Remember the important rule for draining antifreeze - it is unacceptable to mix different coolants with each other. Turn the drain plug a little
Please note that when draining antifreeze from the radiator unit, liquid will also come out of the tank. Loosen the clamp securing the steam exhaust hose of the heater radiator, and then remove the hose from the fitting. Remove the steam exhaust hose from the radiator of the engine cooling system. To remove the reservoir, move it upward and slide the rear panel away from the recess of the engine shield trim. Drain off any remaining antifreeze. Install the new unit using the reverse sequence.
The expansion tank is an important element of the engine cooling system. It has an extremely simple design and rarely fails. Nevertheless, every car owner should know the procedure to follow if damage to the tank is detected.
The main function of the expansion tank is to compensate for evaporated antifreeze in the engine cooling system. In the Lada Priora car, the tank is located under the hood on the driver's side.
The expansion tank is located under the hood on the left (in the direction of travel) side
Inside there are several partitions to strengthen the structure, which can withstand heavy loads.
The coolant level must be indicated on the tank, which should always be between the MIN and MAX marks.
Tool for work:
- Crosshead screwdriver;
- Sealant;
- Container for draining the coolant (a two-liter bottle with the neck cut off will do);
It is necessary to allow the engine to cool down to avoid burns during operation.
Unscrew the clamp of the lower fitting and drain the coolant into a prepared container. It is necessary to drain the liquid only from the expander. Then we fix the removed pipe in a vertical position so that the remaining coolant does not leak out.
We unscrew the clamps of the remaining pipes and remove them, also fixing them in a vertical position.
We remove the tank by pressing on the right side and pulling the left up, it should look like in the picture.
Install the new one in the reverse order of removal. It is recommended to apply a small amount of sealant to the fittings for better tightness of the system.
We add the remaining coolant, start the engine and warm it up to 90°C, after which we check the tightness of the system.
The process of replacing the expansion tank on the Lada Priora has been completed, as you can see there is nothing complicated about it.
Step-by-step guide to replacing the expansion tank in Lada Priora
To remove and install the expansion tank in the Lada Priora, follow the step-by-step instructions:
- You will need a Phillips head screwdriver. First remove the reservoir cap. To make the lid easy to manipulate, turn the drain plug located at the bottom of the radiator tank on the right. Next, drain all the liquid.
- Remember the important rule for draining antifreeze - it is unacceptable to mix different coolants with each other.
- Turn the drain plug a little. Please note that when draining antifreeze from the radiator unit, liquid will also come out of the tank.
- Loosen the clamp securing the steam exhaust hose of the heater radiator, and then remove the hose from the fitting.
- Remove the steam exhaust hose from the radiator of the engine cooling system.
- To remove the reservoir, move it upward and slide the rear panel away from the recess of the engine shield trim.
- Drain off any remaining antifreeze.
- Install the new unit using the reverse sequence.
The expansion tank is an important element of the engine cooling system. It has an extremely simple design and rarely fails. Nevertheless, every car owner should know the procedure to follow if damage to the tank is detected.
Replacing the expansion tank on the Lada Priora
Every driver may encounter the problem of a decrease in the coolant level in the expansion tank. One of the reasons for this may be a leak in the expansion tank. First of all, cracks appear at the joints and at the base of the tank fittings. In this case, the expansion tank must be immediately replaced with a new one.
The step-by-step instructions provided will help you make the replacement.
Replacement requires a Phillips and flat head screwdriver.
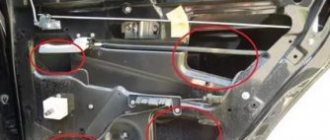
We disconnect the cooling system pipes from the expansion tank and drain the remaining coolant in the tank into a previously prepared container. The expansion tank is secured only with metal clamps, but its removal is hampered by the windshield frill. Therefore, it is necessary to partially disassemble the frill.
Loosen the right side of the frill by unscrewing 4 screws under the plugs and 4 self-tapping screws under the rubber seal.
We pull out the expansion tank towards the left wing.
We clean the area under the expansion tank from dirt and, if necessary, straighten the deformed metal clips.
We install the new expansion tank in the same way from the left wing, being careful not to damage the plastic fittings.
We assemble the frill in the reverse order. We connect the cooling system pipes, having previously cut off the deformed ends.
If necessary, immediately change the cooling system pipes, the pipe clamps and the expansion tank cap.
(2 ratings) Loading...
How to remove the expansion tank on a Priora
Lada Priora and most domestically produced cars allow you to master the repair of many functional components with your own hands, and this is a big plus for owners - you can significantly save money on visiting a service station and acquire the skills of an auto mechanic. Using the instructions provided by specialists, you can remove the old expansion tank in the Lada Priora and replace it with a new device.
Many owners of domestic cars often face repairs to one or another part. Fortunately, nowadays you can find many recommendations for car repairs. What is an expansion tank for? The expansion tank is used to collect excess coolant volume, which changes under the influence of temperature.
How the expansion tank works: The part is made of transparent plastic. There are special marks on the walls showing the coolant level. The expansion tank cap is located on top, in the neck. The plug that closes the neck contains the inlet and outlet valves. They are made in the form of a single block.
When cooling, the volume of liquid decreases and the pressure inside the system decreases. At the same time, the inlet valve is activated, giving air access inside the tank. Often the reason for repairing the expansion tank is a leaky seal. You should also check the functionality of the thermostat and valves. If the liquid boils, be sure to check the serviceability of the valves.
For example, if the exhaust valve leaks, the temperature at which the coolant boils will decrease. And if it gets stuck closed, not allowing air to pass through, this will cause the pressure inside the system to increase, and this can lead to damage to the hoses and radiator.
Replacing the expansion tank Let's move directly to replacing the expansion tank. This is done as follows:1. First you need to remove the drain plug, which is located at the bottom of the radiator tank, and drain all the liquid from it. After draining the liquid, screw the plug back on. Note that when draining the liquid not from the tank, but from the radiator, all the liquid from the tank will also flow out.2.
Now you should loosen the metal worm clamp securing the hose through which steam is discharged from the radiator, and remove the hose from the tank fitting.3. Loosen the metal clamp of the charging hose and disconnect it.4. To remove the expansion tank, you need to lift it up and at the same time remove it from the recess of the engine shield trim.5.
Now you need to drain the remaining liquid from the tank. Then we install a new expansion tank. After everything is installed, you need to fill the system with coolant (according to all standard requirements) and tighten the reservoir cap. After this, you should start the engine and check the hose connections for leaks; if liquid leaks, you need to tighten the clamps well and warm the engine to normal temperature at idle to remove air from the system.
For various reasons, the expansion tank of the Lada Priora cooling system becomes unusable. This usually happens in winter, when the fragility of the plastic parts of the Lada Priora car increases and careless or involuntary application of great forces and impacts leads to cracks or crumbling of the plastic parts.
An important place in the expansion tank of a Lada Priora car is occupied by the expansion tank cap. It's not just a black plastic screw-on lid. The expansion tank cap plays a significant role in the normal operation of the Lada Priora engine.
When a car owner does not use water to cool the Lada Priora engine instead of the required coolant according to GOST, then nothing happens to the safety valve located in the expansion tank cap. This has been tested by time (more than seven years of operation of the Lada Priora from scratch). You can look at the pictures that I posted just above.
The valve in the expansion tank cap is designed to create excess pressure in the cooling system of the Lada Priora engine so that the coolant does not boil and does not form air bubbles in the cooling system. Typically, in the Lada Priora cooling system, the excess pressure fluctuates around 1.1-1.5 kgf/cm2.
Checking the technical condition of the valve in the expansion tank cap is quite simple and does not require much skill. Pry off the sealing gasket (be careful here and do not damage the gasket when removing it) and holding the valve protective casing with your hands from shooting out by the springs, since it is compressed during assembly, it can be easily and simply disassembled.
Some people advise upgrading this valve by simply biting off the valve spring and thereby reducing the technical performance of a normally functioning valve. Do you want to put a puzzled sign here?! and say why. At the factory, the valves are selected on benches and withstand the pressure required for normal operation of the Lada Priora engine under different modes.
I want to say again that all your work consists of visually inspecting the springs and valve holes for clogging and rust (although this is simply impossible in coolant, if not water).
If you did not find anything during inspection (clogging, warping, drying out, accumulation of various deposits.), then you need to tighten the cap of the expansion tank tightly and fairly decently. Thus, you eliminate many unnecessary questions when repairing the engine cooling system.
And for those who are haunted by the modernization of the expansion tank cap, I will say that to each his own.
Replacing the expansion tank; You will need a Phillips-blade screwdriver.
We remove the expansion tank for replacement. If there is coolant in the expansion tank, pump it out with a rubber bulb and hose.
Using a Phillips screwdriver, loosen the clamps securing the steam exhaust hoses of the cooling system radiator and the heater radiator.
Remove the hoses from the tank pipes.
Use a Phillips screwdriver to loosen the clamp securing the inlet hose...
...and remove the hose from the tank pipe. Remove the rubber seal from the edge of the front panel in the tank area. Overcoming the resistance of the front panel upholstery, we pull the tank towards the fender and up...
...and remove the expansion tank from the holder. When installing the tank, do not damage its pipes. Pour coolant into the cooling system (see “Replacing Coolant”).
Replacement
To carry out the work, you do not need any special knowledge of automotive mechanics; after reading our instructions, you will easily carry out this work. For faster and trouble-free dismantling and installation of the tank, you need to prepare the necessary tools. It is also recommended to replace the cap along with the tank.
Tool for work:
- Crosshead screwdriver;
- Sealant;
- Container for draining the coolant (a two-liter bottle with the neck cut off will do);
Work procedure
It is necessary to allow the engine to cool down to avoid burns during operation.
Unscrew the clamp of the lower fitting and drain the coolant into a prepared container. It is necessary to drain the liquid only from the expander. Then we fix the removed pipe in a vertical position so that the remaining coolant does not leak out.
We unscrew the clamps of the remaining pipes and remove them, also fixing them in a vertical position.
We remove the tank by pressing on the right side and pulling the left up, it should look like in the picture.
Install the new one in the reverse order of removal. It is recommended to apply a small amount of sealant to the fittings for better tightness of the system.
We add the remaining coolant, start the engine and warm it up to 90°C, after which we check the tightness of the system.
The process of replacing the expansion tank on the Lada Priora has been completed, as you can see there is nothing complicated about it.
Removing the expansion tank
The tank is mounted in a special bracket. There is no need to unscrew anything except the hoses that go to the tank. But it just didn't work out. The casing has a recess for the tank. The casing must be unscrewed and lifted up a little. To do this, unscrew the wiper arms. Plastic panel under the wipers. Then the casing is unscrewed. Raising the trim a little. It becomes possible to remove the expansion tank. From the bracket.
This design provides for the replacement of the Priora expansion tank with air conditioning. This car has Panasonic air conditioning. Two pipes fit into the expansion tank. Other designs may have three pipes. The parameters of the tank itself do not change.
Procedure for replacing the container
It is advisable to perform the disassembly procedure on a cooled engine, since hot antifreeze will inevitably get on your hands and cause burns. Special equipment and no special conditions are required, including an inspection ditch. For work, choose a lighted, flat area or a warm room if the replacement is being done in the middle of winter.
From tools and additional materials you need to prepare:
- Phillips screwdriver;
- pliers;
- set of open-end wrenches;
- manual or foot pump with a pointed nozzle on an air hose;
- antifreeze basin;
- rags.
To work, you will need a simple set of tools available in every garage.
It is also recommended to stock up on new clamps to match the size of the pipes; it is better not to use old ones.
Instructions for disassembling and installing a new part
To change the container, you need to empty it of antifreeze. There is no need to completely empty the system; no more than 2 liters of liquid should be drained. This can be done in two ways:
- Unscrew the protective boot under the radiator, place a basin and unscrew the lower plug of the main radiator a few turns. When the antifreeze leaves the reservoir, screw the cap back on.
The plug with a thumb for manual unscrewing is located at the bottom of the radiator
Then work in the following order:
- Remove the 2 small tubes from the container by loosening the clamps with a screwdriver. Take them aside.
The hoses are easily removed from the fittings after loosening the clamps
To remove the element, simply unfasten the rubber retainer
The new part is inserted into the niche in place of the old one and secured with a clamp
To add antifreeze to a level between the Min and Max marks on the tank wall without creating an air lock in the system, disconnect the tube from the throttle valve heating unit (this is the highest point of the cooling circuit). Pour liquid into the tank until it runs out of the removed tube, then put it on the fitting and secure it with a clamp. Add antifreeze to the required level.
Before pouring antifreeze into the system, you need to remove one of the pipes connected to the throttle valve block
During the replacement process, you should pay attention to the condition of the hoses leading to the container. If their ends have become soggy and increased in diameter, and cracks have formed on the walls, it is better to change such pipes
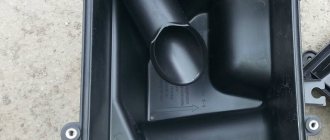
Installation of an expansion tank from Priora
The capacity of the engine cooling system of the VAZ 2170 is distinguished by thicker walls, thanks to which Priora has forever gotten rid of the “childhood disease” of a bursting tank inherent in the VAZ 2110. There is another reason: in the standard tank of the “tens”, a stream of antifreeze from the radiator pipe hits from the inside directly into the lid , which is why the latter leaks. On the “Prior” part, the fittings are at an angle to the neck, so liquid does not get there.
The tank fittings from the VAZ 2170 are directed away from the filler neck
Since the part from the VAZ 2170 is wider than the standard element, its installation is associated with some difficulties: the tank will not simply fit into the narrow space between the glass and the partition. What should be done:
- Remove the windshield wipers by unscrewing the mounting nuts.
- Remove the upper body panel.
- Unscrew the partition trim from the engine compartment side.
- Try on the new tank by inserting it into the opening. Then cut the sound insulation to size and assemble the assembly in reverse order.
In order for the wide element from Priora to fit into a narrow opening, you will have to remove the partition trim
Installation of pipes and filling of coolant is carried out using the technology described in the previous section. As for modifications of the VAZ 2114-15, where the expansion vessel is located in a wide niche in front of the pillar glass, such a replacement will not cause any difficulties.
Video: tank from Priora on a VAZ 2110
The work of replacing the expansion tank on machines of the “tenth” family should be done independently if you want to save personal time and money. A trip to a car service center will take longer and cost more. At the end of the procedure, do not forget to check the operation of the cooling system by warming up the engine to operating temperature and turning on the electric fan.
What to choose?
If you still need to replace the tank, you first need to choose what exactly you will replace the old tank with.
Today there are several decent options on the market that are perfect for your VAZ 2110.
| Option | Peculiarities |
| Standard tank for "ten" | Factory version, which is optimal in terms of price and quality. Sometimes you can’t think of anything better than native parts |
| Foreign analogues | If you can find the perfect tank, you're in luck. The quality is up to par and it performs its functions perfectly. But finding such an option is extremely difficult. Plus the price is higher |
| Capacity from Priora | Many consider it an ideal choice for the VAZ 2110. It costs about 300 rubles. You can find it by catalog number 2170-1300060. The walls are thicker, which has a positive effect on reliability. Just keep in mind that there are two types:
|
If you choose to replace the tank from Priora, then you should take the version for a car without air conditioning.
Features of the expansion tank
This device has two main parts:
- The case is plastic.
- Cover with pressure valve.
The quality of the plastic used to make the case plays a special role. Maintaining the pressure required by the system depends 50% on its plasticity.
Attention! When purchasing a new expansion tank, you must carefully check the quality of the connections at the joints! It is in these places that antifreeze under pressure can break through
Expander Configuration
It has four holes. The lower, large outlet is the pipe for the coolant to enter the line. Small tubes are used to return tasol from the area of the heater radiator and thermostat pipe. Well, and the main neck, which is closed with a special lid. But the remaining 50% is ensured by the correct operation of the valve in the expansion tank cap.
How does the expansion tank cap work?
The principle of its operation is relatively simple. It is based on a soldier valve system. That is, in the system, pressure rises from heating and expansion of the coolant. The spring in the cover is adjusted in such a way that when the optimal value is reached, the valve opens and releases excess air in the cooling system. In this case, air should flow freely in the opposite direction. This allows the components to be preserved during cooling. For example, when the engine is turned off.
Where is the expansion tank for antifreeze located?
In the engine compartment. Right behind the battery. Above the right side member of the Priora there is a plastic housing for this part. The three pipes listed above are suitable for it. One below, on the left. And two small ones at the top left. On the wide side facing the engine compartment.
Why do you need an expander?
To cool the engine, a special liquid based on propylene glycol or ethylene glycol (antifreeze or antifreeze) is used. These types of coolant have large thermal expansions. When the internal combustion engine operates, the coolant heats up and expands. If the cooling system did not use an expansion tank, then due to thermal expansion the radiators or pipes would fail due to excess pressure.
Broken expansion tank due to excess pressure in the system
The liquid in the expansion tank increases when heated and decreases when cooled. To prevent excessive pressure or vacuum from forming in the tank due to constant changes in coolant level, its lid is equipped with special valves that release or, on the contrary, allow air into the system in order to compensate for the load on the tank and maintain normal operating pressure.
Recommendations for selection
For VAZ 2110-12 models, you can find 2 types of expansion tanks on sale:
- old model with two necks: the coolant level sensor is screwed into the first, and the second is closed with a plug with a release valve;
On old-style products, a second neck was made for installing an antifreeze level sensor
The new sample container does not have a level sensor
If your car has a sensor in an expansion tank, then you need to select an old-style product. Accordingly, versions without a sensor will require a new reservoir design.
The reservoir for models 2114-15 has a wider shape and a versatile arrangement of fittings
When purchasing an expansion tank for any series of cars of the “tenth” family, pay attention to the following points:
- the plastic of a quality product should be light and half transparent;
- cracks in the corners or near the fittings are unacceptable;
- the plastic should not be “oaky” or have dark impurities visible to the naked eye;
- look on the body for an imprint of the manufacturer's trademark and catalog number (21083–1311014 for VAZ 2114).
For all modifications “ten”, “fourteen” and “fifteen” a small tuning is available - installation of an expansion tank from the cooling system of a Lada Priora car. Why and how this is implemented will be discussed below.
The reservoir of the Priora cooling system has a rectangular shape and 3 fittings on the front wall
Tank location
The expansion tank is located under the hood on the left side in the direction of travel of the car, between the side member and the windshield. It has a rectangular stirrup shape or two fittings for SOD pipes.
- With two fittings it is used in Prioras with climate control (air conditioning).
- With three fittings in Priors without air conditioning.
Inside there are several partitions to strengthen the structure, which can withstand heavy loads.
The coolant level must be indicated on the tank, which should always be between the MIN and MAX marks.
Replacement or repair?
Is it even possible to repair the tank? If he was torn to pieces, then no.
This element is subject to repair only in the event of failure of components - a float or a cover.
If the seal is lost, regardless of the reasons, repair is impossible. Theoretically, you can glue the plastic together and make patches, but such savings will not lead to anything good.
To replace the cover, use a spare part from the VAZ 2199 model. Although this model is older than the “ten”, the elements are interchangeable. Plus, the quality of the cover from the nine turned out to be better, and the thread matches perfectly.
Simply unscrew the broken cap and screw a new one in its place. That's the whole point of the replacement.
Replacement
So, the old expansion tank has lost its tightness, and therefore it should be dismantled and a new one should be installed in place of the old tank.
To properly replace the coolant container, you will need a certain set of tools and materials:
- Set of wrenches;
- Screwdrivers;
- Pliers;
- Clamps (we strongly do not recommend using old ones);
- Sandpaper.
Sandpaper is required to process the inlet holes of a new tank made of plastic. This is due to their roughness. If you make the holes smooth, the pipes will be stronger and fit more securely.
Installation process
Replacement instructions are included with each new tank. So there shouldn't be any problems with this. Let's describe the main points.
- If the car has just been driven into the garage, be sure to wait a while for the engine to cool down. When removing the container while the engine is hot, the coolant will be very hot. The consequences are not difficult to predict.
- Open the cap on the car's radiator. This will relieve excess pressure from the cooling system.
- Another cap is removed from the bottom of the radiator, which will allow you to drain the coolant. This doesn't always need to be done. For example, if the coolant was changed very recently, simply pinch the reservoir pipes so that you don’t have to drain and refill the coolant.
- Disconnect the coolant level sensor connector.
- Loosen the clamps to remove the steam pipe.
- Loosen the clamp on the filling hose and disconnect it.
- Disconnect the rubber tank securing strap to allow the tank to be removed.
- Reassemble the unit in the reverse order, but now with a new tank.
- If, after replacing the tank, the cap begins to release excess pressure normally, but the low coolant level lamp still lights up on the dashboard, try replacing the coolant level sensor. It is located in the tank itself and can be purchased separately.
- The sensor is installed by disconnecting the chip on the cover and screwing a new one in its place. That's all.
If you chose a tank from Priora, then you will have to remove the hood sound insulation and cut out a small section of it at the level of the top of the tank. This is due to the shape of the tank being slightly different from the standard one.
As you can see, the work is not difficult, no problems should arise. The main thing here is to correctly select a new expansion tank and, according to the instructions, install it in place of the failed component.
Sources
How many liters of antifreeze are in Priora?
It is believed that cooling liquid must be poured into a Priora 16 with a valve system every five years. It is designed to reduce the engine temperature while driving to avoid overheating.
It is worth replacing on time. If this is not done, antifreeze decomposition products will be deposited on the metal parts of the engine. They are incompatible with the operation of the structure. The device runs the risk of wearing out in a short period of time. It is also possible that the cooling fluid may overheat. The consequences of this can be unpleasant:
- reduction in engine power;
- reduction in equipment service life;
- high fuel consumption.
This is possible due to the formation of corrosion in the engine, as well as the narrowing of the tubes through which the fuel passes. Due to the fact that the engine constantly operates at elevated temperatures, the channels are deformed. Fuel and lubricating oil liquids are mixed. This leads to system wear and failure.
Untimely replacement of antifreeze leads to many unpleasant consequences. Check periodically. If, when opening the lid, you notice an uncharacteristic color or consistency of the liquid, it is recommended to replace it immediately.
FEATURES OF THE EXPANSION TANK
This device has two main parts:
- The case is plastic.
- Cover with pressure valve.
The quality of the plastic used to make the case plays a special role. Maintaining the pressure required by the system depends 50% on its plasticity.
The principle of its operation is relatively simple. It is based on a soldier valve system. That is, in the system, pressure rises from heating and expansion of the coolant. The spring in the cover is adjusted in such a way that when the optimal value is reached, the valve opens and releases excess air in the cooling system. In this case, air should flow freely in the opposite direction. This allows the components to be preserved during cooling. For example, when the engine is turned off.
In the engine compartment. Right behind the battery. Above the right side member of the Priora there is a plastic housing for this part. The three pipes listed above are suitable for it. One below, on the left. And two small ones at the top left. On the wide side facing the engine compartment.
Why do you need an expansion tank?
The task of the expansion device installed in the Lada Priora is to compensate for the coolant, the volume of which increases or decreases in accordance with temperature changes. The design of the product consists of the following functional parts:
- There are marks on the body that regulate the level of antifreeze - minimum value and maximum.
- The lid is located at the very top, which allows you to completely close the neck.
- Sealing is achieved with a plastic plug; valves are equipped, making up one block responsible for inlet and outlet.
How many liters of coolant are in the Lada Priora cooling system
Before replacing, it is necessary to determine how much antifreeze to fill. According to the passport, the empty system on the Priora contains about 7.84 liters of liquid. However, when replacing, some of the liquid cannot be drained, as a result of which about 6-6.5 liters are often sufficient for replacement.
Taking into account the fact that antifreeze or antifreeze is often sold in the form of a concentrate, the general rule is:
- mixing the concentrate in a ratio of 50:50 (50% antifreeze and 50% water);
- mixing in a ratio of 60:40 (60% antifreeze and 40% water);
These proportions make it possible to obtain the freezing point of the coolant at around -30 or -35 degrees Celsius, which is quite enough for most regions.
It turns out that for replacement you need to purchase 4 liters of concentrate and 4 liters of distilled water. Ready-made antifreeze for Priora will be obtained with a small reserve. This reserve must be drained into an airtight container and stored, since the liquid will be useful for refilling in the future.