Replacing valve stem seals begins with allowing time for the engine to cool and for the oil to drain into the sump. Once the engine has cooled down, you can begin removing the valve covers. When removing the timing cover, be careful not to damage the gasket. To do this, do not pry it with a screwdriver if it is not removable, but rather hit it with your palm from the side. Replacing oil seals on a diesel engine is no different from the same operation on a gasoline engine.
Purpose of valve stem seals
Since the lubrication of the gas distribution mechanism is combined (the camshaft journals are lubricated under pressure, and the remaining components and parts are lubricated by splashing), a lot of oil accumulates in the upper part of the head while the engine is running, which even covers the upper edge of the valve guides. Therefore, through the gap between the valves and the guides, oil, if there were no valve stem seals, would flow in large quantities into the combustion chamber along the valve stems. Due to the high temperature of the head, the rubber of the oil seals becomes hard, and their working edges over time cease to tightly cover the valve stems and begin to leak oil.
When the engine is running, the exhaust valve is at high temperature. Therefore, the oil that gets on its working chamfer burns, and the carbon deposits from it create conditions for the valve to burn out (when a slag particle breaks off, hot exhaust gases rush into the resulting leak between the valve and the seat and the valve sometimes burns out along with the seat). The intake valve has a lower operating temperature; the oil does not burn on it, but flows from it into the cylinder. Therefore, the intake valve never burns out.
Purpose and design of oil-deflecting valve seals
Rubber valve seals are an integral part of any internal combustion engine. They perform two main tasks:
- Ensuring adequate lubrication of the valve stems is especially important when exposed to hot exhaust gases.
- Prevents excess lubricant from entering the combustion chamber.
The operational parameters of the engine largely depend on the quality and reliability of the oil seals of the timing valves. Their timely change is important and is almost the same for both Lada Samara and BMW.
Design
The current version of the oil seal is a rubber product with a reinforced bushing and a spring that presses the edge of the sealing lip to the valve stem. Motorists interested in how much it costs to replace valve stem seals should also take into account the cost of the consumables themselves, which depends on the brand. For example, over the last ten years, Goetze products have been popular, structurally consisting of the following elements:
- 1 – reinforcing ring.
- 2 – sealing edge.
- 3 – the upper plane of the working edge.
- 4 – lower plane of the working edge.
- 5 – landing edge.
- 6 – mounting collar.
- 7 – expander spring.
The seals are made of elastomers, mainly FP-7510 rubber compound based on fluorine rubber. The service life of parts is on average 160-180 thousand kilometers or 5-6 years. Elring products have a similar design, which is made from a mixture of FPM-8003. But their resource is slightly less - 120-140 thousand km.
When should you start thinking about the cost of replacing the standard valve stem seals on your car?
Increased oil consumption through the seals significantly worsens the combustion of the combustible mixture, as a result of which engine power decreases and fuel consumption increases. On a working engine, where the oil seals, piston rings and crankcase ventilation are in normal condition, the average oil consumption ranges from 120 to 180 grams per thousand kilometers.
If it is found that the exhaust has become too smoky, especially when braking the engine, and the spark plugs are oily, then you should expect that the lubricant consumption will increase to 800-1200 grams per thousand mileage. This picture can be confirmed by the owners of the “ten”, after which they proceeded to change the valve seals on the VAZ 2110 on their own or in a car service center. The latter option makes you think about the cost of replacing oil seals; in any case, timely installation of new oil-deflecting elements will cost much less than overhauling the entire power unit.
In any case, every self-respecting motorist should promptly determine the wear of the sealing cuffs by the following signs:
- Reduced oil level in the internal combustion engine.
- Formation of black carbon deposits on the spark plugs
- Blue smoke from the exhaust pipe when braking the engine or suddenly pressing the accelerator.
- Increased fuel consumption and loss of power.
- Reduced compression.
If replacement is not done in a timely manner, carbon deposits on the cylinder walls and piston surfaces pose a serious danger. During operation of the unit, deposits turn into abrasive, which leads to intense wear of components and parts.
Trust the specialists: how much does it cost to replace standard valve stem seals at a service station?
Traditionally, the first step in eliminating a defect associated with increased oil consumption is to change the valve seals. Only after this, if the desired effect is not achieved, comes the turn of the oil scraper rings on the pistons and further down the list. Many car enthusiasts believe that the first stage of repair is no more difficult than installing a clutch cable on a VAZ 2110 in your own garage.
Why is it better to contact the service?
Correct implementation of all stages of work implies the presence of several factors:
- Thoroughly understand the structure of your car’s engine.
- Have some experience in performing plumbing work.
- Have the appropriate set of tools and equipment.
Take, for example, a device for compressing valve springs - it cannot always be found in the arsenal of even an experienced motorist. Therefore, the question of how much it costs to replace faulty valve stem seals is quite popular among car owners. It is especially important to take into account the moment when repairs are performed by a car mechanic with low qualifications or using a makeshift method. In this case, the seals may lose their properties even at the installation stage.
Replacing valve stem seals without removing the head
The decision to replace oil seals when signs of malfunction are detected is a very correct step
. Sometimes drivers try to solve the problem without “surgical” intervention, using various additives and additives that supposedly soften the rubber and extend the life of the valve stem seals. This decision should not be made: additives either do not have any effect on the seal material, or soften them too much, as a result of which rubber wear only increases.
Replacing oil seals without removing the head is a complex process, so you should devote a lot of time to it, and perform all actions very carefully. How to change valve stem seals? The work algorithm is quite cumbersome, but all these operations must be carried out sequentially and very scrupulously:
1. First of all, you need to wait until the engine cools down and all its elements go into “standby mode”. After this you can start working.
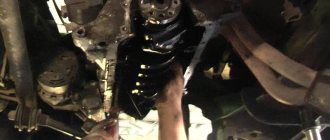
2. The first step is to remove the timing cover. You need to act carefully so as not to damage the gasket (you definitely shouldn’t pick at the cover with a screwdriver).
3. Next, you need to align both shafts (crankshaft and camshaft) according to the marks. Parts should be marked so as not to be confused when assembling the engine, and even better, write down all your actions. When removing the camshaft, you need to loosen its drive. It is advisable to inspect the removed camshaft for the degree of wear - this will help save time and effort during further operation of the car.
Symptoms
Signs of wear on valve seals, called valve stem seals:
- Increased oil consumption. Wear of the rings also causes oil consumption, but then the oil will definitely get into the breather pipe.
- Blueish smoke from the exhaust pipe after starting the engine. This happens because while the car is standing, oil enters the combustion chambers and burns after the engine starts.
- Equally high oil consumption when driving both in the city and on the highway (in the absence of oil in the breather pipe). Moreover, for diagnostics it is important how much oil the engine consumes in various operating modes. Higher oil consumption outside the city will indicate ring wear.
- Burnt oil on spark plugs. If the caps are worn too much, the spark plugs may splatter with oil so much that the engine will stall.
Tools and materials
If you don’t believe in additives, the advertising of which screams about a miraculous effect, and you decide to repair it, then you will need the appropriate equipment. To replace the caps yourself you need:
- Valve desiccant.
- Tweezers.
- Mandrel for pressing caps.
- Hammer.
- Heads with extensions and crank.
- A set of open-end and spanner wrenches.
- Collet clamp for removing caps.
- Silicone sealant, or better yet, a new timing cover gasket.
Replacement
Replacing valve stem seals with your own hands:
- Remove the timing cover.
- Align the crankshaft and camshaft to the marks. Place the appropriate markings on the parts so that there are no difficulties with their placement after repair. Write down the location of the pipes and connectors to be removed.
- When removing the camshaft, loosen its drive tensioner.
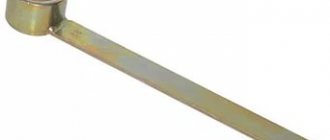
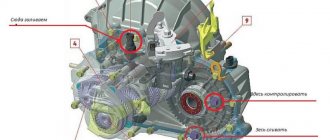
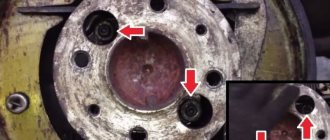
Device for desiccation of valves. The photo shows the process of removing crackers
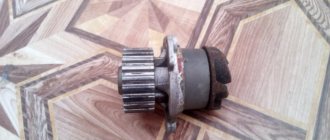
If the drive is chain, unscrew the drive gear and remove it from the camshaft. To avoid losing it, it is better to remove the key from the shaft groove and tidy it up. If the drive is belt driven, it is easier to remove the belt from the gear.
The correct tool for removing caps
Take a desiccant. Fix its bracket, which is attached closer to the edge of the lever, to the bed fastening stud, and attach it closer to the middle with a ring on the plate covering the valve springs. With one hand, press the desiccant lever so that the valve springs are compressed and the plate moves down the rod, and with the other hand, take tweezers and use them to remove the crackers from the plate.
While the valve is free, check the valve stem and guide for wear. To do this, grab the top of the rod with your fingers and try to rock it. If the wear is insignificant, then there will be no play and you will not succeed.
- If you have a mandrel, it's worth using it. If it is missing, for caps on valves with a stem diameter of 8 mm, it can be replaced with a 10mm socket wrench. If the diameter of the rods is 6 mm, then a 8mm wrench will do. Valve seals must be made of fluoride rubber (so called sucking FRM).
Installation process
- Remove the springs from the seals.
- Insert the oil seal into the mandrel and place a drop of oil on the valve stem.
- Place the oil seal together with the mandrel on the valve stem and slide it down to the seating lug of the guide. Lightly tap the mandrel with a hammer to press it into place.
- Do not forget to put the springs on the installed caps before assembly.
- After this, install the valve components and dry using the method used to remove crackers.
- Repeat this sequence as many times as necessary and replacing the caps yourself will be done.
- Reassemble the disassembled components in the reverse order of removal. If your engine does not use hydraulic compensators, adjust the valves.
Now you know how to change valve stem seals with your own hands. No matter how many times you perform all the procedures before, be very careful.
Valve cover installation
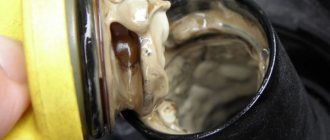
After all the caps have been changed, you can begin assembly. But before assembly, it is necessary to remove the remnants of the old sealant both from the cylinder head itself and from the valve cover. To do this, you can use a blade and a rag with acetone. Also, with the cylinder head, you need to pick out the old rubber rings around the spark plug wells and replace them with new ones.
Next, I propose to carry out a very important operation. At that moment, when we unscrewed the bolts from the valve cover, we could not understand whether any of them were broken. So, while the cover is not coated with sealant and the camshafts are not installed, you can put the cover in place and try to tighten all the bolts with the required force of 17 Nm. I’m more than sure that there will be broken bolts in the cover (well, not the bolts themselves, but the mating part in the cylinder head has a broken thread, naturally). All these are features of the Russian service. “A torque wrench? No, we didn’t!” If there are 2-3-4 broken bolts and they are all not nearby, but scattered across the cylinder head area, then you need to mark and remember their location. If there are more of them, then this is already a reason to cut an M8 thread there instead of an M7 and tighten other bolts, or use studs. But we will not consider this option for now.
Next we apply an anaerobic sealant to the valve cover. It must be applied evenly over the entire area of the valve cover. In addition, on those holes in the valve cover that correspond to places on the cylinder head with broken threads, it is necessary to apply an additional amount of sealant directly inside the hole; it is also a good idea to apply a little sealant to the edge of the holes in the cylinder head, where the threads are broken and it will not be possible to tighten the cover there . An additional amount of sealant will ensure a tight seal there and prevent oil from squeezing out. In addition, when applying sealant to the valve cover, it is necessary to especially carefully check that there is enough of it around the perimeter of the cover and around the bolt holes around the spark plug wells and around the circumference of the spark plug wells themselves.
Before installing the valve cover on the cylinder head, we place the crankshaft at the mark, as when setting the timing belt, with the first piston at TDC. We put the camshafts in their places. At the same time, their position should also approximately correspond to the marks, so that when the shafts are pressed with the cover, the valves do not rest against the pistons.
Before installing the cover, do not forget to pour a little oil around all hydraulic compensators so that all mechanisms are provided with oil.
Also, before installing the cover, you need to check that the camshaft seals on both sides are level.
When we put the cover on the cylinder head, it will lie on the camshafts, which in turn rest on the hydraulic compensators, and until we press the cover, the entire structure will have a gap of approximately 1 cm around the entire perimeter of the valve cover. We tighten all the bolts (except for those about which we know that they have been torn off), and begin to gradually tighten them all and lower the cover with the shafts into place, while controlling the position of the seals so that they do not bite or warp. After the cover is pressed against the cylinder head, tighten all the bolts with a force of 17 Nm . There is no special order for twisting in the manuals, but it is better to go the classic way and twist them from the center to the edges. After all the normal bolts are tightened, we insert and tighten the broken bolts, and hope that there is enough sealant there, oil will not squeeze out from there, and we will not have to cut the threads there.
Next, you need to check how the seals are positioned on the shafts to see if they are warped. There are usually no problems on the sprocket side, however, I first removed one sprocket, checked the seal, and put it back. Then the second star. These seals can be better placed on the shafts before installing the shafts and valve cover. On the opposite side, it is better to install the seals after installing the cover. When installing, lubricate them with oil and put them on the shafts, pressing them inside the seat with your hands or an appropriate large-diameter head. In this case, you don’t need to press them too deep; it’s enough that they are flush with the front edge and stand straight, not skewed.
Useful tips
- There are additives for restoring seals. When you are tempted to use one of them instead of changing the caps, remember that there are no miracles in the operation of the internal combustion engine and natural wear and tear. These additives soften hardened rubber and supposedly restore the quality of the seals. Experience shows that these additives either have no effect on the rubber, or soften it too much, and as a result, the size of the working edge increases, and oil consumption after using the additive increases significantly. So you better think about how to change the valve stem seals. How much it will cost you depends on the type of internal combustion engine. But you will definitely be sure that the caps perform their function. Additives, alas, cannot guarantee you such an effect. You should not try such additives on your car.
- If you haven't found a device with a collet clamp for removing caps, but that hasn't stopped you. Remember that the landing step under the cap has a wall thickness of just over a millimeter and is very fragile, and when you try to remove the cap with pliers, this part of the valve guide is broken very often, and the repairs that are necessary after this (replacing the guide, milling the seat and lapping the valve) are much more expensive more expensive than replacing caps and related devices.
Valve seals perform an important function in the timing mechanism of a car; they remove excess oil from the valve stems as they move and prevent foreign substances from entering the combustion chamber. When the valve stem seals wear out, it is very important to replace them in a timely manner to avoid increased oil consumption and carbon deposits on car parts and mechanisms. Car owners with no repair experience will learn from this article how to replace the caps without removing the cylinder head.
Remove the valve cover.
Now that the belt is off and all the other parts are out of the way, we begin to unscrew all 48 bolts that secure the valve cover to the cylinder head. Yes, Volvo engineers decided that 48 bolts would be enough. This process is not fast. I loosened all the bolts by hand, and then unscrewed them with a screwdriver, it was faster.
After all the bolts are removed, the valve cover is still tightly seated and usually cannot be removed. The fact is that it is still held in place by 5 guides and sealant. I personally took an impact screwdriver and hit the guides themselves with a hammer through it, knocking them down a little. After that, carefully, using an impact flat-head screwdriver, wedged with a hammer between the cylinder head and the valve cover in the area of all 5 guides -. This must be done completely without effort, without fanaticism, carefully, and clearly choosing where you place the screwdriver, the main thing is not to damage the surface!
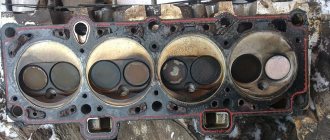
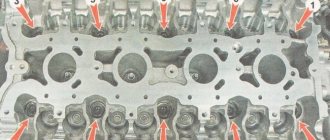
After these operations, the valve cover will be removed without any problems and the picture “God, why did I come here?” will open to your eyes)).
Well, the last stage - we take out and put the camshafts aside, along with the stars. In front of us is the head and 2 rows of hydraulic compensators sticking out of it. This is what we will continue to work with.
What is a car's timing belt?
The smooth functioning of the gas distribution mechanism is very important for the smooth operation of the internal combustion engine. The timing belt supplies the combustible mixture to the cylinders and removes exhaust gases from the combustion chamber.
Timely gas distribution is ensured by the movement of the intake and exhaust valves by transferring force to them from the camshaft through cams. In modern car models, the gas distribution mechanism also affects the power and environmental friendliness of the internal combustion engine.
Functions of valve stem seals
The non-stop operation of the mechanisms while the car is moving requires the presence of a sufficient amount of lubricant in the timing belt, which should soften the friction of the parts, but at the same time not enter the combustion chamber. Valve seals perform the function of removing excess oil during valve operation and serve as a damper that prevents lubricant from entering the chamber.
The valve stem seal consists of 3 components: - a reinforced steel bushing that serves as the base of the cap and gives it strength; — a rubber cap that removes excess lubricant from the valve stem; — an expander spring that ensures a tight fit of the edge of the rubber cap to the rod.
Currently, the rubber part of the valve stem seal is made from acrylate or recycled rubber, in contrast to the old style caps made from polyethylene resin. The use of modern materials has extended the service life of these parts, but still sometimes they become unusable and require replacement.
Replacing valve stem seals without removing the head of a VAZ 2112, 16 valves, step-by-step instructions with photos
Dear friends, today we will tell you in detail and with photographs how to independently replace valve stem seals on VAZ-2112, 2111 and 2112 equipped with a 16-valve engine. The beauty of our story is that in order to replace the oil caps we will not remove the head from the engine, and this is a significant saving of time and labor costs, there is no need to drain the antifreeze, unscrew the manifold, etc.
At the same time, we will do this without using an expensive valve depressurizer, which allows us to do this, but will use a regular valve depressurizer for the VAZ-2110, which can be bought on the car market for 200 rubles. Even before starting work, I recommend purchasing this desiccant, if you have little experience in desiccaning and drying, then take a stock of heels of crackers, we will also need an anaerobic (do not use silicone) sealant, unlike conventional silicone, when in contact with oil, it does not clog the channels but dissolves in it, and also buy a key for tensioning the timing pulley for 50 rubles, since the belt will have to be removed and then set according to the marks. By the way, it wouldn’t hurt to replace the timing belt and rollers at the same time, ideally. If you are ready to do it yourself - no problem, if you lack determination - I can recommend turning to the guys to replace the timing belt in Minsk, they will definitely do it well and inexpensively.
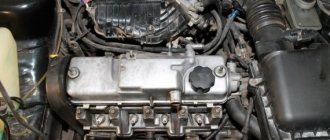
Disconnect sensors, hoses, cables
Well, if you’re ready to do everything yourself, then let’s get started. First, remove the plastic cover from the engine and gain access to the “intake manifold”