What to do if the oil seal in the rear axle gearbox leaks? Of course, change it. You can replace it without removing the gearbox. To do this, you need to drain the oil, remove the wheels with brake drums, disengage the axle shafts and disconnect the driveshaft.
Before starting work, you must clearly decide for yourself that everything must be done carefully and according to the instructions. Because the rear axle gearbox is a very complex mechanism that requires considerable experience, knowledge and special tools. It is generally recommended to repair such mechanisms only in specialized establishments. But if you are clearly confident in yourself and your hands, then let's start.
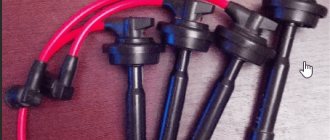
We take a strong nylon thread and wind it onto the cylindrical surface of the flange. We attach the dynamometer and pull it down. At the moment when the flange begins to rotate evenly, we remember the force value on the dynamometer and write it down.
Having written down the values, we proceed to disassembly. We insert two ordinary bolts into the holes of the flange and, having secured them with a pry bar from turning, unscrew the nut with a 27 wrench.
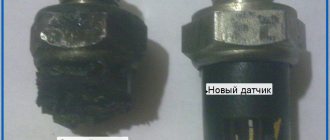
And remove the flange. We inspect it carefully; if there are holes or abrasions on the surface where the oil seal is attached, the flange needs to be replaced. Because when installing a new oil seal, it will quickly fail.
Using sliding pliers, tear out the worn oil seal.
We install the flange and tighten the nut. Now the puff, the most important moment.
And so, back to our recorded dynamometer reading. If the initial indicator was 2.9 - 3.1 kilograms, then the force of the torque wrench is approximately 6.5. A value of 4.3 on the dynamometer corresponds to 9 on the torque wrench. And so on. We tighten it to 6 and check it with a dynamometer as in the first photo. If the indicator is around 2.8 - 3.9 is considered normal. If the value on the dynamometer is 2.8, and the torque wrench indicator exceeds 9, then the spacer sleeve has exhausted its adjusting properties and must be replaced. To replace the adjusting sleeve, the gearbox must be completely disassembled. But if the indicators are normal, we put everything back together and don’t forget to fill in the oil.
On the roads of our country and neighboring countries there are still many cars produced by cars - this is what motorists call the Zhiguli model range - becoming less and less, but to this day all models of this series are popular due to their affordability and service, which in most cases motorists conduct themselves.
Among the “classic” models, the VAZ 2107 car represented a number of luxury cars and was once very popular; its production was discontinued in 2012. Due to the long service life of cars of this model, parts gradually wear out, especially for rubber products, which dry out over time. Diagnosis of oil leakage from the gearbox
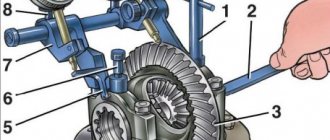
The axle gearbox of the VAZ 2107 car is designed to increase engine torque and change angular speeds. It consists of a housing and the gearbox itself, into which the axle shafts are installed. Transmission oil is poured into the main gear housing, which is kept from leaking by the oil seal located at the base of the gearbox shank. The presence of oil stains on the ground under the gearbox and oiling of the gearbox itself indicate a malfunction of the cuff, and the reasons for this may be the following:
Defective product produced by the factory;
Wear of the working edge of the oil seal;
Broken tension spring;
Flange surface wear.
All of the above defects require replacement of the cuff. Only if the oil seal “fogs up” is there no need to replace it, but you should monitor the oil level in the gearbox from time to time.
Replacing the cuff of the VAZ 2107 axle gearbox
To ensure a high-quality replacement of the oil seal on the rear axle main gear shank, you need to know some conditions and rules that must be observed when carrying out repair work carried out independently.
For the convenience of work related to gearbox repair, the car must be placed on an inspection pit (car overpass), and for safety reasons it is better to install special shoes under the wheels. Having prepared the required number of wrenches and sockets, proceed directly to the repair, observing the following sequence of actions:
1. Before removing the cardan, make installation marks on the hinge fork and the end of the gearbox shank flange. Using a socket head and a 13-mm open-end wrench, unscrew the four bolts connecting the propeller shaft and the flange, move the driveshaft to the side and attach it with a rope or wire to the exhaust pipe.
2. Measure the turning torque of the axle main gear reducer shank. This operation is performed using a dynamometer. The hook of the device is hooked to the upper hole and then the dynamometer is smoothly pulled clockwise; at the moment the flange begins to rotate, the value is recorded on the device and remembered.
3. Having inserted bolts into the two nearest holes of the flange, fix the pry bar between them and, using a 27-mm spanner, unscrew the nut securing the flange to the gearbox shank.
4. Using a puller or two pry bars, remove the flange. Examine its working surface mating with the oil seal; if there is severe wear and voids, the flange is replaced with a new one.
5. Using a wide screwdriver, pry the oil seal from the inside and push it out of the gearbox housing. Clean the vacated area from dirt and cuff residues.
6. After dismantling the worn oil seal, a new cuff is installed in its place. To do this, first select a mandrel corresponding to the diameter of the oil seal - usually this is a section of a suitable pipe. Then the cuff is lubricated at the end with any lubricant such as grease, installed in the shank socket and pressed in using an adapter.
7. The final step in replacing the oil seal is to install the flange and tighten it with a locking nut.
Important condition:
Since the nut, in addition to the fixing nut, also performs an adjustment function, it must be tightened using a torque wrench. The tension when tightening the nut should be no more than 60 Nm.
After completing all of the above operations, install the driveshaft in place, aligning the previously made marks.
Although all the work associated with replacing the classic rear axle gearbox seal is not very complicated, it is still better to contact a mechanic about this problem.
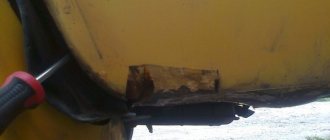
It is necessary to replace the shaft seal of the VAZ 2106 when there is an oil leak from under the tail of the gearbox. This breakdown looks like this: drops of lubricant appear on the outside of the surface of the gearbox housing. It sometimes happens that an oil film is mistaken for damage. Only when there are drops on the surface is this an indicator for replacing the rear axle tail seal. You can easily repair such damage yourself.
Necessary tools for replacing oil seals:
If you decide to start replacing the oil seals yourself, prepare the following tools first:
- Screwdriver Set;
- Set of wrenches;
- Hammer;
- A small container for oil;
- A socket wrench or a 24mm socket;
- To unscrew the drain plug, take a hexagon;
- Two-jaw puller;
- Torque wrench;
- To fill the lubricant with a syringe;
- Jack;
- Body stands.
Important:
All work on replacing oil seals on a VAZ 2106 should be done efficiently. Otherwise, any oversight and carelessness may lead to unpleasant consequences and lead to repair of the axle gearbox. If you doubt your abilities, it is better to contact the service. This way you will protect yourself from unnecessary costs and unexpected car repairs.
Bridge VAZ 2101
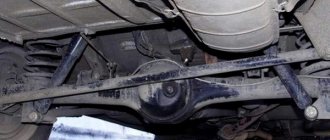
The rear axle is one of the main elements of the VAZ 2101 transmission. It is designed to transmit torque from the driveshaft to the axle shafts of the vehicle, as well as to evenly distribute the load on the wheels while driving.
Specifications
The drive axles of VAZ cars of the 2101–2107 series are unified. Their design and characteristics are completely identical, with the exception of the gear ratio. For a “kopeck” it is 4.3. VAZ station wagon models (2102, 2104) were equipped with gearboxes with a gear ratio of 4.44.
The rear axle is used to transmit torque from the driveshaft to the wheels of the car
Table: main characteristics of the rear axle of the VAZ 2101
| Name | Index |
| Factory catalog number | 21010–240101001 |
| Length, mm | 1400 |
| Crankcase diameter, mm | 220 |
| Stocking diameter, mm | 100 |
| Weight without wheels and oil, kg | 52 |
| Type of transmission | Hypoid |
| Gear ratio value | 4,3 |
| Required volume of lubricant in the crankcase, cm3 | 1,3–1,5 |
Getting ready for replacement
If all signs of malfunction are confirmed, you should immediately replace the worn oil seal. This way we will save the resource of the gearbox. But first we need to drain the oil from the bridge.
To do this, use a hexagon to unscrew the drain hole and place a container with a volume of at least two liters. It is advisable to drain the oil “while it’s hot,” especially if the temperature outside is below zero. But you don't need to warm up the engine. In order for the oil in the bridge to warm up, you need to drive the car at least 3-5 kilometers. It is quite viscous and difficult to drain in the cold. Having removed all the fluid from the gearbox, you can begin replacing.
Rear axle device
The design of the rear axle of the VAZ 2101 consists of two main elements: a beam and a gearbox. These two nodes are combined into one mechanism, but they perform different functions.
The bridge consists of two main components: a beam and a gearbox
What is a beam
The beam is a structure of two stockings (casings) rigidly connected by welding. Flanges are welded into the ends of each of them, designed to accommodate semi-axial oil seals and bearings. The ends of the flanges have four holes for installing brake shields, oil deflectors and plates that press the bearings.
The middle part of the rear beam has an extension in which the gearbox is located. In front of this extension there is an opening closed by the crankcase.
The rear beam consists of two interconnected hollow stockings
Half shafts
The machine's axle shafts are installed in stockings. At the inner ends of each of them there are splines with which they are connected to the semi-axial gears of the gearbox. Their uniform rotation is ensured by ball bearings. The outer ends are equipped with flanges for mounting the brake drums and rear wheels.
Axle shafts transmit torque from the gearbox to the wheels
Gearbox
The gearbox design consists of a main gear and a differential. The role of the device is to evenly distribute and redirect the force from the driveshaft to the axle shafts.
The gearbox design includes the main gear and differential
main gear
The main transmission mechanism includes two bevel gears: drive and driven. They are equipped with spiral teeth that ensure they are connected at right angles. Such a connection is called hypoid. This design of the main gear can significantly improve the grinding and running-in process of gears. In addition, maximum noiselessness is achieved during gear operation.
The main transmission gears of the VAZ 2101 have a certain number of teeth. The drive has 10, and the driven has 43. The ratio of the number of their teeth determines the gear ratio (43:10 = 4.3).
The main gear consists of drive and driven gears
The driving and driven gears are selected in pairs on special machines in the factory. For this reason, they are also sold in pairs. In case of gearbox repair, replacement of gears is allowed only as a set.
Differential
The center differential is necessary to ensure that the wheels of the vehicle rotate at different speeds depending on the load on them. The rear wheels of a car do not travel the same distance when turning or overcoming obstacles in the form of holes, potholes, or ledges. And if they were rigidly connected to the gearbox, this would lead to constant slippage, causing rapid tire wear, additional stress on transmission parts, and loss of contact with the road surface. The listed problems are solved using a differential. It makes the wheels independent of each other, thereby allowing the car to freely turn or overcome various obstacles.
The differential allows the rear wheels to rotate at different speeds when the car overcomes obstacles
The differential consists of two side gears, two satellite gears, adjusting washers and a cast iron box that acts as a housing. The axle shafts fit into the axle gears with their splines. The latter rest on the internal surfaces of the box using adjusting washers of a certain thickness. They do not contact each other directly, but through satellites that do not have a rigid fixation inside the box. While the car is moving, they move freely around their axis, but are limited by the surface of the driven gear, which prevents the axis of the satellites from moving from the mounting sockets.
The differential housing with the mechanism is installed inside the gearbox on roller bearings pressed onto the housing support journals.
Malfunctions of the rear axle of the VAZ 2101 and their symptoms
The complexity of the rear axle design does not in any way affect its performance or service life. If all the parts are selected accurately, the unit systematically undergoes appropriate maintenance, and the car has not been involved in traffic accidents, it may not declare itself at all. But it also happens the other way around. If you do not pay due attention to the bridge and ignore possible signs of its malfunction, problems will definitely appear.
Signs of failure of the “penny” rear axle
The most likely symptoms that your vehicle's axle is faulty are:
- oil leak from the gearbox or axle shafts;
- lack of transmission of torque from the “cardan” to the wheels;
- increased noise level in the lower rear part of the car;
- noticeable vibration when moving;
- uncharacteristic noise (hum, crackling) when accelerating the car, as well as when braking the engine;
- knocking, crackling from the side of the bridge when entering a turn;
- crunch at the beginning of movement.
Failure of the rear axle of VAZ 2101
Let's consider the listed symptoms in the context of possible malfunctions.
Oil leak
Let's start with the simplest thing - lubricant leaks. This is probably the most common problem that owners of “kopecks” face. A timely detected leak does not pose any threat to the unit, however, if the oil level reaches a critical minimum, rapid wear of the main gears, axle shafts and stellites is inevitable.
When oil leaks, gear wear accelerates.
Lubricant from the rear axle of the “penny” may leak from under:
- a breather, which serves as a kind of pressure valve;
- oil filler plugs;
- drain plug;
- shank oil seal;
- gearbox flange gaskets;
- axle seals.
Lack of transmission of torque from the driveshaft to the wheels
Unfortunately, such a malfunction is also not uncommon. Most often it occurs due to low quality parts or manufacturing defects. The breakdown is characterized by the lack of reaction of one or both rear wheels when the “universal shaft” rotates normally. If you have to face such a situation, you can safely prepare to replace the axle shaft. Most likely, it simply burst.
Increased noise level in the bridge area
Strong noise from the bridge while driving may indicate such malfunctions as:
- loosening of the fastening of the wheel rims to the axle shafts;
- wear of axle shaft splines;
- failure of semi-axial bearings.
Vibration
Vibration in the rear of the vehicle while driving can be caused by deformation of the shaft of one or both axle shafts. Similar symptoms also occur due to deformation of the beam.
Noise when accelerating or braking
A hum or crackling sound that occurs when accelerating a car, as well as during engine braking, is usually a sign of:
- insufficient amount of lubrication in the gearbox;
- wear of the mechanism bearings or improper tightening;
- failure of semi-axial bearings;
- exhaustion or incorrect adjustment of the distance between the main gear gears.
Knocking or rattling noise when turning
Extraneous sounds in the area of the rear axle during cornering may occur due to:
- occurrence of chips and scuffs on the surface of the satellite axis;
- wear or damage to satellites;
- increasing the distance between gears due to their wear.
Crunching sound at the start of movement
A crunching sound when starting the car may indicate:
- wear of the satellite axis mounting sockets;
- shank play;
- change in the gap in the connection between the drive gear and the flange.