Rear axle VAZ 2106 - purpose
The rear axle (RAR) plays an important role in the design of the vehicle. Through this unit, the drive wheels are connected to each other, and also attach them to the body and transmit torque to them. The device consists of several individual components that wear out over time and require repair or replacement. Therefore, the design of the rear axle of the VAZ 2106, its shortcomings and repairs deserve detailed consideration.
Rear axle assembly (gearbox 2106) VAZ 21074 (21074240001000)
- Description
- Har-ki
- Reviews
- Delivery
- Payment
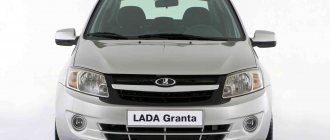
Rear axle assembly (gearbox 2106) VAZ 21074
Catalog number: 21074-2400010-00
Applicability: 2103-2107 and modifications
The manufacturer reserves the right to change the characteristics of the product, its appearance and completeness without prior notice to the seller.
| Automobile model | VAZ 2102, VAZ 2103, VAZ 2104, VAZ 2105 Classic, VAZ 2106 Classic, VAZ 2107 Classic |
Rear axle specifications
In terms of the design and characteristics of the leading axes, all classic Zhiguli cars are the same. The only difference is in the ratio of the main pairs.
Table: characteristics of the rear axle "six"
| Parameter | Factor |
| Serial part number | 21062402010 |
| Length, mm | 1400 |
| Crankcase diameter, mm | 220 |
| Hopper diameter, mm | 100 |
| Weight without wheels and oil, kg | 52 |
| Tool type | hypoid |
| Gear ratio | 3.9 |
| Required amount of lubricant in the crankcase, cm 3 | 1,3-1,5 |
Motor gearboxes VAZ in Sochi
An “Online Consultant” is available on the seller’s website. To go to the site, click “Go to store”
An “Online Consultant” is available on the seller’s website. To go to the site, click “Go to store”
An “Online Consultant” is available on the seller’s website. To go to the site, click “Go to store”
An “Online Consultant” is available on the seller’s website. To go to the site, click “Go to store”
An “Online Consultant” is available on the seller’s website. To go to the site, click “Go to store”
An “Online Consultant” is available on the seller’s website. To go to the site, click “Go to store”
An “Online Consultant” is available on the seller’s website. To go to the site, click “Go to store”
An “Online Consultant” is available on the seller’s website. To go to the site, click “Go to store”
An “Online Consultant” is available on the seller’s website. To go to the site, click “Go to store”
A toll-free number 8-800 is available on the seller's website. To go to the site, click “Go to store”
A toll-free number 8-800 is available on the seller's website. To go to the site, click “Go to store”
Popular products in stock! In the category: VAZ motor gearboxes - buy at a good price, delivery: Sochi, discounts!
Rear axle structure of VAZ 2106
The design of the “six” gear consists of the main components: cast, gearbox and driveshaft. Each of them is an integral part, without which the normal functioning of this mechanism is impossible.
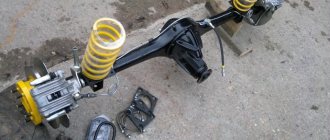
Frame
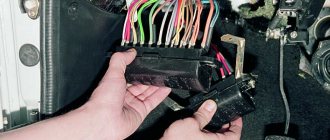
The rear axle housing or support beam consists of two extruded tubular housings connected by welding. On the outside of the housing, flanges with drilled seats for bearings and propeller shaft bushings are welded to prevent lubricant leakage. The flanges have 4 holes for the brake disc bolts on which the brake cylinder and pads are attached. These bolts also hold the oil slurry and plate holding the bearing axle shafts in place. In the middle of the body there is an add-on, which is the oil pan for the rear gearbox. The crankcase has holes for the breather, as well as for filling and draining lubricant. Brackets for attaching rear suspension elements are welded directly to the skin.
Gearbox
The main function of the rear gearbox is to reduce and transmit torque from the cardan drive to the wheels of the rear axle. Structurally, the unit consists of a housing, a pair of main gears, and a differential with rolling bearings. Only the number of teeth on the buffer and planetary gear depends on the gear ratio of the unit. On the VAZ 2106, the number of driven teeth is 43, and the pitch is 11. The gear ratio is set as follows: 43/11 = 3.9.
Half shafts
The main task of the driveshaft is to transmit the torque converted by the gearbox to the wheels of the car. On the one hand, half of the axle has splines that connect it to the gears in the gearbox, and on the other, there is a ball bearing that allows the mechanism to rotate, and a flange for attaching the brake drum and rear wheel.
Rear Axle Sport Reducer: main pair 4.3 + screw lock
- Engine Crankshaft
- Flywheel
- VAZ cylinder head
- Sports camshafts
- Sport timing valves
- Cylinder head components
- Belts | Timing gears
- Gaskets | Oil seals
- Intake system
- Throttle valve
- Clubturbo pistons
- TDMK pistons
- Federal Mogul pistons
- Piston rings
- Connecting rods
- Engine mounts
- Inserts for VAZ engines
- ACL earbuds
- Oil catchers
- Oil crankcase
- Oil pump
- Miscellaneous
- Turbo Turbo kit
- Turbochargers
- Turbo manifold
- Bypass valves
- Westgates
- Intercooler for VAZ
- Intercooler kit
- Piping kit (air ducts)
- Turbo parts
- Adapters for installing an oil cooler | sensors
- Straight pipes
- Blocking
- Vacuum booster
- Clubturbo suspension
- Silencers for VAZ
- Control units | Wiring
- Filler necks
- Moto kits Turbo
- Adapters for installing sports steering wheels
- Keychains
- Bumpers tuning for VAZ
- Hoses | tubes
- Thermal insulation
- home
- Catalog
- Transmission
- Rear axle gearbox VAZ
- Rear Axle Sport Reducer: main pair 4.3 + screw lock
Rear Axle Sport Reducer: main pair 4.3 + screw lock
Sports rear axle gearbox. Assembled and ready for installation on a VAZ car: Classic, Niva, Chevy Niva.
The gearbox is equipped with a main pair 2101 with a gear ratio of 4.3 and a limited slip differential for better wheel grip.
During assembly, only new original components are used. Limited slip differentials Club Turbo assembled from components manufactured at the factory, with a preload of 5-6 kg. At the request of the client, the preload can be changed.
The sport rear axle gearbox helps to increase the acceleration dynamics of the VAZ car
Specifications:
How bridge malfunctions manifest themselves
The rear axle of the VAZ “Six” is endowed with its own characteristic problems that arise one way or another.
Excessive noise from rear wheels
There may be several reasons for the appearance of strong noise from the wheels of the rear axle:
- The wheel mount is loose. In this case, check and retighten the screws;
- Damage to the propeller shaft bearing. The axle bearing wears out over time, which leads to the appearance of characteristic noise. Inspect the axle shaft and replace the damaged component.
Constant noise from the rear axle while driving
Noises that are not typical for the normal operation of the gearbox are in most cases a sign of a malfunction. The main reasons for failure include:
- deformation of stockings. If the case is deformed, you can try to repair it, but it is better to replace it with a working one;
- driveshaft bend and excessive beating. In this case the part is replaced;
- Increase in multi-storey consumption. Requires managing gears and multi-story shots, and then replacing damaged elements;
- The gearbox is not adjusted correctly, the gears or bearings are worn or damaged. Requires complete disassembly, defect and repair of the mechanism;
Noise when accelerating the car
Noise during vehicle acceleration may be due to the following reasons:
- Worn or incorrectly adjusted differential gear bearings. Requires disassembly, inspection and repair of the differential mechanism;
- Incorrect engagement between bevel and planetary gear teeth. The problem is solved by proper regulation;
- Consumption of bearing beds. Damaged shoes must be removed and the bearing replaced;
- Insufficient lubrication. This problem can be resolved in the same way as in the case of constant noise.
Noise when accelerating and braking the engine
If there is noise on the gearbox side when accelerating and releasing the engine, the cause may be as follows
- Excessive consumption or damage to shaft bearings. Requires disassembly and diagnostics of gears;
- Incorrect bevel and planetary gear injection settings. Corrects this by checking the integrity of the parts and installing the correct screw.
Video: identifying the cause of noise in the rear axle
Noises when cornering
External noise can occur not only when driving straight, but also at corners. This may lead to the following reasons
- Difficulties in rotating satellites on axes. Disassembling, checking suitability and replacing elements whose condition does not allow them to continue their use;
- Gear axles. If the gears and the surfaces they contact are slightly damaged, they clean noisily. Otherwise, damaged items must be replaced;
- Incorrect setting for differential mechanism expansion. Diagnosis and correct correction of weak corrections are required;
- Damage to shelf bearings. Damaged items must be replaced.
Knock when starting to move
If the rear axle on the chest "six" (RZM) loses clamping when the car starts to move, this may mean that:
- Excessive play between collar and Wielegapust. Requires multi-layer joint inspection and replacement of used parts;
- Increasing the gap between the stem and the planetary gear. Removed by adjusting the gap;
- Increasing the landing space for the satellite axis. If this error occurs, replace the box;
- It abandoned the field beam attachment while hanging backwards. Check and tighten screws if necessary.
Oil leak
Transmission leakage may occur due to the following reasons:
- Bevel gear collar consumption. If the leak is from the stem side, replace the oil gasket;
- Damage to the throttle axis. If there are traces of grease on the brake rotors, this means that the axle shaft spacer is used and needs to be replaced;
- The mounting gears in the transmission housing are loose or the gasket is damaged. In this situation, it is necessary to tighten the screws or replace the gasket.
Malfunctions and repairs of the VAZ 2106 gearbox
If the gearbox is properly adjusted, it will serve for a very long time.
A gearbox made according to technology and properly adjusted can serve for decades without reminding itself of anything at all. No noise, no hum, no ringing. This was the case until recently, but two popular products appeared on the market - fake gear oil, and a few years later, fake VAZ rear gearboxes. In most cases, everything that is sold in car dealerships and looks like a gearbox is actually just a pile of metal, unsuitable for use. The fact is that for high-quality adjustment of the gearbox, which is necessary, serious skills and sophisticated measuring equipment are needed. There can be no talk of any adjustment by eye here. And most service stations do just that, without realizing that they are simply killing a healthy gearbox. After replacement, you can check the performance of such a unit only on the go. Therefore, they are washed, painted with beautiful paint and placed on store shelves next to counterfeit lubricants. We will talk about lubrication separately, but now a little about the main malfunctions of the VAZ 2106 gearbox.
As with all units that have a closed lubricated volume, the shank oil seal can leak in the gearbox. This is noticeable right away, because after parking, drops of the transmission under the rear axle will speak volumes about it. It may also be that the oil leak is not caused by the oil seal, but by loose bolts securing the gearbox to the rear axle housing. But the most common symptom of gearbox failure is noise. The unit can make noise in different ways and in different modes, so no specialist can give any specific recommendations without listening to it personally. Nevertheless, there are the most common noise manifestations, which we will briefly discuss.
The main source of noise is a worn main pair. This sound cannot be confused with anything else, but it appears under load. As soon as you let off the gas, the noise disappears, and the active phase begins again after pressing the gas pedal. This malfunction can only be cured by replacing the main pair. Those who like to experiment can add magical additives to the lubricant, but, as a rule, these dubious means do not restore the main pair, cannot adjust the gaps, and do not change the bearings.
Gearbox bearing noise is quite easy to identify. They hum under any load, and in the most advanced cases they can even crunch at low speeds.
There are no options other than replacement to fix the problem. Except in cases where the noise was caused by improper tightening of the shank nut after replacing the oil seal. Incorrect adjustment of the gearbox can also cause a hum, but it is almost impossible to describe this noise, because it manifests itself differently in each gearbox. Gear adjustment is carried out only if you have measuring instruments, torque wrenches, the necessary probes and, most importantly, experience in this matter. An incorrect adjustment can ruin a good gearbox literally a thousand kilometers away.
A common sign of a gearbox malfunction is unit noise.
Another source of noise from the gearbox is the loosening of the shank tightening nut. It appears due to the fact that the spacer sleeve sags, the play in the bearing increases, and the nut becomes loose. The reason is insufficient tightening torque of the nut when replacing the oil seal or the disgusting quality of the metal of the spacer sleeve. In order for the gearbox to serve for a long time and happily, only certified transmission lubricants must be poured into it, preferably those specified by AvtoVAZ, observing a replacement frequency of 10-15 thousand kilometers.
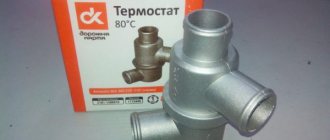
Rear axle oil
On the VAZ 2106 side, the friction of the internal components of the rear axle is reduced due to the use of GL5 gear oil with a viscosity of 85W-90. The volume of this substance is 1.3 liters. Currently, there are many similar oils, but for Zhiguli cars you can use cheaper ones, for example, TAD-17.
It is recommended to change the lubricant in the rear axle every 50 thousand. km.
Checking the oil level and adding oil
A 17 wrench and a special syringe are needed to check the lubricant level and top up. The procedure consists of the following steps:
- Park the car on a level surface.
- Unscrew the oil filler cap and use your finger to check the oil level: it should be level with the bottom edge of the filler hole.
If the oil needs to be changed, simply pour it into a suitable container, drain well, and then add new oil in the required volume.
The rear axle of the VAZ “Six” is a fairly reliable unit and does not require special attention. The need for repairs, if any, is rare. The most common problems are leaking shaft or shaft seal. Replacing them is simple and does not cause any problems. A more complex procedure is replacing the axle bearings or repairing the gearbox. However, these mechanisms can be repaired in a workshop by carefully reading and following the step-by-step instructions.
Rear axle assembly (gearbox 2106) VAZ 21074 (21074240001000) reviews
For any online payment option from a private individual, a fiscal receipt will be sent to your email in electronic form in full compliance with the law on the use of cash register equipment 54-FZ, which does not give you any additional cause for concern regarding our store)
Dear customers! Due to the current situation, there may be delays in delivery of orders placed between 27.03 and 30.04. We continue to work and do everything possible to deliver your orders as quickly as possible. Hope for your understanding.
The following payment methods are available in our online store:
— FOR INDIVIDUALS, payment for orders is carried out in real time on the website of the ROBOKASSA payment system, 0% for transfers: plastic cards of any banks, credit cards, mobile payments (MTS / Beeline / Tele2), electronic money (Yandex.Money, WebMoney, QIWI Wallet ) and others (Samsung Pay, Viber) .
— FOR LEGAL ENTITIES (LLC and individual entrepreneur of the Russian Federation), through any bank on an issued invoice (non-cash payment) “without VAT” , by transferring funds to a current account.
Note ! After your first purchase, you can use the VS-AVTO BONUS PROGRAM to pay for your order.
Please note that delivery is at the customer's expense and is not included in the initial cost of the order.
The period for order formation and dispatch is 3-14 working days after receipt of payment to our accounts and depends on a number of factors: movement of goods between warehouses, part painting, individual tailoring/execution.
After sending your order, you will be sent an email notification with the tracking number of the shipment, using which you can track the movement of the cargo on the carrier’s website.
Pickup from pick-up points in Tolyatti
An order for pick-up is made upon full prepayment of the order (after placing an order on the website, please wait for it to be confirmed by managers). The order is received at the pick-up point during business hours.
Delivery point address:
RF, Samara region, Tolyatti, GSK "Plamya", st. Officer 14
Pick-up point opening hours:
Mon-Fri 7:00 - 19:00, Moscow time
Delivery to regions by Russian Post
Delivery is carried out by Russian Post with 100% payment for the order and delivery. The cost and approximate terms are calculated individually upon confirmation of the order. As a Federal client of Russian Post, we can provide the most favorable delivery rates from 200 rubles. depending on size, weight, value and remoteness of the region.
Note! The shelf life of parcels at Russian Post offices has been reduced to 15 days! In this case, a repeated notification will not be sent to the address specified in the parcel.
Delivery to regions by Transport Companies (TC)
Delivery to the departure terminal in Tolyatti is free of charge, the rest of the delivery cost is paid by the customer upon receipt at the TK terminal in your city. The advantages of delivery using TC include the absence of restrictions on the volume and weight of goods.
Attention! Sending parts made of plastic, glass, abs, glass mat, etc. Recommended by transport companies only in rigid packaging (crate)!
Attention: delivery times are determined by the transport company and are their area of responsibility. VS-AVTO cannot influence delivery times once the cargo has already been sent.
In connection with the amendments dated July 6, 2021 to Federal Law No. 374-FZ “On Combating Terrorism”, as well as the adoption of the anti-terrorism “Yarovaya package”, from July 20, 2016, in order to send cargo, the sender must provide information about himself, the recipient and payer. In particular, our clients require identification document details (Russian passport, driver’s license).
Forwarding (TC GTD)
Forwarding
Forwarding
Transport
Courier delivery service "SDEK"
Take this into account! SDEK is a courier delivery service, it is recommended to choose for shipments with a maximum size of 35x40cm.
Sending by other transport companies is possible in agreement with our managers.
Dear Clients! Our company cares about its Clients and it is important to us that when delivering, you receive your cargo without delays, problems and in full configuration.
To do this, we ask you to adhere to a few simple rules that will help you quickly resolve controversial issues:
Upon receipt of the shipment, carefully check:
- Integrity of packaging and tape;
- Correspondence of the actual number of places to the number specified in the TTN;
- Compliance of the data about the consignee indicated on the box with your data;
- Box weight (Weigh the load! This will help you determine at what stage the shortage occurred).
Only after making sure that the information about your cargo matches the data specified in the consignment note, sign the documents.
If the packaging is damaged, the weight of the cargo is less than stated in the cargo transport form, the cargo is not yours, the boxes are wet or missing, follow the following instructions:
- Identify the item by the sticker on the box that is missing, damaged or does not belong to you.
- Make the appropriate entry in the accompanying documents and submit an application.
- Contact a representative of the transport company with an application and draw up a Report.
Remember! Only by following the above rules will you and I have leverage over representatives of transport companies and suppliers, which means we will be able to minimize possible moral, financial and time losses.
For any delivery method, we recommend opening and checking the completeness and quality of the goods at the place of receipt (TC terminal, post office or in the presence of a courier) . The client puts his signature on the delivery note and on the postal form. This signature serves as confirmation that the Client has no complaints about the completion of the order, the quantity and appearance of the Goods.
You can get more detailed information and advice by calling 8(8482)622-122, writing an email or through an Online consultant on the website.
For any online payment option from a private individual, a fiscal receipt will be sent to your email in electronic form in full compliance with the law on the use of cash register equipment 54-FZ, which does not give you any additional cause for concern regarding our store)
Dear customers, we draw your attention! Due to the current situation, there may be delays in delivery of orders placed between 27.03 and 30.04. We continue to work and do everything possible to deliver your orders as quickly as possible. Hope for your understanding.
The following payment methods are available in our online store:
— FOR INDIVIDUALS:
Payment for orders is carried out in real time on the website of the Robokassa payment system, 0% for transfers. Enrollment is instant.
1. Bank card
7. Through cellular operators: MTS / Beeline / Tele2
— FOR LEGAL ENTITIES (LLC and individual entrepreneur of the Russian Federation):
Through any bank on an issued invoice (non-cash payment), by transferring funds to a current account.
Note ! We work “without VAT”.
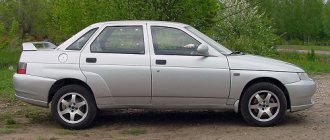
Body dimensions of the “six” and their verification
There is a concept of car body size. Along with this, it is customary to talk about geometric dimensions, which imply control standards and distances, the geometry of door and window openings, the distance between axes and much more.
As a rule, a car that has been in an accident is checked for displacement of the main body elements. Particular attention is paid to the following body parts:
Note. As for the choice of body points, in this case you can choose any. For example, you can select from the pillar to the extreme point of the rear door.
How to repair the rear axle gearbox on a VAZ 2101-VAZ 2107?
Note!
The gearboxes that went into classic cars were all practically the same, they only had a difference in the gears and therefore each gearbox is marked with the numbers 2106, 2103, 2102 and 2101, the repair of all gearboxes is also identical and does not require too high skills for this, the most important thing is to have a torque wrench and think with your head during the repair process and then you will succeed 100%!
Disassembly:
- Before you start disassembling the gearbox, you need to remove it from the car; if you do not know how to perform this operation, we recommend that you read it in the article that is posted on our website and it is called: “Replacing the rear axle gearbox on a VAZ.”
- Now, with a cloth, clean the entire gearbox from dirt and then put it where it will be most convenient for you to work (a workbench, for example, or you can lay it out on the ground, but just don’t lose anything in this case), then take a wrench in your hand and use it to turn it out the bolt that secures the locking plate (see photo 1), immediately after the bolt is unscrewed and the plate is released, remove it from the gearbox (see photo 2), perform exactly the same operation on the other side of the gearbox, respectively, with the other plate, when both locking plates will be removed, use a center punch, and use it to put marks on the bearing caps as shown in the figure number 3, the whole point is that the caps will need to be installed during assembly in exactly the same places where they stood previously and therefore (the cover of everything two, left and right) on each cover you need to make a mark relative to the body to which it is bolted, after the marks are made, select the cover that you will remove first (It doesn’t matter, but they need to be removed separately, it will be easier) and start unscrewing the bolts that secure it (Only two bolts secure one cover, see photo 4).
Removing the locking plate and marking the bearing caps to understand which cap goes where
Note!
Let us clarify once again about the marks that you need to make (This is for those who have not yet understood), we definitely recommend that in addition to the marks, you also put numbers or several marks on the lid, now we will explain everything! Since the covers must be installed strictly in the same way and strictly in their places, you can, for example, mark the first cover with one mark and this will mean that this is the right cover; on the second cover you can put two marks and this will indicate that it is left cover, for more details about where the marks need to be applied, see the photo below:
The arrows show marks made with a center punch and when reassembling the gearbox, you won’t get confused about which cover to put where.
- Then, when the bearing cover mounting bolts are unscrewed, take them out and remove the cover itself, as well as remove the adjusting nut as shown in photo 3 and then install the outer bearing ring after it and remove it too (see photo 4).
Removing the bearing cap bolts, removing the cap and removing the adjusting nut and bearing outer race
Note!
Perform exactly the same operation on the other side of the gearbox, but only when you remove the outer ring of the bearing on that side, mark it with something (a felt-tip pen, for example) and you will no longer confuse which outer ring is installed where, just their location also matters (If When the bearing is replaced, it will also have new rings, so if you have already bought a repair kit and there is a bearing and this ring, then there is no need to mark the removed one with anything)!
- Now that nothing is in the way, we move on to removing the driven gear assembly with the differential, to do this, just grab it with your hand and remove it (see photo 1), and also pull out all the other parts that are in the gearbox and are not attached to anything, these parts include the drive gear (see photo 2) which is assembled with such small but very important parts as a separator, with an adjusting ring, etc., the most important thing is that when you remove the drive gear it will be installed on it (it may fall when removal) spacer sleeve (Must be replaced) and remove it (see photo 3), after removal, take a drift and a hammer in your hands and use them to remove the inner ring with the cage and rollers; to do this, place the drift against the inner (namely, the inner) ring of the bearing and Hit it with a hammer until the inner ring with all the parts is removed along the shaft (see photo 4).
Removing the driven gear and removing the drive gear from the gearbox housing and removing the spacer sleeve and rear bearing ring from it
Note!
When you remove the inner ring by knocking it out along the shaft with all its parts (by the way, you need to knock it out not only in one place, otherwise you won’t succeed, hit it a little and in different places, so the ring will come off a little bit), there will be a there is an adjusting ring (Indicated by the arrow), remove it along the shaft too and do not damage it!
The arrow indicates the adjusting ring which must be removed after removing the rear bearing ring.
We would like to tell you a few words about the spacer sleeve and explain why it must be replaced. Firstly, the sleeve is deformed over time and since you have already disassembled the mechanism, it needs to be replaced, especially for those who have tightly tightened the gearbox flange nut and then it deformed, but choosing a new bushing is also not so easy; for more detailed information on why this bushing is needed and why it needs to be changed, see the video below:
- Let's go further, now you will need to remove the oil seal from the gearbox socket where it is installed, for more detailed information on how to do this, read the article: “Replacing the VAZ gearbox oil seal”, but only there the whole process is shown on the installed gearbox and you have it removed, so keep that in mind.
- After removing the oil seal, there is an oil deflector in the socket where it was located, carefully pry it with your hand and remove it, or simply tilt the gearbox a little and it will fall on its own, but just do not deform it (see photo 1), immediately behind this oil deflector there will be another ring bearing with the same cage and rollers, remove it from the seat too (see photo 2) and then, on the other side of the gearbox (from the inside), use a drift to knock out the outer ring of the bearing (see photo 3) and be prepared for the fact that it it will fly out on the other side, so you need to knock it out either with your hand or with something soft (see photo 4), otherwise it will be all scratched and therefore you will have to replace it.
Removing the oil deflector from the gearbox socket, removing the bearing ring and knocking out the outer ring of the bearing located inside the gearbox
Note!
According to the instructions above, you knocked out the outer ring of the front bearing with a drift; knock out the outer ring of the rear bearing in the same way, but only knock it out from the other side of the gearbox!
- Next, if you need to disassemble the differential previously removed from the gearbox, then take the special puller that we talked about at the beginning of the article and use it to press along the shaft (in simple words, remove along the shaft means) the inner ring of the bearing as shown in photo 1, if the puller is such no, then use a chisel as shown in photo 2 to move the inner ring of the bearing a little (also hit in different places, so the ring cannot move and will move) so that two thick screwdrivers fit there, as soon as space for two screwdrivers is free, insert them sides and using it as a lever (see photo 3) completely remove the inner race of the bearing from the shaft.
Pressing the bearing inner ring
Note!
After removing the bearing race from the shaft, the same way you remove the inner race of another bearing!
- To work further, you will need a vice or something else you need to clamp the differential so that it does not move when you unscrew the driven gear fastening bolts (A vice is needed from soft metal jaws, if you don’t have such, then place a thick rag between the jaws and between the part and firmly clamp the differential already in this case, it is not necessary, everything should be neat), as soon as you secure it, unscrew all 8 bolts that secure the driven gear (for clarity, a couple of bolts are indicated by an arrow in photo 1), after unscrewing, take a hammer with a rubber striker or with a plastic one and knock it down driven gear from the differential (It is indicated by a blue arrow in photo 2).
Unscrewing the bolts securing the driven gear to the differential and knocking it down with a soft-faced hammer
- Well, in conclusion, we move on to disassembling the differential, first remove from it the axle (see photo 1) on which the satellites are located, then, turning the satellites by hand, remove them from the differential (see photo 2), after them remove the side gears ( see photo 3) and their support washers (see photo 4) and with this the entire disassembly is completed, below it is explained how to assemble all these parts and their troubleshooting is explained (Fault detection is checking parts for defects, it explains what you need to look for and when in which cases it is necessary to replace certain parts with a new one).
Removing the satellite axle and removing the satellites themselves from the differential, as well as removing the semi-axial gears and their support washers
Assembly:
- All parts are assembled in the reverse order, but before assembly they need to be washed in kerosene and inspected, so after washing, pay special attention to the gears, each gear has teeth, so they should not be damaged, should not be scuffed, and should not change color either be painted (they must have the color of the metal and no black scale from the oil), since this is unacceptable; in addition, with fine-grained sandpaper, clean the satellite axle, the axle gears, namely their journals and the seats of these gears from scratches and minor damage if they will wear out; if the parts are severely deformed, replace them with new ones.
Note!
When you disassembled the gearbox from there, at the very last moment you had to remove the support washers and before that the semi-axial gears, so the semi-axial gears, as you already understood, go as one with these washers, and if you find that the support washers are deformed (Even insignificant), then in this case, be sure to replace these washers with new ones, but keep in mind that they need to be taken exactly the same thickness as the old ones, so don’t be mistaken!
- Now check the differential bearings; in no case should there be deformations or various kinds of scuffs on their working surfaces; if they are present and thus the working surface is not smooth, then replace these bearings with new ones and by the way, they are the cause of constant noise during operation of the gearbox (This is if they are worn out).
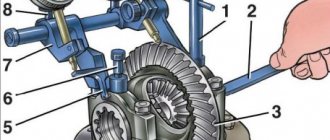
- When assembling the differential, the inner rings of the bearings, which you previously removed using a special puller, are installed with a piece of pipe of a suitable diameter until the rings rest, in addition, when assembling the differential, lubricate the side gears and their support washers with transmission oil, and also lubricate the satellites (One of the satellites indicated by number 9 in the diagram) and install all these parts back, during installation, rotate the satellites and side gears (One of them is indicated by a number
 so that the axis of the satellites can enter and install it after that.
The photo shows a diagram of the rear axle gearbox, but it is not complete, but with it you can understand everything perfectly
Note!
Also check the axial clearance of the axle gears, it should not be more than 0.1 mm, and if there is, then replace the support washers on all gears with washers of greater thickness, and if you can do anything else, determine the torque of the differential gears (By hand, these gears in case of determining the torque must be rotated as shown in the figure below), then this moment should not exceed more than 14.7 N.m (1.5 kgf.m)!
Rotate the differential gears and thus check the axial clearance of the gears
- Next, use a hammer and a suitable piece of pipe or a socket, with their help you will need to press (This means inserting) the outer ring of the front and rear bearings inside the housing (see photo 1), then if you decide to replace the main gear pair (The main pair includes the driven gear and the drive gear) or the bearings of the drive gear, then the adjusting ring will still have to be selected (Indicated by number 6 in the diagram above), to select it you need to make a device from the unnecessary (Old) drive gear, for this take a plate 80 long mm and weld it to the gear and after welding, grind it depending on the end of the gear to a size of 50-0.02 mm (see photo 2 in which the plate is already welded to the gear), then grind it or remove the layer of metal from that place with fine-grained sandpaper gears where the rear bearing is installed (indicated by number 5 in the diagram above), the metal layer must be removed until you achieve that the inner ring of the bearing is installed using a sliding fit; as soon as the required layer of metal is removed, install the inner ring with the cage and rollers on the gear, and insert it all into the gearbox housing (we install it in its place, it’s easier to say), after installing the same inner ring, but only the front bearing (The front bearing is indicated by number 4 in the diagrams above) with the separator and rollers, install the flange on its own put the seat on and rotate it so that all the bearing rollers are in the correct position, immediately after that tighten the flange nut with a torque of 7.9–9.8 N.m (0.8–1.0 kgf.m) and place the gearbox level and upright as shown in the third photo, then place the straight edge so that it touches the bearing beds along the same line and use a set of feeler gauges to determine the size of the gap between the straight edge and the same plate that you welded a little earlier (see. photo 3), write down this gap value somewhere or remember it and compare it with the deviation from the nominal position of the new gear (The deviation of the gear is written on it itself, it can be either with a plus or a minus sign, look for the location of this entry on conical part of the gear shank, see photo 4).
Pressing in the outer ring of the front bearing and installing a special drive gear, thanks to which you can find out how thick the adjusting ring will need to be installed
Note!
Now open the calculator or think everything in your mind, for example, you have a gap of 2.90 mm, and on the conical part of the gear tail there is -15 (This is the deviation of the gear from the nominal position), let’s first convert the gear deviation into millimeters for this: “-15 x 0.01 = -0.15 mm”, after translation we find out the exact thickness of the adjusting ring that we need, for this: “2.90 - (-0.15) = 3.05 mm”!
- Then remove the old gear with the plate welded to it, as well as the flange, remove both inner rings with cages and rollers, take the new gear and install the rear bearing inner ring on it (see photo 1) and then insert this gear into the crankcase gearbox, install a new spacer sleeve, the inner ring of the front bearing and the oil deflector, lubricate the working edge of the new oil seal with Litol-24 grease (For more details on how to install the oil seal and how to lubricate it, read the article linked above, this article is called: “Replacing the gearbox seal on a VAZ”) and install the gearbox flange in its place, stop this flange so that it does not rotate and begin to tighten gradually, then the nut securing it using a torque wrench, you need to tighten the nut until the torque reaches 118 N.m (12 kgf.m) as shown in photo 2, while tightening the nut, also check the moment of resistance of the bearings to rotation of the drive gear (the moment is checked with a dynamometer, this is shown in photo 3) and if it turns out to be less than 157 N.cm (16 kgf.cm) - for new bearings, and for bearings with mileage over 30 km. less than 39.2 N.cm (4 kgf.cm), but the tightening torque will not be exceeded, then leave everything without bringing the nut to a torque of 118 N.m (12 kgf.m), and if the torque turns out to be more than 197 N .cm (20 kgf.cm) - for new bearings and more than 59.0 N.cm (6 kgf.cm) for used bearings, then the very first time you pulled this nut, the bearing tension was exceeded, in this situation it needs to be replaced replace the deformed spacer sleeve with a new one and reassemble everything and adjust the tension of the central flange nut in the same way.
Hammering the drive gear ring and determining the torque of the gearbox flange
Note!
When assembling the gearbox, install the adjusting nuts (One of the nuts numbered 14 is shown in the diagram above for clarity) so that they come into contact with the outer rings of the bearings and then tighten the bolts that secure the left and right covers to the required torque (Install the covers according to the marks made earlier, since the left cover is different from the right), these adjusting nuts, by the way, can be rotated, thereby tightening and loosening them, for this, make a steel plate 49.5 mm wide and 3-4 mm thick and it is necessary to tighten these nuts, but to carry out this operation, adjustment you need to perform several points, the first is you will need to use a caliper to measure the distance between both bearing caps (see photo 4 above), after measuring you should get 0.15-0.20 mm, otherwise make the adjustment, to do this, screw the left adjustment slightly you made the nut with a special plate that you made earlier (see photo 1, the right nut is shown there, and the left adjusting nut is the one that comes from the side of the driven gear, the driven gear is the large gear), you need to tighten the nut until the gap is completely removed in the engagement of the main gears gear and then screw the right nut in the same way until it stops, then tighten the left adjusting nut a little until the lateral clearance in the meshing of the main gear gears is set at around 0.08-0.13 mm (This gap is difficult to check with anything, so it can be determined by touch, to do this, grab the driven gear with your hand and rock it with your hand, namely with your fingers, you will feel the very minimum play and the sound of teeth hitting when rocking should be heard), after setting the preload of the bearings, all using the same adjusting nuts, for this I can’t tighten both adjusting nuts evenly until the distance between the bearing caps is within 0.15-0.20 mm (see Fig. photo 4 above), after that, finally check the lateral clearance in the meshing of the main gears (It should not change), to check it, read the text just above described there and in addition to checking this clearance, grab the driven gear with your fingers and slowly turn it three turns (see photo 2) while using your fingers to control the backlash which should be minimal!
Checking the driven gear for backlash and adjusting this backlash using a special plate and adjusting nuts
Well, in conclusion, we will give some advice, these adjusting nuts regulate the gap between the driven and driving gears of the gearbox, so if this gap goes beyond 0.08-0.13 mm, then in this case, rotate the adjusting nuts and adjust it, if the gap is less position, then by tightening one of the adjusting nuts and loosening the second one to the same angle, ensure that it returns to its specified value!
Didn't find the information you are looking for? on our forum.