Content
The injector is controlled by electrical signals that come from a microprocessor
, and in order to issue them, he monitors signals from sensors installed on and in the engine.
The only work that can be done on an injection engine to adjust it and stabilize its operation is flushing the injector, or rather flushing the injectors.
Injector flushing procedure
The contamination of injectors with tar deposits is primarily caused by the desire of companies that own gas stations to buy fuel cheaper and sell it at a higher price, and at the same time mix into it everything that increases the volume:
- benzene;
- sulfur;
- water;
- olefin;
- sometimes it's just dirt.
The whole process is discussed in detail in the article:
“How to flush an injection engine yourself.”
After consuming such a “cocktail”, a tarry coating forms
, which does not contribute to the normal operation of the engine.
The procedure for cleaning the nozzles and flushing the injector will consist of the following manipulations.
Before starting work, you need to stock up on special flushing liquid, new spark plugs and a syringe or powerful syringe. It is best to invite an assistant to perform this type of work. He does not need any qualifications in car mechanics; his task will be to maintain constant engine speed by pressing the gas pedal.
Algorithm
- Flushing liquid is mixed with gasoline in a volume of 1.5–2 liters;
-
connecting the intake manifold and the brake booster is disconnected - A mixture of gasoline and rinsing is introduced into the adapter using a syringe;
- For the flushing mixture to react and clean the surface of the nozzle, it is enough to pause for 20 minutes. After this, the engine starts and idles. The speed must be constantly maintained with the gas pedal;
- After injecting the flushing solution, white smoke will come out of the hose along with pieces of black dirt. It will be greater the less frequently the injector is washed;
It is best to inject the washing mixture In this case, the quality of washing will be higher. After injecting the entire volume of flushing, the engine can be turned off;- It is necessary to install new spark plugs only on a cooled engine, for which a certain time is allotted.
As a preventive measure, to reduce the degree of contamination of injectors, repair of the VAZ 21099 injector must be carried out every 5,000 km. mileage
, adding special additives with a cleaning effect to the gas tank as a preventive measure.
It is strictly not recommended to use solvent as a cleaning agent, as it will simply corrode the silicone on the injectors.
How to remove and check injectors on a VAZ 2114 with your own hands
Content:
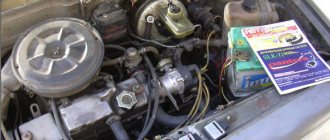
The “fourteenth” model of the domestic automaker represented by AvtoVAZ is equipped with injection power units. The motors have fairly good reliability indicators, but problems are rarely avoided. This is influenced by many factors.
If the Check Engine light comes on on the dashboard, and other symptoms of engine trouble are observed, it is likely that the injectors are clogged. In practice, cleaning injectors on a VAZ 2114 with your own hands is done quite often. It is not necessary to be an expert in the field of auto repair to understand the nuances of this event.
It is the issue of cleaning this fuel cell that our material today is devoted to.
Symptoms of a problem
Fuel rail
There are several key symptoms that indicate the presence of such a problem:
- There are misfires at idle;
- Fuel consumption increases sharply;
- There is instability in engine operation;
- The car accelerates more slowly than usual when the gas pedal is fully pressed.
It is very important to identify such a problem, since the injectors supply fuel to the system. Without fuel, engine operation is impossible. It is not always worth replacing them immediately, since they often need to be cleaned.
What you need to know about injectors
The quality of the fuel used has a huge impact on the safety and efficiency of the injectors on your VAZ 2114. Alas, the quality of domestic fuel leaves much to be desired. If you regularly fill your car with low-quality gasoline, the injectors will not last more than 120 thousand kilometers.
Unscrew the fuel pipe
The optimal replacement frequency is about 80-90 thousand kilometers.
As for the cost, original injectors for the VAZ 2114 cost from 500 rubles apiece. Foreign analogues are more expensive, sometimes several times. But the price is largely justified by reliability and longer service life. Therefore, if possible, buy high-quality imported devices.
How to extend the life of injectors
There are essentially two main ways to ensure that the fuel cells installed in your vehicle last as long as possible.
- Use of additives. Special additives for increasing fuel quality and cleaning the system can be found in any automotive chemical store. They are poured into the gas tank. The additive costs quite little, so everyone can afford to buy it. But when starting to use additives, you should do this regularly, otherwise they will not be effective. Some people believe that additives only spoil the condition of the injectors. This statement may be true if low-grade or counterfeit chemicals are used. Good products, although they do not completely clean devices, can significantly extend their service life.
- The second method is periodic flushing. Experts recommend performing the operation approximately once every 40 thousand kilometers traveled by your car. Some people do the cleaning themselves, while others turn to auto repair shops for help. For reference, we note that the cost of cleaning injectors at a service station will be from 1,500 rubles.
Checking the operation of injectors
Before replacing injectors on an 8-valve VAZ 2114 or cleaning them, you should check the functionality of the devices.
Do-it-yourself washing
There are two proven methods for this. With their help, you will learn how to check an element for functionality.
| Method | Your actions |
| Checking on a cold power unit with the engine running | Touch each nozzle with your hands. If it is working properly, the device will vibrate or pulsate. The method is bad because it does not provide complete information |
| Idle check | Add revs and let the car run for a while. Then loosen the cap nuts one at a time. They hold the injectors. At the same time, the speed should drop. If the speed does not decrease, one of the injectors is not working. |
Cleaning injectors with the help of workshops is quite an expensive proposition. In addition, it is quite possible to do the work yourself.
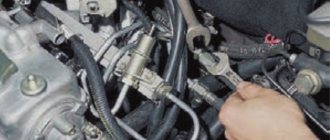
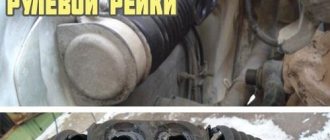
Removing injectors
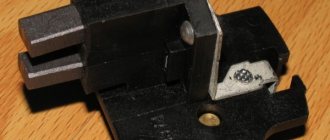
Clip
To clean the devices, they must first be removed from the vehicle. Let's figure out how to remove injectors on a VAZ 2114:
- Turn off the engine and let it cool for a while. This is necessary for your own safety;
- Disconnect the negative terminal from your car's battery;
- Remove the protective casing;
- Remove the air filter;
- The high pressure pipeline should be unscrewed from the nozzle and pump. It must be removed from the support bracket;
- You now need to unscrew the nozzle with a spanner wrench. Do this together with the puck;
- Be sure to disconnect the electrical connector and slide the lock located along the ramp;
- Manipulate all 4 injectors in the same way, which will allow you to eventually remove them;
- If the device is completely out of order, you will have to replace the injectors on the 8-valve VAZ 2114. If everything is fine with them, just clean them.
Cleaning
Handy cleaning agent
The procedure is not complicated, but try to do everything carefully and step by step.
- Visually examine the condition of the item. If there are traces or signs of leakage, it is better to immediately replace the elements, since cleaning will definitely not have a long-term effect.
- If the injector can be saved by stripping, remove the O-rings located on the body and nozzle.
- Place them in acetone for a while. As an analogue, you can use regular gasoline. But do not forget that these are highly flammable mixtures, so there should not be any sources of even the slightest spark nearby.
- Be sure to keep a fire extinguisher near you. Let you be the most careful and consistent person, accidents have never been canceled.
- Keeping the injectors in acetone or gasoline will allow you to better clean all accumulated contaminants.
- While the units are soaking, pay attention to the valve cover and ramp. It is advisable to clean them, as they act as sources of contamination.
- The ramp is blown out with a conventional vacuum cleaner.
- Now we take out the nozzles and start working directly with them.
- Coke often forms on the nozzles, resembling resin in appearance and consistency. Be sure to get rid of these deposits.
- The surface around the nozzle is cleaned with gentle movements of a pin or needle.
- At this point, external cleaning can be considered complete.
- Now the most difficult process is the internal “cleaning” of the elements. For this procedure, arm yourself with a tube, a syringe and a can of a substance intended for cleaning carburetors. It doesn’t matter that you have an injection car produced by our glorious automobile company AvtoVAZ. It is not difficult to purchase such a product, and it is cheap.
- The product must be applied under pressure using a tube, simulating an injection. For each injector, perform several such manipulations. This will allow them to cleanse themselves and break through from within. As a result, the devices will be able to spray fuel liquid more evenly than before cleaning.
- Be sure to give them some time to dry.
- You should also replace the old O-rings with new ones. It is strongly not recommended to use the old ones, even if you clean them. Replace the seals every time you clean the injectors.
- To delay the next cleaning as much as possible, and also to ensure long-term and efficient operation of the cleaned injectors, it is recommended to replace the mesh on the fuel pump, as well as the fuel filter.
The most important recommendation, which should be followed in any case, before and after self-cleaning, is a little different.
To save your car, get rid of many problems and malfunctions, and also allow the elements of the fuel system to do their job effectively, refuel with high-quality fuel. VAZ 2114 drivers motivate the use of cheap gas stations by the need to save money. But if this is not stopped, clogged injectors will be only a small part of the problems your car will face due to poor fuel. And all the money saved on gasoline, plus the same amount, will be spent on repairs. Here is the price of cheap gas stations.
No Comments Yet! You can be first to comment this post! Close Window
Loading, Please Wait!
This may take a second or two.
luxvaz.ru
When replacement is required
There are several signs that indicate you need to at least remove and check the condition of the fuel injectors. Next, a decision is made to clean or replace the elements.
Pay attention to the behavior of your car and specifically the engine. They will tell you if there is something wrong with the injectors. This may manifest itself as follows:
- The engine produces less power, the same acceleration efficiency is not felt;
- If the engine performs poorly or lacks power, fuel consumption still increases;
- Poor starting is not a rare sign of injector failure;
- If the engine does not hold idle speed well, the injectors may well be the cause;
- The amount of toxic components in exhaust gases increases;
- At idle the speed increases.
Replacing injectors
The difficulty in identifying problems in the operation of injectors is that the fuel system is quite branched and it is necessary to diagnose the functionality of all its parts. For example, a malfunction such as a decrease in engine power can have two reasons - failure of the injectors or exhaustion of the pump's life.
Clogged injectors can result in sudden jerking of the engine while driving or unstable idle speed. In addition, an increase in fuel consumption can be considered a sign of injector failure.
You can check the functionality of each injector even without removing them. Simply start the engine and remove the wires from the connector of each injector one by one. If immediately after removal the engine starts to twitch or stalls, then the injector is fine. If the stability of the engine does not change with removal of the wire, then the injector needs to be thoroughly cleaned or even replaced.
Removal and replacement
Now we’ll talk specifically about how to properly remove and replace old injectors that have lost their usefulness with new units.
The process of dismantling each of the 4 injectors is identical, so there will be no difference in the process.
Perhaps the most problematic step in replacing or cleaning injectors is dismantling the fuel rail. Therefore, we will separately tell you how this knot is removed.
Fuel rail
The fuel rail is the bar on which the injectors are mounted. It is secured with a pair of bolts on the intake pipe. To the left of the ramp there is a fuel pressure control fitting. To remove it you need:
- Disconnect the negative terminal from the battery. Nobody needs short circuits;
- Relieve pressure in the fuel line;
- Remove the air filter and disconnect the intake pipe hose, then remove the vacuum hose of the pressure regulator;
- Disconnect the power supply wire from the idle speed sensor. To do this, simply press out the pad retainer, made of plastic;
- Disconnect the block with the wires coming from the injectors;
- Disconnect the drain and supply hoses from the fuel pipes;
- Unscrew the pair of mounting bolts that secure the fuel rail to the intake pipe;
- The fuel pipes are held in place by a special holder, which requires unscrewing one mounting screw to remove;
- Remove the fuel rail by sliding it along the axis of the fuel nozzles. This way they will come out of their seat on the intake pipe;
- Assembly is performed in reverse order.
Removing the ramp
Please note that under the fuel rail mounting bolts there are washers, which must be returned to their place during reassembly or replaced with similar new ones.
- First, remove the fuel rail from your vehicle.
- Next, the ramp is laid on a flat surface, after which the wiring block is disconnected from the damaged injector. To remove it, you need to compress the spring mounting bracket and then disconnect the block.
- Using a screwdriver, slide the metal retainer toward the fuel rail. It serves to fix the fuel nozzle. For some reason, many people remove the lock completely. There is no need for this. Just move it a little to the side.
- Take the nozzle in your hand and rock it slightly to the sides. So it should come out of the fuel rail without any problems.
- At the same time, be sure to check the current condition of the sealing rings of the fuel atomizer body.
- The sealing ring of the nozzle spray element is checked in the same way. To do this, you need to pry both rings with a screwdriver and see if they are worn out.
- In the case of fuel injectors, there is no need to change the O-rings when replacing the injectors themselves if they are in good condition. Only if you are going to reuse them, be sure to lubricate the rings with oil before installation. Motorized, of course.
- When the nozzle is removed and the rings are replaced (or the old ones are left), you can begin installing new devices. The procedure is performed in reverse order.
- Insert the nozzle into the hole on the fuel rail and secure it with the clamp.
- Return the block with the wires to its place, and install the fuel rail in its rightful place.
Where is the temperature sensor located?
If the temperature sensor does not show on the instrument panel, there is a high risk of overheating the engine, since the instrument panel does not inform the driver about the heating of the internal combustion engine coolant. Of course, the instrument panel or electrical wiring may be faulty, but most often the temperature sensor (DTOZH) on the engine itself refuses to work.
Where is the temperature sensor located on an injection car 099? Of course, you need to look for it in the engine compartment:
- open the hood;
- we find the wiring that is located between the rear of the engine valve cover and the air filter housing;
- where the DTOZH is located can be seen in more detail in the following photos.
The speed sensor (DS) on front-wheel drive VAZ cars reads pulses depending on wheel speed and transmits the data to the electronic control unit (ECU). When braking the engine, the fuel supply is turned off with the help of the diesel engine and the computer, thus achieving more economical operation of the internal combustion engine. If the sensor is faulty, an error code is recorded, gasoline consumption increases slightly, and idle speed decreases, especially during heavy braking. It is difficult to immediately detect where the speed sensor is located, since it is hidden under the air filter housing (AFC).
We find the part we need as follows:
- open the hood of the car;
- Using a 10mm wrench, unscrew the two KVF fastening bolts;
- loosen the clamp of the air “corrugation”, disconnect the “chip” with the wires;
- we take out the KVF, now the sensor has already appeared in the field of view, it is located on the gearbox (gearbox) housing, wires are connected to it, connected using a connector.
The DS can be easily unscrewed by hand, and the plug with wires can be pulled out even after the sensor has been unscrewed (but carefully so as not to damage the wiring during rotation).
Cleaning
There are two ways to clean fuel nozzles, each of which has its own nuances. Choose for yourself which one you like best or is more affordable, taking into account the available funds.
Spray to the rescue
Cleaning method
Necessary materials
Features of the event
- Injector cleaner;
- Carburetor cleaner in spray form;
- Spare O-ring
- Carburetor cleaning spray;
- Pump;
- Pressure gauge;
- Sealing ring
A simple cleaning method
Both operations take approximately 2-3 hours, but cost several hundred rubles. This is ten times cheaper than replacement and about the same amount more affordable than service stations.
After cleaning the injectors, check their operation. If this does not work, you will have to change it.
How to replace old injectors with new ones (in detail)
All four injectors are removed and installed identically, so we will consider replacing only one injector. The dismantling of the injectors was described in detail above, so we move on to the next stage - replacement.
- First of all, we check the condition of the sealing rings of the fuel atomizer housing.
- Likewise, check the O-ring of the injector spray component. To do this, pry up both rings with a screwdriver and inspect them for wear.
- When it comes to fuel injectors, there is no need to change the O-rings when replacing the injectors if they are in good condition. But if you are going to reuse them, lubricate them with engine oil before installation.
- When the nozzle is removed and the rings are replaced (or the old ones are left), you can begin installing new devices. The procedure is performed in reverse order.
- Then we insert the sprayer into the hole located on the fuel rail and secure it with a clamp.
- We return the block with the wires to its place, after which we install the fuel rail in place.
Cleaning injectors on VAZ 2108, VAZ 2109, VAZ 21099
Welcome! Do you want to learn how to clean fuel injectors on fuel-injected cars of the Samara family? If you are interested in this, then continue reading the article further, in it you will find instructions for properly cleaning the injectors.
Summary:
When should you clean your injectors? Each person cleans their injectors differently, because as a rule, there are no exact numbers that would indicate how often fuel injectors should be cleaned. But there are small signs by which you can determine that the injectors are not working correctly, the signs are as follows:
- Basically, if the injector is heavily contaminated, the car’s engine may become difficult to start.
- It may begin to exhibit unstable operation, this will be especially noticeable at idle.
- The engine may also stall at idle.
- And in some cases, its speed may increase while operating at the same idle speed.
- And finally, due to improper operation of the fuel injectors, when driving the car may experience jerks, various kinds of failures, and fuel consumption usually increases.
What things are needed to clean injectors? 1) Firstly, you will need a charger for your phone, but not one that you use every day, but one that you don’t need, provided that it works.
Note! In such cases, old phone chargers are best suited: Nokia, Samsung, in some cases Siemens and others!
2) You will also need a special can for cleaning the carburetor, which must be filled with cleaning liquid.
Note! As a rule, a small stick is included with the can; it is indicated by an arrow in the top photo; be sure to try to get it because in some cases it simply gets lost. But if you fail to find this wand, then use any analogue of it!
3) You will also need a short length, one thick and one thin hose.
Note! A thick hose must be selected according to the size of the spray part of the nozzle so that it can be easily installed on it, as shown in the photo below. And the thin hose must be selected in such a way that it can fit inside the thick one and at the same time does not interfere with the passage of the thin stick that comes from the spray head of the carburetor cleaning cylinder. (For more information on how to assemble a thick hose together with a thin one, see below in the same article, under the heading: “Preparation”, point “3”)
4) And to all this, you will also need two clamps, one of which will hold the hose on the fuel injector.
Where is the starter relay located?
Quite often a problem arises with the Ninety-Nine when the engine fan does not turn on and the coolant begins to boil. If such a malfunction occurs, first of all they check the functionality of the fan itself by applying voltage directly to it from the battery, but there may be other problems.
In order to check the entire circuit, it is important to find where the VAZ-21099 injector fan relay is located, since it is responsible for turning on the airflow. We find this part in the front of the car, on the passenger side, it is installed under the glove compartment, at the passenger’s feet.
The required relay in the picture is indicated by an orange circle, and here you will also find a fuse that blows when the cooling fan is short-circuited.
Just like the engine cooling fan, the starter is controlled by a relay, and its malfunction can cause problems:
- when you turn the ignition key, nothing happens, the engine does not show any signs of life;
- When I try to start the engine, clicks are heard, but the starter does not crank.
Finding out where the starter relay is located on a VAZ-21099i car is very simple; to do this, you just need to open the hood of the car and look behind the air pipe of the injection engine; the part you are looking for is shown below in the picture.
VAZ 21099: injector repair - how to do it?
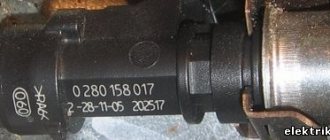
Installing an injector in a VAZ 21099 car
Reliable operation of the fuel system of the VAZ 21099 depends on the injector. Its clogging can lead to large excess fuel consumption, unstable idling and a decrease in engine power, and the car jerking during acceleration. Many gas stations sell low quality fuel that contains dirt, benzene, water, sulfur and olefin. This leads to the accumulation of tarry deposits in the fuel system, rail, and on the surfaces of the injector. This article discusses how to flush the injector on a VAZ 21099 car yourself.
How to remove VAZ 2109 injectors (injector) step by step
Removing the fuel rail
- First of all, you need to remove the fuel rail.
- Then place it on a flat surface, and then disconnect the wiring harness from the damaged injector. To dismantle it, compress the spring mounting bracket and disconnect the block.
- Using a screwdriver, slide the metal retainer toward the fuel rail. It is designed to fix the fuel sprayer. For some reason, many car enthusiasts completely remove the lock. However, there is no need for this. Just move it a little to the side.
- Take the nozzle in your hand and swing it to the sides. This way it will come out of the fuel rail without any problems.
Disconnect the wire block
Injection system VAZ 21099
The main elements of the injection system are shown in the diagram:
Diagram of the injection system of a VAZ 21099 car
Positions on the diagram:
- 1 – air filter;
- 2 – air flow sensor;
- 3, 4,10, - system hoses;
- 11 – electronic control unit;
- 13 – fuel filter;
- 14 – fuel tank;
- 18 – pressure regulator;
- 20 – injector ramp;
- 21 – nozzle;
- 26 – cylinder head.
How to properly wash the injector on a VAZ 2109 car
To clean the fuel injectors from tarry deposits that appear due to poor quality fuel poured into the gas tank, it is sometimes enough to wash the injector on a VAZ 2109. This can be done in a specialized workshop or with your own hands. The work process is as follows:
- Purchased: flushing fluid, syringe, set of new candles.
Advice: It is better to do the work with an assistant who will press the accelerator pedal to maintain the required engine speed.
- Mix 1.5 - 2 liters of gasoline, which is usually poured into the tank, and flushing liquid.
- The hood opens.
- On the hose connecting the intake manifold and the vacuum brake booster, the rubber adapter tube is disconnected.
- Using a syringe, the prepared mixture of washing liquid and gasoline is poured into it.
- About 20 minutes is enough for all the growths inside the device to come off.
- The assistant gets behind the wheel and the engine starts. The accelerator pedal must be held down, otherwise the engine will not maintain speed due to the tube being disconnected.
- The mixture is injected.
Tip: High pressure in the tube can cause the syringe to be pulled inward, so you need to gently press it, and the liquid will flow into the tube itself.
- There is no need to pay attention to the black pieces of garbage flying out of it and the emanating puffs of white smoke. All this may be accompanied by various sounds, especially in VAZ 2109 cars, injector cleaning, which has not been carried out for more than three years.
Tip: You need to pour in the washing mixture in small portions, this will wash the device better.
- When all the mixture is finished, the engine is turned off and time is given to cool down.
- A new set of spark plugs is installed.
- The engine workplace is wiped with a dry cloth.
- The hood closes.
Lada 21099 Harmful › Logbook › Flushing the cooling system!
Well, in general, when I bought the car, the CO hoses were leaking, and somehow, without bothering about it, I topped up the water, because it was summer and there were no signs of trouble, but apparently, due to water vapor, corrosion began on the expansion tank cap and valve it got stuck in it, and the antifreeze began to boil because because of the valve there was no required pressure in the CO, I had to add more water. In general, at the end of the summer of 2014, I looked into the expansion tank and the antifreeze there was orange, somewhere it was still starting to rust, well, then I decided to change all the antifreeze in the CO. As it was in the summer, but damn, I didn’t think of rinsing the CO before replacing the antifreeze, and after a while, the antifreeze was orange again, but last weekend it was already warm, and I had to go to a neighboring city for some parts. I decided to combine 2 things, a trip and a flush, bought antifreeze for 600 rubles and flushing the cooling system for 150 rub.
This time I warmed up the engine, drained the antifreeze and poured water into CO, washed it 3 times and on the 4th I poured this chemical along with water, in general it seemed to me that it was nonsense and not a wash, the water didn’t come out particularly dirty, then I washed it with CO 3 more times , in total it turned out 7 times). I took a canister of old antifreeze with me and while I was wandering around the neighboring city I stopped in a private sector and refilled the canister from the pumps, well, of course, I drained it anywhere because there was already rust and water there and that was not enough. When I drained the water 7 times, the water was already almost transparent, or maybe transparent because I had already drained it all in the dark with a flashlight). But now the antifreeze in the tank is bright blue, without dirt and rye)
What is an injector - a modern replacement for a carburetor
An injector is a device that replaces the operation of a carburetor and consists of a fuel rail (rail) onto which injectors are attached. Under high pressure from the gasoline pump, fuel enters the rack, and from there the gasoline is distributed to the injectors. The injector nozzles, using rubber sealing rings, are inserted together with the rack into the engine block and inject fuel, which then ignites.
One of the main parts of the work in the injector is performed by the intake manifold. Its device includes a throttle valve, which is responsible for supplying air from the environment to the engine block.
An injector is a fairly thin device, the operation of which is constantly regulated by the electronic “brain” of the car. The presence of an on-board computer allows specialized car repair shops to carry out quick and accurate vehicle diagnostics. Diagnostics is carried out by connecting special equipment through a connector to the vehicle’s on-board computer.
Injection models of the VAZ 21099 since 2000 have also acquired electronic “brains”. This car model has front-wheel drive and shows high road stability. The engine of the injection 99 is four-cylinder, eight-valve, with a displacement of 1.5 liters. In a modern VAZ, the maximum speed indicated on the speedometer is 180 km/h. In practice, it is not recommended to accelerate this car over 160 km/h.
A design feature of a car injector is much lower fuel consumption compared to a carburetor car. VAZ 21099 (injector) has an average consumption of 7.0–7.5 liters per 100 km, at an average speed of 100–120 km/h. It was possible to achieve a reduction in fuel consumption by reducing the vehicle's energy consumption. It is worth noting that the injector of this car is not very picky about octane fuel and consumes the same gasoline, both A-92 and A-95.
Malfunctions of VAZ 21099 - the injector also fails!
Regardless of the time of year outside, very often the car may simply stop starting, or begin to respond poorly to the gas pedal. In this case, all on-board computer sensors may not show errors. The causes of failure should be sought in the injector.
Usually the breakdown is associated with clogging of the fuel injector nozzles, which increases fuel consumption in the car and reduces traction. Due to the fact that the fuel does not enter in the quantity required for engine operation, the idle speed begins to float. For a VAZ, the normal value when the engine is idling in warm weather is 900 rpm. When starting in the cold season, the engine produces 1500 rpm; with proper operation, after 5–10 minutes they should drop to 900.
It is also worth paying attention to the throttle valve of the intake manifold - over time, black deposits appear on it, which prevents it from properly passing air. It is enough to clean the damper with a special spray and gently wipe with a cloth - the problem is eliminated!
Repair of VAZ 21099 injector
In most cases, you can get by by simply cleaning the injector. This procedure can be done at every car service center. To prevent serious damage, have your car diagnosed in a timely manner. You can do the cleaning yourself using chemicals, but it will not be complete. If you decide to clean the injector yourself, you need to buy a repair kit for rubber O-rings for injectors and injector cleaning fluid.
Before performing this procedure, you need to remove the terminals on the battery and disconnect all power supply connectors near the injector. Then we proceed to remove the manifold, carefully unscrew and disconnect the pipes from it. After this, we release the pressure in the fuel rail of the injector by pressing the nipple on the left side of the rail.
Next, carefully move the sealing clamps from the injectors and, by swaying in different directions, remove our injector. It is not difficult to see whether the injectors are dirty. After disconnecting each nozzle, place them in a jar with a pre-prepared chemical mixture for 30–40 minutes. Once you have completed this procedure, we proceed to reassemble our fuel system in reverse order. Be sure to remember to change the o-rings on the injectors that come in the repair kit.
|
|
How to clean injectors yourself
Method 1: fuel additive
The simplest and relatively gentle cleaning method is using special additives. More suitable for preventing the formation of deposits inside all elements of the fuel system - from the gas tank to the injectors.
The disadvantage of such additives is that on cars with high mileage they lift all the dirt from the gas tank and pipelines. As a result, the filters and the injectors themselves become clogged, which leads to even more disastrous consequences.
You will need
- Fuel additive-injector cleaner.
How to do
- Pour the product into the tank immediately before refueling according to the proportions in the attached instructions.
- Operate the vehicle as normal.
- For the best cleaning effect, it is advisable not to stand in city traffic jams, but to drive along the highway.
Method 2: flushing the injectors on the engine
This cleaning method is more difficult, but also more effective. It not only cleans the injectors, but also additionally decarbonizes the piston rings and also increases compression. Flushing is carried out with the engine running, which runs on detergent instead of gasoline.
The main disadvantage is that the quality of washing cannot be controlled. Other disadvantages include the entry of aggressive substances into the exhaust tract and potential damage to the catalyst. After using some products, spark plugs may need to be replaced.
You will need
- Injector cleaner;
- fuel filter;
- two-liter plastic bottle;
- wire;
- 1 m of fuel hose with a diameter of 10–12 mm;
- 3 clamps with a diameter of 9–14 mm;
- 2 nipples from a tubeless tire;
- bolt M12;
- screwdriver or drill;
- drill with a diameter of 12½ mm;
- tire compressor;
- spark plugs (if their replacement is recommended in the flushing instructions).
How to do
- Drill one hole each in the cap and bottom of the bottle. Install the nipple with the valve turned out into the cover. The nipple will supply liquid to the ramp.
- Insert the second nipple assembly into the hole in the bottom. You will need it to pump in air later to create pressure.
- Place one end of the hose onto the nipple in the cover, and install the other on the fuel filter, according to the arrow on the body. Tighten the ends of the hose with clamps. Wrap the bottle with wire so you can hang it.
- Warm up the engine to operating temperature and turn it off. Disable the fuel pump by removing the corresponding fuse.
- Start the engine. Let it run to relieve pressure in the rail. Wait until the engine stops.
- Disconnect the fuel supply hose from the line and connect it to the filter of an improvised flushing receiver. Pour the wash into the bottle, close the cap and hang it on the hood.
- If the car has a return fuel line, plug it using a bolt of suitable diameter and clamp it with a clamp.
- Use a compressor to pump air into the bottle until the pressure reaches 2–2½ bar.
- Start the engine and let it idle for 15 minutes, maintaining the pressure in the bottle at the same level.
- Turn off the engine and wait about 15 minutes for all deposits to soak off.
- Start the engine again and use up any remaining flushing fluid while maintaining the RPM between 1,000 and 1,500.
- Remove the bottle, the return plug and connect everything as normal. Don't forget the fuse.
- If the flush is aggressive and affects the spark plugs, replace them.
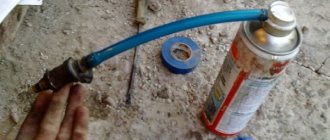
Method 3: washing and removing the injectors
The most difficult method, which involves removing the fuel rail and injectors. At the same time, it is the most effective and targeted - there is no harm to other elements of the system. For flushing, the operation of an injector is simulated, and a carburetor cleaner is used instead of gasoline.
The only disadvantages of this method are the difficulty of dismantling the ramp and injectors, as well as the need to replace microfilters and o-rings.
You will need
- Aerosol cleaner for carburetors;
- syringe 5 mm³;
- 9-volt Krona battery;
- 1–2 m of wires;
- doorbell button or other without fixation;
- 4 alligator clips;
- screw with a diameter of 4 mm;
- pliers;
- repair kit for injectors (only rubber rings and a filter are allowed).