Solenoid valve
Quite often, disturbances in the operation of the engine in the idle speed mode (idling speed) are associated with the appearance of a malfunction in the EPHH - the economizer of this idle speed. As a rule, for some reason, in a VAZ 2109 the solenoid valve in the carburetor stops working, and this causes problems. Anyone can diagnose and repair a malfunction; the valve is small and does not require disassembling the carburetor, so you can figure out something with the solenoid valve in a VAZ 2109 yourself.
Carburetor tuning
Not all owners of VAZ 2108/2109 cars know that you can modify the carburetor yourself. Tuning will not only increase the resource of the power unit, but also increase the speed characteristics of the car. To do this, you will need to ensure a decrease in the resistance of the air flow that is sucked into the carburetor.
To carry out tuning, it is necessary to remove the carburetor, clean it inside and outside to ensure full operation of all its components.
After which it is necessary to remove all the jets and throttle valves from the housing. The cavities of the two internal combustion chambers must be enlarged using a lathe. The larger the volume of the chamber, the less air resistance there will be. And also, simultaneously with boring the chambers, it is recommended to increase the cavity of the diffusers. It is better to entrust work on the machine to a specialist, since this is the only way to avoid damage to the housing.
In addition, you will need to select new jets with larger diameter holes. It is recommended to install fuel and air nozzles with an increase in the opening by 0.05 mm. This is quite enough to increase the throughput of carburetor parts.
In addition, you can change the needle on the economizer device. It is best to replace it with a rubber product. The rubber needle can withstand longer periods of high loads and has an increased service life. Only such equipment will allow you to get rid of the engine freezing when you sharply press the gas pedal.
Increasing internal cavities minimizes air resistance
Nuances of choice
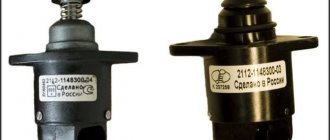
The stores offer a huge number of different sensors from different manufacturers. The original part must be marked XX-XXXXXXX-XX. By the last two digits you can figure out compatibility. So, numbers 01 and 03 are interchangeable, and 02 and 04 can also be swapped. Instead of 02, you cannot put 01 or 03. If the sensor is original and new, it is better to additionally lubricate the spring and rod with thick lubricant.
When buying a sensor, even in a trusted store, you should look at the following nuances:
- there are no marks on the packaging by which the manufacturer can be distinguished;
- the sticker on the device body is yellow and has no frames;
- the needle has a dark tip;
- the o-ring is thin and black;
- rivet heads less than 3 mm in diameter;
- white spring;
- The length of the body is 1 mm less than the length of the standard AvtoVAZ sensor.
All these nuances indicate that a counterfeit VAZ-2109 idle speed sensor is being offered. You can see photos of real and fake devices above.
Preparation for setting up the VAZ 2109 carburetor
To figure out how to adjust the carburetor on your VAZ 2109, you should start with preparatory measures. They include:
- Preparing a room for regulation, where there is constant access to fresh air;
- The machine must be horizontal and as level as possible;
- Do not use ordinary rags while working, as they produce lint that can damage the car;
- You should always have a flathead screwdriver on hand;
- Prepare cleaning products or gasoline. Compressed air cleans the system best.
Carburetor cleaning
You cannot adjust the carburetor on a VAZ 2109 with your own hands until you clean it.
Regular gasoline or compressed air, detergents and cleaners are suitable for this. Adjust the ignition pre-ignition. If it is early or late, then adjusting the carburetor will do absolutely nothing.
Carry out work only after the engine has reached operating temperatures. To do this, you need to start the car and keep it idling. You need to remove the linkage from the gas pedal, unscrew the crankcase ventilation, and check that there is no vacuum regulator in the tube. If there is a vacuum, then you did something wrong. Be sure to adjust the quality screws.
Step by step adjustment
You can make the adjustment yourself, but to do this you should follow a clear sequence of your actions.
Step 1: Adjust the throttle
- Check the cable tension level. It may be too tight or too tight.
- Use a 13 key to adjust the tension.
- Check your work. By pressing the pedal all the way, the damper should open completely, and by releasing the pedal, it should be completely closed.
- Using the same 13mm wrench, adjust the position of the locknut to achieve the ideal result.
Step 2: Adjusting the air damper
Air damper
- Remove the cap from the filter and replace it if necessary.
- Check its functionality. Recess the choke handle completely, and then the damper should be completely open and located under the dashboard.
- Pull the damper lever to fully open it.
- Push the lever all the way in.
- Remove the cable from the insulation and press the traction adjustment bolt.
- Check the functionality of the damper again.
- Having achieved the desired result, fix the bolt on the lever and close the air filter cover.
Step 3: Starter
Adjustment is carried out by removing or not removing the carburetor. If you can't remove it, then use a tachometer. The air filter housing is removed, and the air damper lever is removed. Start the engine and watch what happens.
The air damper is opened a third with a flat screwdriver, and the adjustment bolt is adjusted with a 7 key. The tachometer should show 3100-3400 rpm. If the desired result is achieved, you can release the shutter.
Step 4: Adjusting the idle speed
- Charge the battery as fully as possible.
- Warm up the engine until it reaches its operating temperature.
- Turn on your lights, audio system, and other equipment that uses electricity. It is required to achieve maximum utilization of battery charge.
- Idle at maximum speed.
- By rotating the quality screw, reduce the speed by about 50-150.
Video
https://youtube.com/watch?v=-iYxxRFBWUo
Do not forget that constant adjustment of the carburetor, its proper cleaning and tuning will significantly extend the life of the device and avoid complex and expensive repairs. Plus, this has a positive effect on fuel consumption, which is reduced as a result of such procedures.
Now you know what to do if the carburetor on your VAZ 2109 malfunctions, failures during acceleration, inability to maintain idle speed and other troubles.
Of course, if the problem turns out to be serious and the carburetor needs repair, then it is better to entrust it to professionals. It is not recommended to undertake such a task on your own.
Loading …
What to do if there is no idle on a VAZ-2109 car
As mentioned above, this problem is quite common, and this applies to a greater extent to “nines” with a carburetor engine. Here they often get clogged:
Because of this, the speed eventually begins to fluctuate or the engine simply stalls. Fixing this problem is not very difficult. You can do everything yourself, thereby saving a certain amount of money, because you will have to pay for the diagnostics and work of the car service technicians.
In the “nines” the jet is responsible for the stable operation of the carburetor. The problems here arise due to its contamination. Accordingly, to eliminate them you just need to unscrew the nozzle and blow it out with a stream of air. This is the simplest solution to the problem.
However, in case of more serious blockage, it is no longer possible to do without the flushing procedure. This is done using a diluted mixture of acetone or gasoline.
It should be noted that some VAZ “nines” are equipped with jets with a valve that has an electromagnetic control.
With its help, the supply of the fuel mixture to the nozzle is adjusted. If the valve is operating normally, the flow stops when the engine speed rises above 2.1 thousand per minute. Manufacturers claim that a breakdown of a jet with such a valve can only be diagnosed at a car service center, using special equipment. However, craftsmen have come up with their own way to avoid a visit to the service station. In particular, you just need to quickly disconnect and reconnect the wire that supplies power to the valve. If, while performing this manipulation, you hear a clear click, it means that everything is fine with this unit, and the source of the problem should be looked for elsewhere. In the fuel line through which gasoline is supplied to the carburetor, there is a fine filter. Its contamination can also cause problems with the normal operation of the car at idle. According to the recommendations of the manufacturers, this element should be changed after every 15 thousand kilometers. However, the fine filter will only have such a resource if the car is constantly refueled with high-quality fuel. Otherwise, you will have to change it much earlier. It should be immediately noted that the purging procedure is ineffective here. Therefore, change the filter immediately, especially since it is not that expensive.
Incorrect carburetor adjustment is another very common cause of problems with idle speed on the VAZ-2109. In this case, you need to set the screws that regulate the mixture to the correct position. The procedure for adjusting the carburetor is quite simple, and you can do it yourself. The problem may also be caused by air getting into the fuel mixture due to poor sealing of the connections. First of all, you should check the pipe that connects the intake manifold and the brake booster.
On “nines” with an injection engine, the main cause of problems with idle speed is the idle speed regulator. If everything is in order with this unit, you should continue to search for the cause of the malfunction. In particular, you need to check the pressure in the fuel rail. To begin, simply remove the cap from it and press a suitable object onto the valve. After this manipulation, gasoline should spray out in a powerful stream. This means everything is fine. If the gasoline “sputters,” then you should arm yourself with a pressure gauge and measure the pressure. The normal range is 2.8 to 3.5 bar.
Also, the cause of problems with idling on a VAZ-2109 with an injection engine can be various sensors - XX, throttle position, camshaft position, fuel pump failure or dirty injectors. It is best to start the checking procedure with spark plugs and high-voltage wires. Next, inspect the distributor and slider. If you have time, then you can easily start looking for the source of the problem yourself. Here you just need to be prepared for the fact that you will have to go through several possible reasons at once, methodically moving from one to another. If you don’t want to do this, go to the service. There, the diagnostic procedure will take a little time. Once the cause has been determined, you can fix the problem yourself.
Valve check
There are three main steps to checking the functionality of the solenoid valve.
| Verification method | Your actions |
| Basic operating mode of EPHH |
|
| Engine braking mode |
|
| Fuel cut-off when ignition is turned off |
|
In addition to the solenoid valve itself, you should also definitely check the EPHH control unit.
Plus and minus
Checking the control unit
To check the control unit of the solenoid valve of the carburetor VAZ 2109 you will need a wire. The length of the wire should be such that it is sufficient to connect the valve to the positive terminal of the battery. Plus, you will need a standard voltage control light.
Your steps when checking the control unit will look like this.
- Disconnect the power wire from the valve without interfering with the operation of the carburetor itself. After this, connect the valve via the prepared wire to the positive terminal of the battery.
- The supply wire of the solenoid valve, which you disconnected in the previous step, must be connected to the positive terminal of the control lamp. The minus connects to the mass.
- Turn on the engine and let it idle for a while. The crankshaft should rotate at a speed within 850-900 rpm. The control lamp should light up.
- Begin to gradually increase the speed, reaching 2100 units per minute. If the control unit is working properly, when this level is reached, the light will go out. Reducing the speed again to 1900 units per minute, the lamp should light up.
Useful diagram
If a malfunction was discovered during the check of the valve and its control unit, you will need to replace the corresponding failed components of the carburetor power system of the VAZ 2109.
EPHH is an important component of the car, which requires constant monitoring by the car owner.
Loading …
Checking, cleaning or replacing the idle speed solenoid valve VAZ 21093
Tool:
- L-shaped socket wrench 14 mm
- Pliers
- Needle for cleaning the jet
- Tester or indicator lamp
- Medium Phillips screwdriver (when replacing the EPHH unit)
Parts and consumables:
- Solenoid valve (2108-1107420) (replacement if necessary)
- EPHH block (5003.3761) (if replacement is necessary)
Notes:
This manual is suitable for all cars of the Lada Samara family equipped with the same carburetor engine.
VAZ cars with a carburetor have an electromagnetic valve (EMV) with an idle jet in the idle system. This valve is controlled by the electronic forced idle speed unit (EFI). There are three most common reasons for the disappearance of idle speed on VAZ 2108, VAZ 2109, VAZ 21099, VAZ 21093 cars:
- clogging of the idle jet of the solenoid valve;
- solenoid valve burnout;
- lack of power supply to the EMC.
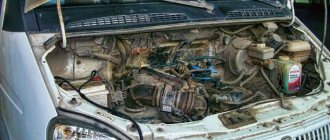
1. Place the car on a flat, horizontal platform and open the hood. The VAZ 21093 solenoid valve is located under the air filter housing, on the left side in the direction of travel of the car.
Replacement or cleaning
Practice shows that in a fairly large number of cases, simply cleaning the idle air regulator allows you to restore its functionality. Therefore, we advise you to try this method first. And if it does not give results, then it will not be difficult to replace the device.
- Buy a container of carburetor cleaner. In this case, your engine may well be fuel-injected. It’s just that this composition is excellent for cleaning IACs and more.
- Disconnect the connector with wires from the sensor, unscrew the two fasteners and remove the affected regulator itself.
- Clean the regulator from accumulated debris and contaminants, and be sure to clean the needle and spring itself. This should be done with carburetor cleaner. Use available tools to tidy up a fairly compact device.
- Be sure to clean the idle air control housing on the throttle assembly. This is where the cone-shaped needle of the XX sensor enters.
- After completing the cleaning of the device, return it to its place and check its operation.
- If cleaning does not bring the desired result, the engine continues to behave inadequately, you will have to purchase a new regulator and install it in place of the old sensor.
- Before replacing, be sure to turn off the power to the car by disconnecting the negative terminal from the battery, then disconnect the block with the power wires, unscrew the mounting screws and remove the device.
- Reassemble in reverse order.
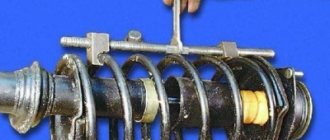
Disassembling the unit for cleaning or replacement
The main thing here is to act carefully and not to overdo it with the carburetor cleaner if you first decide to try cleaning the device. Otherwise, replacing the IAC does not cause problems even for beginners.
Loading …
Lada 2109 › Logbook › Unreliable XX system on the VAZ 2109 carb!
The long torment is over and it looks like I have solved the problem! I used to have difficulty idling my car. then the wire flew off, then the solenoid valve did not work, and then the EPHH unit itself flew off. I decided not to bother and, as they say in the language of garage “bugs,” drown it out. Work order: 1) Remove the pan (carburetor cover). You need to remove both covers 2) Next, we unscrew the electromagnetic valve with a peck at 13 (you can see it; there’s just a wire going to it) 3) We take out the yellow jet and see a plastic needle on the valve, carefully cut it off with pliers to the very root. put the jet in place. tighten the valve by hand 4) start the car by sound, tighten it a bit with the key (it’s important not to overtighten it, otherwise I broke the thread and bought a new carb cap) 5) assemble the pan and don’t forget to put in the air filter Consequences: The car will consume more gasoline But not by a lot, since gasoline will always be present in the idle jet. But I think it’s better to turn it off and forget about the problem than to constantly stall without suction) Thank you for watching! I'm waiting for comments!
Like 4 Subscribe
Models of carburetors for VAZ 2108/2109
Carburetor mechanisms of the Solex series are produced at the Dimitrovgrad Automotive Accessory Plant. The designs are intended for use with front-wheel drive VAZ vehicles, in which the engine unit is located transverse to the body.
The standard model for equipping the VAZ 2108/2109 is the DAAZ 2108–1107–10 carburetor. It is paired with a 1.3-liter engine. Carburetors 21083–1107010 are installed on 1.5 liter engines.
The DAAZ carburetor is used to equip all cars of the eighth and ninth models
Modern equipment of the VAZ 2108/2109 is provided by carburetors of more advanced models, since they are equipped with a starting device in automatic mode:
- modification 21083–1107010–31 has one stage of automatic control and start in a given mode;
- modification 21083–1107010–35 is equipped with two stages of air damper control, which ensures more stable operation of the power unit;
- modification 21083–1107010–62 is similar to the previous version of the carburetor mechanism, but has the addition of an electrical air-fuel mixture mixing system.
How to check a sensor with a multimeter
Using a multimeter, you can diagnose the VAZ-2109 idle speed sensor (injector) in two ways: first, measure in ohmmeter mode, then in voltmeter mode.
If you close the contacts on the CD and AB plugs, the multimeter should show a resistance in the range of 40-80 Ohms. If you close the DC and AD contacts with probes, then the multimeter on a working IAC will show infinity.
In voltmeter mode, the voltage on the sensor when the ignition is on should be 12-20 V.
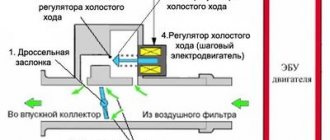
Operating principle
When the car is moving and the throttle valve is open, the IAC is not involved in the process, its valve is closed and the rod is motionless. When the damper closes and the engine goes into idle mode, voltage is applied to the electric motor and the rod moves towards the opening - the valve comes into operation. It opens slightly, and air enters the engine bypassing through a special hole.
When the driver turns on the ignition, the IAC rod fully extends to its extreme position and closes the calibration hole in the throttle pipe. The sensor then counts the steps and the valve returns to its home position. As for this basic position, it can be different and depends on the firmware installed in the ECU. For January 5.1 firmware the position is 120 steps, for Bosch firmware it is 50 steps.
Signs of IAC malfunction and ways to eliminate them
If the engine begins to malfunction or previously unidentified symptoms are observed in its operation, then they may indicate malfunctions in the regulator, for example:
- idle speed is unstable;
- when changing gears or by itself, the engine begins to stall;
- there is no increase in speed when starting the car, which is typical for the primary mode
- warming up;
- When various additional equipment is turned on, the speed decreases.
Similar symptoms are also observed if:
- the bypass channel of the throttle assembly is clogged with dirt;
- there is damage to electrical wires (breaks, broken contact connections, etc.);
- The installed IAC variant does not match the ECU firmware type.
Before starting diagnostics of the regulator, it is recommended to make sure that the above defects are absent.
Reassembling the Solex in reverse order
Installation of the carburetor mechanism on the intake manifold is possible after washing and repair, as well as some adjustment steps
It is important to connect all fuel and other hoses correctly so that there are no problems with engine operation. The DAAZ 2108–1107–10 carburetor is assembled in the following order:
- A gasket is applied to the installation site. It serves to reliably connect two units - the carburetor and the intake manifold.
- After this, the carburetor itself is threaded onto the studs and secured with four nuts.
- After the assembly has been carefully attached, hoses can be connected. The first step is to connect the vacuum and ventilation hoses.
- Next, the heating block is screwed to the carburetor.
- On one side, the fuel supply pipe is connected, on the other, the return hose for supplying excess fuel.
- The EPHH drive wire is connected to the corresponding screw.
- To complete the work, you can screw two wires (air and throttle valves) to the screws.
The strict connection sequence is due to the design features of the carburetor
After installing the carburetor, it is recommended to turn on the ignition and check the performance of the engine unit. If oil or fuel leaks occur at the hose connections, turn off the ignition and carefully check all connections.
All work that a car owner performs to maintain his car must be conscious. There is no need to disassemble the carburetor and replace its parts unless there are obvious signs of malfunction. In addition, when self-adjusting, it is necessary to adhere to clear rules of action. Both poor-quality repairs and incorrect adjustments can seriously affect the performance of the carburetor.
Photo report on replacing IACs with your own hands
The idle speed sensor is an important part of a modern engine, and it is important for stable engine operation and fuel economy. So let's get started.
The very first thing to do is to disconnect the battery, i.e. turn off the power to the car.
This is much easier to do if you purchase quick-release battery terminals for your car. They will come in handy more than once, especially in winter. Having disconnected the battery, we find the XX regulator itself, which we will change. It is located on the engine, on the interior side, under the throttle valve.
When you have disconnected the chip from the sensor (photo 3), unscrew the two bolts that are located on the sides of the sensor.
It is more convenient to “crawl” up to the bolts with a thin screwdriver, preferably a magnetic one, since the bolt may fall under the engine or to the ground.
It is better to place the container down. Then you won’t have to be distracted by searching for the “lost thing.” And also, after tightening and pulling out the first bolt, do not rush with the second. It’s better to alternate actions: unscrew a little, pull out the sensor a little, and so on until the end. Then the likelihood of the bolt falling out is reduced to nothing. Having unscrewed the regulator, we pull it out to the white light.
Compared to the new idle speed sensor, the old one has deposits, play, etc. If it is not possible to purchase a new idle speed sensor, restore the old one. But it is better to purchase a new idle speed sensor from a trusted manufacturer. This guarantees the car owner that it is efficient and of high quality.
The new sensor, compared to the old one, “makes an impression.” There is no play in it, it is clean, shiny, and much better than the refurbished old one. Installing a new idle speed sensor occurs in the reverse order of how the old one was removed. One piece of advice! To install the new sensor with the correct side, before installing and screwing it, put a “chip” on it. Then, if you try to install the idle speed sensor with the wrong side, the “chip” wire will not allow you to do this.
We tighten the top bolt first, since it is more difficult to hit the bottom one. To make it easier for the bottom bolt to fit onto the thread, it is recommended that before installing the sensor, insert a bolt into the bottom hole of the mount, and with it, insert the device into place. If the lower bolt is not inserted into the hole first and the upper bolt is tightened, then even a magnetized screwdriver will not help; it will be impossible to get the lower bolt onto the thread.
So, the new idle speed sensor is in place. When installing, we notice whether it fits tightly. Since the sensor is located extremely inconveniently, sometimes it takes quite a long time to “tinker”, especially if a person is replacing it for the first time. Sometimes the bolt “doesn’t work,” especially for inexperienced car enthusiasts. There is nothing wrong with this, you will have to spend more time and remove the throttle valve. There is nothing complicated, it is attached with two bolts.
The next step is to connect the battery terminals, followed by a test run of the engine. Without this, we will not understand whether replacing the idle speed sensor was effective and how stable the engine is at idle speed.
Something else useful for you:
- The main symptoms of a malfunction of the idle speed sensor on a VAZ-2110
- The car twitches when accelerating and moving the car. What to do?
- Why doesn't the car pull and what needs to be checked in this case?
When the engine starts, we analyze its operation “cold” and after warming up. If the speed is stable and within the required parameters, our work has given a positive result. We successfully did the work ourselves, for which a service station would have charged us a lot of money.
Seal
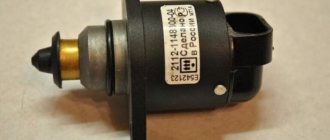
How to replace the idle speed sensor
If cleaning does not help and the IAC does not work, then the VAZ-2109 idle speed sensor (injector) needs to be replaced. This is done very simply.
The sensor is installed on the throttle body. It is secured with two screws, just like the fuel pump. To remove, unscrew the mounting bolts and disconnect the plug from the device. Before installing a new DXH, it is recommended to sand the seat.
The new IAC is installed in the same way, in reverse order. The element is installed in place, fixed with bolts, and wires are connected. But sometimes it happens that replacement does not solve the problem, and the idle speed fluctuates even with a new sensor. The reason here is the quality of spare parts in stores - before installation, it is better to make sure that the new sensor is working.
Kopek carburetor breakdowns
Now it’s worth considering what problems can occur in the carburetor. If suddenly the engine begins to operate unstably at idle, changes in crankshaft speed are observed, or the engine stalls if you do not press the accelerator pedal, there is no need to blame the carburetor for the troubles. In particular, this is relevant for those cases when such symptoms began to manifest themselves sharply, there were no prerequisites for this.
If a carburetor or some of its components suddenly fails, or its settings are lost, then the change in operation does not occur abruptly, but smoothly. Very often, the cause of floating idle speed is the solenoid valve, which is installed on the VAZ carburetor. If your car has a similar device in its design, then first of all you need to check it.
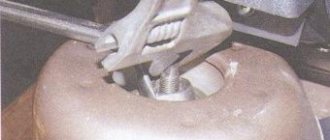
To do this, disconnect the wire that goes to it, and then apply plus to the valve contact from the battery. If the winding is working properly, a slight click will be heard. After this, the presence of voltage is checked on the wire that is connected to the solenoid valve. If there is no voltage, then there is damage to the wiring from the ignition switch to the solenoid valve.
Also, the symptoms described above may appear in cases where there is very large carbon deposits on the spark plug electrodes. As a result, the spark power is simply not enough to ignite the air-fuel mixture. If there is carbon deposits on the electrodes, then the carburetor itself should be blamed for this. The fact is that it supplies a lot of air-fuel mixture to the combustion chambers. The saddest reason for this is a burnt-out intake valve.
But don’t grab your head right away, first try to set the gasoline level in the VAZ 2101 carburetor. The float position must be adjusted correctly. Often the penny begins to stall and sneeze at high crankshaft speeds. The carburetor, as a rule, has nothing to do with it. The reason lies in the gasoline supply. The fuel pump diaphragm may already be worn out, but most often the fuel pump rod is worn out. You can read about it in a separate article.
Why does the VAZ-2109 not idle?
Unstable idle is a problem that VAZ-2109 owners encounter quite often. After the gearshift lever is switched to the neutral position, the engine speed may begin to fluctuate, and in a fairly serious range. Moreover, often the car simply stalls. Naturally, such a ride can hardly be called normal. After all, the driver, instead of focusing all his attention on the road situation, has to constantly play with the clutch pedal so that the engine does not stall.
Operation and repair
The VAZ 2109 carburetor, like all other parts, tends to break. Typically, a breakdown involves the failure of any spare part. In such cases, repair usually helps.
The first thing that can break is the accelerator pump. Its purpose is to enrich the fuel mixture, regardless of the air supply, when the throttle valves are opened. If, when you sharply press the gas pedal, the car jerks, it means that there is either not enough fuel, and significant gaps occur in the supply, or, on the contrary, there is too much of it, and it overflows the spark plugs. So, to avoid this problem, an accelerator pump is used. It regulates the exact amount of fuel required for normal engine operation, even when the gas is pressed hard.
The accelerator pump more often becomes clogged with sediment than breaks down, and then repairs are not needed, but simply cleaning is enough. But, if this is not the case, but there is still a breakdown, then the pump needs to be repaired urgently, otherwise operation of the engine of the VAZ 2109 car will be impossible, and you are guaranteed to have pedal failures.
The first symptoms that the pump is faulty is that when you press the pedal, the speed does not increase steadily, but floats. This is due to a shortage, or vice versa, an excess of fuel. The spark plugs do not have time to burn out all the gasoline, and they are simply flooded, so the car jerks while driving. Also, the pedal may fail when pressed.
Repair for such a breakdown is as follows:
We take out the sprayer; Shake it. If there is a characteristic knocking sound of the ball inside, then the sprayer is working, if not, then this will be the reason why the pedal failed; The pump has a rather heavy structure with parts. A large number of holes and channels increases the chance that the pump will clog, and pedal failure will be inevitable. If the holes are clogged, then repairs are not needed. You just need to buy carburetor cleaning fluid and use it to blow out the channels.
Scheme of operation of EPHH
If the VAZ 2109 jerks when idling, and there are dips when you sharply press the gas pedal, then the EPHH control unit has a malfunction. Its repair primarily depends on which control unit is installed. They can be 4 or 6 pin. Repair of EPHH must be carried out by a specialist. If you do not have the appropriate knowledge, simply replace the part with a new one.
The reason that the VAZ 2109 jerks when driving, or even stalls, and when you press the gas pedal, failures occur, may be not only the carburetor or the EPHH control unit, but also the spark plugs. When used for a long time, carbon deposits appear at the contact site. Because of it, the spark plugs do not completely burn out the fuel in the cylinder.
Sometimes the spark plugs flood even at idle. This is due to the fact that the EPHH control unit is selected incorrectly. The valve opening does not occur synchronously, and the engine speed fluctuates. At the same time, gas pedal failures and late ignition are observed. In order to understand which EPHH is better to install, you need to decide on the choice of carburetor jets. The type of device depends on their diameter.
Replacing spark plugs
In general, before repairing the carburetor, make sure that the speed is fluctuating precisely because of it. Also, gas pedal failures occur for this reason. After all, maybe the candles are to blame for everything. If they are flooded, the car will jerk and stall. But in this case, the cause must be sought in the fuel lines, pump and similar components. But this is better than repairing the carburetor, since this work is quite painstaking.
Didn't find the information you are looking for? on our forum.
Symptoms of a problem
Under no circumstances should you ignore signs of failure of the idle speed sensor on your injection or carburetor VAZ 2109. This will make driving uncomfortable at first, but can soon cause a serious accident.
There are several main symptoms that may indicate problems with ICC:
- The revolutions spontaneously begin to increase and decrease;
- When turning on a cold power unit, the speed does not increase;
- When using additional electrically dependent devices, such as headlights or a heater, the speed immediately begins to drop at idle;
- When shifting gears or idling, the engine may stall.
This is not a complete list of possible symptoms, but they are all indirect. Therefore, to make sure that the problem lies precisely in the IAC, and not in other engine components, it is necessary to check the current state of the sensor.
Checking status
To check the current state of your IAC on a VAZ 2109 car, follow several sequential steps.
Having determined that the old idle speed sensor has already served its purpose on the VAZ 2109, it needs to be replaced. The procedure is completely doable without outside help.
Removing the IAC