Replacing headlights on a VAZ-2110 may be required as a result of gradual natural wear and tear, affecting lighting characteristics, or possible damage as a result of external influences.
And the most dangerous malfunction is just natural wear and tear. A gradual decrease in the intensity of the light flux, unnoticeable to the driver, and a decrease in the efficiency of road lighting leads to increased fatigue when driving in the dark and can cause a serious accident, the culprit of which will be declared to be the driver of a car with faulty headlights. An examination of the lighting equipment of domestic cars, carried out by experts from the magazine “Behind the Wheel”, clearly showed that a modern headlight, equipped with halogen lamps with a bulb temperature of about 700 degrees Celsius, does not comply with GOST parameters by the end of the fourth year of operation and does not provide proper illumination of the road surface .
Preparatory work
Before replacing the headlights of a VAZ-2110, the first thing you need to do is use a high-pressure washer on the front of the car. Many will say that this operation is useless, but after breaking several hidden fasteners, unscrewing bolts with threads clogged with dried dirt, they will agree that it would be better to wash off the dirt and lubricate the threads with WD-40 or similar liquid, and it would be much better to work with a clean car nicer.
Having installed the car at the repair site, remove the negative terminal from the battery to avoid possible short circuits in the electrical wiring and disconnect the pads located on the back side of the headlight and turn signal housing.
If your car is equipped with a hydraulic headlight direction corrector, the next operation will require increased care. The old plastic becomes brittle, so without using excessive force, press the latch, turn the hydraulic corrector cylinder approximately 90 degrees counterclockwise and carefully remove it from the headlight housing.
Replacing headlight parts
In some cases, a complete replacement of headlights may not be necessary; sometimes breakdowns can be eliminated by replacing headlight parts. Quite often, car owners notice that the light flickers noticeably when the car is moving. This may be due to the reflector rattling. To eliminate light flicker, you need to check:
- positioning the reflector in place in the latch;
- presence of adjusting bolt rods;
- emphasis in the seating recesses of the hydraulic corrector rod;
- sagging thread (high and low beam lamps are swapped);
- integrity of the hydraulic corrector tube.
More successful methods for eliminating jitter are:
- replacing the hydraulic collector with an electric corrector;
- increasing the length of the hydraulic corrector rod to tension the spring.
Note. This method allows you to get rid of light flicker by placing a cap on the hydraulic corrector rod.
The caps can be replaced with a plastic dowel 8 millimeters long; a cap that can be removed from the brake fitting; another plastic cap. This is done in this order:
- the hydraulic corrector is removed from the illuminator;
- The cap is screwed tightly onto the corrector rod, preventing it from jumping inward;
- The corrector is installed in the mounting socket.
Replacing the headlight hydraulic corrector method 1
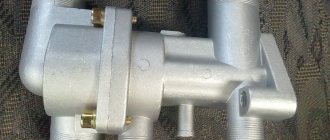
Headlight hydraulic corrector
It is also common for the headlight hydraulic corrector to break down, causing the adjustment to stop working and the reflector to lower. The light beam has to be adjusted quite often, especially when the car trunk is heavily loaded, when the light is directed into the eyes of drivers of cars moving towards you. Repairing the headlight hydraulic corrector takes a little time:
- First, the headlight fasteners are unscrewed and removed;
- The headlight is disassembled: the glass and metal clips are carefully removed;
- Using a knife, the glass is cleaned of sealant;
- The convex profile on the glass is cut off;
- The screws are unscrewed from the reverse side;
- The paper reflector is removed.
Note. Near the hydraulic corrector hole in the illuminator body there is a spring that needs to be removed.
The same actions are performed with 2 plastic rosettes from 2 “turntables” fixing the reflector. During the repair process, the broken latch is replaced with a gasket, which does not allow you to clearly feel that the adjustment rests in the extreme position.
Note. The hydraulic corrector ball snaps into the plastic groove, and the metal bobbin into the second groove. It stops the adjustment, preventing it from being twisted further. If you squeeze the hydraulic manifold while adjusting the headlights, you can break the metal latch. The ball will pop out of the groove and the headlight will “fall”.
As a result, there is a possibility that the corrector will be compressed again.
Note. It is better to improve the fastening by inserting plastic pieces or a cotter pin made of hard wire between the petals.
After completing the necessary steps, the headlight is assembled in the reverse order of disassembly.
Note. First you need to clean the old sealant and apply a new one.
Replacing the headlight hydraulic corrector method 2
There is also a second way to repair the hydraulic corrector. For this:
- The adjustment screws are threaded (metric 3);
- The screws are screwed into the illuminator, then the washers are put on;
- The plastic fasteners are removed;
Replacing the hydraulic corrector for a VAZ headlight
- A bar with low and high beam modules placed on it is put on;
- Put on top: a washer, a spring on the washer, on top of which another washer is put on. It is worth using locknuts;
- Everything gets twisted;
- The structure is fixed using anaerobic sealant.
Lighter repair
The illuminator can be repaired without the need for disassembly. The ball can be snapped into place through the lamp hole on the back of the illuminator without removing the glass. So:
- First, a hole is drilled directly opposite the latch at the top of the headlights;
- A screwdriver is inserted into the hole made;
- A collet is attached to the corrector ball;
- Then the drilled hole is sealed;
- Using a hinged loop from a furniture cabinet (loops 5-6 centimeters long, with a cutout on top and mounting holes where it is attached) it is attached to all broken corrector units;
- The canopy is inserted into the slot of the adjusting screw;
- The screw is moved so that the slot is in a narrow section of the canopy;
- Holding the canopy, the screw is unscrewed until it stops with force. This is how the canopy is fixed, which must be placed in a horizontal position;
- Using an electric drill, using a 3mm drill bit, holes are made in the base of the light where there are holes on the canopy;
- A shortened self-tapping screw is screwed into the hole so that it does not reach the high beam reflector. This slot will allow you to securely fix the adjusting screw, which will not be broken again.
Before carrying out work, it is recommended to watch this video, which shows how to replace the headlight on a VAZ 2115, which is completely similar to the ten.
In addition, as experts and craftsmen advise, when replacing, it is advisable to often use photographic materials, which provide a visual aid. With your own hands, if you do everything as required by the instructions, you can not only replace the headlight glass or entire headlight, but also repair any part of the car. The main thing is the desire and awareness that by carrying out repairs or replacements yourself, you can save a lot of money. After all, the price of repair services in car repair shops today is high, and why snatch funds from the family budget if everything works out perfectly with your own hands.
Removing related parts
To get to the headlight mount on a VAZ-2110 car, you need to:
- remove the radiator trim;
- loosen the bumper fastenings;
- remove the trim, called by motorists “eyelash”.
To remove the radiator lining, simply unscrew the fastening bolts located in the upper part and carefully, remembering the fragility of the plastic, pull it up until the latches are released.
After removing the cladding, unscrew the two top and one side bolts securing the headlight to obtain some freedom of movement of adjacent parts when removing the decorative trim under the headlight. To facilitate further dismantling, you can unscrew the two upper bumper mounting bolts, but this operation is not mandatory.
To remove the decorative trim, simply pull it towards the center of the car until it disengages from the wing of the fixing protrusion.
How to disassemble a headlight on a VAZ 2110
Home › Cars › VAZ ›
Often, car enthusiasts are faced with the problem of dismantling a headlight, due to its damage or to disassemble other components and assemblies. On a VAZ-2110, you can dismantle the light element quite simply with your own hands.
The video will tell you how to properly remove and disassemble the headlight, and also tell you about some of the subtleties and nuances of the dismantling procedure.
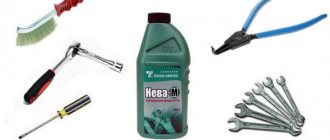
Necessary tool
To begin with, you should understand that you will need structural knowledge of the car. To remove a headlight from a VAZ-2110, a motorist needs to assemble a set of tools, namely a 10mm wrench and a ratchet with an extended head.
Before work, the headlight must be washed to prevent dirt from getting inside.
The process of dismantling the headlight on a VAZ-2110
When the car enthusiast has assembled everything, you can proceed directly to the removal process:
- We remove the negative terminal from the battery.
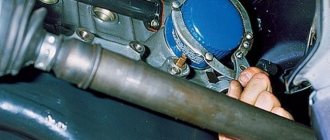
- At the back of the headlight, disconnect the wire block. At the same time, scroll and pull out the headlight range control.
Disconnect the headlight wiring and remove the corrector.
- Unscrew and dismantle the radiator grille.
Changing the type of optics (tuning)
Car enthusiasts often tune their car headlights to improve their appearance. High-quality tuning gives the car a fashionable look and beauty. If you choose the right accessory, the appearance of dozens will change completely . The most popular among car enthusiasts is tuning headlights in the form of tinting. It is carried out in a variety of ways that have virtually no effect on the brightness and quality of road lighting. Types of headlight tinting:
- Painting of the headlight mask;
- Glass painting;
- Glass tinting film.
The process of such tinting is best shown in a video. For those who don't want to paint or tint their headlights themselves, there are ProSport headlights. They are already sold in black or chrome. You just need to install them instead of the standard headlights. Only they cannot boast of high quality or bright light.
Disassembling the headlight and removing the glass
Once the headlight is removed from the car, you can begin the disassembly process. It is worth understanding that over the entire production period of the car, the appearance and body of the headlight have changed, so disassembly will be different, but the processes are still similar.
The VAZ-2110 was equipped with headlights manufactured by Kirzhach and Bosch.
Let's consider the dismantling process separately.
Kirzhach
There is nothing difficult in disassembling the Kirzhach headlight. The glass itself is glued to the sealant. Therefore, to remove it you will need a stationery knife. Let's look at the operation itself step by step:
- Take a utility knife and very carefully cut the old sealant.
Using a utility knife, cut the sealant to remove the headlight glass.
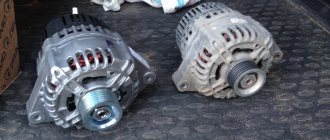
- Now you can dismantle the glass. When installing new glass, it is necessary to change the seal and use sealant for gluing.
Old and new headlight glass with sealant.
- We take out the headlight bulbs by turning them counterclockwise.
- To remove the light diffuser, you just need to unscrew a few screws inside the headlight and the parts will fall out on their own.
- Assembly is carried out in reverse order.
Bosch
Disassembling a Bosch headlight is slightly different from Kirzhach, namely in the presence of latches of the headlight glass to the body.
All other operations are carried out the same way. As in the case of the Kirzhach headlight, it is necessary to use sealant during assembly, despite the presence of latches.
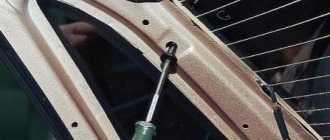
Using a screwdriver, disconnect the glass from the body.
Types of lighting devices
Depending on the year of manufacture, the VAZ 2110 can be equipped with either Kirzhach or Bosch headlights. Both of them are a block that includes high and low beam headlights, side lights, and direction indicators.
No matter how much difference there is, there are some nuances:
- In Kirzhach, the glass is sealed, so both removing it and replacing it with a new one is more difficult. In addition, the low beam glass has a lens that makes the light output more focused, although limited; Left headlight block Kirzhach
- Bosch glass is secured with latches. They are sealed with rubber gaskets. Their low beam boundary is more blurred, since there is no lens in the glass. Right headlight block Bosch
It’s difficult to say unequivocally which headlight unit is better. But disassembling Boshevskys is definitely easier. In any case, it doesn't hurt to know how to do it in both cases.
How to remove glass?
Removal will be necessary if, for example, it is necessary to replace broken glass on a VAZ 2110 or it has become cloudy, covered with microcracks, etc.
If you are dealing with Bosch, then you need to release the latches, then easily remove the glass. When installing a new one, it’s worth inspecting the rubber; replacing it won’t hurt either. Some also use sealant, although there is no particular need for this, unless, of course, you are dealing with genuine products and not Chinese fakes.
You'll have to tinker with Kirzhach a little longer. Here, in order to remove the glass, you must first carefully insert a flat-head screwdriver into the corner of the glass, forming a gap. Then connect a thin stationery knife to the process.
So, with the help of a knife and a screwdriver, you may be able to detach the glass. If the sealant “sticks”, you need to warm it up with a hairdryer and immediately continue removing the sealant while it is warm.
When installing new glass, the headlight block can be placed on a softer, construction sealant. In addition, by removing the glass, you can disassemble the reflector from the outside of the car if it also needs replacement.
The headlight unit can be dismantled for repair, replacement with a new one, or for tuning or modification. In this article we will talk about the removal and disassembly of a VAZ headlight of the tenth family, depending on its manufacturer (Bosch or Kirzhach).