The clutch in a car serves as the connector between the engine and transmission. This unit takes on all the load that occurs when changing gears. Accordingly, the part can rightfully be considered a consumable item, because car owners regularly face the need to replace it or schedule maintenance.
It is almost impossible to influence the degree of wear of this unit. Therefore, after the clutch has exhausted its service life, it must be replaced partially or completely (in case of serious malfunctions).
When is it necessary to change the unit?
The mechanism requires servicing in the following situations:
- The clutch "drives". Motor power drops.
- The unit slips or incomplete activation occurs.
- Clicking noises are heard when changing gears.
- The clutch disengages automatically.
- Vibration is noticed when the clutch pedal is pressed.
In each of the above cases, it is recommended to carry out partial maintenance or replace the unit in question.
Nuances of the work
Following all the recommendations from the automaker's manual does not guarantee that everything is done simply and quickly. Not every car owner has the opportunity to drive the car onto a pit or overpass. A lift is perfect for carrying out work, but not everyone has one either.
When you contact any service, the replacement will be made within a couple of hours, but for such a service you will need to pay a considerable amount. It may take a whole day to do the work yourself. Maybe more if you don't have experience in car repairs.
Most of the time is spent on disassembly and assembly. The operation to replace the node will take you no more than half an hour. Later in the article we will look at the process of replacing a clutch without a pit/lift.
Before starting work
Almost every car owner is interested in the question: is it possible to perform a replacement without dismantling the gearbox?
You are unlikely to find a definite answer, but the procedure is quite feasible. First of all, find several large stumps up to 40 cm high, and also get a few additional bars. To prevent the car from simply falling during the work, take care to install a pair of regular wheels under the car.
Whether to remove the gearbox or not - you will have to answer this question specifically. Because if you act carelessly, the gearbox may simply fall to the ground, and lifting it from under the car will be very problematic.
Initially, disconnect the battery so that the machine's electrical system is de-energized. You can then proceed to the process shown in the following list:
- Remove the wheels and move them away from the car.
- Remove the steering ends and free the racks.
- Unscrew the ball joint mounting bolts.
- Remove the engine protection using the cable.
- The next step is to drain the oil from the box.
- Loosen the rocker nut and remove it.
- Unscrew the nuts on the two pillows.
- Place a jack or other support under the engine.
- Disable the reverse sensor.
- Disconnect the wires from the starter, unscrew the nuts and dismantle it.
- Unscrew the nuts on the flywheel guard and fork.
- In this step, remove the CV joint on the right side. The left side should not be dismantled.
- Unscrew the fixing bolts to the gearbox block.
- In the last step, unscrew the nuts that are located above the right CV joint.
First stage
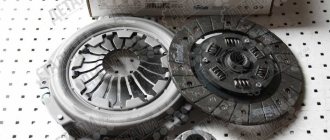
VAZ clutch disc 2109
Until the last moment, you can doubt whether it is possible to replace the clutch without completely removing the box, because you don’t want the massive gearbox to fall to the ground. But lifting it is problematic, since it is impossible to crawl under the car with it. First, disconnect the battery by de-energizing the system. So the whole story begins - start preparing the car for repairs, removing all unnecessary elements. Namely:
READ How to remove the KIA RIO 4 radiator grille
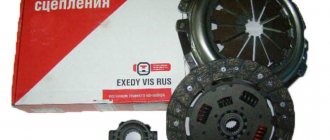
Clutch replacement
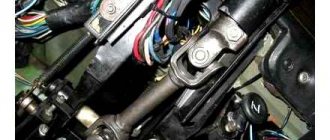
After the preparatory work has been completed, you can remove the box. However, don't rush. To continue the process, take the two bolts from the upper arm. These elements have a thread suitable for our situation. Screw them in from above and you can begin to separate the units using a crowbar. This clutch replacement scheme is very labor-intensive. Remove the release bearing through the gap and unscrew the basket bolts.
Compared to the instruction manual, the replacement process is slightly different. The new release bearing is installed in its place. Next, the disk is placed on the flywheel, and only then the basket is put on top.
The bolts need to be tightened approximately two turns. They should not be over-tightened. In the next step, with extreme care, begin to slide the input shaft onto the disc splines.
During the replacement process, pay attention to the petals of the basket. These elements have an insignificant operating life. Therefore, if necessary, they should also be replaced.
After carrying out operations to replace the clutch, reassemble the car in the reverse order. At this point we can consider that the repair is completed.
To summarize, we note that from the article you learned how to replace the clutch on a VAZ-2109 with your own hands. If you feel a lack of experience in car repairs, then the best way out of the situation is to contact a service station. In this case, you will save a lot of time, nerves and money.
The clutch is one of the main components in a vehicle, without which the operation of the machine is impossible. Therefore, replacing the VAZ 2109 clutch in the event of its breakdown is a mandatory procedure. In this article we will tell you how to repair and install the unit at home, which clutch is better to install and how much repairs cost on average at a domestic service station.
So, when does a clutch basket need repair?
It is necessary to change the node if the following symptoms occur:
- If, while driving, your vehicle suddenly begins to slip and the unit does not turn on completely. In particular, the engine will gain power, but the car cannot accelerate; as a rule, this problem is especially acute when driving uphill. In addition, you may hear an unpleasant odor in the cabin, and gasoline consumption will also increase significantly.
- If the clutch system (hereinafter referred to as SS) is driven, that is, it does not turn off completely. In particular, changing gears will become more difficult, and when the reverse gear is engaged, a sound appears, while the gearbox operates in normal mode.
- When the car starts moving, jerking will occur.
- In general, the SS is noisy, it rattles and makes some sounds when you press the accelerator.
- Another symptom indicating that the CC needs to be changed is the appearance of a knocking sound when the pedal is released.
Malfunctions
Replacing the clutch on a VAZ 2109 is not the easiest task, so you should correctly determine the moment when it is worth completely dismantling something, and when it is enough to repair several parts.
In the “nine” there are 4 common problems that precede the replacement or repair of clutch elements:
- Incomplete gear shift, clutch is moving.
- Incomplete activation of the system, towing occurs in the system.
- Jerks with vibration when trying to change gear and disengage the clutch.
- Noise coming from under the car when changing gears.
Signs and causes of clutch failure
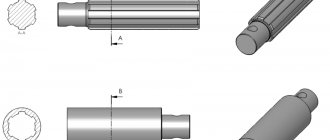
The VAZ 2108, 2109, 21099 clutch consists of a basket, a pressure bearing, a drive and driven disk. The main signs of a clutch malfunction are clutch slipping and incomplete disengagement:
- When switching off is incomplete (the pedal is pressed), there is difficulty shifting gears with the engine running, noise and crackling noises when changing gears, and large free play of the clutch pedal.
- When the clutch “slips” (the pedal is released), a burning smell may be felt in the cabin from the burning of the clutch disc linings, the car’s dynamics will deteriorate, the engine may overheat, and fuel consumption will increase.
In addition to the clutch disc itself, the release bearing can also fail - it serves to smoothly engage and disengage the clutch. When the release bearing wears out to the limit, you can hear a characteristic squealing sound - this is a sure sign that the bearing needs to be replaced. The cause of clutch failure may also be a breakdown in its drive mechanism, for example, a break or jamming of the clutch drive cable, a breakdown of the lever system, a fluid leak from the hydraulic drive if the clutch is hydraulic, or other similar breakdowns in the drive.
By the way, when replacing the release bearing at a service station, they may advise you to also replace the clutch disc. Usually, if problems begin with the clutch, it is better to replace all these parts, because replacing the clutch is very difficult: you need to remove the gearbox. But if someone wants to save on this, then all clutch parts can be purchased separately.
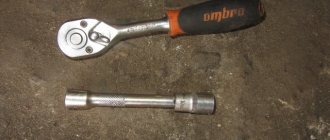
To work you will need the following:
- wrenches 8, 10, 13, 17 mm;
- torque wrench, 8 mm socket;
- jack;
- container for draining oil;
- inspection hole or lift.
- flat screwdriver, hammer.
Replacing the clutch on a VAZ 2109/21099 without removing the gearbox
Replacing the VAZ 2109/21099 clutch without removing the gearbox is quite difficult. You will not find instructions or recommendations on this topic in the car's owner's manual. These recommendations are based on the experience of car enthusiasts who share their experience of replacing the clutch.
The main problem when replacing a clutch is that not every motorist has an overpass, a pit, and especially a lift, and it is necessary to make sure that the massive gearbox does not fall to the ground. But lifting it is problematic, since it is impossible to crawl under the car with it. All steps for removing the gearbox are almost the same as the instructions above, with the exception of some nuances:
- Purchase two bolts from the upper arm of the classic front suspension from the store. Their threads are exactly the same as those on the bolts that secure the box and the engine block together.
- Screw them in from above, only after that, with a small crowbar or screwdriver, we begin to disconnect the nodes. After moving away, the rear part of the box will rest on the transverse rod, and a gap of about 15 centimeters will form between the clutch housing and the flywheel.
- The release bearing is removed through the resulting gap and the bolts on the basket are unscrewed.
But the installation is slightly different from the process shown in the instructions:
- Place the new release valve in its place. Then a disk is installed on the flywheel and a basket on top of it.
- Just tighten the bolts a couple of turns, but do not overtighten!
- Carefully begin to slide the input shaft onto the splines in the disc.
- Then we move the box back and tighten the bolts on the basket. The basket fastening bolts are tightened only after the box is installed in its place.
- After this, you can install the gearbox and tighten the bolts on it.
Lada 2109 Rusty basin. Sawn. › Logbook › Photo report. Replacing the clutch alone
So today the clutch on my nine was replaced. all work was done alone. There are no helpers and there could not be any. The main task was to try myself - whether I could do it or not. Because I don’t trust services lately - because they take a lot of money and do it worse than me.
As advised above, I completely unscrewed the left saber with the crab and the lever. The ball bolts and the hub nut were previously unscrewed. mirei2.users.photofile.ru…5262/xlarge/172511515.jpg mirei2.users.photofile.ru…5262/xlarge/172511521.jpg
I took both CV joints out of the hubs - then tighten the nuts so as not to spoil the threads, otherwise there were cases where you couldn’t tighten the nut anymore. mirei2.users.photofile.ru…5262/xlarge/172511525.jpg
Next, the battery was removed, the clutch cable, the speedometer cable, the front and side airbags, the starter to make the box lighter, and the 3 bolts securing the box were unscrewed. I placed a stump with a brick under the engine crankcase so that the engine would not collapse. I kept thinking that the box was jerking but would not come off - upon a more detailed inspection I found another nut screwed onto the stud on the opposite side. Above the left inner CV joint. mirei2.users.photofile.ru…5262/xlarge/172511527.jpg
After unscrewing this, the box easily fell out where it was intended. It was hanging backwards and hanging - at first I didn’t understand and then I saw that I forgot to unscrew the ground wire. After unscrewing, the box lay on the platform along with the CV joints. PHOTO inside. In my opinion, the release lever doesn’t feel very good - for some reason the boot is not on. And so it seems to be spinning. mirei2.users.photofile.ru…5262/xlarge/172511530.jpg mirei2.users.photofile.ru…5262/xlarge/172511533.jpg mirei2.users.photofile.ru…5262/xlarge/172511536.jpg mirei2.users.photofile .ru…5262/xlarge/172511541.jpg
flywheel is in good condition. I would like to sharpen it but there is nowhere. The most important thing is that wear is invisible. It looks like there are cracks in the PHOTO - I looked at it in detail - a visual illusion. mirei2.users.photofile.ru…5262/xlarge/172511547.jpg
But the basket is really bad. The petals are ground down to half their thickness mirei2.users.photofile.ru…5262/xlarge/172511558.jpg
Installed the release valve. I lubricated the fork with lithol. The working surface of the release too. Removed excess grease (no photo) mirei2.users.photofile.ru…5262/xlarge/172511572.jpg
Then the fun began. For about five minutes I thought about how to put the box back. I took out two jacks and a long piece of crap from the garage. I placed a mechanical jack under the inner left CV joint and began to lift it by 15 centimeters, then took an iron rod, rested it on the stabilizer and, using it as a lever, raised it to a height sufficient to install a hydraulic jack. mirei2.users.photofile.ru…5262/xlarge/172511580.jpg mirei2.users.photofile.ru…5262/xlarge/172511582.jpg
In this way I raised the box to the required height - I placed a stump in case the box decided to fall on me))) And began to push the box. A couple of minutes and the box sat in its place. So it was centered perfectly. Then I tightened everything up and put it back.