"Samara" (VAZ 2109), in itself, is a durable and reliable car. And if something “flies”, it is usually the result of extreme temperatures, or improper operation. But time spares no one, not even cars. Therefore, one day it may simply not start. And the cause of such a malfunction may not be in the engine or ignition at all. Failure of valves often leads to such breakdowns.
Principle of operation and symptoms of failure of control equipment
The immediate task of the electromagnetic valve installed in the carburetor of the VAZ 2109 engine is to stop the fuel supply in “inertial” modes:
- engine braking;
- movement downhill;
- gear shift.
The electromagnetic switch is an integral element of the forced idle economizer and executes commands from the control electronics. The EPHH device is programmed according to the following algorithm:
- when the crankshaft rotation speed is more than 2,100 rpm and the gas pedal is released, the actuator is turned off, the needle closes the holes, fuel is not supplied;
- upon reaching 1,900 rpm, the device turns on, the needle retracts and the fuel begins to move through the channels.
Based on the functional responsibilities assigned to the electromagnetic switch, it is not difficult to determine a list of symptoms of failure of this unit:
- unstable operation of the engine or spontaneous cessation of idling;
- inability to activate the engine in a situation where the crankshaft is turning.
On-site diagnostics of the carburetor solenoid valve of a VAZ 2109 engine
It is possible to determine the performance of EPHH components as a whole directly on the carburetor. The procedure is as follows:
- remove the standard terminal from the valve;
- turn on the ignition;
- reconnect the terminal.
valve When connected, a characteristic click should be heard, indicating that the needle is retracted and the economizer as a whole is working.
The absence of sounds in the area of the VAZ 2109 carburetor indicates either a failure of the solenoid valve or a defective control unit. A faulty sensor is identified “locally” as follows:
- a piece of wire is prepared to connect the element being diagnosed directly to the “plus” of the battery;
- the standard power wire of the electromagnetic switch is disconnected;
- the ignition is turned on;
- a previously prepared conductor that is already connected to the positive pole of the battery is connected.
If a click is heard during the connection process, the valve is working properly, the problem is hidden in the EPH control system. An alternative method for diagnosing the performance of the control needle does not require available tools. With the engine running, it is enough to remove the tip of the standard wire from the element terminal and observe the reaction of the engine. The engine has stalled - the element being diagnosed is absolutely serviceable.
Symptoms of a problem
There are several main signs indicating failure of the EPHH:
- The engine regularly stalls at idle;
- Detonation occurs in the engine when the ignition is turned off;
- The engine stalls when coasting braking is performed.
You can check whether the EPHH and its control unit are working correctly with your own hands. To check the valve, you should monitor its activation in various operating modes. Correct operation is determined by ear or using a voltmeter.
Independent examination of the valve condition
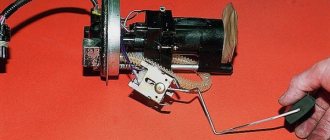
A detailed check of the functioning of the needle is possible only after dismantling the element under test. You must first remove the air filter and the filter element housing itself. The switch is unscrewed with a regular open-end wrench 13, carefully removed from its seat, and the analog element that dispenses the amount of fuel is removed.
The range of actions for a full diagnosis is as follows:
- pre-prepared conductors are connected to the battery terminals;
- “plus” is connected to the terminal, and “minus” is connected to the body of the part;
- The device reacts after voltage is applied.
dampers The shut-off needle is unprecedentedly retracted into the device body in the presence of a potential difference and instantly returns to its original position - the device is subject to further operation.
By turning on the ignition and closing the VAZ 2109 solenoid valve to the carburetor (body to body), with a known working EPHH control system, it is easy to assess the suitability of the locking element. As a result of contact with the “ground”, the needle should go inside the body with a characteristic click. Experienced owners test a newly purchased switch in this way.
- before screwing the device back in, the fuel nozzle should be washed/blown out;
- if the precision holes are heavily soiled, it is necessary to clean them with a fishing line or a soft wood needle;
- a loose valve may make it impossible to start the engine when the crankshaft is rotating;
- When tightening the element, you should not apply great forces, leading to deformation of the actuators of the part.
Briefly about the main thing
The solenoid valve stops fuel supply when the accelerator pedal is released and the crankshaft speed is more than 2,100 rpm, and resumes fuel supply at a frequency of less than 1,900 rpm under the same conditions. A faulty switch will prevent the engine from starting or will deliberately stop it from running.
There are several ways to check the serviceability of the solenoid valve on the carburetor of a VAZ 2109 car:
- connect standard or bypass power to the element output - a click should sound;
- remove the standard wire from the device with the engine running - the engine will stall;
- dismantle the sensor, connect it to the standard circuit and lean it against the carburetor - the needle will retract with a characteristic click;
- Connect the dismantled sensor to the battery: the needle should retract freely when voltage is applied and extend when there is no voltage.
Application of two-way valves in automotive systems
Since numerous vehicle systems constantly require shutting off, redirecting and mixing various flows of liquids or gases, the use of various bypass devices, such as valves, is required. The principles of their operation are based on different drives: pneumatic,
Setting up the carburetor of a 4-stroke scooter
Tuning the carburetor of a 4-stroke scooter is, of course, not rolling back the injector using broadband lambda, but it also requires a competent approach and knowledge. For stable operation and efficiency, Chinese manufacturers have developed and implemented several design additions. Before you get started
Carburetor DAAZ-4178 - installation and main causes of malfunctions
The Dimitrovgrad Automotive Component Plant produces DAAZ-4178 carburetors for UAZ vehicles, which can be used instead of the standard K-151V. The manufacturer guarantees an increase in dynamics and a reduction in fuel consumption to the level of 11 liters per 100 km in mixed mode, which is comparable to the fuel consumption of a GAZ
Selection of jets on a Solex 21083 carburetor
The Solex 21083 carburetor model with jets that affect the properties of the fuel-air mixture can be modified to suit any engine size. To do this, it is enough to select jets, which is quite possible for an experienced car enthusiast. Solex 21083, subject to proper improvement, is quite
What’s easier: to rack your brains or figure out how the carburetor works in a Lada?
To an uninitiated user, it may seem that the VAZ 2109 carburetor is complicated, so not many people decide to adjust it themselves.
Why did the Solex break down?
A carburetor is the main element of a car's fuel system. It is designed to mix air with fuel in the required proportions and form a fuel mixture supplied to the combustion chambers of the engine.
I-POMAN › Blog › Checking the EPH system of VAZ 2108, 2109, 21099 cars
Checking the EPH system of VAZ 2108, 2109, 21099 without special instruments Diagram of the carburetor solenoid valve control system
In the absence of a voltmeter and tachometer, a malfunction of the solenoid valve and control unit can be determined using a piece of insulated wire about a meter long. We perform troubleshooting using the method of elimination. If there is no idle speed, remove the wire tip from the solenoid valve terminal. Turn on the ignition without starting the engine. Connect the tip to the valve outlet. At the moment of connection, a click should be clearly audible. If this does not happen, you should check the serviceability of the solenoid valve. To do this, we again remove the wire tip from the valve terminal and, using a piece of wire, apply voltage to it directly from the “positive” terminal of the battery. If the valve operates with a characteristic click, it means that the control unit is faulty or there is no power supply to it. The connecting wires or their connectors may also be damaged. If the valve does not operate when voltage is applied, it should be replaced. When the engine is idling, you can verify that the solenoid valve is working properly. To do this, with the engine running, remove the wire tip from the valve terminal. If the valve is OK, the engine should stall. You can check the operation of the control unit using a known-good solenoid valve. To do this, turn on the ignition and put the tip of its wire on the valve terminal. With a working control unit, a characteristic click should be heard when the valve body closes to ground. It should be taken into account that using these methods it is impossible to verify the correct moment of turning on and off the EPH system. If the car is equipped with a tachometer, then the functioning of the system can be checked with sufficient accuracy using a test lamp instead of a voltmeter. For this purpose, a car lamp with a power of no more than 3 W and a voltage of 12 V, for example, an instrument backlight lamp, is suitable. We solder two pieces of insulated wire about 0.5 m long to its contacts. It is more convenient to use a lamp with a socket, then the wires are connected to the terminals of the socket. To check, connect a test lamp to the tip of the solenoid valve wire. We connect the output of the solenoid valve with a piece of wire to the “plus” terminal of the battery. The procedure for checking with a lamp is the same as when checking with a voltmeter. Using a test lamp, you can detect malfunctions in the tip of the “quantity” screw and its wire. To check, connect one wire of the test lamp to the tip of the screw wire, and the second to the “plus” terminal of the battery. When the throttle valve of the first chamber is closed, the lamp should be on, and when it is open, it should go out. In the same way, you can check the condition of the wire by removing its tip from the tip of the screw and connecting it to the carburetor body. Checking the EPH system using special instruments
Source
How to properly install a solenoid valve (EMV) in a carburetor
How to properly install a solenoid valve (EMV) in a carburetor
Using the example of installing a solenoid valve in the Solex 2108 (21081, 21083) carburetor of VAZ 2108, 2109, 21099 cars.
The EMC is installed in the Solex carburetor by screwing it into the upper part (“lid”). To screw in, use an open-end wrench set to “13”.
Features of installing the EMC carburetor Solex 2108 (21081, 21083)
This seemingly simple procedure has its own characteristics and pitfalls. When screwing, it is necessary to achieve such a position of the valve in the “cover” in which the valve-cover connection will be sealed and the fuel jet CXX (carburetor idle system) will pass fuel most efficiently. In this case, excess air will not be “sucked” into the carburetor and deplete the fuel mixture. The correct position of the CXX fuel jet in the fuel channel of the carburetor “cover” will ensure an uninterrupted supply of fuel to the engine at idle.
If the valve is installed incorrectly, excess air will lean the fuel mixture at idle. The engine idle speed begins to “float” and the engine “troubles”. It becomes difficult to adjust the idle speed by rotating the adjusting screws.
How to properly install an EMC in a Solex carburetor
— Screw the solenoid valve into the carburetor “cover”
We wrap it with our hand until it stops, but without being too zealous.
— Warm up the engine to operating temperature (80-90 degrees)
If there is no idle speed, then we warm it up using “suction”.
— Turn the valve clockwise with a key
We carry out the work with the engine running and warm, with the carburetor air damper fully open.
The procedure for screwing the valve is as follows: move the key a centimeter or two clockwise, remove the tip of the wire from the valve. Has the engine stalled? No? We put on the wire. Again we move the key a centimeter or two and remove the wire. Doesn't it stall? We put on and turn the key again. We repeat the procedure until the engine begins to stall. After which the valve can be turned back a little until stable idle speed appears.
That's it, the valve is installed correctly in the Solex carburetor and the engine runs smoothly.
Notes and additions
— The electromagnetic valve (EMV) is an element of the EPH system of the Solex carburetor, which is responsible for the operation of the car engine at forced idling (FID) when the driver releases the gas or the car coasts with the gear engaged, or when changing gears.
In addition, it is an element of the carburetor idle system. The CXX fuel nozzle is inserted into its tip.
Removing and checking the solenoid valve
This is easier to do if you first remove the air filter housing (see Disassembling the carburetor).
1. Disconnect the wire from the solenoid valve terminal
2. Using a 13 key, unscrew the solenoid valve
Removing the solenoid valve
4. Remove the idle fuel jet from the valve holder
5. We check the serviceability of the solenoid valve by connecting its terminal to the “+” of the battery, and the body to the “-” (the plastic shut-off needle should retract when voltage is applied and return to its original position without jamming when the voltage is removed).
6. You can simultaneously check the serviceability of the valve itself and the electrical control circuit: press the valve with the wire attached to the carburetor body and turn on the ignition - the needle should click into the valve body.
The system serves to control the activation and deactivation of the carburetor solenoid valve in forced idle mode. This mode occurs, for example, when braking or shifting gears, when the throttle valve of an engine operating at high speed suddenly closes. To reduce fuel consumption and reduce exhaust gas toxicity, in this mode the solenoid valve closes and the fuel supply to the carburetor idle system is stopped.
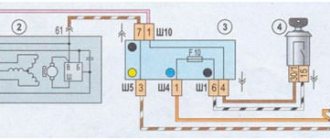
The main unit of the system is the electronic control unit 3 (Fig. 133). It receives information through two channels. Firstly, from limit switch 2 of the carburetor about the position of the first throttle valve. This switch connects terminal “5” of the control unit to ground when the damper is closed. Secondly, from ignition coil 1 about the crankshaft speed. This information comes in the form of voltage pulses taken from the primary winding of the ignition coil. The control unit takes all this information into account and at specified moments produces a voltage that turns on the carburetor solenoid valve.
Rice. 133. Connection diagram for the carburetor solenoid valve control system:
1 – ignition coil; 2 – limit switch in the carburetor; 3 – control unit; 4 – solenoid valve; 5 – mounting block; 6 – ignition switch.
When the carburetor limit switch is not shorted to ground, i.e. the first throttle valve is not closed, the control unit supplies voltage to the solenoid valve at any crankshaft speed. If the limit switch is closed to ground (the damper is completely closed), then in this case the activation of the solenoid valve depends on the crankshaft rotation speed. If at the moment of closing the first throttle valve the rotation speed was above 2100 rpm, the control unit will turn off the solenoid valve and turn it on only when the rotation speed drops to 1900 rpm.
"Samara" (VAZ 2109), in itself, is a durable and reliable car. And if something “flies”, it is usually the result of extreme temperatures, or improper operation. But time spares no one, not even cars. Therefore, one day it may simply not start. And the cause of such a malfunction may not be in the engine or ignition at all. Failure of valves often leads to such breakdowns.
VAZ 2109: the solenoid valve does not work - how to fix it
Quite often, disturbances in the operation of the engine in the idle speed mode (idling speed) are associated with the appearance of a malfunction in the EPHH - the economizer of this idle speed. As a rule, for some reason, in a VAZ 2109 the solenoid valve in the carburetor stops working, and this causes problems. Anyone can diagnose and repair a malfunction; the valve is small and does not require disassembling the carburetor, so you can figure out something with the solenoid valve in a VAZ 2109 yourself.
Design and principle of operation of the solenoid valve
The solenoid valve, also called the forced idle economizer (IAF), is an integral component of any carburetor in modern cars. The active use of this unit began in the 80s of the last century, when the “battle” between injection and carburetor units intensified. This is largely due to the fact that the former had noticeably lower fuel consumption, and this already captivated a larger number of motorists.
In order to minimize the consumption of carburetor engines, automotive engineers began to actively electronize them. In a few words, the essence of the latter was to reduce fuel consumption through the use of electronic devices. As a result, electronization resulted in the appearance of a carburetor solenoid valve, as well as a number of other electrical devices in the design of this unit. But why was this necessary and how did it help the competition between carburetor engines and injection engines? In order to answer this question, it is worth paying attention to the operating principle of the EPH.
So, the carburetor solenoid valve is a device that runs on electric current and performs very specific functions. More precisely, it works to organize stable and optimal idle speed in the so-called forced mode of engine operation. The essence of the optimization is that when the engine operates in modes that do not require fuel consumption (switching to a lower gear, coasting, etc.), the EPHH turns off its supply without involving the throttle valve in the movement at all. This happens by transferring fuel through special channels at idle. During this transportation, only the idle jets, valves and some paths in the carburetor function, that is, its chambers and throttle valve are completely inactive.
Let's consider the principle of operation
EPHH is used to disable the idle system in forced idling mode (abbreviated FHH), which occurs during engine braking, when the vehicle is moving downhill, or during gear shifting. So:
- By this, it prevents both the unproductive loss of gasoline and reduces atmospheric pollution, because under the conditions of the storage facility, the combustion of the working mixture is greatly deteriorated, and therefore the concentration of CH and CO in the exhaust gases increases sharply
- When the ignition is turned off, the supply of gasoline is also interrupted, which eliminates the diesel effect - spontaneous ignition of the combustible mixture in the cylinders
- Thanks to EPHH, fuel economy is 0.2-0.5 liters for every 100 kilometers driven
- The resulting diesel effect is dangerous, as it can lead to undesirable consequences, such as detonation (see VAZ 2109: engine detonation - how to remove it?) and knocking due to the resulting “reverse impacts” (this occurs with premature outbreaks inside the cylinders, when the piston has not yet completed the compression stroke), such impacts lead to damage to the piston rings, connecting rods and crankshaft
- Therefore, we do not recommend removing the EPHH (replacing the valve with a plug, or removing the shut-off needle from it), based not only on environmental considerations
- When you release the gas pedal, the gasoline supply is turned off at a crankshaft speed of more than 2100 rpm
- When the rotation speed decreases to approximately 1900 rpm, then the gasoline supply is resumed and the engine gradually returns to idle speed
- As you can see, the thresholds for triggering the feed when the speed increases or decreases are different (this is a normal phenomenon called “hysteresis”), this is what ensures the stability of the motor
- The working element of the EPHH is its electromagnetic valve (aka EM - valve, simply EMK), the valve has a shut-off needle, with which it shuts off the flow of gasoline through the carburetor jet
- Turning the EMC off and on is performed by the EPHH control unit (marked for VAZ - “5013”) and is located under the hood, screwed to the front wall above the battery - it looks like a black plastic box with a connector and a harness is connected to it
- It determines engine speed (and most importantly their thresholds of 1900 and 2100 rpm) based on a signal from the primary winding of the ignition coil
- And the limit switch informs him that the gas pedal is released (see the green wire with a chip that comes from the area of the right front corner of the carburetor)
EPHH on VAZ 2109 (carburetor)
Content:
Almost all VAZ 2109 cars that have a carburetor in the engine compartment are equipped with economizers. This is the abbreviated name for forced idle economizer or simply EPHH.
Functions
The task of the EPHH is as follows:
- Saves fuel in the car;
- Eliminates the supply of fuel to the power unit when the engine is turned off;
- Turns off the fuel supply to the engine through the idle system when the engine is braking.
Design
EPHH carburetor VAZ 2109 includes the following components:
- Economizer;
- Solenoid valve;
- Throttle valve limit switch.
If at least one component of the EPHH design fails, the entire assembly stops working.
Element location
Operating principle
To determine the cause of the problem and take action to troubleshoot the EPHH, you need to know about the principle of its operation.
- The economizer is equipped with output and input circuits.
- The input circuits are a limit switch and a wire that connects to the switch.
- The throttle (throttle) limit switch tells the economizer whether the gas pedal is depressed or not at that particular moment.
- If the pedal is not depressed, the limit switch closes to ground.
- As soon as the gas pedal is pressed by the driver, the contact is switched off.
- The wire that connects the switch and the economizer reports the number of pulses to the ignition coil. In fact, due to this, the economizer is able to find out about the actual current speed of the power unit.
- The EPHH has only one output circuit - the XX solenoid valve of the carburetor system (XX - idle speed). The economizer can turn this valve on and off.
- Fuel economy is ensured by closing the XX fuel jet at high engine speeds.
- If the gas pedal is not depressed, the throttle limit switch closes to ground, the speed is less than 2.1 thousand per minute, then the economizer opens the XX solenoid valve.
- When the gas pedal is depressed, the limit switch opens, leaving the valve open anyway. The valve closes only when the engine speed exceeds 2.1 thousand per minute.
- The valve is in the closed position until the speed drops below 1.9 thousand per minute.
If the car is coasting with the gear engaged and the accelerator pedal released, the EPHH will not turn on, even if the revolutions drop below 1900 per minute.
The economizer monitors the closed position of the damper. If the engine speed at idle is too high, it is perceived as coasting. Actually, this is all you need to know about the operation of such an element as EPHH.
Practice and research show that the use of an economizer allows you to save about 5 percent of engine consumption.
Symptoms of a problem
There are several main signs indicating failure of the EPHH:
- The engine regularly stalls at idle;
- Detonation occurs in the engine when the ignition is turned off;
- The engine stalls when coasting braking is performed.
You can check whether the EPHH and its control unit are working correctly with your own hands. To check the valve, you should monitor its activation in various operating modes. Correct operation is determined by ear or using a voltmeter.
Valve check
There are three main steps to checking the functionality of the solenoid valve.
| Verification method | Your actions |
| Basic operating mode of EPHH |
|
| Engine braking mode |
|
| Fuel cut-off when ignition is turned off |
|
In addition to the solenoid valve itself, you should also definitely check the EPHH control unit.
Plus and minus
Checking the control unit
To check the control unit of the solenoid valve of the carburetor VAZ 2109 you will need a wire. The length of the wire should be such that it is sufficient to connect the valve to the positive terminal of the battery. Plus, you will need a standard voltage control light.
Your steps when checking the control unit will look like this.
- Disconnect the power wire from the valve without interfering with the operation of the carburetor itself. After this, connect the valve via the prepared wire to the positive terminal of the battery.
- The supply wire of the solenoid valve, which you disconnected in the previous step, must be connected to the positive terminal of the control lamp. The minus connects to the mass.
- Turn on the engine and let it idle for a while. The crankshaft should rotate at a speed within 850-900 rpm. The control lamp should light up.
- Begin to gradually increase the speed, reaching 2100 units per minute. If the control unit is working properly, when this level is reached, the light will go out. Reducing the speed again to 1900 units per minute, the lamp should light up.
Useful diagram
If a malfunction was discovered during the check of the valve and its control unit, it will be necessary to replace the corresponding failed components of the carburetor power system of the VAZ 2109.
EPHH is an important component of the car, which requires constant monitoring by the car owner.
No Comments Yet! You can be first to comment this post! Close Window
Loading, Please Wait!
This may take a second or two.
luxvaz.ru
Correct installation of the EM valve
It would seem, well, what’s so difficult, I screwed the valve into the carburetor and that’s it, but there are some nuances unknown to many, so if you do the installation yourself, without following them, you get new problems. So:
- It is extremely important to correctly screw the EMC onto the carburetor
- The most popular misconception is that it can only be tightened by hand.
- Moreover, this can be heard not only from a beginner, but also from middle-aged and very experienced specialists in reputable car services
- After such a recommendation, you and other drivers are in the deepest misconception
- The point here is that a valve that is loosely tightened (by hand) begins to dangle in the thread, and a poorly squeezed rubber band adds additional air leakage, which leads to a lean mixture - just one of the common reasons for unstable speed
- A similarly erroneous technique was proposed in an article titled “Capricious Valve” in a magazine titled “Behind the Wheel”:
- Let the engine idle, while turning off the power supply to the valve
- We tighten it little by little until the combustible mixture normalizes and the speed increases; if the engine stalls, this means that the valve is tightened
- Then start the engine and check the operation of the valve by disconnecting and connecting the power supply
- The whole point here is that the engine will stall as soon as the end of the nozzle has just begun to enter its seat, but it has not yet reached the end
- This “wisest” recommendation is also complemented by: “If necessary, you can tighten the EMC by about one more turn.”
- Doing this is just dangerous - if you squeeze the EMC, you can ruin the XX jet, or ruin the seat for the jet, which is even worse, and if you break the thread located in the carburetor cover, then the cost of repair will skyrocket
The results obtained in this way:
- The first case - just change the jet
- The second case is replacing the carburetor cap
- The third case is to replace or repair the cover (drill out and insert a threaded bushing)
- For your information, the Repair and Maintenance Manual tells us a tightening torque of 0.4 kilograms per meter (corresponding to 3.68 Newtons per meter)
- For a valve with a body diameter of 20 millimeters, the force required is 40 kilograms, and for a 13 millimeter valve - 61.5 kilograms
- You are unlikely to be able to create such a force with your fingers, but with a key about 15 centimeters long - 2.5 kilograms is normal
- In the book by the author Tyufyakov it is written like this: “The valve must be tightly wrapped in the lid, until the rubber sealing ring is completely pressed into the spacer tube.”
The most sensible recommendation on how to install an idle speed solenoid valve on a VAZ 2109 is as follows:
- It is necessary to remove its rubber seal from the EMC, then screw it in by hand until it stops, while counting the revolutions and also remember in which location you have the contact
- Then we put on the elastic band, and screw it first by hand, and then with the “13” key to its previous position (which we remembered), but no further
- I’ll add on my own that with the VAZ 2109 engine running, the idle speed solenoid valve can be slightly unscrewed (no more than 120 degrees) to achieve maximum speed
Functionality check
Simple instructions will help you check the functionality:
- The functionality of the EMC is first checked with the engine stopped, turn on the ignition, removing and then putting on the wire going to the contact
- There should be a loud click heard when doing this
- Separately, you should check the operation of the limit switch contact located on the carburetor when releasing the gas pedal
- The contact may be oily or clogged with dirt.
- It happens that the “floating” speed of XX occurs due to damage to the rubber seal of the EMC
- This rubber band delaminates due to age, and air leaks begin, and the mixture becomes leaner, so the speed drops
- And sometimes when driving the car there was a slight smell of gasoline, as soon as it appears, you know that it’s time to replace the rubber
- Its “native” seals, which are installed by the factory during assembly, last the longest
- Among those that are now available in stores, it is better to take red ones; they are more resistant to gasoline than black ones
- There have been cases where air was sucked through the valve body, or cracks in the epoxy around the terminal, or simply a lack of seal
Causes of idle speed loss
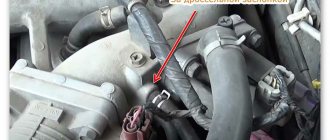
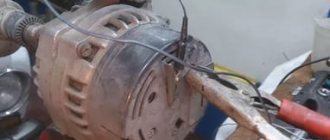
Let's look at the reasons for the loss of idle speed on a VAZ, as well as what devices besides the valve can be the reason for this, for example, the EPHH shown in the photo below.
The red arrow shows the EPHH that controls the operation of the solenoid valve
There are three most common reasons for the disappearance (disappearance) of idle speed in VAZ 2108 - 21099 cars:
- The idle jet that opens the EMC is clogged
- Solenoid valve burnt out
- There is no power to the EMC
Parts and consumables:
- Oil filter
- Engine oil
- Rags
- L-shaped socket wrench 14 mm
- Pliers
- Needle for cleaning the jet
- Tester or indicator lamp
- Medium Phillips screwdriver (when replacing the EPHH unit)
Parts and consumables:
- Solenoid valve (2108-1107420) (replacement if necessary)
- EPHH block (5003.3761) (if replacement is necessary)
This manual is suitable for all cars of the Lada Samara family equipped with the same carburetor engine.
VAZ cars with a carburetor have an electromagnetic valve (EMV) with an idle jet in the idle system. This valve is controlled by the electronic forced idle speed unit (EFI). There are three most common reasons for the disappearance of idle speed on VAZ 2108, VAZ 2109, VAZ 21099, VAZ 21093 cars:
- clogging of the idle jet of the solenoid valve;
- solenoid valve burnout;
- lack of power supply to the EMC.
Checking and Troubleshooting
To check the solenoid valve on a VAZ 21093, you need to get to it:
- Remove the air filter cover by unfastening the spring clips and unscrewing the nut according to
- Removing the air filter
- Unscrew the four nuts using the “8” wrench
- Using a screwdriver, loosen the clamp on the crankcase ventilation hose, where it connects to the valve cover
- Removing the air filter housing
- Turn on the ignition
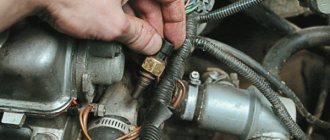
- Then we remove the power wiring from (EMK)
- Touch the power supply terminal to the EMC terminal several times
- When touched, clicks should be clearly audible
- If there are clicks, use the key “13” (or “12” or “14” - whichever is suitable) to unscrew the solenoid valve from the carburetor cover
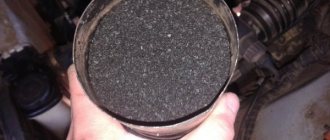
- Then, with two fingers, remove the fuel nozzle intended for idling
- We immediately pay attention to its central hole - you should remove debris from the nozzle using a compressor or air pump, and then make sure the hole is clean by looking at the clearance
- After this, install the fuel jet back
- Then the EMC is installed and wrapped as described above!
- We put on the power cables and start the engine of the car
- If there are no clicks in the solenoid valve, use the key “13” (again, whichever “12” or “14” is suitable) EMC
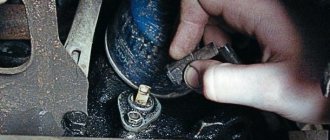
- Using an additional piece of wire, we feed the “plus” from the battery to the valve terminal, and with its body we touch the “minus” terminal of the battery several times
Carburetor solenoid valve VAZ 2109
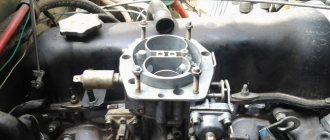
The prerequisites for checking the carburetor solenoid valve are as follows: the car periodically (or even constantly stalls at idle). The solenoid valve in the Solex carburetor is designed to supply fuel to the first chamber of the carburetor at idle. That is, this valve is designed to ensure that the carburetor prepares the working mixture when the throttle valve is closed. The valve is controlled by the idle economizer - an electronic device that turns on the valve at engine speeds below 1800 rpm, and turns it off at higher speeds. The principle of operation of the solenoid valve is extremely simple: there is 12 volts on the valve chip - it is open and gasoline flows through it, there is no voltage - the valve closes and the supply of gasoline stops.
VAZ carburetor solenoid valve
Let us pay attention to one important point: in many cars of this family the idle economizer is disabled. That is, voltage is supplied to the valve not from the economizer, but directly, when the ignition is turned on. Therefore, it is very important for you to understand what controls the solenoid valve, since the valve itself may be working properly, but the valve control system is faulty. Let's check the valve itself: start the engine and leave it idling (if the problem with the engine stalling occurs periodically). Before doing this, remove the air filter from the carburetor to facilitate access to the valve. With the engine idling, remove the valve plug. The engine should stall. If it doesn't stall, then your carburetor's idle speed is set incorrectly, but that's another question. The fact that the engine stalls when the chip is removed indicates that the valve is currently working. We turn off the engine and use a 13 key to unscrew the valve from the carburetor. Now let's check its operation using the battery.
Connect +12V
Find a piece of wire 30 centimeters long and connect it to the battery ground. Place the valve itself with a pin on the +12V terminal and connect the ground to the valve body.
We close the mass to the body
You should hear a click as the coil retracts the valve stem. Click the valve, if it works every time, then it is working. If you don’t hear any clicks, then the valve is 100% faulty. If the situation turns out that the valve works as good as it should, but the car sometimes stalls, then buy a new one. It is inexpensive, about $5.
Fuel leaking through valve
If the valve works fine but the car always stalls at idle, try the following. Take a wire about 1 meter long, connect one end to the + 12 V battery, and the other to the valve pin. Now the valve is always open. Start the car, release the gas pedal to idle. Now the car should not stall, since the gasoline flow is always open through the constantly open idle valve. If the car still stalls, blow out the valve with compressed air. The reason that the valve works from the battery, but not from the chip, is a malfunction of the electronic economizer, but this is nothing to worry about, most owners of nines drive without it. You just need to stretch the wire from the B ignition coil to the valve chip. When the ignition was turned on, the solenoid valve opened and remained open all the time until the ignition was turned off. This will not result in significant excess fuel consumption.
Sources:
https://mashinapro.ru/1220-klapan-2109.html https://twokarburators.ru/proverka-elektromagnitnogo-klapana-solex/ https://zen.yandex.ru/media/id/5d39599e92414d00ac68c5ab/5d4b995cbf50d500ad17d45c https: //masteravaza.ru/zubilo/remont-i-ekspluataciya-zubilo/vaz-2109-ne-rabotaet-elektromagnitnyj-klapan-700 https://vaz2109.net/electrooborudovanie/elektromagnitnyiy-klapan-karbyuratora-vaz-2109.html
Valve inspection and repair
Checking valves is a mandatory process when diagnosing a car. It will help to weed out some of the possible causes of the malfunction.
It often happens that the needle valve of the VAZ 2109 carburetor can sometimes simply “stick”. And this causes problems. If the fuel supply needle valve is faulty, it should be cleaned or replaced.
It happens that the valve stops working in very hot weather. This can be expressed in the fact that the car starts, but after ten to twenty seconds the engine stalls. Externally determining the cause can be very problematic.
Sometimes in such cases, tapping on the carburetor cover helps, and then a few strokes are made on the manual drive of the fuel pump.
When the needle valve stops working in the closed state, nothing happens externally and you will not hear any sounds. An open valve produces the sound of gasoline filling the float chamber.
The process of replacing the needle valve of a VAZ 2109 carburetor
We recommend that you do not abuse the car and replace the valve. Otherwise, sooner or later, you will have to do more serious repairs to the VAZ 2109 carburetor.
Attention! Replacement is carried out only on a cold machine.
- It is necessary to loosen the bolts securing the cable and braid of the “choke” drive. After this, it can be freely removed from the carburetor.
- Now you need to leave the clamps in order to remove the hose from the carburetor that supplies gasoline and the return line. You can disconnect the wire from the forced idle Economizer valve.
- Once you have done all this, you need to unscrew the five screws that secure the carburetor cover. In this case, it is very important not to damage either the gasket or the floats. Now the cover can be removed.
- Turn the lid over so that the floats are at the top. After this, you can take an awl and push out the axis of the floats to remove them. We do everything carefully to avoid damaging the reeds. Otherwise, the fuel level may be disrupted.
- Now remove the old valve. New ones are made in such a way that its needle is essentially a separate part. This is very convenient because now the bridle can be easily put on the tongue.
- Be sure to soak the new needle for ten minutes in gasoline before you begin installing the new valve.
- Attach the new valve.
- The needle is put on the tongue with a bridle. In this case, it is inserted into the body itself. Next, the floats are installed, aligning the holes for the bracket axis and on the floats. We return the float axis to its rightful place.
- Now the cover can be returned to its place. But ideally, also wash the fuel filter. To do this, unscrew the plug located opposite the inlet pipe and pull out the filter. After that, it is washed in gasoline and put in place.
- Tighten the screws on the carburetor cover.
- We return the hoses and cable to their place and secure them.
After this, there will definitely be no problems with valve sticking. If necessary, check the solenoid valve of the VAZ 2109 carburetor.