For a long time I noticed various kinds of sounds and creaks coming from the trunk, which became more and more annoying over time. Over time, I did everything possible: I installed an acoustic shelf instead of the standard one (later I’ll make a short note about this) and taped the trunk cavity itself with vibration and noise insulation (I’ll also post a photo later). Now I got my hands all the way to the trunk lid... And by the way, I didn’t like that rear wiper and the presence of nameplates)))
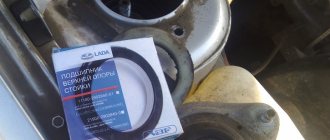
Surely every owner of a Priora hatchback has noticed how the trunk lid rattles when you drive on a rough road)) I think it’s due to the fact that the lid itself is large and has few support points, to which it also does not fit tightly))) We’re talking about these rubber pads))
I took off these pads and cut out gaskets from ordinary wheel tubes according to their shape (at a tire shop there are plenty of them, you just have to stop by and ask))) The effect was impressive: the lid stopped rattling, but the crickets and squeaks did not go away ((.
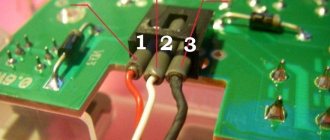
Now about gluing and small changes)) To remove the plastic cover of the lid, you need to slip a knife under it and unclip the pistons from the lock to the sides - 4 pieces, the rest will do the same)) Next we observe a healthy wiper mechanism, which is put on 3 studs and secured with nuts. It was not difficult to unhook the wire block and remove it (the twin itself is secured from the outside with a nut). Here's what we have:
We have 2 holes left from the wiper. On the inside, like a native one, there is a plug from the bottom of the 8 or 9. The outer hole has an oval shape - I also picked up a round plug in the store, sprayed it liberally with Vedakhoy and it also fit well into place.
This article will consider an example of a repair involving a Lada Priora hatchback. In general, the procedure for removing the trunk lid trim (upholstery) may be needed in the following cases:
- Repair or replacement of rear window wiper motor
- Soundproofing the rear door
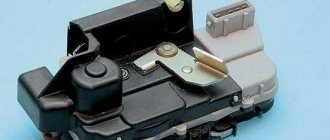
- Repair or replacement of locking elements or the trunk lock itself
How to remove the trunk trim on a Prior hatchback
For a long time I noticed various kinds of sounds and creaks coming from the trunk, which became more and more annoying over time.
Over time, I did everything possible: I installed an acoustic shelf instead of the standard one (later I’ll make a short note about this) and taped the trunk cavity itself with vibration and noise insulation (I’ll also post a photo later). Now I got my hands on the trunk lid itself... And by the way, I didn’t like this rear wiper and the presence of nameplates))) Surely every owner of a Prior hatchback noticed how the trunk lid rattles when you drive on a rough road)) I think because The lid itself is large and has few support points, to which it also does not fit tightly))) We are talking about these rubber pads))
I took off these pads and cut out gaskets from ordinary wheel tubes according to their shape (at a tire shop there are plenty of them, you just have to stop by and ask))) The effect was impressive: the lid stopped rattling, but the crickets and squeaks did not go away ((.
Now about gluing and small changes)) To remove the plastic cover of the lid, you need to slip a knife under it and unclip the pistons from the lock to the sides - 4 pieces, the rest will do the same)) Next we observe a healthy wiper mechanism, which is put on 3 studs and secured with nuts. It was not difficult to unhook the wire block and remove it (the twin itself is secured from the outside with a nut). Here's what we have:
We have 2 holes left from the wiper. On the inside, like a native one, there is a plug from the bottom of the 8 or 9. The outer hole has an oval shape - I also picked up a round plug in the store, sprayed it liberally with Vedakhoy and it also fit well into place.
This article will consider an example of a repair involving a Lada Priora hatchback. In general, the procedure for removing the trunk lid trim (upholstery) may be needed in the following cases:
- Repair or replacement of rear window wiper motor
- Soundproofing the rear door
- Repair or replacement of locking elements or the trunk lock itself
Remove the rear door trim of the Priora station wagon
Removing the car door trim is a mandatory procedure if you need to carry out certain operations - repairing wiring, installing new equipment such as speakers or window lifts. Cars from the Lada Priora line have a standard door mechanism design, which allows you to open it by following the same instructions regardless of the model.
The vehicle owner only needs patience, a set of tools and strict adherence to instructions to avoid damage to the trim. The design of the rear and front doors on cars is slightly different, but the general principle of operation is the same.
- Tools for removing car trim
- How to remove the front door trim on a Priora
- How to remove the rear door trim on a Priora
- Door trim repair
- Replacement/installation of sound insulation
- The benefits of working independently
- Recommendations for working with car doors
Tools for removing car trim
The standard list of tools includes:
- It is advisable to have a special kit for removing the trim; if you don’t have them, you can use a flat-head screwdriver or something similar;
Set of tools for removing trim and clips
It should be taken into account that the clips may crack when removed, so it is better to stock up on additional copies just in case. It is preferable to buy the kit in advance to save time at work. It is worth paying attention to what model the clips are purchased for - only for the Priora, the rest do not match in size.
Clips for door trim of different Lada models
If electronic elements are installed in the doors, you will need a wrench - this applies to window lifts. It is necessary to have space to open the doors to the sides, so you need to empty the garage/box of unnecessary things that interfere with the procedure. Another option is to take the car outside in warm weather, and collect all the removed elements in a tool box with pre-prepared compartments, so that nothing gets overlooked during reassembly.
It is imperative to disconnect the battery if there are electronic components in the doors, so as not to provoke a short circuit and the need for premature replacement of wiring and other spare parts - just remove the negative wire. When using screwdrivers, the best option is to wrap them in electrical tape so as not to scratch anything (including the paint on the metal), and you need to work with the tools carefully - without sudden movements.
How to remove the front door trim on a Priora
Dismantling begins by unscrewing the screws located near the door handle. Next, you will need to remove the screws holding the power window control module. At this stage, care must be taken not to damage the glass itself. The window lifter element will need to be removed along with the module for controlling the mirrors. Next you need to work in the following sequence:
- if there is a speaker in the door, then it is necessary to dismantle it;
- unscrew three screws from the bottom of the casing;
- the screw at the door handle is unscrewed;
- Next you will need a TORX wrench; use it to unscrew two bolts in the recess on the armrest;
- The pad on the armrest itself, in addition to the bolts, is attached to latches - you may need a flat-head screwdriver to unlatch them. Be careful! The latches are quite fragile and can break if pressed hard.
- the wires are connected to the removed cover with a special plug; it is simply removed;
- the door lock is twisted;
- Now the trim is held in place only by clips around the perimeter of the door. Removal is recommended to be done using special trim removers so as not to break the clips. You can operate from any of the angles - the casing is pryed up and carefully, but with little effort, removed from the clips.
Removing and installing tailgate trim on Priora Hatchback
In fact, this procedure is so simple that there is practically no point in describing it. But still, let’s do this review. First of all, we remove the two rubber clips that are located on the outside of the upholstery.
This procedure is clearly shown in the photo below.
Now we pry up the upholstery from one side and slightly move it to the side, carefully tearing it off the fastening clips, which is clearly shown in the photo below.
And finally remove the trunk lid trim.
The final result of this simple repair is shown in the photo below.
The price of new upholstery on a Priora hatchback is about 700-800 rubles. Installation occurs in reverse order. It is worth noting that the clips can be damaged even when removed for the first time, so it is possible that you will have to buy new ones, which is best done in advance.
Soundproofing the trunk on a Priora
Owners of new Lada Priora cars (hatchback and station wagon) over time notice strong noises in the luggage compartment, so the most suitable solution would be sound insulation. There is an option to do it yourself, the main thing is to adhere to our management.
The development of car sound insulation is the same for all brands and types of cars, but in certain cases, of course, it has its own characteristics. For which the design of the Lada Priora is intended, the process begins with dismantling the trunk trim. If the body is a hatchback, as it is also called a station wagon, then it will be necessary to remove
central and side shelves. Let's not forget to remove the trunk lid trim. Next, the entire working surface must be cleaned and degreased, nettle, using White Spirit.
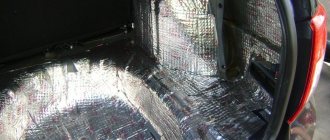
The first layer is a vibration isolator.
We are considering the traditional scheme, when sound insulation begins with vibration material. Here the example uses material from the Shumoff and STP offices). We cut out sheets of suitable size (the more simple the pieces are, the better), and heat the bitumen side with a technical hairdryer. Then we glue the “vibra” onto the cleaned metal of the body, and roll out the sheet with a hard (plastic/steel) roller.
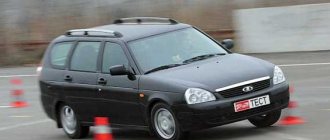
How to install a roof rack on a Priora
Owners of Lada Priora cars often face the problem of transporting goods, this is due to the fact that the car’s trunk is not as spacious as they would like.
This problem is especially relevant for married couples with children. So, for example, if the child is just a toddler, then the back seat is occupied by a safety seat, and the standard trunk is occupied by a baby stroller, which you cannot do without. There is practically nowhere to put the rest of the things. In such situations, the simplest and most reliable way to organize additional space for transporting luggage is a car box (a trunk located on the roof of a car). This trunk today is not something exclusive, as it was before. Nowadays, you can purchase this trunk for almost every model of passenger car, for example, the universal car box https://www.tonna-gruza.ru/shop/thule-touring-600-black-glossy-left of the Touring series. However, some craftsmen equip such a box themselves. This usually involves making guides for attaching the roof rack, and the rack itself is either made by yourself or purchased ready-made in accordance with the selected overall dimensions. We'll talk about the autobox, which was designed specifically for the Lada Priora car. One of the well-known and reliable manufacturers of luggage racks for VAZ cars is the Atlant company (Russia, St. Petersburg), whose products we need. This trunk consists of aluminum arch guides that can withstand a load of 100 kg, while the trunk is capable of carrying cargo weighing up to 75 kg.
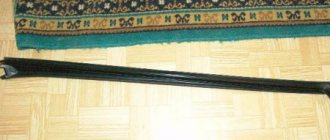
The design of the trunk provides for its fastening to the roof to the doorways and is carried out using special adapters. The load-bearing capacity of the trunk is taken over by special arches made of anodized aluminum, size 20x30 mm with a wall thickness of 2.5 mm. The length of each arc is 1100 mm, at the ends of which there are plastic plugs. Fasteners that contact directly with the car body are made of durable composite material. To prevent unauthorized access, a hidden lock is built into the design of the fasteners. This autobox is designed for the Lada Priora sedan and hatchback model range.
The luggage carrier includes: 1) Mounting system kit for Lada Priora. 2) Set of load-bearing supports. 3) Atlant roll bar set.
As for installing and removing the trunk, it takes 15-20 minutes, and the installation process is intuitive and does not require explanation. However, if difficulties arise, the kit provides detailed step-by-step instructions.
Good day!
I'm going to PURCHASE and then INSTALL a roof rack for a Priora (sedan 2170).
It is advisable, of course, to install slats, and not the old-fashioned lattice)) )
I put it on the seven, I put it on the Muscovite, but I didn’t quite understand the installation system on the Priora.
Can you help? Preferably, of course, with a photo or a link to the photo.
When going to the sea, on vacation, going to the country or just to the lap of nature, it is very convenient to load some of the necessary things into the upper trunk of the car. All previous VAZ models were initially prepared so that a light, elegant metal roof rack could be quickly mounted on the roof. How is this issue resolved by the now popular Priora?
Sound insulation of LADA Priora trunk
If you are the owner of a VAZ 2170, then the question of trunk soundproofing has probably never arisen in your mind.
But if you have a VAZ 2171 or 2172, then soundproofing the Priora’s trunk is simply necessary for a comfortable ride and spending time in the car’s interior. It’s worth saying right away what points you need to pay special attention to when installing sound insulation. The stages of the technological process for soundproofing the trunk in all cars, regardless of their model and type, are approximately similar. But in order for sound insulation to be carried out efficiently, each specific case should be approached individually.
ATTENTION! Now you can buy a completely new radio with a Pioneer AVH-3100DVD monitor for only 2990 rubles! Don't believe me? Then follow the link and see for yourself! Read more"
Soundproofing the trunk of a Priora hatchback begins with removing the trim inside the trunk itself. In addition, the side and center shelves must be removed. The trunk roof trim is also removed. After this, you should thoroughly wipe the entire working area, for example, with White Spirit, degreasing and cleaning the surface from dust and excess debris.
The most optimal and simplest option for installing sound insulation is considered to be the option in which sound insulation is made using layers. Soundproofing the Priora with your own hands will thus take you no more than 10 hours of work. The necessary materials will be the following:
- Vibration-absorbing sheets – 8-9 pieces;
- Splen sheets – 2 pieces;
- Modelin - 1 m 2;
- Bitoplast – 1 m2.
Transverse mounting of the roof rack on the priors
a common type of installation of additional space for transporting goods. It attaches easily, quickly and securely. Suitable for those who use personal transport as a cargo taxi. Regardless of the model and body type of the vehicle, the arches are installed along the edges of the roof. You can use two or three crossbars. Fastening to the body surface is done using bolts.
This method is common, not only for domestic vehicles.
The only caveat is that when moving at high speed, a rattling noise appears.
First vibration-isolating layer
Following the standard trunk noise insulation scheme, the first layer means covering the surface inside the trunk with vibration material. The highest quality vibration-absorbing materials are considered to be materials from STP and Shumoff.
First, you need to cut several sheets of a certain size and shape from a single sheet of vibration-isolating material, and then slightly warm up the bitumen side using a technical hair dryer.
Then the heated sheets of vibromaterial are carefully laid on the cleaned and degreased trunk frame and carefully rolled out with a hard roller made of iron or plastic.
After the first sheets fill most of the trunk area, the next sheets of vibration material should be prepared in the same way. They must be overlapped.
As a result of the manipulations performed, the metal surface of the body should be covered by 55-100%, depending on the material used.
Second soundproofing layer
The second layer of sound insulation is designed to suppress unnecessary sounds and retain heat, depending on the material used.
The basic principle of operation at this stage is to glue sound-absorbing Accent and heat-insulating Splen on top of the vibration-insulating material. Both materials have a self-adhesive base, so their installation does not require significant effort and special knowledge in the field of sound insulation. It is necessary to cover the surface with soundproofing material 100%. The only exceptions are technological openings, namely ventilation openings. Only in this case will it be possible to achieve the greatest effect.
The final stage of soundproofing the trunk
In order for the soundproofing of the trunk to be most effective, at the final stage of the technological process it is also necessary to soundproof the plastic in the trunk. Following the algorithm described above, the trunk roof lining is made heavier, which is subsequently covered with bitoplast. Then all wiring is wrapped in Anti-creak. And to avoid unnecessary squeaks, the side shelves and plastic linings of the window mullions are also glued with modelin.
Do not forget that the sound insulation of the Priora will be effective only if the sound insulation was carried out not in one of the components of the car, but in the entire car as a whole. If you soundproof one trunk, you will certainly notice a certain difference. But things will be completely different if your iron “horse” is soundproofed in all parts of the car.
Trunk and hood trim
Trunk lining is an important point in arranging a car.
Every car enthusiast strives to make his car more beautiful and comfortable. When upgrading your car, you shouldn’t forget about such a part as the trunk. Often, the manufacturer saves on the equipment of this part of the car by not providing it with full upholstery. And this not only looks unattractive, but also affects sound insulation and leads to heat loss in winter. However, there is a way out - there are various options for trunk trim available on sale. You can find them for almost any car, including domestic models (Lada Granta, Priora, Lada Vesta, Datsun).
What are the functions of the trunk lining?
It solves several important problems at once:
- aesthetic - covers the frame, giving the luggage compartment a neat look
- sound insulation - dampens noise
- thermal insulation - helps retain heat in the cold season
- The presence of an organizer in many upholstery options allows for more efficient use of the usable trunk area.
Replacing the casing is another reason to purchase it
Purchasing upholstery is necessary not only if it is not included in the original configuration. Over time, any upholstery is subject to wear and damage, which affects its appearance and leads to a deterioration in the functions it performs. Therefore, every car enthusiast sooner or later is faced with the need to replace the trim.
This is a simple procedure for VAZ cars. The only tools you need are a Phillips and slotted screwdriver.
If the car already has old upholstery, you must first remove it. To do this you need:
- Use a slotted screwdriver to unfasten the fastening buttons of the front and rear trunk trim;
- Use a Phillips screwdriver to unscrew the self-tapping screws of the front and rear upholstery;
- remove rear trim;
- Using a Phillips screwdriver, unscrew the screws of the right upholstery and dismantle it;
- Unscrew the screws of the left upholstery, then remove it and the spare wheel cover;
- unscrew the screws and remove the left rear arch trim;
- Now you can begin installing the new casing, which is done in the reverse order.
Lining the trunk is a step that should not be ignored. After all, this is a simple way to make your car even more comfortable and attractive. A wide range of commercially available skins will allow you to choose the most optimal option.
Source
Blitz tips for maintenance and operation of Priora
How to properly extinguish the Check Engine light on a Priora
You can disconnect the battery terminal, but this will reset the radio settings and LCD display information (average consumption, daily mileage, clock, etc.). It is much more convenient to do everything as follows: under the hood, in the main fuse block, pull out fuse F1 in the yellow housing (30A), after 10 seconds, install the fuse back. The “check” goes out, but the settings remain.
Do not forget that in any case (you pull out the above-mentioned fuse for 10 seconds or remove the battery terminal), a record will be made in the controller’s memory that the controller’s power is turned off. If the car is under warranty and there are questions during maintenance, explain that you removed the terminal from the battery to inflate the wheels (in accordance with safety requirements).
Soundproofing Priors hatchback is a necessity
Priora hatchback interior sound insulation
Sound insulation of the Priora hatchback is a pressing issue among owners. To overpay at a service station, or to do it yourself, that’s what you need to decide on.
On the one hand, you paid - and everything was done, you don’t need to bother yourself, on the other hand, doing it yourself is much cheaper, and you are sure of the quality.
First vibration-isolating layer
Following the standard trunk noise insulation scheme, the first layer means covering the surface inside the trunk with vibration material. The highest quality vibration-absorbing materials are considered to be materials from STP and Shumoff.
First, you need to cut several sheets of a certain size and shape from a single sheet of vibration-isolating material, and then slightly warm up the bitumen side using a technical hair dryer.
Then the heated sheets of vibromaterial are carefully laid on the cleaned and degreased trunk frame and carefully rolled out with a hard roller made of iron or plastic.
After the first sheets fill most of the trunk area, the next sheets of vibration material should be prepared in the same way. They must be overlapped.
As a result of the manipulations performed, the metal surface of the body should be covered by 55-100%, depending on the material used.
Second soundproofing layer
The second layer of sound insulation is designed to suppress unnecessary sounds and retain heat, depending on the material used.
The basic principle of operation at this stage is to glue sound-absorbing Accent and heat-insulating Splen on top of the vibration-insulating material. Both materials have a self-adhesive base, so their installation does not require significant effort and special knowledge in the field of sound insulation. It is necessary to cover the surface with soundproofing material 100%. The only exceptions are technological openings, namely ventilation openings. Only in this case will it be possible to achieve the greatest effect.
The final stage of soundproofing the trunk
In order for the soundproofing of the trunk to be most effective, at the final stage of the technological process it is also necessary to soundproof the plastic in the trunk. Following the algorithm described above, the trunk roof lining is made heavier, which is subsequently covered with bitoplast. Then all wiring is wrapped in Anti-creak. And to avoid unnecessary squeaks, the side shelves and plastic linings of the window mullions are also glued with modelin.
Do not forget that the sound insulation of the Priora will be effective only if the sound insulation was carried out not in one of the components of the car, but in the entire car as a whole. If you soundproof one trunk, you will certainly notice a certain difference. But things will be completely different if your iron “horse” is soundproofed in all parts of the car.
Trunk and hood trim
Trunk trim is an important point in arranging a car.
Every car enthusiast strives to make his car more beautiful and comfortable. When upgrading your car, you shouldn’t forget about such a part as the trunk. Often, the manufacturer saves on the equipment of this part of the car by not providing it with full upholstery. And this not only looks unattractive, but also affects sound insulation and leads to heat loss in winter. However, there is a way out - there are various options for trunk trim available on sale. You can find them for almost any car, including domestic models (Lada Granta, Priora, Lada Vesta, Datsun).
How to Remove the Trunk Lid Trim of a Priora Hatchback
Sound insulation line on Prior
Owners of new Lada Priora cars (hatchbacks and station wagons) eventually notice a lot of noise in the luggage compartment, so sound insulation is the most suitable solution. It is possible to do this yourself, the main thing is to follow our guidance.
The development of car sound insulation is the same for all brands and types of cars, but in some cases, of course, they have their own characteristics. What the design from Lada Priora is intended for, the process begins with removing the trunk lining. If a hatchback body is required, as it is called a station wagon , take off
Center and side shelves Don't forget to remove the trunk lid trim. Next, the entire work surface must be cleaned and degreased with nettles using White Spirit.
The first layer is a vibration isolator.
Let's consider the traditional scheme, when sound insulation begins with vibrating material. This is an example of Shumoff and STP office materials). Cut the sheets to the appropriate size (bigger pieces are not just better), and heat the bitumen side with a heat gun. We then attach the "vibration" to the cleaned body metal and roll the sheet using a rigid (plastic/steel) roller.
Another sheet of vibrating material is lined. We cover from 60 to 100% of the surface, depending on the type of material (see Abstract).
Let us remind you that on the pages of our website there are already materials about soundproofing roofs and doors of Lada Priora. Working your entire body will have the biggest impact, but it's worth it.
soundproofing cover
Previous trunk and hatchback: