For what
Reasons to raise your rear suspension:
- Of course, increased cross-country ability. When hitting bumps, the car's wheels hit, and many people raise the suspension to correct this problem.
- Increased load capacity. If you load something heavy into the car, the springs cannot withstand it and the rear end drops significantly. To avoid this, you need to raise the rear suspension.
To raise the rear suspension of any of the three cars in question, spacers are needed. On the VAZ 2110 and VAZ 2115 they look the same, but on the VAZ 2107 they are slightly different.
It is important to consider that when installing spacers the following changes:
- rear brake pressure regulator position;
- castor (the longitudinal inclination angle of the front wheels' turning axis).
Review of spacers to increase ground clearance on the VAZ-2114
Many motorists want to increase the ground clearance of the VAZ-2114. This is due to increased load capacity and cross-country ability. But not everyone knows how to do it with their own hands. For this, there are special spacers that are installed between the shock absorber and the body. They are different for the front and rear pillars, but the principle remains the same.
Classification of spacers to increase ground clearance
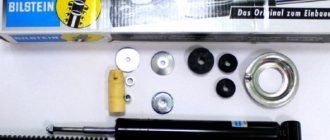
Set of spacers to increase ground clearance
Spacers for the front struts are installed between the body and the strut, while the rear ones are installed between the axle and the shock absorber. They have different shapes and differ from each other, and therefore it is quite difficult to confuse them.
You can buy spacers either as a set or separately.
Rear spacer kit to increase ground clearance
Types of spacers
Spacers for cars are:
- Aluminum . Most often used for rear shock absorbers.
Aluminum spacers for installation under the front wheels
At the installation location
Also, spacers may vary depending on the installation location:
- Interturns . Placed between the coils of the spring. The installation method is quite simple and easy.
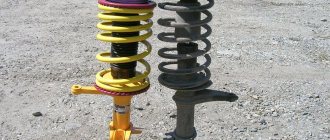
Spacers for springs
Installation of spacers on VAZ-2114
So, now we can consider the process of installing spacers on shock absorbers, both for the front and rear wheels. To do this, you will need to dismantle the front shock absorbers with springs assemblies, but the rear ones - partially. In both cases, you will need a pit or lift and a set of keys.
Installing front spacers
Front spacers, as mentioned earlier, are placed between the body and the spring. This increases the ground clearance by several centimeters, depending on which gasket is selected. Now you can go directly to the installation process:
- We place the car in the pit.
- Jack up the front wheel.
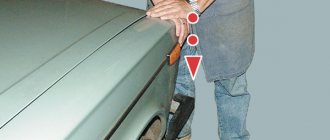
Removing the front wheel
Removing the tie rod pin
The process of removing the rack mounts
Unscrew the upper shock absorber mount
Installed shock absorber spacer
Video about installing spacers on the rear suspension
Now, the ground clearance of the front wheels has been increased, and accordingly it is necessary to perform a similar operation with the rear ones.
Installing rear spacers
Let's look at the process of installing rear spacers:
- Unscrew the lower shock absorber mount.
Removing the rear shock absorber lower mount
The process of measuring and installing the spacer
Rear spacer installed
Video about installing spacers on the rear suspension
conclusions
Selecting and installing a spacer for VAZ-2114 shock absorbers to increase ground clearance is quite simple. Even a novice motorist can cope with this task.
Let's improve the VAZ 2110
To raise the rear suspension on a VAZ 2110 you need to:
- Put the car on the handbrake.
- Use help to lift the rear of the car so that the wheels are in the air and spin freely.
- Remove the wheel.
- Unscrew the shock absorber mounting bolt. To do this you will need a key “19”.
- Get the bolt. Perform a similar operation with the opposite shock absorber.
- Take the spacer and determine on which side the distance from the base to the first hole is greater. The side where it is larger should be directed inward. The same spacer can be installed on both the right and left shock absorbers, since these devices are mirror symmetrical.
- Install the spacer so that a line is drawn from the center of its lower hole to the upper hole, which falls into the vertical of the rack. You can install the spacer so that it is not adjustable in height by screwing the shock absorber into a single hole.
- By unfolding the spacer, you can adjust the suspension height by screwing the strut into the upper or lower hole, but the device will then need to be placed on the opposite rear shock absorber.
- When installing a spacer on an eye, it is important to install a bolt spacer so that the mechanism does not break during operation. You don't need to tighten the bolt too much, just make sure it fits snugly and doesn't wobble.
- Install the strut mounting bolt into the holes in the spacer and shock absorber. The height can be adjusted by selecting the top or bottom holes.
- Also install a spacer on the opposite shock absorber.
- Adjust the rear brake pressure regulator by unscrewing its mounting bolt. Next, you need to move the bracket with something until the distance between the lever and the spring becomes 2 millimeters.
- Check the functionality of the brake system. When braking hard at low speed, the rear axle should lock a little later than the front. If the rear wheels brake much later, then you need to reduce the distance from the lever to the mounting spring, and if it is too early, increase it.
Photo instructions
Installing spacers on the front suspension of VAZ 2108-2115
Installing spacers on the front suspension of VAZ 2108-2115
All cars in these series have good ground clearance, but sometimes it is not enough. The reason for this may be either spring fatigue or the need to drive on difficult off-road conditions. Installing spacers that change the ground clearance by more than 10 mm will require camber and toe adjustments. If the spacer changes the ground clearance by more than 20 mm, it is advisable to install longer brake hoses.
Selection of spacers
Spacers can be installed in the front suspension of these cars in two places:
1. between the spring and the upper or lower bowl of the rack;
2. between the pillar and the body.
The first option is used if it is necessary to compensate for spring subsidence. If the springs are normal, then the second option is preferable, because it allows you to increase the ground clearance without changing the operating mode of the shock absorber. When choosing a spacer, carefully read the articles (how to choose spacers) and (why polyurethane is better), this will help you avoid mistakes. Good polyurethane spacers are offered by the AutoDVC online store, which is located at https://autodvc.ru. You can pick up the selected parts yourself or receive them by transport company or Russian Post.
Preparing to install spacers
Before starting work, carefully read the article (Safety precautions when installing spacers). Make sure you have all the necessary tools. If you don’t have a tool, buy it or ask your friends. For this job you will need:
· a set of open-end and socket wrenches;
· cylinder (wheel wrench);
· adjustable (gas) wrench;
· coupler (puller) for springs;
By replacing struts and shock absorbers
The method of installing spacers is the most effective and least expensive. The downside of installing this element is that the suspension becomes stiffer. To raise the rear suspension, you can replace the struts and shock absorbers. In this case, the service life of the entire suspension will be extended.
When raising the rear of the car using springs and shock absorbers, it is worth knowing that the height of the suspension does not depend on the strut, but the handling of the car does. To raise the rear suspension of the VAZ, it is worth buying longer springs, but you need to know the limit, since they may not fit into the struts. To prevent the car from sagging due to overload, it is worth installing stiffer springs; they are not always higher than the factory ones. You should not buy the toughest of them, as driving in such a car will turn into a test.
Rigid, because on the road the car will not tilt from side to side due to the slightest unevenness.
Some people install air suspension on domestic cars, then the ground clearance increases significantly, but the special convenience is that it can be adjusted.
When raising the rear suspension of a VAZ, you should know when to stop, since after all, this is not an SUV and the components of this car are not designed for such a load.
Video
How to install spacers on a classic, see the following video:
Hello!
It's been a while since I wrote anything. It's frosty or all sorts of things. I don't want to do repairs in the cold. The keys stick to your hands. But there is nothing to do, we must go.
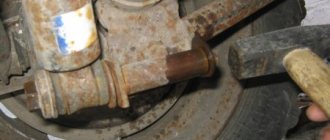
I covered my neighbor's entire garage with snow. He still doesn't show up here. I say sell it, it doesn’t sell))) My garage has no light, so I have to repair it with the gate open. My friends have already buzzed my ears. — Take the generator outside, start it, and close yourself. And warm and light. But somehow I can’t carry it with my hand; it stands under the workbench. And when the car is standing still, you can’t pull it out at all. Well, okay, I won’t worry about the painful things. And since many of my subscribers and others know that I made myself spacers from flange connections. For those not in the know, here is the link. Let's read and comment. On occasion, I bought some studs for my Niva hub. I also took 16 nuts from the field and a thread lock. Everything is extremely simple, just put it on a pin and screwed it into place.
Let me tell you right away that it sets within 24 hours. I screwed it in one day and assembled everything on the second day. I tried to unscrew one of the studs, but it didn’t work. Only the thread jams. The sealant is just a plague! Here's how the rear hub turned out
Everything is as simple as Anna’s in the pharmacy))) I screwed it on without fear that I would turn the pin)
They are almost invisible.
At one point I changed the handbrake cable.
I didn't suffer much.
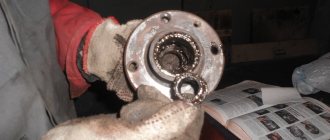
I couldn’t screw the nut, I had to tighten the cable with a rope. Eh, I wish I had a third hand))) I’ve finished with the back, let’s move on to the front. I left the garage and drove backwards so that it would be easier to repair. Someone says (asked, clarified) that the wheels rub when turning, look at the photo anywhere and there is no hint of this. I specially wiped everything with a rag so that it could be seen. The second side is the same. I’m saving space under the photos, it’s bad that you can only put 20 pieces. So much remains behind the scenes, it’s even a pity. So much could be written and shown. In principle, there is nothing simple to describe here. I applied sealant and screwed it in. By the way, I screwed it in and tightened it with two nuts on the stud. Don't wrap your hands.
I screwed the spacers onto small 3 cm bolts with a 13mm wrench.
I wanted to do it differently but changed my mind. I couldn't find the required bolts for a Phillips screwdriver. The idea was this: take a bolt for a Phillips screwdriver and buy small bits. Insert the bits and weld them in place. The idea is not bad, but alas, it is not destined to come true. I see some advantages in this modification. The car on the road moves calmly and does not look for a rut. It takes turns with a bang. Now I go into turns without slowing down the gas. The wheel is very convenient to install, it hangs on the heels and you don’t have to hold it. The disc itself fits onto the hub very tightly, if there were no studs it would hang without them.
Someone asked to show how it was and how it became. It was
So it became
The spacers could have been made 15 mm. They will also enter and will not touch the arch. But this is the limit, if you put more, you need to roll the arch. It was freezing when it started, as you can see from the photos. And when I finished it became warm. And the roads floated along with the asphalt. But this is not worth talking about. Thanks to all! Bye, until new entries.
Issue price: 0 ₽
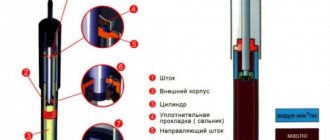
In the case when a car, when fully loaded, or sometimes when partially loaded, touches the wheel arch liners with its rear wheels, we want to lift the rear of the car. There are several ways here. The first is to replace the sagging standard springs with similar ones or reinforced ones. But there is a second option, putting spacers under the shock absorbers. at the same time, the construction length of the shock absorbers actually increases, the connecting dimensions are preserved, that is, the spacer + shock absorbers assembly can be installed in a regular place in the car.
It’s worth mentioning right away about the changes that will have to be taken into account: - you will have to adjust the position of the rear brake pressure regulator, - the direction of the light beams of the headlights; — it is necessary to adjust the pitch angle of the front wheels (caster).
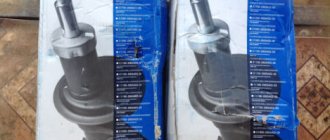
If the first two parameters can be adjusted independently, then the castor will have to be adjusted at a service station, since this is actually the geometry of the wheels and without special ones. devices and equipment are indispensable here. I can say that, in principle, after installing such spacers on a VAZ 2110 car, I made adjustments only for the pressure regulator (sorcerer), adjusted the geometry in accordance with scheduled maintenance, after about 2000 km, adjusted the headlights using a manual hydraulic corrector from the interior. This may not be an ideal option, but it is nevertheless acceptable, especially since the spacers can be installed on a trial basis, that is, for a while. The cardinal method is still replacing the springs, which not only restores the height of the suspension, but also increases the comfort of its operation, well, that’s not what this article is about, so let’s continue. You can probably find spacers for shock absorbers in any car store; their cost is not high, and they look something like the photo below.
Next, we provide information on setting the angles of the front wheels for a VAZ 2110, 2111, 2112, 2170, 2171, 2172 in running order and with a payload of 320 kg (4 people) in the cabin and 40 kg of cargo in the trunk; the installation angles of the front wheels should be in within the following limits:
Installation angles of the front wheels of the car in running order (without driver, passengers and cargo):
It is to these values that the angles should be adjusted after installing spacers under the rear shock absorbers.