Device and purpose
The unit consists of the following parts:
In early Niva models, an intermediate shaft with a rigid connection in the form of a cross was installed. However, in recent years, manufacturers have been installing CV shafts on CV joints. Both types of parts are available in stores. Therefore, it will be useful for the owner of a Chevrolet Niva to know the difference between the shafts on the crosspiece and the CV joint.
In the intermediate shafts on the constant velocity joint, the rigid type connections are replaced with a movable connection. This reduces vibration, slows down wear of parts and ensures smooth acceleration when starting from a standstill. The design of the intermediate shaft on CV joints has the following advantages:
The advantage of a shaft with a cardan is its high strength and reliability. It is capable of transmitting great forces, so for off-road use and other harsh operating conditions it is worth installing a universal joint shaft.
In this case, slight discomfort from vibration is the price to pay for reliability. The factory part number is GM 212302202092000. However, stores offer analogues with different markings from different manufacturers.
The price depends on the design and brand. A shaft with a cardan costs from 2500 rubles, with a CV joint - from 4500 rubles.
Basic hinge malfunctions and their symptoms
The comparative simplicity of the design and the small number of components makes this unit quite reliable and capable of working for a very long time without any intervention. But this hinge also has a drawback - it is very sensitive to contamination.
The working elements of the unit - balls, rollers, grooves along which they move, and needle bearings - have a high degree of surface treatment. And sand and dust have a fairly strong abrasive effect, so when they get inside, they lead to intense wear of the surfaces, which ultimately causes the destruction of the unit.
Rubber boots are used to prevent contamination from entering. So they are the “weak point” of the angular velocity hinge. During the operation of the car, the rubber, constantly in contact with the environment, gradually “ages”, and cracks appear in the boot, through which sand gets into the joint.
In general, this is the only reason why these nodes can break. And since they cannot be repaired, they are replaced.
Note that the appearance of a crunch indicates that the hinge has already received damage that cannot be repaired. There are some measures you can take early on. First of all, you should wash the hinge, apply new grease and replace the boot. Then you can change the sides of the installation (that is, for example, swap the left inner hinge with the right one). Another option is to add small shavings of soft plastic to the lubricant.
But since the component parts have already been damaged, all of the above measures only slightly extend the service life and ultimately the unit will have to be replaced, and it is better to do this before it completely collapses, which usually happens along the way.
From the above, it can be understood that the only way to preserve the hinge is to periodically check the condition of the boot and, if even the slightest damage is detected, immediately replace it. After all, a rubber element will cost much less than a CV joint.
Replacing a CV joint is a relatively simple operation to perform, but there are a number of nuances when carrying out an operation with an external and internal unit. Also, the specifics of the work depend on the design of the hinge.
Next, let's look at how to replace external and internal CV joints using the example of several cars that use different types of drive shafts.
Chevy Niva blower shaft malfunctions
The parts of the shaft gradually wear out under the influence of load, temperature and chemical exposure. The last two factors concern the rubber coupling and boot. These problems manifest themselves as follows:
To troubleshoot problems, it is necessary to check and tighten threaded connections, replace the boot, balance the shaft or replace individual parts. Most of the listed operations require dismantling the industrial shaft. If repair is impossible, all that remains is to replace the assembly part.
Malfunction prevention
In order for this part to last as long as possible, it is necessary to completely eliminate the possibility of dirt and water getting under the rubber cuffs of the CV joint. If there is the slightest damage, this part must be replaced with a new one.
For this purpose, it is better to use original spare parts that are made from high-quality rubber. If you purchase counterfeit cuffs, the procedure for replacing this part will have to be carried out too often.
Another reason why the CV joint often fails is its insufficient fastening to the main gear shaft. If the bolts are not tightened well enough, then over time they begin to unscrew randomly. In this case, the outer CV joint moves significantly away from the shaft, and with a significant gap, knocking noises will be observed in the transmission. If this malfunction is not detected in time and the fastening bolts are not tightened, then in a short time the CV joint will be completely “broken.”
How to change the CV joint and how to determine the malfunction of this part is described in detail in the article. The operation of replacing the CV joint will not take much time, but if you do not want to fix this problem yourself, you can always turn to a car repair shop for help.
Removal and replacement process
The work is carried out using an inspection pit, overpass or lift. To replace the washer you will need the following tool:
You will also need to stock up on the following items:
To remove the intermediate shaft, you must:
Important: you have to knock it out using a beard and a hammer.
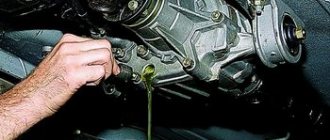
In most cases, the leak can be repaired. You can replace the boot or joint, flexible coupling or spline seal. After this, you need to install the intermediate shaft in place. Don't forget to install new self-locking nuts. These parts cannot be reused - they may come loose due to vibration.
Replacement of external CV joint
Since the external CV joint on all cars is a ball joint, the further sequence of work is almost the same for any model, with the exception of some minor nuances. We will consider dismantling the unit and replacing it on the VAZ-2110 model.
It is noteworthy that CV joints are one of the few components in a car design that do not require pair replacement. That is, if one joint begins to crack, then only replace it; there is no need to touch the rest.
The tools you will need to carry out the work are:
- a set of keys and a set of sockets with a knob and rods (a 30 socket head is required);
- jack;
- mallet or regular hammer with a wooden handle;
- rags;
- steering wheel end remover.
Parts and consumables you will need:
- new hinge;
- new shaft end mounting nut;
- anther;
- clamps (it is better to purchase not tape clamps, but screw clamps);
- “CV joints-4” lubricant or its equivalent (intended for use in constant velocity joints);
https://youtube.com/watch?v=Y5s4cpiwYmw
Next, we will consider the disassembly sequence, and also indicate some tricks that will help carry out the work more quickly. So:
- We place the car on the inspection hole and immobilize it.
- While all the wheels are still in place, take the 30mm head, tear it off and loosen the nut securing the shaft to the hub. This nut is pinned, so unscrewing it will not be easy, since it will require significant force, for which you can extend the wrench with a piece of pipe. On a jacked car with a wheel removed, it will be very difficult to loosen the nut.
- After loosening the nut, jack up the required wheel and remove it.
- To pull the hub off the shaft end, you need to ensure that the stand can move freely. To do this, unscrew the fastening of the ball joint of the suspension arm to the hub.
- Using a puller, disconnect the steering tip from the rack.
- Unscrew the nut completely.
- We grab the brake disc and pull the hub towards ourselves to pull it off the shaft end.
- After the shaft comes out, move it to the side;
- When replacing the outer CV joint, it is not necessary to completely remove the drive shaft, that is, there is no need to pull out the inner joint.
- Next, we dismantle the external assembly itself from the shaft. To do this, we loosen or cut (cut) the clamps, and then pull the boot off the CV joint (you can simply cut it, since it is no longer needed).
- We climb under the car and, using a hammer with an adapter, knock the hinge off the shaft. The blows applied should be of little force, the main thing here is to knock the assembly off the retaining ring, and it will come off the shaft splines themselves even with the force of your hand.
After this, assembly is carried out. First, a new boot is put on the shaft, and then a new hinge is placed on its splines. All that remains is to seat it so that the retaining ring fits into the groove made in the inner race. To do this, we again use a hammer with an adapter and, with gentle blows, press the hinge into place.
We apply lubricant (do not regret it), pull the boot onto the edge of the outer race, after which the rubber element must be slightly squeezed by hand to remove air. All that remains is to fix the boot on the holder and shaft using clamps.
We install the assembled shaft with the new hinge into the hub, attach and tighten the nut until it stops. Next, we put everything back together - install the steering tip, the suspension ball joint, and the wheel.
After removing the car from the jack, tighten the fastening nut with a wrench with an extended shoulder. All that remains is to secure it to prevent spontaneous unscrewing.
Promval Niva Chevrolet, theory
As a rule, when transmission vibrations occur in fields and shnivy, everyone rushes to look at the cardan shafts. There is, of course, some truth in this, except for one remark. In the theory of machines and mechanisms, there is a recommendation: start looking for the cause of vibration either directly from the source of rotation (that is, the engine itself) or from bodies of rotation that have a high angular velocity. Let's go down the chain. The first is the flywheel with clutch. Nothing can happen to it after capitalization or installation, except that when replacing the crankshaft cuff, it could be put in a different position. Next comes the clutch disc, clutch basket, gearbox, centering rubber-metal bushing and finally the Chevrolet Niva flush. The clutch kit consists of metal rotating parts, and, if the manufacturer is of a good level, as a rule it does not produce vibrations. But the hero of this article contains ball joints, a rubber coupling and a spline connection. When the slightest play occurs, vibrations have room to roam. In the vast majority of cases, the rubber coupling is to blame. Yes, it is sold separately, BUT the assembly requires balancing after assembly. There's a dead end here. Even in my native St. Petersburg, there are no companies where this can be done in good quality. The best option is to take a new assembly.
Types of CV joints, their design and operating principle
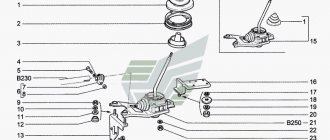
CV joint device: 1. Right front wheel drive; 2. Gearbox; 3. Left front wheel drive; 4. External joint housing; 5. Retaining ring of the hinge cage; 6. 18. Hinge cage; 7. 19. Hinge separator; 8. 17. Hinge ball; 9. Outer clamp of the cover; 10. 15. Protective cover for the hinge; 11. Thrust ring; 12. 14. Left wheel drive shaft; 13. Inner clamp of the cover; 14. Internal hinge lock; 15. 20. Retaining ring of the inner joint cage; 16. 21. Shaft buffer; 17. 22. Internal hinge housing; 18. 23. Axle gear retaining ring.
There are several types of CV joints, but only two are widespread in passenger cars:
- Ball.
- Tripoid.
The design of a ball CV joint includes two cages - an internal one, in the form of a spherical fist (fitted onto the shaft), and an external one (made integral with the shaft end, which is inserted into the hub or gearbox). Between them there are balls placed in special grooves, which are kept from falling out of the hinge by a separator. It is the balls and the grooves along which they move that are the main working elements of the CV joint, since they transmit rotation and allow you to change the angle of one race relative to the other.
To prevent the inner race from coming off the shaft, it is secured with a retaining spring ring located in a special groove on the shaft. The locking ring is also used on the shaft ends of the outer race of the internal joint.
The tripoid joint does not have an internal race; instead, a three-pin fork mounted on the shaft is used. Each cleat on this fork has spherical rollers on needle bearings. Thanks to these rollers, rotation is transmitted, the shaft with the fork can change the angle relative to the cage, and also move longitudinally relative to the outer cage (enter into it), which makes it possible to change the length of the drive.
The connection between the fork and the shaft is splined, but at the same time it fits onto the shaft quite tightly. Additionally, the fork is secured with a retaining ring to prevent it from jumping off.
It is noteworthy that tripoidal CV joints are used only on the gearbox side, but they are not used on the hub side.
Ball joints can be located on both sides. That is, you can find drive shafts on cars with two ball joints, internal tripoid joints and external ball joints, but never with two tripoid CV joints. This is due to the peculiarities of the operation of each of these types of hinges.
It is interesting that some cars (for example, Volkswagen Golf 2) use an internal ball joint of an interesting design - the outer race with the shaft end is not made at the same time, but they are connected to each other by bolts. We'll touch on them a little later.
Promval Niva Chevrolet, specifics
Important. When you install the washer, you will see a centering rubber-metal bushing on the shank of the box. When it is sold counterfeit, it is simply made of rubber. In the factory version, this is a metal sleeve that is rubberized on the outer surface. There should be no loose fit on the shaft. This part, like the clutch fork with boot, changes when replacing the clutch. In the case of a hard hole, this part is structurally absent.
Source
How does the repair work?
- The shaft is clamped in a vice
- The inner and outer clamp of the CV joint is removed
- The cover slides and turns out to protect from dirt
- Using a drift, the hinge of the inner CV joint is knocked out
The same process is done with the hinges located on the outside. After removing the old worn hinge, we proceed to install the new one. But the installation should adhere to certain points:
- Make sure that no dirt gets in while installing new ones.
- Also, when replacing, you should replace all clamps and covers that protect against dirt, since such clamps are disposable. It is also worth remembering that new clamps should be the same as the old ones.
To summarize, it must be said that this replacement procedure on a Chevrolet Niva is quite a troublesome task. If there is a crunching or knocking noise, this does not mean that it is the CV joint that needs to be changed, it could also be the anthers, but if they are not changed in time, this will sooner or later lead to the replacement of this entire mechanism, and this is an expensive operation, so it is better to keep an eye on immediately after their condition and not to bring them to a state of greater wear and tear.
Promval for Niva: which one is better to take for yourself
Are you looking for which one is better to install a washbasin on your Niva? Today we will tell you not only about what kind of exhaust valves there are, but also how to choose an exhaust valve depending on possible malfunctions for any modifications of the Niva.
Content
What is a washout
Before understanding the question of which is the best one to buy for a Niva, let’s understand what this part of the machine’s “organism” is and what task it performs.
The intermediate shaft transmits torque from the gearbox to the transfer case. From there, through the cardans, rotation is transmitted to the front and rear axles. The composition of the product includes a constant velocity joint, an elastic coupling and a small flange.
The coupling dampens jerks in the transmission. The balancing washers from the mounting flange deserve special attention - they equalize the position of the shaft relative to other units.
As for the hinge, which looks like a regular wheeled “grenade,” it is secured to the shaft with a retaining ring. And it is protected from dirt by rubber corrugation. Due to the presence of several generations of transmission parts for the NIVA 2121 car, there are different types of exhaust shafts that are different in configuration, but identical in essence.
Niva 2121 and other versions
The promval for Niva 21213, for a regular SUV, differs in that it is quite short. In the early versions of the car, until about 2009, transmission parts were installed exclusively on crosspieces (including the washer), which gave the domestic SUV an unforgettable vibration, as well as a symphony of sounds, in which the signature howl of the transfer case sounded “first violin”.
There is such a product on sale now:
It remains in the role of a reinforced structure for use in competitions or serious work on poor road surfaces.
Later, accordingly, the crosspieces were replaced with CV joints. For some, this is convenient; for those who like to tackle rough off-road conditions, this design seems less reliable, but from the point of view of ordinary car owners, the Niva car has become a little less noisy and a little more comfortable.
Chevrolet Niva
In the newer, and therefore improved, version of the Russian Niva, the torque from the box is transmitted by a longer shaft. Here, between the coupling and the CV joint, the shaft imparting torque is visible to the naked eye:
Source
Removing the ball joint
This is the next step required to remove the drive. The point now comes down to the fact that it is necessary to ensure the mobility of the steering knuckle, which is now held on the rack, the ball joint of the lever and the steering tip. In order to remove the drive, you need to move the knuckle to the side; in most cases, for this it will be enough to dismantle the ball joint, although, for example, for owners of a Peugeot 307 it will be convenient to unscrew the knuckle from the strut.
It is worth knowing that the design of the ball joint differs depending on the model, for example, on the Peugeot Boxer it is directed downwards, and it is similar on the Peugeot 308.
To dismantle you need to carry out the following operations:
- Loosen the ball joint nut
- I use a special puller (its cost is about 500 rubles in any auto tools store) to press out the support
Next, using a pry bar, press the lever down and, pulling the fist towards you, remove the outer CV joint from the hub.
Note: to make it easier to press the lever, you should unscrew the stabilizer link.
The option described requires less manipulation, but may not be convenient for everyone. Therefore, you can additionally unscrew the bolts securing the fist to the strut, then removing the right drive from the hub will be even easier. There is also the option of not touching the ball joint, but unscrewing the steering end and shock absorber strut bolts. In general, you can choose what is preferable, including unscrewing everything and removing the entire fist.
How to change the washer in the field
I thought today I would share my joy about eliminating vibrations, but... It turned out that I would have to repent and sprinkle ashes on my head.
at 11.00 Ufa time, I ran to my almost native car repair shop to change the CV joint universal joints to the Tirsanov cross-joints that had arrived.
I personally sprayed the crosspieces onto them and carefully wiped off any excess lubricant with a cloth before installation. the master famously installed them, and after jumping into the car with him, we rushed to the track to enjoy the updated tires on the super-Turkish Tirsans. I was jubilant when I left the service. The knocks and backlashes when switching have disappeared. the ride became smoother. But. This is only at low speeds. When we drove out onto the asphalt and I tried to accelerate the shredder, terrible low-frequency vibrations appeared at 40 mph. which, in principle, disappeared with a further increase in speed (more precisely, they did not disappear, but ceased to be felt. They cannot disappear). turned around, back onto the lift. They began to look for the reason, and it seemed to be on the surface: the flanges of the front and rear axles relative to the corresponding flanges were raised up (see the picture in the attachment). there can be no talk of their parallelism. In terms of the experiment, instead of the front cardan, they screwed back the CV joint. and went for a ride again. the situation has improved. There are fewer cardan vibrations. but they still remained. because they simply could not help but stay. (see previous addition “not a lot of driveline theory”). After some thought, I also returned the rear CV joint. something like this. a big, fat hello to the idiot designers who need to be taken out into an open field, placed facing the wall and shot in the forehead. Yes Yes Yes. exactly. These ignoramuses deserve nothing more. Damn, it was necessary to make it so weird. Well, you can drool here for a long time, but it won’t change anything.
In general, the result of the first half of the day was about 3 thousand wasted on work on replacing CV joint driveshafts with Tirsans, and work on the reverse replacement. buying lubricant, bolts, and some other nonsense.
conclusions: you can’t trust anyone. no one at all. I searched through a bunch of forums. with reviews on the topic: how crazy it became when I installed Belcard/Tirsan, everything is finally so super and cool. no vibrations. What kind of broken buckets were the authors driving when, having replaced their collapsed factory universal joints with new reinforced ones, they began to unanimously scream “Hurray! it worked. “This is either outright stupidity or outright lies. or on the fields that came with cardans, the flanges of the bridges and transfer case are still more parallel. All. This is where the final point in debates and discussions is put. You can't fool physics. everything else is either stupidity or deliberate lies. TC.
Clutch and gearbox
These units do not differ from the predecessor Lada 4*4 and come in the same housing. The clutch is a dry type, rotation from the flywheel is transmitted through the driven disk to the sprockets of the variable gearbox.
The gearbox is 5-speed, another important difference from the classic Niva is the mounting under the car body and an extended gear shift drive.
Frequent malfunctions are leakage of gearbox seals, so the gearbox body must be carefully inspected for leaks. If the replacement is not carried out in time, due to oil starvation, the 5th gear, located above the other sprockets, will wear out first.
The 2123 clutch is quite durable, but it is better to trust proven imported brands.
Promval Chevrolet Niva on CV joints reviews
Online Vitaly Yaroshenko, tell me, I bought a new shaft, and on it, or rather on the rubber coupling, there is some kind of tin crimp. I don’t have one like this on mine, so should I install it with this tin or immediately remove it, will it leak at speed and what is it there for anyway, THANK YOU in advance, HAPPY NEW YEAR EVERYONE. I like it Dec 31, 2013 at 06:20 pm|Edit|This is spam|Reply
Vladimir Danilko she pulls the rubber band together) without it it will be difficult to screw the coupling to the box. Screw it on, and then feel free to remove the tin. Happy New Year! Like Dec 231, 2013 at 6:25 pm|Edit|Delete|Reply
Alexander Arzamazov It’s not that you can boldly film it, you MUST film it. Like Jan 1, 2014 at 07:32 pm|Edit|Delete|Reply
Evgeniy Yuminov and if you don’t film it, you’ll hear it yourself)) I like Jan 2, 2014 at 0:49 am|Edit|Delete|Reply
Flush with cross Mi Ma There are 16 messages in the topic
Mi Ma has anyone installed such a flush on 213
Like Jan 18, 2014 at 1:54 pm|Edit|This is spam|Reply
Andrey Kainov Installed. The “proprietary” Nivov vibration of the transfer case increases and the need for more accurate centering arises. In terms of reliability, it is certainly better than a CV joint. Like Jan 18, 2014 at 02:31 pm|Edit|Delete|Reply
Andrey Komarov I broke two CV joints and it’s so indestructible. It really depends on what for. There are more vibrations with him, that's for sure. For shit only him I like Jan 20, 2014 at 0:23 am|Edit|Delete|Reply
Andrey Basynin In a year and a half, he broke 3 CV joints, and we don’t sell shafts separately. In the end, it was almost 4 rubles down the drain. I put it on the crosspiece and I’m glad as an elephant. I spent an hour on alignment, it’s true, but the vibrations ended up being Zero. I like it Feb 1, 2014 at 23 :19|Edit|Delete|Reply
CV joint replacement
Replacing a CV joint depends on which part needs to be replaced, internal or external. Replacing the outer joint or the inner one, in any case, will require removing the axle shaft from the car. Disassembling this part will not take much time, and is usually carried out in the following sequence:
- The front wheel of the car is removed from the side where the repair work will be carried out;
- The wheel hub nut is unscrewed;
- The bolts that secure the outer CV joint to the main drive shaft are unscrewed;
- The axle shaft, together with the inner and outer CV joints, is removed from the car.
After removing the axle shaft, we disassemble it and replace the CV joint.
In place of the dismantled parts, new spare parts are installed, which must be properly fixed on the shaft. Neglecting this rule can lead to rapid wear of the new part, as well as the possible occurrence of an emergency, because a faulty transmission element, when the car is moving, is always subjected to excessive loads that a faulty CV joint may not be able to handle.
Many motorists are interested in the question: how to remove the inner CV joint so as not to damage the axle shaft splines. If it is necessary to replace the internal hinge, then its removal from the shaft must be carried out using a wooden spacer, through which, by lightly tapping with a hammer, this part is knocked out of the retainer.
Removing the inner CV joint
When the installation of the CV joint on the axle shaft is completed, it must be installed on the vehicle in the reverse order of removal. Be sure to thoroughly tighten the hub nut and the outer CV joint bolts that secure this part to the main drive shaft. If necessary, a similar operation is carried out with the CV joint of the other wheel.
Lada 4×4 5D Snow Queen › Logbook › Second Repair: Replacement of the Promval
After one year + five months, that is, almost a year and a half of
quite active but
careful
operation and
51,000
kilometers (and also eight months after the previous repair), the second breakdown of the Niva occurred. Compared to the first breakdown, which, in principle, cannot even be called a breakdown (although if it had not been changed at the time, perhaps the consequences would have been the same), the second one is already more serious - the Intermediate Shaft was “covered”. At first, light vibrations began at a speed of about 30-40 kilometers per hour. No more. And five days later, when I try to start at the Crossroads on a flat road - “crunch ...” and that’s it - not a single speed is engaged. I've already reached the Garage in tow!
So, look at the Video of what happened:
I almost guessed the breakdown. The fact that it was Promval - I realized right away when, even before the breakdown, I was turning the transfer case in Neutral at 5th speed - these were the very same vibrations that were on the move. But I thought that it was the Elastic Coupling that had fallen apart, but it turned out to be a CV joint.
After reading many interesting articles, and listening to a huge number of opinions, which were in almost equal numbers both for the “Sondovsky” Promval “CV-CV joint” and for the Zavodskoy Val, and also for the old-style Promval, which is on the Krestovina, it was decided The decision was made to take the new ShSUR-CV joint shaft. This choice was also made because I have a “Niva-Comfort” subframe installed, which, by the way, made my work easier by “holding” and moving the “Razdatka” on itself and thanks to which it is likely that the new CV joint will also may break minimally.
At the beginning, an overview Video of the new Industrial Shaft “CV joint-CV joint”:
And now a photo of the general view below:
So, replacing Promval. The work was carried out in the Garage on a concrete floor and soft bedding; the height of the Niva was quite enough to carry out all the necessary activities while lying on its back. Using the key “13” we unscrew the Promval from the side of the “Transfer”
Next, use the same Key set to “13” to unscrew the front and rear Cardan shafts from the Transfer Case side:
And again, use the Key “13” to unscrew the fastening of the Rear Cardan Suspension Bearing:
Next, using the same Key, I free the Transfer Case from the Subframe, for which you need to unscrew the six bolts in the places indicated by the green arrow in the photo:
Now with two Keys set to “19” you need to unscrew the 3 bolts on the Elastic Coupling of the Promshaft. You need to unscrew those bolts whose nuts face the “Transfer case”. To prevent the clutch from turning, set the gearbox to First Gear:
Next, pull out the bolts towards the Engine:
Now you can remove the Promshaft by moving the Transfer Case as far back as possible. Moreover, the “Razdatka” itself remained lying on the “Stretcher”. Those who don’t have it simply remove the “Razdatka” itself.
Next you need to remove the Fluid Valve Flange. I tried it myself first with the head: I fixed the gearbox in First Gear - it didn’t help, the “Box” was turning. Then I tried to fix the Flange with a screwdriver - the knife did not help, the screwdriver began to bend:
Realizing that if you “squirm” further, the head may break, I took a 30mm spanner with a round end:
Let’s replace the bent screwdriver with a more powerful “lock” and with a “jerky” force of the legs we somehow managed to unscrew it:
Source
Promval 21213 and its alternative
The trophy raid ended with a technical failure for us.
Breakage of the intermediate shaft of our Niva. The technical meeting took place on May 3. We got home in the evening, and it was just brutal. We realized about the leak later, but it looked like this: you’re driving along, and suddenly the traction disappears. In general, the gear is engaged, the engine is running, everything is as usual, but you are standing still. It's like the transfer case is in neutral. So it is, the moment from the box to the RK goes through the groove, and at the junction of the donut and the flange it began to turn. Somehow we got out of the forest onto the highway, 170 km to the city. We started, drove more or less 4th gear for 100 km, trying not to breathe. After 100 km the connection began to disappear. Stop, play with gears, drive slowly. Until at some point they were no longer able to go. The house is 60-70 kilometers away. The navigator, but in fact an excellent pilot, and a friend suggested an option. The steering wheel was loosened on the mounts and pushed forward as far as possible towards the checkpoint. Somehow the wash-out caught a snag, and we quietly paddled home at 50 km/h. And about the trophy raid itself. The breakdown resulted in a study of the device and a debriefing of the flight. It turned out that 21213 uses a CV joint shaft. The CV joint is practically the same grenade as on the wheel drives. The advantage of a CV joint shaft is reduced vibration and greater comfort. At the same time, the 21213 industrial shaft has a stated disadvantage - less reliability compared to the industrial shaft based on crosses as in the 2121 fields. I will remember this for the rest of my life
Transmission vibrations
This definition does not exist in mechanics, let it be a “popular name”. These vibrations can be divided into two large groups.
- First order. These are poorly balanced or broken cardans, shafts and, of course, wheels. We will not consider this group as a completely “children's version”.
- Second order. This is something that we cannot “notice” when installing a spare part on a car. The most striking example is the flanges of the transfer case and gearboxes, as well as the output flange of the gearbox (helicopter). But these vibrations are noticed by our vestibular apparatus; this is the case when you get out of the car, and your head “floats” as if after a sea motion.
Lada 4×4 3D Owlet › Logbook › Flush shaft, elastic coupling, vibration (part 1)
The shaft shaft (or as it is correctly called “intermediate cardan shaft” 21213-2202010) is a legendary Niva part that causes problems for most nivavods. So this trouble befell me. In the spring of 2021, with a mileage of about 46 thousand km, vibration began to bother me at speeds of 80 km/h. Or rather, not so much a vibration as an incomprehensible rattling
from under the dashboard in the glove compartment area (only recently I discovered that this is
created by the passenger seat adjustment bracket
). I crawled under the car: the coupling was all cracked, in one place it was almost completely torn. The shaft was original with a “round” coupling 2101; there were (balancing?) plates on two of its fastening bolts. There were no spacers under the transfer case, and it stood a little diagonally (judging by the marks on the anticorrosive, it looks like it was centered). The CV joint had a slight play, so it was decided to change the shaft assembly (in the hope that it was balanced at the factory). I bought it, it seems, from a trusted online auto store, “original AvtoVAZ.” It immediately aroused my suspicions: no packaging, no balancing plates or grooves, the donut is crooked, the rubber is clumsy, it looks like plastic. But the seller assured that this was the original. There was no choice.
It was before the May weekend, which I wanted to spend at the dacha. And since there is no hole, I decided to go to the service center at the car dealership in the regional center. It seems that the price of the work is adequate, and in the region, craftsmen deal with Nivas more often and know the nuances... yeah, right... The master tinkered around for four hours, removing the cardan shafts and transfer case. And then, without centering, I put it in the same place, following the marks on the anticorrosion. The price of the work is 3000 rubles. Upon departure, I discovered that the vibration and rattling had gone away, but some new rattling sound had appeared (as if a washer was rotating somewhere on a shaft). I went to take a look: I didn’t find anything, I just washed the shaft spinning a little tighter (apparently, the CV boot was limiting the bending, or maybe the CV joint itself was tight...). Then the chirping disappeared. I went to Moscow, went to work for a week, and went to the dacha on Friday evening. I drove 10 kilometers from the city, smoothly accelerating after the traffic lights... At a speed of 70 km/h I heard a loud rubber “thump” on the bottom. At the same time, the behavior of the car did not change until I accelerated to 80. Then the transfer case began to shake so much back and forth that it seemed to have come off completely. I reached the wide shoulder, from 40 km/h. and below there is also a wild vibration: the car rattles like a bucket of bolts. I changed into work clothes and crawled under the car with a flashlight (at that time I didn’t know that you could inspect the washout from the interior by removing the tunnel panel and the lever boots
). Amazing: the donut fragment is completely missing, now it’s like the letter “s”... I’m sitting in the car, it’s 10:00 p.m., it’s getting dark... Should I go back or forward (more than 250 kilometers)? It’s decided: forward and only forward! I googled 24-hour auto stores and services along the way: yes, not a lot. I drove steadily in the speed range of 42-78 km/h. I stopped at a convenience store at the crossroads in Lukhovitsy, not particularly hoping for success. “Is there a flush clutch on the VAZ 21214?” and the sleepy guy: “Uh... What shaft?” He showed with his fingers what it is and what it looks like. About 10 minutes later I brought a “square” bagel 2123 from Balakovo for 700 rubles. At that time I was not yet interested in bagels and did not know about their properties and interchangeability, but based on the size I realized that it would be suitable. It looks high-quality and elastic, but expensive (but then I looked: the price is even lower than in Moscow).
Having perked up, I drove on... and got there! That was the first time I became convinced that Niva would always take you there, no matter how bad she was! I called that service and outlined the result of their work, which took a week and 500 kilometers. The next day , before driving, it somehow occurred to me to loosen the nuts securing the transfer case supports and drive a little
.
And this helped to drive quite comfortably, there were even practically no vibrations. Why didn’t I do that on the track?! In general, again four hours of poking around, the surprised face of the receptionist: “How did you even drive so many kilometers?!” I was ready to shell out three again, because the spare part was mine. But then I was surprised when the receptionist said that it’s a mistake, they work for free, they wouldn’t even take money for the coupling. I thought why I gave my own, but they would have installed the “round” one again and who knows what quality, but this one looks more reliable. I only paid 700 rubles for the alignment of the transfer case. In general, of course, respect to the service that they themselves recognized the warranty case, despite the fact that this was most likely a defective part. But I’ll try not to go to this service again... I didn’t notice any difference in vibrations with clutch 2101 and 2123.
Source
Checking the serviceability of the cardan transmission on the car
Check the driveline from underneath the vehicle while it is on a lift or inspection ditch. The gearbox and transfer case must be in neutral. Check the tightness of all threaded connections, the condition of the hinges and the rubber mass of the elastic coupling of the intermediate shaft (by external inspection).
1. Grasp the shaft near the joint being tested with both hands. Using short, sharp movements, rock each driveshaft in directions perpendicular to its axis. No noticeable play in the hinges is allowed.
2. Repeat the check for all universal joints.
3. Using short sharp movements, turn the propeller shaft around its axis in both directions, holding the universal joint yoke-flange from turning. Perceptible circumferential gaps are not allowed.
4. Repeat the check on the remaining universal joints.
Lada 4×4 3D Adventure time ⌚ › Logbook › Vibrations defeated. Refusal of the double CV joint. =)
Continuation of a story
. After installing the double CV joint and the third transfer case support, I encountered several problems.
The first is an incomprehensible ringing sound similar to the ringing of a flange mud ring, which only appears under load (you pick up speed). I checked all the flanges - the rings are not loose. Only at the transfer case on the side of the shaft it moved, but it sat tightly. And then I noticed that the distance between the body and the third support of the transfer case is small.
When picking up speed, the units shifted and the transfer case hit the body, the blows were transferred to the ring and it rang. The problem was solved by increasing the gap between the body and fixing the mud ring.
The second and main problem is vibration. No matter how strange it may sound when talking about installing a double CV joint. )) In the city cycle, up to 4th gear, up to 60 km/h, everything is fine, it’s very pleasant to drive. You go out on the highway, turn on fifth and there is a strong vibration. And after some time, even in 4th at speeds of 60 km/h, vibration.
With a double-CV joint, aligning the transfer case relative to the gearbox is not difficult; deviations are clearly visible. Therefore, they stood relatively coaxially. Not ideal, but the angle of deviation was not large at all. For the CV joint it should not be critical at all.
I took off the transfer case and removed the new gearbox flange to install the oil seal (without shortening the secondary shaft). I thought that was the problem. I have seen reviews online that they are not sharpened smoothly. I measured it - the flange is straight, there is no runout.
I can assume that the cause of the vibrations was one of the CV joints. I used CV joints from my two “classic” shafts with elastic couplings. They both stood and worked fine. I currently do not have the opportunity to buy new CV joints or a double CV shaft assembly.
I decided to return to the classic scheme - a flush with an elastic coupling. But in order for everything to be fine, I checked the planes of the “helicopters” from the side of the shaft and the gearbox flange. On the side of the gearbox flange, one of the sides was deflected (less than 1mm). Perhaps it was bent when the distributor was removed/installed (in the summer, after replacing the gearbox secondary shaft oil seal, vibration appeared).
From the side of the washout, the “helicopter” was relatively level. I have two of them from two industrial shafts. We sharpened all the parts so that there was no beating.
There were two elastic couplings available: classic 2121 (Balakovo) and “shniva” 2123 (STAF). I checked the elastic planes. Everything is fine with the classic Balakovskaya. The Shnivovskaya one has deviations (less than 1mm; many people have complaints about STAF). In the end I decided to put on the classic one. Firstly, it is smooth, and secondly, it is softer. The fact that it is softer is both a plus and a minus.
I assembled the washout and removed the third support. I had a negative experience with the third support when working in tandem with a blower shaft on an elastic coupling (the transfer case stops swinging - this is good, but additional vibrations appear on the body - bad).
I assembled everything and installed it. I didn't really center the transfer case. Cardan shafts on CV joints allow you to neglect this. I checked it in the garage - there are no vibrations. I went to the city and it was great too. I drove to the gas station. I went out of town and everything was great on the highway too. I'm happy.
There is no desire to buy CV joints and experiment again now. Therefore, I decided to sell a kit for assembling a double CV joint. The shaft is short (so as not to cut the secondary shaft) and the gearbox flange is extended with 23 splines. Production "Taya". I'll give you back for what I paid. If anyone is interested, write in a personal message.
Source