Generator VAZ 2106: purpose and functions
A car generator is a small electrical device whose main task is to convert mechanical energy into electrical current. In the design of any car, a generator is needed to charge the battery and feed all electronic devices while the engine is running.
Thus, the battery receives the necessary energy for engine operation from the generator, so we can say that the generator is an indispensable attribute in the design of any car.
The generator's task is to ensure uninterrupted operation of all electrical systems of the machine and the battery.
How exactly does the generator work on a VAZ 2106? All processes of energy conversion from mechanical to electrical are carried out according to a strict scheme:
- The driver turns the key in the ignition.
- Immediately, the current from the battery through the brushes and other contacts enters the excitation winding.
- It is in the winding that the magnetic field appears.
- The crankshaft begins to rotate, from which the generator rotor is also driven (the generator is connected to the crankshaft by a belt drive).
- As soon as the generator rotor reaches a certain rotation speed, the generator enters the self-excitation stage, that is, in the future, all electronic systems are powered only from it.
- The generator performance indicator on the VAZ 2106 is displayed in the form of a control lamp on the dashboard, so the driver can always see whether the device has enough charge for full operation of the car.
Read about the design of the VAZ 2106 instrument panel: https://bumper.guru/klassicheskie-modeli-vaz/elektrooborudovanie/panel-priborov/panel-priborov-vaz-2106.html
Standard device for the "six"
Design of the G-221 generator
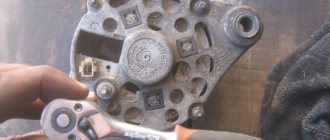
Before talking about the design features of the VAZ 2106 generator, it should be clarified that it has unique clamps for mounting on the engine. On the body of the device there are special “ears” into which studs are inserted and tightened with nuts. And so that the “ears” do not wear out during operation, their internal parts are equipped with a high-strength rubber gasket.
The generator itself consists of several elements, each of which we will now consider separately. All these devices are built into a light-alloy cast housing. To prevent the device from overheating during long-term operation, the case has many small holes for ventilation.
The device is securely fixed in the engine and connects to various car systems
Winding
Due to the fact that the generator has three phases, windings are installed in it immediately. The purpose of the windings is to generate a magnetic field. Of course, only special copper wire is used for their manufacture. However, to protect against overheating, the winding wires are covered with two layers of heat-insulating material or varnish.
Thick copper wire rarely breaks or burns out, so this part of the generator is considered the most durable
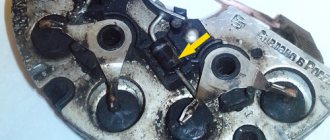
Relay regulator
This is the name of the electronic circuit that controls the voltage at the output of the generator. The relay is necessary to ensure that a strictly limited amount of voltage reaches the battery and other devices. That is, the main function of the relay regulator is to control overloads and maintain an optimal voltage in the network of about 13.5 V.
A small plate with built-in circuitry to monitor the output voltage
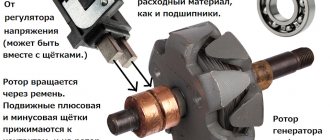
Rotor
The rotor is the main electric magnet of the generator. It has only one winding and is located on the crankshaft. It is the rotor that begins to rotate after the crankshaft starts and gives movement to all other parts of the device.
The rotor is the main rotating element of the generator
Generator brushes
The generator brushes are located in brush holders and are needed to generate current. In the entire structure, it is the brushes that wear out the fastest, since the main work of generating energy falls on them.
The outer side of the brushes can quickly wear out, which is why there are interruptions in the operation of the VAZ 2106 generator
Diode bridge
A diode bridge is most often called a rectifier. It consists of 6 diodes that are placed on a printed circuit board. The main job of a rectifier is to convert alternating current into direct current to maintain stable operation of all electronic devices in the car.
Due to its specific shape, drivers often call the diode bridge a “horseshoe”
Pulley
The pulley is the driving element of the generator. The belt is tensioned simultaneously on two pulleys: the crankshaft and the generator, so the operation of the two mechanisms is continuously interconnected.
One of the generator elements
Voltage regulator
Using a voltage regulator, a certain value is maintained on the excitation winding. Today, most generators are equipped with an integrated relay-regulator. It is worth noting that there can be two designs of relay regulators: a hybrid one, in which radio-electronic components are used, such as zener diodes, resistors, capacitors, and an integral design, in which all the elements included in the relay regulator are made on one semiconductor wafer . This is the main element that makes up the VAZ-2106 generator. The semiconductor connection diagram is given in the article.
At the output of the generator, a voltage that is stable in value is generated, regardless of the frequency with which the crankshaft rotates, as well as what load is applied to the engine. Stabilization is fully automatic and requires no intervention from the driver. Using the regulator, the voltage is changed, which is supplied to the battery to charge it. Therefore, it is important to know how to connect a VAZ-2106 generator. The connection diagram for its elements will be useful to all owners of this car.
Technical characteristics of the VAZ 2106 generator
The “six” comes from the factory with a G-221 generator, which is classified as a synchronous alternating current device. The device is fixed to the engine on the right side, but it can only be adjusted or changed from under the body, since it is difficult to get to the generator from above due to the presence of many hoses, devices and instruments.
The nominal voltage of the G-221 corresponds to the voltage of a typical VAZ battery - 12 volts. The generator rotor rotates to the right (when viewed from the drive side), since this feature is due to the position of the generator relative to the crankshaft.
The maximum current that the VAZ 2106 generator is capable of delivering at a rotor speed of 5000 rpm is 42 amperes. Power indicator - at least 300 watts.
The device weighs 4.3 kilograms and has the following dimensions:
- width - 15 cm;
- height - 15 cm;
- length - 22 cm.
Standard device for equipping all VAZ 2106
Checking and replacing the regulator
Before starting to diagnose the condition of the voltage regulator, it is recommended to charge the battery. To do this, remove it and, unscrewing the plugs of all compartments, let it charge from the mains for several hours. Monitor the charge level using the indicator on the charger.
After this, install the charged battery on the VAZ 2106 car and start the engine. Using the choke handle, set the engine speed in the range of 2500-3000 rpm. All consumers of electrical energy must be turned off; even the operation of LED running lights is not allowed.
Using a wide-scale voltmeter (can also be used with a digital indicator), measure the voltage at the battery terminals. The voltage value should be approximately 14.2 V. A deviation up or down is allowed, but not more than 0.1 V. If the deviation is significant, the relay-regulator must be completely replaced immediately. Just remember to check the following immediately before starting diagnostics:
- the alternator belt has normal tension;
- The VAZ 2106 regulator body has reliable contact with the car body.
If there are any shortcomings, they must be eliminated by adjusting the belt tension or tightening all the nuts that secure the regulator relay to the body. To replace the VAZ voltage regulator, you will need to perform the following steps:
- Unscrew 2 nuts from the studs;
- mark all the wires with a marker so as not to confuse them later;
- disconnect the wires from the voltage regulator;
- remove the old regulator and install a new one in its place;
- connect the wires according to the diagram;
- tighten the nuts.
The electronic voltage regulator of the VAZ 2106 is one of the components of the “six” electrical equipment system. Its functions are to constantly change the generator current in automatic mode in accordance with the generated voltage mode of the generator and maintain these parameters in the set mode.
What generators can be installed on the “six”
Structurally, the VAZ 2106 is ready to install a generator not provided by the manufacturer. The question arises: why change the “native” G-221 at all? In fact, for its time, this generator was the optimal device, since Soviet Zhiguli cars used a small number of electrical appliances.
However, over time, the VAZ 2106 began to be equipped with more modern devices, each of which requires “its share” of energy . In addition, drivers connect navigators, cameras, pumps, powerful audio systems and other devices to the battery, which makes it difficult for the generator to generate the required amount of current.
Therefore, car owners began to look for equipment options that, on the one hand, would allow all the equipment in the car to operate in normal mode and, on the other hand, would have an optimal effect on the battery life.
Today the following types of generators can be installed on the VAZ 2106:
- G-222 is a generator from the Lada Niva, which is designed for higher loads and produces 50 amperes of current. The G-222 design already has its own regulator relay, so when installing it on a VAZ 2106, the relay will need to be removed.
- G-2108 can be installed on both “six” and “seven” and “eight”. The device in normal operation produces 55 amperes of current, which even by modern standards is quite enough for the functioning of all electronic devices in the car. The shape and fasteners of the G-2108 are identical to the standard G-221, so there will be no problems with replacement.
- G-2107–3701010 produces 80 amperes and is intended for lovers of high-quality acoustics and additional electronic devices in the car. The only caveat: the generator for the VAZ 2106 will have to be slightly modified, since the regulator relay is not suitable for this model.
Photo gallery: generators that can be installed on the VAZ 2106
The device from Niva has good traction
The generator from the G8 is considered a more modern unit
The most productive device in VAZ equipment
Find out about the repair of VAZ 2106 units: https://bumper.guru/klassicheskie-modeli-vaz/poleznoe/remont-vaz-2106.html
Thus, the driver of the “six” can decide for himself which generator can be installed on the car. The choice ultimately depends only on the power consumption of the car.
troubleshooting
To accurately determine the source of the problem with the generator, you need to perform a basic check. If you do not have “additional” energy consumers, you can immediately look for generator faults; if there are any, turn them all off for a while. Moreover, do not turn it off, but simply disconnect it from the car.
Test plan:
Measure the current output on a cold car, when it is not running and all its life support systems are turned off. It will be ideal if there is no return at all. But this happens extremely rarely. On almost every VAZ 2110, somewhere due to insufficient contact, local short circuit, etc. there is still a small return
But - just a small one, and not one in which the battery can run out during a night of parking; If everything is normal, there are no current leaks, or they are negligible, the battery is not discharged, reconnect all those devices that you (no matter, independently or with the help of hired specialists) installed on your car on your own initiative. Repeat the same check
If it turns out that current is actively leaking, it means that the reason is not in the battery and is not related to the generator; it is the device not provided for by the designers of the VAZ 2110 that is to blame; But if even then no kickback is detected, we proceed to a thorough examination of the generator. And here there are many possible malfunctions: there is not enough contact between the brushes and the rotor rings; there is a break in the field winding; an interturn short circuit is possible directly in the field winding coil. At the same time, the generator heats up and hums; the field winding may short-circuit to the rotor housing; breaks can also occur in the stator phase winding; the stator can short-circuit to the housing; Possible short circuit of the “plus” to the housing; can break through diodes in the rectifier unit; Mechanical failures are also high on this list.
Now let's look at all of the above generator malfunctions in more detail.
Generator connection diagram
Being an electronic device, the generator needs to be connected correctly. Therefore, the connection diagram should not cause double interpretation.
A schematic diagram of exactly how the G-221 is connected to a VAZ 2106 can be viewed here.
All components of the circuit are as clear as possible, so no separate explanation is required
Many car owners wonder when replacing a generator where which wire should be connected. The fact is that the device has several connectors and wires, and when replacing, you can easily forget which wire goes where:
- orange is not useful for connection, it can be left as is, or connected to gray directly to autostart the car;
- a gray thick wire goes to the brushes from the regulator relay;
- a gray thin wire connects to the relay;
- yellow - coordinator of the control light on the control panel.
Thus, when working independently with the G-221, it is better to sign the meanings of the wires so as not to connect them by mistake later.
The most difficult thing about working with a generator is connecting it correctly
Generator malfunctions on VAZ 2106
Like any other mechanism in a vehicle, the “six” generator can work incorrectly, break down and fail. However, cases of unexpected breakdowns are extremely rare, since the driver can always track the occurrence of a “disease” by noticing its first signs.
The charging indicator light came on
There is a lamp on the instrument panel that indicates the functionality of the generator. It can blink or stay on continuously. In any case, the activation of this indicator is considered the first signal of a malfunction in the generator.
| Cause of malfunction | Remedies |
| Slipping of the generator drive belt Break in the connection between plug “85” of the charge warning lamp relay and the generator The battery charge warning lamp relay is misregulated or damaged Break in the power supply circuit of the excitation winding The voltage regulator is misaligned or damaged Wear or freezing of the generator brushes; oxidation of slip rings Open circuit or short circuit to ground of the excitation winding of the generator Short circuit of one or more positive diodes of the generator Open circuit in one or more diodes of the generator Open circuit in the connection between plugs “86” and “87” of the charge control lamp relay Open circuit or interturn short circuit in stator winding | Adjust the tension of the generator belt Check and restore the connection Check the relay, adjust or replace it Restore the connection Clean the contacts, adjust or replace the voltage regulator Replace the brush holder with brushes; wipe the rings with a rag soaked in gasoline Attach the winding leads to the slip rings or replace the rotor Replace the radiator with positive diodes Replace the generator rectifier unit Restore the connection Replace the generator stator |
Battery won't charge
The generator can work, but the battery is not charging. This is the main problem of the G-221.
| Cause of malfunction | Remedies |
| Weak tension of the generator belt: slipping at high speeds and when the generator is running under load. The fastening of the wire lugs on the generator and battery is loose; battery terminals are oxidized; Wires are damaged Battery is faulty Voltage regulator is misaligned or damaged | Adjust the tension of the generator belt Clean the battery terminals from oxides, tighten the clamps, replace damaged wires Replace the battery Clean the contacts, adjust or replace the regulator |
Find out how to start a car with a dead battery: https://bumper.guru/klassicheskie-modeli-vaz/poleznoe/kak-zavesti-mashinu-esli-sel-akkumulyator.html
The battery is boiling over
If the generator connection is poor, there may be a problem with the battery.
| Cause of malfunction | Remedies |
| Poor contact between ground and voltage regulator housing Voltage regulator is misaligned or damaged Battery is faulty | Restore contact Adjust or replace voltage regulator Replace battery |
The generator is very noisy
The device itself should make sounds during operation, since the rotor is constantly rotating. However, if the operation sound is extremely loud, you need to stop and find out what's wrong.
| Cause of malfunction | Remedies |
| The generator pulley nut is loose The generator bearings are damaged Inter-turn short circuit of the stator winding (generator whine) Brush creaking | Tighten the nut Replace the bearings Replace the stator Wipe the brushes and slip rings with a cotton cloth soaked in gasoline |
Modifications
Switching diagram for electric windows of the front doors
1 - main fuse block; 2 — relay for turning on electric windows; 3 — left door power window switch; 4 — right door power window switch; 5 — gear motor for the right door electric window; 6 — gear motor for electric window lifter of the left door; 7 - additional fuse block; 8 — ignition switch; A - to terminal “30” of the generator; B - to the instrument lighting switch; B - conventional numbering of plugs in the gear motor block.
Carburetor solenoid valve control circuit
1 - ignition switch; 2 - generator; 3 - battery; 4 — ignition coil; 5 - switch; 6 — control unit; 7 — carburetor solenoid valve; 8 — carburetor limit switch.
Engine cooling fan motor
1 - generator; 2 - battery; 3 — ignition switch; 4 - main fuse block; 5 — electric fan activation relay, 6 — electric fan activation sensor; 7 — electric fan; 8 - additional fuse block
When repairing a VAZ 2107 car generator, you will need this generator set diagram and a detailed current path in the field winding circuit.
1. Battery. 2, 5. Basic rectifier semiconductor diodes. 6. Generator stator winding coils. 7. Semiconductor integrated voltage regulator (charging relay). 8. Excitation winding (rotor) of the generator. 9. Noise filtering capacitor. 10. Mounting block (relays and fuses). 11. “Battery charging” indicator lamp. 12. Voltmeter (on-board voltage indicator). 13. Ignition relay (ignition switch relay). 14. Ignition switch.
Current path of the excitation winding with the ignition on and the engine not running: Terminal “+” of the battery – pink wire – terminal “30” of the generator – pink wire – contact “1” of connector “Ш10” of the mounting block – internal current-carrying tracks of the mounting block – contact “4” » connector “w1” of the mounting block – brown wire – pin “30” of the ignition relay (installed under the dashboard) – closed contacts of the ignition relay – pin “87” of the ignition relay – black and blue wire – pin “6” of connector “w1” of the mounting block – fuse “pr 10” of the mounting block – contact “1” of connector “w 4” of the mounting block – orange wire – contact “4” of the instrument panel connector (black) – conductors and conductive tracks of the instrument panel – contacts of the “battery charging” warning lamp holder - filament of the "battery charging" lamp - socket contacts - instrument panel conductive tracks - contact "2" of the instrument panel connector (white) - white-brown wire - contact "3" of the mounting block connector "w5" - internal conductive tracks of the mounting block - contact “7” connector “Ш10” of the mounting block – white-brown wire – terminal “61” of the generator – connecting bus for additional rectifier diodes – short conductor – charging relay terminal – internal semiconductor junctions of the charging relay – first brush – first contact ring of the rotor – generator excitation winding – the second contact ring of the rotor – the second brush – the “minus” contact – car body parts – the “-” terminal of the battery.
How to check the generator
Checking the functionality of the device will give the driver confidence that it is working properly and there is no cause for concern.
It is prohibited to check the generator on a VAZ 2106 when it is disconnected from the battery while the engine is running, as a voltage surge is possible. In turn, instability of operation can damage the diode bridge.
Checking the functionality of the generator can be done in various ways. The most common are:
- checking with a multimeter;
- at the stand;
- when using an oscilloscope.
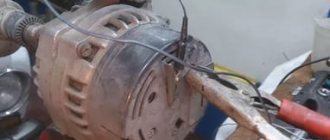
Self-check with a multimeter
This technique is the simplest and does not require special devices or extensive knowledge of how the car works. However, it is necessary to purchase a digital or indicator multimeter, and also enlist the help of a friend, since the test involves the work of two people at once:
- Set the multimeter to DC measurement mode.
- Connect the device to each battery terminal in turn. The voltage should be between 11.9 and 12.6 V.
- The assistant should start the engine and leave it idling.
- At this time, the measurer must carefully monitor the multimeter readings. If the voltage in the network drops sharply, it means that the generator is not working fully, or its resource is not enough to charge.
- If the indicator is more than 14.5 V, the driver needs to know that such operation of the device will in the near future lead to the boiling of the battery.
The fastest way to find out what condition the generator is in
Testing at the stand
The check is carried out on a computer stand by service station specialists. In this case, the generator will not need to be removed from the car, since the computer is connected to the device through special probes.
The stand allows you to simultaneously check a working generator in all respects with high accuracy. Current performance indicators will be displayed on the computer screen, so the car owner can determine the “weak” points of his generator in real time.
The computer immediately determines all the operating parameters of the device
Checking with an oscilloscope
An oscilloscope is a device that reads basic voltage readings and converts them into waveforms. The device screen displays curved lines, from which a specialist can immediately identify defects in the operation of the generator.
The device can be used to check the functionality of any device
Diagnosing charging relay faults
- Worn generator brushes. If the length of the generator brushes of the VAZ-2106 car becomes insufficient, the charge may be lost. When diagnosing a malfunction, you should first carefully check the condition of the brushes in the generator. Their length should not be less than 12 millimeters. If it does not meet the minimum requirements, then they need to be replaced.
- The diode bridge of the generator does not work. Failure of one or more elements of the rectifier unit may cause a charging malfunction. You should use a tester to check the serviceability of all diodes.
- Circuit breakers. If there is no charging current in the VAZ-2106 car, it is worth checking the fuses. If a burnt one is found, it should be replaced.
- Alternator belt and its tension. The generator belt is made in the shape of a wedge, so it is bursting between the cheeks in the pulley. When the pulley wears out, the generator belt may slip in the cheeks. Because of this, charging problems sometimes occur. In this case, it is necessary to immediately replace the generator pulley and belt.
- Battery terminals. If there is oxidation on the battery terminals, it may prevent the battery from charging. In this case, you should clean the terminals with soda dissolved in water. This product can remove plaque. After completely cleaning the terminals from oxidation, wipe them well with a dry cloth and then lubricate them with thick lubricant.
How to remove, disassemble and repair a generator on a VAZ 2106
The G-221 generator on the “six” cannot be called a simple device. Therefore, in order to carry out certain repair work, careful preparation will be required, since you will have to first remove the device from the car and then disassemble it.
Removing the generator from the car
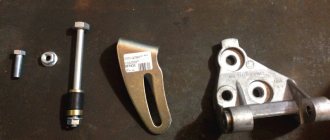
To quickly and safely remove the G-221 from the machine, it is recommended to prepare the tools in advance:
- open-end wrench 10;
- open-end wrench 17;
- open-end wrench 19;
- mounting blade.
Of course, it is easiest to work with a cooled engine, so you need to let the car sit for a while after the trip.
The generator is held on by two long pins
The process of removing the generator is carried out according to this scheme:
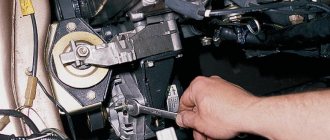
- Loosen the lower generator fixing nut. Then loosen the nut on the other stud.
- Remove the nuts along with washers.
- Move the generator slightly forward (relative to the engine).
- This movement will allow you to easily remove the belt (first from the generator pulley, then from the crankshaft pulley).
- Remove the wires from the terminal.
- Disconnect the wire from the winding plug.
- Remove the wire from the brush holder.
- It is immediately recommended to label the wires by color and connection location, since problems may arise when reinstalling the generator.
- Next, unscrew the nut from the stud of the lower mounting of the generator.
- Remove the generator from the studs.
Video: dismantling instructions
Disassembling the generator
After the device has been dismantled, it must be disassembled for subsequent repairs. To do this, let's change the set of tools:
- open-end wrench 19;
- socket wrench 19;
- ratchet (you can add an extension);
- head at 8;
- head at 10;
- small hammer.
It is recommended to put small parts in separate containers so as not to lose them.
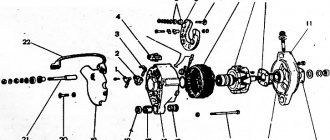
Next, if necessary, you can lightly clean the device body from dirt and begin disassembling:
- Unscrew the four fastening nuts on the back cover.
- Using a 19mm wrench, unscrew the pulley mounting nut (to do this, you will need to carefully fix the generator in a vice).
- After this, you can separate the device into two parts. If the halves are jammed, you can lightly tap them with a hammer. As a result, two equivalent parts should remain in your hands: a rotor with a pulley and a stator with a winding.
- Remove the pulley from the rotor.
- Pull the key and key out of the housing cavity.
- Next, pull the rotor itself along with the bearing towards you.
- The other part of the generator (stator with winding) is also disassembled into parts; you just need to pull the winding towards you.
Video: disassembly instructions
After disassembly, it is necessary to clarify which element of the generator needs to be replaced. Further repairs are not particularly difficult, since all components of the generator are interchangeable and can be easily removed/put on.
Correct repair and replacement of the device
Maintenance is carried out in a garage, even if the driver does not have much experience in car mechanics. First you need to turn off the engine and remove the terminals from the battery. Further repairs involve carefully removing the two nuts of the regulator itself using an “8” wrench. As soon as the device comes out of the grooves, you must smoothly disconnect the 2 wires.
It is recommended to inspect the generator pulley and its housing for signs of mechanical damage or short circuit. If there are any, then there is no point in repairing it. Firstly, it will take a lot of time, and secondly, the battery charging process will not be complete. In this case, it is more advisable to purchase a new regulator.
It is attached to the mudguard and secured with 2 bolts. The following recommendation will help you correctly connect the generator to the VAZ: the orange wire is connected to output No. 15, and the gray wire to output 67. The VAZ 2106 generator connection diagram, which should be at hand, will help you avoid getting confused here. You must use the option supplied with your passport. He will tell you in detail how to connect the generator.
Before turning the key in the ignition switch, it is imperative to make sure that the contact between ground and housing 2101 is reliable. If this is not done, the service life of voltage regulator 2101 will be short-lived. Excessive charge will literally burn the device.
Analogues or original spare parts? There is no consensus among drivers about which parts are best to use. The cost of a new voltage device is about 100 rubles, and connecting the generator itself does not require professional skills. Despite this, it is better not to take risks, because uncompensated power surges will damage all the electronics in the car.
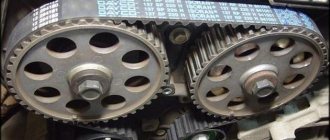
Generator belt
Of course, the G-221 will not work without a drive belt. The belt for the VAZ 2106 generator is 10 mm wide and 940 mm long. It is wedge-shaped and toothed in appearance, which allows it to easily cling to the teeth of pulleys.
The belt resource is designed for 80 thousand kilometers.
The belt is made of high-strength rubber and is designed for a long period of operation.
How to tighten a belt
Tensioning the alternator belt after installing it is considered the final stage of work. For fast and high-quality work, you will need to comply with the factory tension regulations:
- Loosen the self-locking nut (on the top of the generator).
- Loosen the lower generator fixing nut.
- The body of the device should move slightly.
- Insert a pry bar between the generator housing and the pump housing.
- Move the pry bar to tighten the belt.
- Without releasing the mount, tighten the self-locking nut.
- Then check the belt tension.
- Tighten the bottom nut.