Installation of parking sensors on a grant of 8 sensors
Having passed TO2, I decided to further improve the car. The first in line was the parking sensor! It was ordered from China back in the winter, it cost $15, the delivery set is standard for such devices:
— 4 sensors — control unit — remote screen — leaflet with description — cutter — connecting wires, double-sided tape.
After reading several driver's manuals and consulting in the comments, I decided to install without removing the bumper (although many advise that it is easier to install by removing). The following fastening elements of the rear bumper were unscrewed: - 4 self-tapping screws on top (not useful, extra work - don’t unscrew them) - 3 bolts from below (I highly recommend it to make it more convenient to lay the wires and tie the wires from the sensors into the harnesses with ties) Wires to the interior (trunk ) are inserted through a rubber plug under the left headlight (rear view) through which the factory made an input for illuminating the license plate. squeezed it inside the trunk to make 4 additional holes. I took the included cutter and inserted it into the drill. I pasted a strip of masking tape onto the bumper and marked the drilling points along it:
The result was the following distance between the central sensors - 450 mm; distance between the central and side ones - 350 mm
In my opinion, this is the optimal ratio, otherwise the extreme ones will look completely to one side. It is better to drill at low speed; plastic tends to melt. After drilling, treat the edges with a knife to prevent sagging, otherwise they will not fit tightly when installing the sensors. The sensors have silicone spacers and grips for easy recessing and fixation, lubricated with wd. I filled up all 4 sensors (preliminary marks were made with a marker on the sensor connectors which is which from which): I lay under the bumper and tied the wire bundle with zip ties so that they would not sag. Next, from the trunk, I brought a hook out of the wire and used it to pull in the wires from the sensors. I inserted it into the rubber plug and decided to put it in place. The problem is... it has a taper and can only be inserted from the outside of the case. For me, this was the most difficult and time-consuming and nerve-consuming work. My hands can’t really get under the bumper to press in the plug, it took me a while, but I did it.
Next, we connect the power: black under the bolt near the same left headlight (by the way, 2 wires are already screwed there) +12 volts are screwed to the green wire in the harness. We connect all the connectors to the main unit and the screen. We put the box in R, turn the key 1 click (you don’t need to start the engine) and check the operation. I installed the screen on the top of the interior mirror. I ran the wires along the roof under the ceiling trim and into the trunk. The control unit itself was installed under the headlight.
It works stably: it sees a distance from 1.8 m to 0.2 m, while the intensity and frequency of the sound from the tweeter increases. Less than 0.2 m begins to show zero and beep loudly and continuously.
Thank you all for your attention, I will be glad if this material is useful to someone.
UPD: July 6, 2017, when installing parking sensors on a friend’s grant, a peculiarity was discovered. When installing central sensors, I advise you to place them at the edges of the number. If the central sensors are moved to the center of the license plate, then they will rest against the housing of the license plate illumination device (plastic), which is located just behind the bumper in this place and it (the housing) will have to be cut.
Anyone who recently got behind the wheel of a car experiences a lot of inconvenience. Most of them are associated with a lack of feel for the car, in particular its dimensions and steering wheel. Experience, sooner or later, will come, but until this moment the novice driver will experience difficulties performing the maneuver of parking a car while driving in reverse. There is no need to despair, because modern technology comes to the rescue; to be more precise, it is parking sensors.
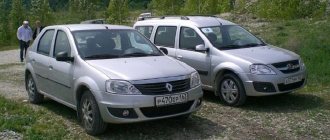
Parking sensor Lada Largus, RENAULT Logan, Duster.
Dear customers, in order to avoid errors when sending parking sensor 8450000983 used in conjunction with the parking safety system (SBP) alarm control unit, please indicate your car model and year of manufacture in the “Comment” line.
Based on the name, we can confidently conclude that parking sensors are an electronic device that helps the driver park his car. There are fewer and fewer places to park a car in cities, and if there are any, you need to have a fair amount of skill to squeeze your pet between other cars. Therefore, parking sensors become an indispensable assistant when parking a car. The parking sensors will promptly report the dangerous proximity of a parking post, which you may not see because it is in the “dead” zone, or some tree stump that you have not noticed. Parking sensors will inform the driver about the danger and indicate the distance to it. For this purpose, the parking sensors are equipped with sound and light alarms. Parking sensors are a useful device, especially in city conditions.
The principle of operation of the Lada Largu parking sensors is quite simple. Parking sensors 8450000983, their number may vary, detect an obstacle. As a rule, they are installed on the car bumper. The principle of their operation is to emit ultrasonic waves, and if there is an obstacle, part of the waves returns to the sensor, which sends a signal to the electronic control unit.
The control unit calculates the distance to the obstacle and provides this information:
— One element of the parking sensors is an audible alarm. It is configured in such a way that the shorter the distance to the obstacle, the higher the signal frequency.
— The second indicator showing the distance to the obstacle may be a light indicator. There are several types of them. The first type is an indicator that changes color depending on the distance to the obstacle. For example, green indicates a safe distance, while red indicates immediate danger. The second type of indicators are indicators with divisions; the more divisions are lit, the closer the obstacle. Indicators with two scales show danger on the right and left.
Parking sensors have a different number of sensors. The price of the system, but also its effectiveness, depends on this. The dependence here is direct. The more sensors, the more space is “surveyed” by sensors and the driver receives a more reliable picture of obstacles around the car. Parking sensors with two sensors are ineffective, since “dead” zones can form and obstacles can get into them.
There are different types of sensor installations. The most widespread are mortise sensors. Holes are drilled in the bumper and sensors are inserted there.
The second type is adhesive sensors. This method is simple and easy to install. But there is a possibility that the sensor may come off when washing the car under high pressure.
The liquid crystal screen included in the parking sensors system greatly facilitates the work with the parking sensors and the parking itself, but significantly increases the cost of the entire system. Recently, parking sensors have appeared with information projected onto the windshield. This is the most expensive parking sensor option. But maybe some people will like it. As you can see, there are many types of parking sensors and choosing one of them is your choice.
Parking sensors without a screen are good as a range finder when driving straight, in other cases it fails. Convenient as an alarm in case of sudden appearance of a person or animal.
Allows you to “by ear” estimate the distance to an obstacle. There is no exact information about the location of the object.
Other article numbers of the product and its analogues in catalogues: 8450000983.
Lada Largus, RENAULT Logan, Duster.
Any breakdown is not the end of the world, but a completely solvable problem!
How to independently install or replace a parking sensor on a Lada Largus, RENAULT Logan, Duster and their modifications (SBP).
With the online store Discounter AvtoAzbuka, repair costs will be minimal.
Just COMPARE and BE SURE.
Don't forget to share the information you find with your friends and acquaintances, because they may also need it - just click one of the social networking buttons located above.
Review of manufacturers and tips for installing parking sensors on the Lada Granta Liftback
A parking sensor, also known as parking sensors, is installed as standard equipment on the Lada Granta Liftback in the Luxury Premier configuration. Previous modifications do not have this bonus.
You can install parking sensors on the Granta Liftback (hereinafter referred to as DP) yourself; the installation work is not complicated. The main thing is to follow the instructions and avoid haste.
We will tell you further about how to professionally install the DP on the Lada Granta Liftback.
Checklist: Lada Vesta parking sensors - 5 faults, installation
The safe parking system has become almost an integral part of the car, which is not surprising. Even simple cars already have a standard parking sensor—Vesta is also equipped with it from the factory. Parktronic Lada Vesta is a convenient, inexpensive gadget that was originally intended as an assistant in parking a car. The standard device on the Lada Vesta consists of several components. Parking sensors do not work most often due to dirt or wiring. However, it is not present in all trim levels. Built-in parking sensors of the Lada Vesta are available in the “Comfort” configuration and higher. The starting version of Vesta is ready to install any equipment you choose to measure the distance to nearby objects.
Review of Manufacturer Prices
*prices are current as of October 11, 2018
Recommendations for choosing a manufacturer
There is a wide range of products on the market, but not always of high quality. Carefully check the package contents and the presence of a warranty card. Be sure to request the provision of a sales receipt as a guarantee of the legality of the transaction and the possibility of return if defects are detected.
Typical characteristics of parking sensors
Preparatory stage before self-installation of parking sensors on the Lada Granta Liftback
Required tools and materials:
- parking sensor complete with a cutter for cutting holes in the bumper;
- rags, masking tape for covering the perimeter of the rear bumper;
- a set of car tools for removing the bumper.
Where is the standard parking sensor unit installed in the Lada Largus Cross?
- Standard devices
- Which model to choose
- How to install
- How to connect and test
Due to the fact that the manufacturer installs a standard parking sensor unit in Largus only in Lux and Cross vehicles, the owners of other cars have to do this work themselves. Most often, a set with 4 sensors is used. This is enough for safe parking of the car both during the day and at night.
Sequence of actions when installing parking sensors on a Lada Granta Liftback car
- We place the car on a flat platform. It is not advisable to use the inspection channel; access to the car is required.
It is important to know! There are two ways to install the DP: with removing the bumper and without dismantling it. Both options are acceptable for the Lada Granta Liftback. The difference between the methods is in the time and effort spent.
- We choose the path with the least resistance - without dismantling the rear bumper. Unscrew the four screws in the lower perimeter of the bumper.
- Cover the middle perimeter of the bumper with masking tape. It is necessary for marking the points where holes for the sensors will be drilled.
- We mark the holes. On the rear bumper of the Lada Granta Liftback, the connectors will be placed as follows: 15 cm - the distance from the edge of the bumper to the side sensor, 33 cm - between the central sensors, 52 cm - the distance to the ground.
Note to the driver!
Side DPs are allowed to be installed at a distance of 12–15 cm from the edge of the bumper. Exceeding the specified range reduces the response angle of the side sensor. The remaining sensors are installed at an equidistant distance from each other.
- After applying the markings on the masking tape, drill holes with a drill. Clean the edges with a utility knife.
- We insert sensors. If the holes are larger than the thickness of the sensor, then attach them with silicone glue.
- We bring the block with wires from each sensor through the technological opening in the left wing into the luggage compartment.
- Screw the lower perimeter of the bumper.
- In the luggage compartment we unscrew the sound insulation and trim. In the lower left part, through the technological hole, we insert the blocks with wires from each sensor.
- We install the stiffener block controller and secure it with a plastic tie.
- We physically connect four blocks with wires in sequence, starting from the left edge.
- Open the rear left lamp valve, find the green wire - this is the reverse power cable, connect to it (cut in)
- We lay the cable under the casing to the controller unit, power the “plus”. We connect the “minus” to the body in any place where it will be convenient for the driver.
Note to the driver!
If you wish, you can power it from the “minus” on the rear light - the wire is black.
- We install the sensors in the “Up Arrow UP” position. Otherwise, the sensor will react to every blade of grass, pebble on the ground, or asphalt.
- We connect two wires from the controller unit to the interior of the car, run them through the channel, under the plastic covers, and bring them out to a place convenient for the driver.
- We connect the block with terminals, fix the DP on the dashboard (above the rearview mirror).
- We assemble the trim and sills, start the engine, and activate reverse gear. We check that the parking sensors are working properly. The permissible error is 100 mm.
The work is completed, you installed the parking sensors on the Granta Liftback with your own hands.
Selection and preparation for installation
Installing parking sensors on a Lada should begin with choosing a model and checking it. When choosing a model, you should definitely ask the seller whether the device will fit on the Lada, and find out about the manufacturer.
After purchasing a parking sensor, you can test it at home. To do this, it is enough to simulate a parking situation and an obstacle. They can be a wall in a room. When checking the device, you need to make sure that the distance shown on the display corresponds to the real one. In this case, you can close your eyes to a small error in measurement. If the error is more than 0.5 m, you should consult with the sensor manufacturer and, if necessary, replace the device or buy it elsewhere.
How to install
Installation of parking sensors on Renault in most cases is carried out without removing the bumper. The installation process includes the following steps:
- Bumper markings. First of all, places are marked for the introduction of touch sensors. The points are located at a distance of 0.5-0.6 m from the ground. For convenience, you need to stick masking tape on the bumper, after which you can mark it with a marker.
- Drilling holes. A milling cutter is used to make symmetrical slots. This results in 4 holes located at a distance of 0.5 m from each other. The edges of the slots are cleaned with a file. Adjustment rings are installed in the resulting holes to ensure the correct position of the sensors.
Installation details
After carefully taken measurements, you can begin to mount the sensors on the rear of the Granta body. First of all, we must remember that any manipulations must be performed with a clean car. If necessary, you can use a car wash, but even after it, it is better to wipe the back from dust and fine dirt.
Next, you should mark on the bumper the places where the sensors will be installed. It should be remembered that the distance between them should not be less than 10 cm. The peculiarities of installing parking sensors on the Lada Granta are that the holes for the sensors are best made 10 cm from the edges of the trunk towards its center.
After making the holes, the parking sensors unit is placed in a special technologically designated hole under the left lamp. In order to gain access there, you need to remove part of the interior trim. But you shouldn’t worry about its appearance: it’s easy to return.
Next you need to find a set of wires that goes to the rear lights. Among them you need to find a green wire (if necessary, you can check where it leads; it should lead to the rear lights). This wire should be connected to. Thus, the battery will supply power to the parking sensors when reverse gear is engaged.
We establish a connection between the device and a screen that can be placed in the cabin. It will be better if it is within sight to focus attention when parking in reverse. One of these places is next to the mirror.
Parktronic Lada Largus installation
Hello everyone, exactly a year ago I installed parking sensors on my Logan, after traveling I realized how convenient it is, by the way I installed some of the cheapest parking sensors, so I’ve been watching this Chinese miracle for a year, they work. At first there was a thought that in winter they might not show correctly, but I was pleasantly surprised that they work properly and do not cause any complaints.
Today the weather is rainy, after working in the morning I got some free time, went to the garage to install it, my hands were itching)
Included: 1. 4 parking sensors (with a very long wire) 2. power cable with chip 3. module itself 4. screen with beeper
Having prepared the place, the heat rushed)
I took a 20 mm drill, but the size of the parking sensors itself is about 21 mm, I did not modify the hole much with sandpaper.
let's go stretch the wire and figure out what's what)
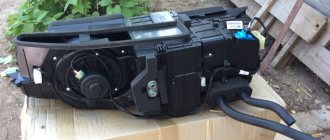
under the screw hole there was a small plastic plug in the body, behind it there was a nightmare, I didn’t take pictures of these details, but I think a photo from the internet will be fine)
Installing parking sensors on a Lada car
The safe parking system (parking sensors) is installed by the factory on some top-end configurations of Lada cars. Simpler versions of the car (“Standard” or “Norm”) do not have this useful accessory. Let's look at the features of self-installation of parking sensors on modern Lada cars.
The instructions for installing parking sensors for Lada Granta, Priora, Kalina, Vesta, Niva and XRAY are similar. There is a separate photo report for Lada Largus. Also see the instructions for installing front parking sensors on Lada XRAY.
We study the instructions that come with the parking radar and, according to the attached diagram, mark the locations for the sensors on the bumper. We make the holes using a drill and a bit (crown), which comes with the kit. Try not to overheat the plastic of the bumper. We fix the parking sensors in the resulting holes, taking into account the top and bottom of the sensor (see markings).
You can drag the wires from the parking sensors into the trunk (in this case, Lada Granta liftback) without removing the bumper. It is enough to unscrew a couple of screws from below to gain access to the standard hole on the left side. We route the wiring through a tight rubber seal.
We place the parking sensor control unit in the trunk using double-sided tape. To connect, you will need to find the “plus” after engaging reverse gear; on Lada cars this is the green wire of the rear light. Mass - black. The parking sensor display is most often mounted above the mirror. To do this, we stretch the wires from the trunk to the front of the car under the floor lining. Then behind the panel, behind the windshield pillar trim and under the headliner (removing the sun visor).
By the way, if you fix the parking sensor screen on the ceiling in the trunk (of a hatchback, station wagon or liftback) or in the interior of a sedan, then you can monitor the distance through the interior mirror, and there is no need for additional wires throughout the cabin.
The process of installing parking sensors on the Lada Granta is also shown in the video:
Let us remind you that you can buy inexpensive parking sensors on AliExpress.
How to connect and test
Power is supplied from the reversing light chip. If the display is installed on a dashboard or interior mirror, then the connecting harness is pulled along the floor of the car and raised along the A-pillar to the monitor. If the indicator is installed on the ceiling near the loading door or a beeper is used, there is no need to lay wires throughout the cabin.
After installation, the kit is checked for functionality. When the transmission is on, an object is brought to the sensors one by one until a signal appears. After this, measure the distance to the nearest sensor that detected the obstacle. The resulting value will be the boundary of the sensitivity zone.
To determine the minimum operating distance of the sensor, you need to install an object between the sensors (outermost and central) and put the Lada Largus in reverse mode. The distance at which the presence of an object is not determined will be the desired value. This method can also determine the “blind” zone.
If the parking sensors do not respond to the presence of objects in the work area, it is necessary to determine which element has failed. To do this, with the power on, lightly touch the sensor emitter. A working element produces clicks that can be felt by your finger. A malfunction may also appear in the connecting wires. Therefore, there is no need to rush to throw away the sensor without checking the integrity of the lines.
The functionality of the unit is checked by connecting a known-good sensor. If the kit reacts to objects, then the unit is working. Defective elements must be replaced as soon as possible, since the efficiency of the system is reduced, which can negatively affect parking results.
- DIY parking sensor diagram
- Parktronic Lada Vesta
- Parktronic Chevrolet Cruze
- Installing a rear view camera on Largus
Installation location
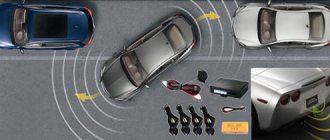
In parking sensors with eight sensors, 4 radars are installed at the front of the car and 4 at the rear on the bumper. The control unit is mounted at the rear of the machine. The display is located inside the cabin - on the mirror or dashboard.
Important. Connecting front sensors is especially important for owners of cars with poorly visible front dimensions.
Standard devices
The standard parking radar kit for Largus Cross includes:
- 4 sensors with wires and connectors;
- Control block;
- LED indicator for displaying information;
- power wires;
- cutter for making holes;
- installation guide.
More functional and expensive devices may additionally include 4 sensors for installation in the front bumper. The transmission of information in such safe parking systems can be transmitted both by wire and by radio.
Connecting sensors
Before starting work, the installation site is taped with masking tape. Markings are made on it and installation points are indicated. All sensors should be located at the same height and equal distance from each other at an angle of 90 degrees to the ground.
After marking, you can start drilling holes. This is done using a screwdriver or drill with a cutter pre-attached to them, which comes with the parking sensors. After sharpening the grooves, the tape is removed from the bumper, and the holes are cleaned with a sharp knife or file.
Important. It is not necessary to remove the car bumper to install and connect parking sensors. In most cases you can do without this.
It is convenient to install sensors in the holes using a hook, which can be made from thick wire. The wires are pulled in strict order in the direction from the one farthest from the radar unit to the closest. Use a hook to hook the wires through the holes and pull them through. First, one wire is pulled, then two, 3 wires are pulled into the third hole, and 4 into the fourth. After pulling, the cables are straightened, tied into a bundle with electrical tape and passed through a plug into the inside of the car. Where possible, they are fastened with nylon ties and only then connected to the main unit.
To fix the sensors themselves in the holes, lightly press them and snap them inward. In this case, you do not need to press hard on the center of the radar. The pressure should be as smooth and accurate as possible.
Display Mounting
The parking sensor display is installed on the rearview mirror or on the dashboard of the car. The product is attached to a previously degreased surface using double-sided tape. The wires coming from the display are pulled up through the A-pillar, and then through the door seal and the C-pillar to the rear of the car. They need to be connected to the parking sensor control unit.
Important. The most convenient place for the display is a mirror.
Installation of the control unit
The control unit is installed in the rear of the car, since it must be connected to the reverse signal and the vehicle's ground, as well as to the positive after the ignition switch. The equipment is connected to the reverse signal for the operation of the rear bumper sensors, and to the plus signal for the operation of the front radars.
The easiest way to connect is through the positive of the fuel pump. True, in this case the equipment will only work when the engine is running, but this is even better and more convenient.
Important. The wire from the reverse gear can be easily identified using an LED tester.
Connecting parking sensors to the front bumper
Installation of sensors on the front bumper is carried out in almost the same way as on the rear. At the connection point, tape is glued, markings are made, holes are drilled, and locators are inserted. The bumper is removed, and the wires are laid along its beam from left to right as the car moves. After connecting all the connectors, the buffer is installed back and the parking sensors are tested for functionality. The test is carried out by pressing the brake pedal. If everything works fine, the locators are fixed with glue and the bumper is screwed into place.
Important. All parking sensor locators must be located at a distance of at least 45 cm from the ground. If this condition is not met, the sensors will constantly “glitch” and give false signals.
Replacing the ignition switch on a Grant
I think that many car owners have encountered such a problem when, with excessive force when turning the key, it could remain in the ignition switch, or rather, its blade. In this case, you will have to replace the lock, since it is almost impossible to get the key.
On the Grant, as on other front-wheel drive VAZ cars, the lock is mounted on the steering shaft and secured using breakaway bolts. This was done specifically for security purposes, so to speak, to prevent unauthorized access to your car.
To replace the lock, you will need the following tool:
- Phillips screwdriver
- The chisel is narrow and sharp
- Hammer
- Key for 10
How to remove the ignition switch on a Grant
In order to get to the ignition switch structure on the Lada Granta, you need to remove the steering column cover. This can be done using a Phillips screwdriver.
After this, using a chisel and a hammer, we tear off the lock fastening bolts, as is clearly demonstrated in the picture below.
When the caps are already loose enough, you can unscrew them using long-nose pliers.
When all the bolts are unscrewed, hold the lock and remove the clamp securing it to the shaft.
And the lock on the back side.
Now you need to disconnect the two plugs with the power wires from the lock, as is clearly shown in the photo.
Sensor tuning
Before installing the sensors, they can be painted to match the color of the car. In case the radars do not fit correctly, several spacer rings should also be painted. Painted parking sensors look very cool. They are practically invisible on the car.
Important. Locators need to be painted over only after marking. After all, some of them may end up on the jumper, which is different in color from the main body.
Sources:
https://litezona.ru/ustanovka-parktronikov-na-grantu-8-datchikov/ https://remont-avtovaz.ru/sovety-po-ustanovke-parktronikov-na-ladu-grantu-liftbek/ https:// 1ladagranta.ru/obsluzhivanie/ustanovka-parktronika.html https://xn--80aal0a.xn--80asehdb/do-my-self/tuning/tuning-lada-vesta/644-ustanovka-parktronika-na-lada-granta .html https://electro-kot.ru/kak-podklyuchit-parktronik-na-8-datchikov.html