Coolant temperature sensor (fan on) and its purpose
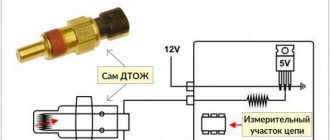
A temperature sensor or DTOZh is a part that is included in the engine cooling system and controls the process of warming it up. This element does not display the corresponding temperature values on the instrument panel, since another device is responsible for this action (temperature sensor on the DUTOZH arrow). DTOZH sends a signal to turn on the fan to cool the radiator (at a temperature of 98 to 107 degrees), through which liquid circulates. That is why such a device is often popularly called a fan sensor. However, its correct name is DTOZH or coolant temperature sensor.
In addition to turning on the fan, the DTOZH on the Priora performs another very important function. It consists of adjusting engine operation by changing the composition of the fuel-air mixture and setting the ignition timing. This is achieved by connecting the sensor to the electronic control unit. A corresponding signal about the engine temperature is sent to the ECU from the DTOZH, and depending on the incoming readings, the engine operation is adjusted. It looks something like this:
- When starting the engine cold, the ECU receives a signal that the engine has not warmed up to operating temperature (i.e., cold).
- The control unit makes a decision on preparing fuel assemblies in a certain proportion. To do this, a signal is sent to the idle speed regulator, which opens the XX valve to the appropriate distance (a certain number of steps), which leads to an increase in crankshaft speed. To quickly warm up the engine, more fuel is supplied through the injectors, and the ignition angle is also adjusted.
- When the coolant temperature rises to a certain value, the engine speed is reduced and the mixture composition is adjusted.
If on carburetor cars only liquid temperature sensors are used to display information on the dashboard, and they do not affect the operation of the engine, then on modern injection engines two types of devices are installed. If the coolant sensor is faulty, the engine will most often start and it will run, but the fuel assemblies are prepared according to average values in emergency mode (the computer, if there is no signal from the DTOZH, takes the temperature of the internal combustion engine as 0 degrees). This also turns on the fan, which cools the liquid in the radiator to eliminate the possibility of overheating the engine (since the ECU does not see the actual engine temperature).
Typical signs of a device malfunction are the following:
- unpredictable operation of the cooling fan. If a break occurs in the electrical circuit, which happens due to damage to the supply wire or sensor contacts, the fan will operate continuously
; - floating speed, since the faulty element gives incorrect signals, as a result of which the ECU will strive to adjust the optimal mixture ratio;
- The Check Engine light comes on, indicating an engine malfunction.
It is important not to confuse the coolant temperature sensor on the Priora with the element that is responsible for displaying information about the temperature of the internal combustion engine on the instrument panel. These are two different sensors that have a similar operating principle, but are responsible for performing different functions. If there is a malfunction of the device that displays the engine temperature value on the instrument panel, the CHECK indicator will not light up.
This is interesting! On the Priora, the DTOZH has two contacts, and there is only one sensor per arrow. The operating principle of the devices is the same, and the only difference between them is that on the DTOZh the resistance is measured between the terminals, and on the pointing device - between the body and the contact.
Replacing the fan switch sensor
This section covers replacing the fan switch on VAZ 2107, 2110 and 2114. Fundamentally, all these processes are the same on any car, the differences are only in the details.
Advice. Before replacing the sensor, read the instructions and look at the photo.
Tools
You don't need much for this operation:
- 30 ring wrench
- Rags
- Coolant container
As you can see, replacing the VAZ 2109 fan switch sensor yourself will not cost much. You only have to buy a sensor.
Replacing the sensor
Note! It is best to replace the sensor on a cold engine. This way you can avoid getting burns to the skin of your hands and other parts of the body.
- It is not necessary to drive the car onto an overpass or inspection hole - this will even cause some inconvenience. Just a closed room - a garage - will be enough.
- Disconnect the negative terminal from the battery.
- First you need to drain the antifreeze from the radiator. There is no need to drain it from the cylinder block.
- Unscrew the cap of the expansion tank of the engine cooling system.
- To drain the antifreeze, you need to unscrew the radiator drain plug. It is usually located at the bottom of the radiator and can be unscrewed simply by hand.
Replacing the fan switch sensor in a VAZ 2110 - unscrew the drain plug
- Place a container for antifreeze under the car and wait until it drains completely.
Advice! Use a clean container, as the same antifreeze will have to be refilled.
- Screw back the drain plug.
- Disconnect the contacts from the sensor.
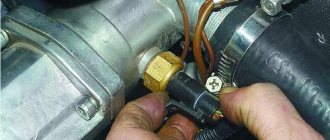
- Using a 30mm wrench, unscrew the fan switch sensor.
- Unscrew carefully so as not to damage the plastic radiator tank.
- Screw the new sensor in place of the old one. Don't forget to install a copper gasket under the new sensor.
- Reconnect the electrical wiring to the sensor.
- Fill the expansion tank with antifreeze, which was previously drained.
- Bleed the cooling system to ensure there is no air in the system.
- Connect the battery terminal.
- Start the engine, warm it up and check the functionality of the sensor.
- If the fan turns on at the desired temperature, then everything is in order.
- If not, then you will have to check other possible fan malfunctions.
Replacement without draining antifreeze
Replacing the fan sensor on a VAZ 2110 with draining the antifreeze takes a lot of time. Of course, not as much as overhauling the engine, but still, if you omit draining and filling antifreeze from the process, you can save a little time.
Advice! To replace the sensor in this way, you need some skill and at least some experience in car repair.
- To quickly replace the sensor, you should rip off the old one with a 30mm wrench and unscrew it almost completely.
- Next, you need to prepare the new sensor so that you can unscrew the old sensor with one hand and quickly screw in the new one with the other hand.
- Thus, the loss of antifreeze will be small.
- After such a replacement, wipe the area around the fan switch with a rag to determine the presence or absence of an antifreeze leak.
This way you can carry out this operation a little faster. Don't be afraid to repair your favorite car yourself. Despite the fact that the price of car repairs is not low now, it is very profitable. Besides, experience in life will always come in handy.
The principle of operation of the DTOZH on Priora: how the fan switching device functions
The design of the element in question is based on a semiconductor element - a thermistor. When the temperature applied to the thermistor changes, the resistance increases or decreases. Below is a cross-section of the design of the temperature sensor, which will help you understand the principle of its operation.
Such an element is connected to the circuit using two contacts. Changes in temperature change the resistance, and as a result, the voltage in the circuit increases or decreases. The ECU records changes in voltage (drop), and depending on its value, makes appropriate decisions about preparing the mixture and adjusting the ignition. A voltage of up to 5V is supplied to the sensor from the controller through a 2 kOhm resistor, and depending on its fluctuations (drops), the electronic unit determines the engine temperature at the corresponding moment in time.
What is the operating temperature of the Lada Priora engine?
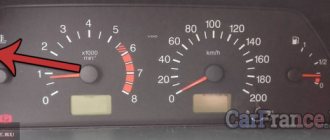
A car engine is equipped with a cooling system that contains liquid. The temperature of this liquid is measured by a sensor. This value that it records is the engine operating temperature (ERT). The data recorded by the sensor is displayed on the dashboard. The average operating temperature of a Priora car engine is 95 degrees. This indicator is optimal when the car is moving at a speed of approximately 70-80 km/h and provided that the ambient temperature is not higher than +20 degrees. When the liquid heats up to 100 degrees, the fan turns on, which is designed for additional cooling. With such indicators, it is time to say that the power plant of the machine is functioning without failures. In winter and summer, the RTD may be different. Which RTD is considered optimal for this car? The average is 85-90 degrees.
Types of engine temperature sensors: what type is used on Priora
It is important to understand that there are two types of engine temperature sensors. They differ in the principle of operation, and you need to know the operating features in order not to make a mistake when choosing such an element for your car. The following types of DTOZH are distinguished:
- With a negative temperature coefficient
(NTC - negative temperature coefficient) - it works as follows: when the temperature rises, the resistance decreases, and vice versa. - With a positive coefficient
(PTC - positive temperature coefficient) - it has the opposite principle of operation. When the temperature increases, the resistance increases.
The most common types are negative temperature devices. It is these sensors that are used on Priora cars.
When the engine is cold, the maximum resistance of the Priora DTOZH thermistor reaches 100.7 kOhm (this value will be at a temperature of -40 degrees). When the engine warms up, the temperature increases, which means the resistance drops. At a high temperature of +130 degrees, the thermistor resistance is about 70 Ohms. These readings are the operating range. When the engine is cold, the voltage drop in the circuit will be large (drops to 18%). As it warms up, it will increase (up to 90%).
This is interesting! If the engine is cold, then the voltage in the circuit will be about 3.4V, and when it warms up, the value decreases to a minimum (0.15V). It is important to know what type of sensor is used on the car in order to diagnose it and check for serviceability or correct operation.
At what temperature does the fan on the Priora turn on?
New generation Lada
The engine of any car, including the Lada Priora, is a rather complex unit consisting of various mechanisms and systems. The stable operation of the engine is influenced by many factors, including temperature.
If the thermal conditions of the power unit are insufficient, this will affect the quality of formation of the fuel mixture in the cylinders. And when the thermal conditions are higher than required, this can lead to jamming of the cylinder-piston group, serious damage and lengthy and expensive repairs.
Return to contents
The principle of operation of the cooling system
The main task of the cooling system is to ensure optimal temperature conditions for the Priora engine. The vehicle is equipped with a system with forced circulation of coolant. Its main element is the cooling jacket through which the liquid circulates.
To maintain the integrity of the shirt, you should constantly monitor:
- quantity
- quality of the liquid (for example, Antifreeze).
If its amount is too low, the system will not be able to properly maintain the thermal regime of the power plant, and it will overheat. Antifreeze heavily diluted with water will not have adequate frost resistance, and in winter the shirt may freeze.
Another important element of the system is the liquid pump. The purpose of the pump is to ensure the circulation of Antifreeze throughout the system. The Priora pump is belt driven from the crankshaft. The condition of the pump also needs to be constantly monitored. If the bearing in it starts to fail, it will jam. The result of wedging will be:
- inability to maintain optimal temperature;
- the likelihood of a timing belt break.
This, in turn, will damage the gas distribution mechanism.
Until the engine reaches the desired temperature, the liquid circulates in a small circle, that is, it moves only along the jacket. When the temperature approaches normal, the liquid will begin to move in a large circle. In addition to the cooling jacket, it also includes a radiator with a fan installed on it. The cooler starts working only when the liquid temperature begins to exceed the permissible limit. For monitoring, a temperature sensor is built into the cooling jacket, also known as a fan switch on sensor.
The thermostat is responsible for which circle the Tosol moves in. Incorrect operation of the thermostat or its jamming will either lead to overheating of the unit or to the fact that it will not be able to reach the optimal thermal conditions.
This system works on a Priora like this: while the power plant is cold, the thermostat is in a position that blocks the channel going to the radiator. The liquid, thanks to the pump, circulates through the cooling jacket. As it warms up, the thermostat begins to open the channel slightly, and liquid begins to flow into the radiator to reduce the temperature of the liquid itself.
In the summer, when idling in a traffic jam, the air flow passing through the radiator is insufficient, and the temperature continues to rise. The fan switch-on sensor monitors this indicator, and if it begins to exceed the permissible limit, it turns on forced cooling of the radiator, which additionally creates an air flow to ensure cooling of the Antifreeze.
Return to contents
Cooling system malfunctions
Cooling system diagram
The system is structurally simple, but it needs to be constantly monitored. First you need to know what the operating temperature of the engine of the Lada Priora is. For this car it is 90˚С. The engine temperature is displayed on a sensor located on the dashboard. While driving, you should constantly monitor its readings. If they exceed 100˚C, you should pay attention to whether the fan turns on.
Characteristic signs of DTOZ failure on Priora: reasons for increased consumption
The engine temperature sensor or fan activation sensor is one of the main executive elements of the control unit. The malfunction of such a device entails incorrect operation of the engine, and the consequence of such a breakdown “hits the wallet”, because fuel consumption increases significantly. Due to the fact that the DTOZh performs a very important function, measuring the engine temperature and transmitting information to the electronic unit, such a device rarely fails. This means a complete malfunction of the sensor when the Check Engine lights up on the instrument panel and the following error codes are displayed on the on-board computer:
- P0115 - malfunction of the electrical circuit of the DTOZH;
- P0116 - sensor error in the form of values falling outside the permissible range;
- P0117 - low signal level at the DTOZh output (the ECU receives a voltage below 0.14V from the sensor);
- P0118 - increased signal level from DTOZH (output voltage over 4.91V);
- P0119 - unreliable sensor contact. Typically, this error is displayed if the signal from the device is interrupted.
There are the following types of malfunctions of TOZh sensors that are found on Priors:
- Over time, the thermistor begins to show incorrect temperature values, that is, it lies. You can verify this using a multimeter.
- Chafing of wires near the sensor connector, which also leads to its incorrect operation.
- Reduced insulation quality.
Characteristic signs that the element in question is out of order or it is “jamming” are the following manifestations:
- when cold, engine speed drops;
- lack of idling or floating speed;
- unstable operation of the internal combustion engine;
- impossibility of starting the engine when hot (due to DTOZh failure);
- turning on the fan, which is usually accompanied by error P0115.
This is interesting! However, the most common type of DTOZ malfunction on a Priora is when the cooling fans turn on and off for no apparent reason, that is, on a cold engine or if the temperature has not reached the switch-on value.
The consequence of a malfunction of the device is increased fuel consumption to 10-15 liters per 100 km. Operating a car with a faulty DTO is strictly contraindicated. If signs of its malfunction are identified, you should immediately resort to diagnosis or replacement.
Factory setting of fan temperature
The switch-on temperature depends on which ECU is installed and what settings are used in it. In stock, the first fan should turn on at 97 degrees , the second at 104 degrees .
A little more and the fan should turn on. Depends on the settings in the ECU.
You can change the switching parameters using an on-board computer, for example, BC STATE. We don’t have a BC, but we connected it specifically from another machine, and set the response temperature to 95 degrees. By the way, our editorial office has one of the very first Prioras. Here the factory temperature for turning on two fans at once is 104 degrees .
We do not recommend the old-fashioned way of turning on the fan with a button.
Optimal temperature
After turning off the fan, the temperature should be at this level. If this is not the case, then look at the thermostat; most likely it circulates the liquid in a small circle.
The optimal temperature for turning on the cooling fan depends on the operating conditions of the vehicle. If the main mileage is on the highway, then the factory settings (universal) will be optimal. If you live in a “warm city” and often get stuck in traffic jams, then it is better to lower the switching temperature. It's calmer this way.
An internal combustion engine is a complex mechanism, in order to ensure smooth operation of which a number of conditions must be met. And the temperature regime is no exception. For example, if the temperature is insufficient, this will negatively affect the quality of the formation of the fuel mixture in the cylinders. If, on the contrary, the heating is too strong, then the cylinder-piston group may jam , which in turn leads to the need for lengthy and expensive repairs.
Thus, the normal temperature (operating) for the Lada Priora engine is 85-90 degrees . When the temperature rises to 97-100 degrees , the fan should automatically turn on. If this does not happen, then the problem may lie both in the fan itself and in its activation sensor . But first of all, you should check the wire connections.
In some cases, the following happens: the fan does not start due to a loose terminal. It is enough to return it to its place, and the problem will be solved.
Radiator Inspection
Photo from the inside. We inspect for fluid leaks and strong dents.
Severely clogged cooling radiator.
If you have any more questions, you can leave them in the comments!
Source
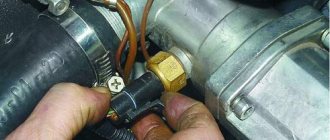
Where is the coolant temperature sensor installed on the Priora?
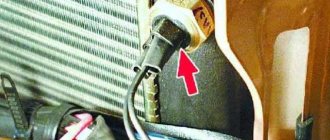
Many car owners do not know where the element in question is located on Priora until they are faced with the need to diagnose or replace it. In order not to make a mistake and correctly find the coolant temperature sensor on the Priora, below is a photo of its location. It is located between the cylinder head and the thermostat.
Access to it is almost free, but for ease of diagnosis or removal, it is necessary to dismantle the air filter housing. It is important not to confuse this element with the device responsible for displaying temperature readings on the instrument panel. In the design of the Priora cooling system, two temperature sensors are installed: one on the arrow (it is located below), and the second on turning on the fans and transmitting readings to the computer.
Design of a cooling fan on a Priora
From a constructive point of view, the product is quite simple and consists of the following elements:
- electric drive;
- plastic blades;
- relay responsible for turning on or off;
- connecting wires.
The electric drive is powered by a battery and is activated depending on the coolant temperature.
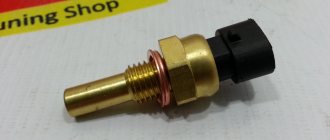
Coolant temperature sensor on Priora: technical parameters
The cost of DTOZh on Priora is about 200-400 rubles. Products are produced by different manufacturers, but the most popular are Luzar devices. The coolant temperature sensor on Priora has article number 23.3828.
It comes in a cardboard package along with an O-ring (copper or steel washer), which is important not to forget to put on the thread when installing. Below are the technical parameters of the sensor.
Characteristics of Priora DTOZH
Before installing a new product, you can check it by measuring the resistance value. This will ensure that you have not purchased a defective product. How the replacement is performed is described in detail below.
The fan comes on when the engine starts on the Priora
- Registration
- Entrance
- To the beginning of the forum
- Forum Rules
- Old design
- FAQ
- Search
- Users
There are several options here.
(If you are absolutely sure that the Temperature Sensor and relay you replaced are working.)
An error was once entered into the controller, which it no longer displays, but simply turns on Carlson. But as far as I remember, usually the Carlson does not turn off and keeps pounding even for some time after the ignition is turned off.
In general, it still looks like a low-quality, sticky relay.
ALL errors on the controller are erased by disconnecting the battery. but that's not the point. I went to the diagnostics, there was only one error (invalid value of the temp sensor), but after replacing it with a new one, the situation continues. I changed the relay myself, although I’m not 100% sure that I changed the right thing.. there were three of them.. on the market they said the one opposite the fan fuse
In the description of any sensor error, there is a continuation, read in the injection primer: like “The sensor or its circuit is faulty”
So, in your case, most likely the chain, i.e. either the wires, and the wires to the DTOZH are always taut, or the wires are sealed in the connector. And a break in the DTOZh circuit, with the ignition on, will definitely cause the fan to turn on. Turn on the ignition and move it, swing the wires to the sensor.
The wires to the sensor were moving, nothing was wrong... the contacts were good, and I changed the relay correctly. k7. What other wires can be moved and where?
Not a single relay in the switching unit is responsible for injection. The fan relay is one of three under the center console next to the ECU, the fuse is there. And you can move at least the entire injection harness. There have been miracles with wires breaking in the harness itself. Once even in the passage through the motor wall. But usually at the connectors of both the sensor and the ECU.
Yes, there was one ten with the spontaneous inclusion of Carlson. I fucked with her for two evenings. Only the scanner helped. It turned out that there was a short in the harness along the command circuit for requesting to turn on the air conditioner (which was not there, but there was wiring to it in the harness), and a request to turn on the air conditioner causes the radiator fan to turn on. Since the owner of the car had no plans to install an air conditioner, he simply cut off the air conditioning request wires right at the ECU connector.
Source
How to remove and replace the coolant temperature sensor (fan on) on a Priora
The process of replacing the sensor is not complicated, but before implementing it, it is important to know the following: before unscrewing it, you should unscrew the cap of the expansion tank and relieve the pressure in the cooling system. After this, you can begin dismantling work, but it is also important to take into account that after unscrewing the product, antifreeze will flow out of the installation hole. According to the manual, it is recommended to drain antifreeze from the radiator in an amount of at least 1 liter, but practice shows that if you relieve the pressure in the system and quickly replace the device, a small amount of liquid will leak out.
This is interesting! It is important to understand that if you are working on a warm engine, you need to either wait until it cools down or drain the antifreeze so as not to get burned in the process.
The process of replacing DTOZH on Priora is carried out as follows:
- Disconnect the negative terminal from the battery. Why do this? Naturally, no one is going to short-circuit the contacts, and the likelihood that they will close when in contact with metal parts of the engine is extremely low. However, after removing the sensor, antifreeze may get on the chip, and if there is voltage on it (there is none when the ignition is off), the ECU may short out. And therefore, if you do not disconnect the terminal from the battery, then after removing the chip, move it to the side so as to eliminate the possibility of a short circuit. However, to reduce the risk, it is better to disconnect the terminal on the battery.
- To make work easier, it is recommended to remove the air purification filter housing.
- After draining at least 1 liter of liquid from the cooling system (if you decide to go the right way), you need to disconnect the power supply. To do this, you need to pull back the tongue and remove the chip.
- Unscrew the sensor with an open-end wrench to “19”, and if liquid leaks out of the hole, quickly install a new sensor in place, having previously prepared it.
- When installing, do not forget about the copper washer.
- Tighten the sensor with a force of 9.3-15 Nm using a torque wrench.
This completes the process of replacing the fan sensor on the Priora. All that remains is to reset the errors from the BC and make sure that the engine is working properly, as well as the absence of signs that forced you to check and replace the DTOZH.
DIY fault repair
We will not talk about solving problems such as failure of fuses or the sensor itself. Everything is so simple here - failed elements are removed from their installation locations and replaced with new ones.
Separately, it is necessary to highlight the replacement of the ventilation unit - read about this below:
- So that during the repair process you do not have to dismantle the radiator, do everything carefully, since there is a possibility of damage to other elements.
- Open the hood and disconnect the battery. Remove the air filter.
- Having done this, you can dismantle the radiator grille.
- Next, you will need to unscrew the top mountings of the optics - the right and left lights.
- Using a 10mm wrench (it will be more convenient to take a socket wrench), you will need to remove the upper front panel.
- After these steps are completed, you will need to disconnect the plugs that are connected to the ventilation unit. Having done this, the wires can be twisted a little.
- Next, using a wrench, you will need to unscrew the four screws that secure the device to be replaced. The arrows in the photo indicate the screws that secure the assembly; they will need to be unscrewed.
- Only after the unit is freed will it be necessary to dismantle it and replace it with a new one. After removal, just in case, clean the connectors themselves so that in the future you will not be bothered by the problem of poor contact. Further assembly of the system and installation of all elements is carried out in the reverse order.
1. Remove the air filter.
2. Unscrew the mounting bolts marked with arrows.
We recommend: How to check the ABS sensor