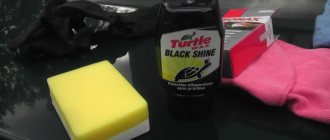
Hi all! I decided to start my drive activities with something more or less useful and significant, so I decided to describe in detail the process of painting stampings. I always wanted to cast, but with our roads, prices and the risk that they will be twisted, I preferred to stay on stamps (strictly in a boyish way), but looking at these rusty-swamp VAZ masterpieces, my heart simply bled. This is my first painting experience, so I decided to start with winter wheels. I didn’t really want to paint it in the usual black, white, silver, or bright pink, lime green, or blue, so after watching the trailers for the new NFS and admiring the casting from BBS of the “cobwebs,” I decided to paint it in gold-silver colors. To begin with, I bought everything I needed (in the photo there is enough material for 9 wheels: a winter spare tire , only then I bought an additional can of primer and varnish). For 4 wheels we need: 2 masking tape, a couple of newspapers, a can of spray paint in the colors you need (or 2 cans of the same color if you paint in 1 color), 2 primers, 1 varnish, gasoline solvent for degreasing and it is advisable, but not necessary, to buy a rust converter.
Next, we take our wheels and wash them, in 1 photo they are more or less clean (it’s a pity I didn’t take a photo in what form I got them after that winter)
After washing, you need to treat the surface, I didn’t split hairs and bought an attachment like this for a drill, plus I went over it with sandpaper.
Now we degrease the wheels and start gluing them:
Next, we proceed to the primer, in 2 layers, with breaks of 20 minutes, while the layers on the 1st wheel were drying, I covered the 2nd wheel, then the 3rd and 4th ones, so I didn’t have to get bored while the primer was drying.
Now we glue the middle, I tried to show in the photo the easiest way to do this
Well, now let's paint the rims
I also advise you to apply the paint in advance somewhere you don’t mind, just in case you don’t like the color
Now we can go eat, since it’s better to let the rims dry thoroughly, at least 2 hours.
Have you had lunch? Great! With renewed vigor we proceed to the middle, the process is the same, we pasted it over and painted it in 2 layers at intervals of 20 minutes:
We waited for the paint to dry, removed the tape from the rims and applied the varnish in 2 layers:
Next, we wait for this thing to dry and remove the rubber adhesive, ready! Just give this whole thing a day to dry thoroughly)
I will add on my own behalf: It took a day to do everything about everything, it is advisable to paint in warm weather and even more preferably indoors, I also do not advise you to rush and it is better to stretch the process over several days (1 day primer, 2 days for the first color, 3 days for 2 th color, day 4 we are varnishing) since the paint will dry better and the quality of the paint will be higher, I will do exactly this with a summer spare tire. I liked the process itself, nothing complicated, but quite labor-intensive (especially in a day), be patient. As can be seen in the photo, a little paint got on the rubber, the result of a crappy pasting, and in general, from my small but still experience - 70% of the matter depends on the pasting, so don’t slack on this matter) And if you are planning any repair actions on tire fitting, do them BEFORE painting, I was stupid and forgot to straighten one stamp (Spray paint with a can at a distance of 30 cm, do not “hover” for a long time over one point and try to paint evenly, I think I described all the nuances, if you have any questions, write in the comments , I’ll be happy to answer, happy painting!
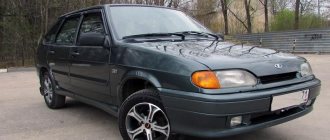
Looking for recommendations on how to paint stamped wheels yourself sometimes takes owners of not very new cars with a limited family budget by surprise. There is no interest in buying a new stamping - too soon it will be no different from the old one. You still need to save up a lot of money for cast alloy wheels, but driving on used, rusting and bent ones is not only unpleasant, but also risky - you will forget about the condition of the rims, and you may end up without wheels at all.
Spending on painting at a service station is quite illogical and expensive: it’s a fairly simple matter, it doesn’t require much intelligence, and auto mechanics will charge so much for painting work that, you see, it’s enough for one brand new alloy wheel. So painting the stampings yourself is a profitable and convenient option in all respects.
How to paint stamped wheels yourself: the instructions are detailed, clarifying all possible points and offering different options.
Preparation
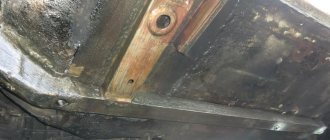
First, you need to carefully check the condition of the disc being painted. Agree, it will be extremely disappointing if it turns out that a disk that looks like a brand new one does not hold its geometry. That is, we go to the service station and roll stampings if they need it. Any small holes found (if the discs are in a disgusting condition) are welded. But it’s better not to let this happen, and not to restore a leaky disk at all (only if absolutely necessary).
That the wheels are removed from the car is not a question. Whether to remove the tires is up to everyone to decide for themselves. There are enthusiasts of complete dismantling, but most amateur car painters agree that this is unnecessary, unless you suspect rust under the slope - then the rubber will have to be removed without fail. If the ramp cannot be dismantled, it needs to be lowered a little to make it easier to work. The rubber is covered on all sides with polyethylene, its edges are hidden along the disk and secured with masking tape. You can completely cover it with pieces of masking tape.
Powder painting
There are different options for painting wheels, one of which is powder. The process is complex and requires an electrostatic spray gun and a thermal chamber.
Powder coating spray gun
Step-by-step instruction:
- Apply paint. It is important to wear a protective suit and a respirator.
- Place the discs in the oven and heat to 200 degrees. A second coat of paint may be required.
- Apply varnish.
Firing in the chamber lasts for different times. Sometimes it goes up to 8 hours.
If you have no experience in powder coating wheels, it is better not to start work, but to trust the professionals.
Disc processing
First, it is naturally washed off road deposits and dried. Then all rust spots are cleaned off and the welds are smoothed out. To speed up the process, either buy or borrow from neighbors in garages an electric drill with appropriate attachments. Hard-to-reach curves are sanded by hand
, sandpaper. Periodically, it is necessary to wash off the resulting dust so that it does not cover untreated areas and subsequently does not get under the primer or paint. If somewhere the corrosion has eaten too deeply, you will have to resort to a corrosion converter.
After cleaning, making sure that nothing is missing anywhere, the disk is finally washed, dried (for speed, you can use a hair dryer, if you have somewhere to get it), and the disk is degreased - at least with the same unchanged white spirit. Chips, deep cracks and rust holes are smoothed out with putty. After it dries, the disc will have to be degreased again.
Lada 2109 › Logbook › Stamps in the swamp. Painting wheels.
Bright sun, dry asphalt, everything was conducive to changing shoes for the summer. BUT the summer was in such a state that I could just install it and not bother. One of my friends, of course, suggested that I put hubcaps on, but it’s somehow not boyish)) There are millions of records about how everyone paints Ladovian stamps in swamp. But no matter how much I look, everyone does everything perfectly, probably all are masters. I’m not a master and this was my first time painting wheels, naturally there were some mistakes, which I’ll tell you about.
So what do we have? Rusty 4 stamps. Our task is to make candy out of them.
The budget for painting was allocated 500 rubles, and that’s basically how it turned out (550 rubles). I bought it at a car market. I bought VIKA swamp enamel for painting wheels, thin primer 89 (it’s better to take the same company as the enamel, but since it wasn’t available, I bought it from another company, in principle it’s not critical, it didn’t affect the painting in any way, some do it without it at all) degreaser , sandpaper (2 sheets 240, 2 sheets 800, 1 sheet 120)
First of all, I polished the discs, long and hard. In places of severe rust, I rubbed it with 120-grit sandpaper, and everywhere else, mostly with 240-grit sandpaper. Of course, I didn’t remove the old paint due to lack of equipment, but I brought it to a matte state.
I sanded at home, on the balcony. After the disc was prepared for priming, I sealed it and took it to the garage.
I brought it to the garage, degreased it, and started priming. The soil lay down absolutely perfect. I thought about doing two layers at first, but then I changed my mind because it turned out perfectly in one layer, without gaps.
I primed it late in the evening. I left it to dry overnight, and the next day, in the late afternoon, I took it to another garage to apply the first coat of paint. (garages are naturally not mine, where they shelter, that’s where I do them) It is very important to paint gradually, layer by layer (2-3 layers). Make layers light, do not bring the can close. The first coat of paint went on without any problems or jambs. I painted it outside, at a temperature of +4.
There are two options for painting, someone puts on the first layer, then waits 20-30 minutes and puts on the second layer. And someone puts the first layer, and after complete drying, the next day puts the second layer. The first method works, many people have done this and everything is fine, but in my case it is not suitable, since it is still cool outside, and the garage is not warm, nothing will dry out in 20-30 minutes. Therefore, I came the next day to blow out the second layer. I degreased one disc and started painting it, but everything didn’t go according to plan. After application, within 4-5 seconds the paint began to crack and swell a little. I read about paint on the Internet and realized that the so-called paint lifting effect had occurred. There can be a huge number of reasons for this. Starting from a low temperature (it was 2+) ending with the first layer not drying, which most likely, since there was a slight frost at night and probably the first layer did not dry completely. I decided not to paint anything else that day and come tomorrow.
Direct painting
At the main stage there is a subtlety: you need to process both the front side and the one facing under the bottom. People approach the issue in different ways. Some completely finish the first side (prime, paint, dry), and only then move on to the second. Others first apply a primer on all sides, then start painting, again all sides. Decide for yourself what is more convenient for you. In any case, the untreated side is covered with film while waiting, so that you don’t have to wash it again afterwards. But it is better to degrease again before immediate action.
The fully prepared disc is primed. This is done in at least two layers, but it is better to use 3-4, with breaks between approaches to allow the previous application to dry. When the soil dries completely, you can sand the surface with the finest sandpaper so that it is perfectly smooth. However, this step is not required; many people skip it.
Next step
– actual painting. The most suitable paint is acrylic. It is smoother, more economical and faster to apply it with a spray gun with an attached compressor, but you can also get by with spray cans. Acrylic is poisonous, so we follow the safety rules:
- the room should be well ventilated, otherwise it is better to do the work outside, but in the absence of strong wind and rain;
- no drafts are required. Outside you will have to wait for calm weather or find a quiet corner where the wind does not blow;
- face mask. Ideally, a respirator, but at least don’t neglect the mask.
The paint is applied from a spray can from a distance of 35-50 centimeters (different manufacturers have different requirements, so don’t forget to look at the instructions). There should also be 2-3 layers. Check the drying time according to the same instructions, but keep in mind: firstly, in dampness and coolness it takes a little longer; secondly, each subsequent layer takes a little longer to dry. Those who want to shorten the wait can remember about a hair dryer.
One more clarification:
It is necessary to spray quickly, with confident movements, so that unsightly drips do not form when the hand is kept in one position for a long time. Final drying may take several days, but certainly not less than one.
If desired, you can also coat the top of the disc with wheel varnish. This way the paint will be more resistant to abrasion and scratches, and the discs themselves will acquire a beautiful shine.
Don’t doubt your abilities, since painting stamped wheels yourself is not at all difficult. Proceed with confidence - in their processed form they will serve you for several more years.
It is generally accepted that stamped wheels only spoil the appearance of the car. Therefore, most car enthusiasts prefer hubcaps as a way out of the situation. But there is another, no less interesting and reliable solution. Painting stamped wheels will give your car a completely new look.
At the same time, it is not at all necessary to contact a specialized workshop. You can do everything yourself. This will require some equipment and supplies, as well as step-by-step implementation of all the necessary processes.
Painting process
So we got to the most important thing. Let's look at how to properly paint stamped wheels so that you don't have to redo everything from scratch later. In principle, there is nothing complicated in this process:
Read more: Where is the Chevrolet Lanos fan fuse located?
Applying paint to the rim
Of course, not everyone has a spray gun, nor does everyone have special equipment. Therefore, an upside down bucket, unnecessary tires, etc. will help again. The main thing is to be smart, as the author of this photo did:
Homemade equipment for disks
Also, it is advisable to follow these tips:
- When using an aerosol, the can must be shaken periodically;
- The temperature of the aerosol package should not be too low: 30-35 degrees is the norm;
- Keep the aerosol at a distance of 20 cm from the surface (no less);
- When painting, you should not stay in one place for a long time, otherwise streaks will form.
The paint is applied in two or three layers, maintaining an interval of 10 minutes. An hour after painting, the surface is treated with varnish. You can use the finished product within a day. But it’s better to wait 60-80 hours – during this time the varnish gains maximum strength.
Equipment and consumables
So, to complete the work you need:
Basic materials and equipment
- Spray gun with compressor;
- Drill with a special attachment;
- Sandpaper;
- Primer for discs;
- Paint (in the absence of a spray gun, aerosol at the rate of 2-3 cans per wheel);
- Solvent;
- Masking tape;
- Rags.
DIY painting is done using a spray gun and a compressor. In their absence, you can use regular cans. In addition to paint, you need to prepare a primer, sandpaper and, preferably, have a drill with a special attachment for metal brushes.
Before starting work directly, the condition of the disc is assessed for cracks, scratches and other damage, as well as rust.
Hub like a lathe
There is a method that allows you to quickly paint the rim:
- Let's say there is rust on the surface of the rim. To find out about this, you will have to disassemble the disk (Fig. 1);
- Next, the disk is mounted on the hub, the engine is started and the gear is engaged (Fig. 2);
- If you are using a left-hand hub, turn the steering wheel to the left, and vice versa;
- Using cloth-based sandpaper, sanding is carried out (Fig. 3). It is better to fix the sandpaper on a block;
- Just as “preparation” was done in step 4, painting can be done (Fig. 4).
Read more: Hi gear rust converter
Car stamped wheels lose their original appearance over time, and this has a negative impact on the overall appearance of the car. This is where the dilemma arises: paint it yourself or go to a service center. But service services are not always affordable, and you will have to spend a lot of time. So let's start painting it ourselves.
Main stages
Painting stamped wheels is practically no different from painting a car body. It is carried out in several stages. If the sequence is followed correctly, a good result is guaranteed. Below are the main types of work that need to be done:
- Preparation of equipment and materials;
- Preparation of stamped discs;
- Application of primer;
- Painting;
- Applying varnish.
Working with a drill with an attachment
Preparing stamped discs for DIY painting
After removing the tire from it, the disk must be thoroughly washed. Regular detergents can be used for this purpose. If there are places with complex contamination, then chemicals are used to clean them. Next you need to take the following steps:
- Carry out a thorough inspection for damage. If deep cracks are detected, they are processed using a file. Detected dents are straightened.
- If, as a result of the inspection, pockets of corrosion were found, they should be eliminated. For this purpose, grinding or chemical treatment can be used.
Read more: How to fill oil in a Peugeot 408 box
It is advisable to dwell on the last point in more detail. In order for the fight against rust to be successful, it is necessary to prepare the following materials:
- A set of sandpaper from P60 to P120. The number of sandpaper used depends on the depth of damage to the metal surface.
- A rust converting chemical, plus some solvent.
- A lot of rags.
Processing should begin with grinding work.
For grinding, you can use a drill with a wire brush attachment.
You can sand with sandpaper either by hand or using an attachment for an electric drill. It looks like a metal brush. The goal of this stage is to make the entire surface of the discs absolutely flat.
Primer
Before you start applying paint to the surface, it is necessary to prime it so that the painting of steel wheels is of high quality. The primer is applied in several layers (usually two or three). After the last layer has dried, it is necessary to sand the surface so that it is smooth.
When doing all this work with your own hands, it is important to remember that the break between applying each layer can be from 4 to 6 minutes.
Thank you, your order is already being processed! We will call you soon!
You can continue to edit the ordered print, or create a new one
- PROMO 79 rub.
- PNG format
- High quality
- Transparent background
- ECONOM 119 rub.
- PNG + SVG format
- High quality
- Transparent background
- Scalability
- PREMIUM 169 rub.
- PDF
+ SVG + PNG - High quality
- Transparent background
- Scalability
- GOLD WORD 209 rub.
- DOCX
+PDF+SVG+PNG - High quality
- Transparent background
- Scalability
In order to continue, pay 63 rubles.
After payment, a button to download the layout will appear in the designer, and the layout will also be sent to your email (If the button does not appear, refresh the F5 page)
.
Enter your email
If the payment page does not open, we recommend doing the following:
1. Disable the Adblock plugin (or other ad blocker
2. Clear your browser cache
3. Temporarily disable ad blocking in your firewall (antivirus) settings
An email will be sent to your email with a link to the saved layout.
Every organization is faced with the need to buy a seal . This is a mandatory attribute of business relationships. However, it is important to pay attention not only to the shape and size of the print . For the stamp to work, you need to choose the right ink for it.
Nowadays, three types of inks for stamps are popular: alcohol, oil and water. The use of each of them depends on several factors:
- the surface to be stamped;
- required color scheme;
- type of cliche and pillow used;
- financial capabilities of the buyer.
It is important to remember that all stamp inks have their pros and cons. Therefore, the selection of dye should be taken responsibly. You should not be guided by advertising or the advice of friends. It is advisable to understand their features yourself in order to get the desired result and avoid unnecessary financial costs, as well as unpleasant moments.
Types of dyes for stamps: advantages and disadvantages
Modern technologies allow the owner of the company to make the print himself, pay for the service of the company for the production of these products and download the seal online. However, you need to decide in advance what stamp ink you will use.
Water-based (water-glycerin) paints
The basis of these dyes is water and glycerin. They are perfectly absorbed by paper and are suitable for all types of stamp pads (desktop and removable). It is important that such dyes do not destroy the stamp cliché. Therefore, they are compatible with both manual and automatic options.
Users love the rich range of colors of this type of paint. In addition to standard shades (black, purple, blue, green), you can choose original ones:
- menthol;
- orange;
- yellow;
- pink;
- brown;
- white (for colored paper).
However, gray or other light shades are an indication that the dye is running low. The production of water-based and water-glycerin paints requires extremely bright colors, which is considered their disadvantage.
Alcohol dyes for stamps
They are practically not absorbed by surfaces. They dry quickly, so they do not form blots. This solution will appeal to careful users.
However, the disadvantage of alcohol ink is its destructive effect on the cliché (the print and the pillow dry to each other). Therefore, it is better not to use it with automatic equipment. Also, the buyer of such a product should know that he will have to change even table pillows often.
However, the advantage of alcohol dyes is the richness of the color range. There are even clear ultraviolet (fluorescent) stamp inks.
Informed users are well aware of Noris 196-C paint. This is a classic example of alcohol stamp ink.
Oil paints for stamps
Imprints of such dyes are not removed. They are distinguished by deep absorption into the structure of the material. This can be both a positive and negative side of this decision. However, in complex cases, such imprints are evidence of the exact date of production or dispatch of the goods, etc.
These products are best used with metal cliches. They are often used with special franking machines.
Application of paints
Water-based dyes are usually used for paper or cardboard. Where to print using water-based dyes? These seals are suitable for documents, envelopes or paper parcels. An excellent option for documents.
Spirit dyes are good for wood, plastic, glass surfaces, as well as glossy paper and polyethylene. With their help, logos are perfectly applied, as well as production batch numbers and dates. Alcohol-based fluorescent paints are suitable for nightclubs or checkpoints (sometimes they place imprints on the hands of visitors).
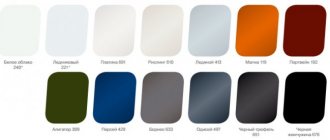
Swamp color of vases disks paint number
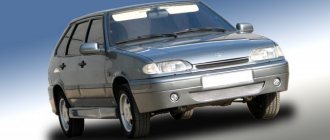
The body colors of VAZ cars and color numbers given in the table below will help you find out the color of the car and the paint number of the car. It is applicable to the following models of domestic VAZ cars: 1111 Oka, 2101-2121, 2131 (Niva) 4×4, Chevrolet Niva, LADA Priora (Priora), LADA Kalina (Kalina), LADA Kalina Sport, LADA 110, LADA 112 Coupe, LADA Samara, LADA 2105, LADA 2107, LADA 4×4, LADA Granta, Volga, IZH, GAZ cars
How to find out the color of a VAZ car
The label with the body color number of domestic cars can be found on the trunk lid, in the glove compartment, in the spare tire niche near the spare wheel or under it, under the brake light on the spoiler. This simple piece of paper is called Form 3347. It can be difficult to find, easy to lose, and easy to forget. Therefore, if it is found, champions recommend writing down the number and name of the paint with a marker on the inside of the gas tank flap. If you have a used car, check to see if someone has already done this.
Please also note that the color code is also written on the warranty card .
What else can you do to find out “what is my Lada painted?” An alternative is to contact the dealer from whom you bought the car, which works naturally only if the dealer is a completely official organization.
If you do not have any documentary evidence indicating the color your car is painted, you can try to establish this using the LADA painting plan at the factory. To do this, you need to know the exact date (year, month, day +/-) of the release of your car and it should not be younger than 2005. If you know the date, write to us and we will try to find out the color of the car this way.
However, the surest way to determine color is to contact a colorist . And you can choose the right shade if you show the colorist the gas tank flap, with the help of which a specialist using special equipment will be able to make paint for you exactly in the color and in the volume you need - tint, spray can or can. Actually, all this can be done in our computer paint selection laboratories.