Adjusting Niva fog lights
The Niva's fog headlights are also adjusted manually. To do this, we rotate each headlight vertically and horizontally until it meets our standard. Of course, you should first unscrew the mounting bolts a little for practicality and ease of setup.
After completing the procedure, do not forget to tighten the bolts again. Remember that it is strictly forbidden to adjust the light beams so that they blind oncoming drivers. For such an act, you can safely receive an administrative fine for obstructing the driving of oncoming traffic. The fine starts from 500 rubles. The amount is not large, but the human factor plays a greater role here.
Remember the main thing is that if the body of the Chevrolet Niva is not damaged, the optics are intact, then there is no special need to adjust the headlights. Sometimes they resort to tuning when the owner intends to tune the car with non-standard equipment.
In such cases, a new mounting socket can be cut out, optics with a completely new shape can be installed, and new electrical power cables can be pulled. But that's a completely different story.
The video below shows how to adjust the headlights of a Chevrolet Niva with your own hands, taking into account the angle of incidence of the headlights.
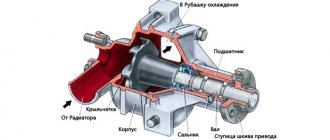
Over time, a Chevrolet NIVA car owner may be faced with the need to adjust the high and low beam headlights, as the quality of light reflection gradually becomes worse.
At night, visibility and vehicle control depend on how bright the optics are.
Therefore, the importance of the correct placement of lighting is very important for every driver.
Lada 4×4 3D Nessi34 › Logbook › Replacing lamps in Niva headlights and adjusting them.
The standard original lamps and the headlights in general are a quiet horror, plus my right headlight was fallen, generally shining dully at the very bottom. In preparation for the autumn bad weather and winter darkness, I decided to replace the lamps and adjust the light, otherwise driving in the dark on a country road without markings was relatively safe only at a speed of no more than 50-60 km/h. I ordered the lamps Osram 64206ALL 85/80 through the online store www.h4.ru, they were sent the next day after payment, delivery by Russian Post took a little more than 2 weeks.
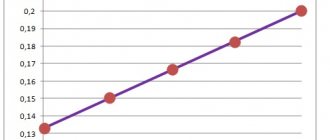
. You can also buy OSRAM ALLSEASON super H4 12V 60/55 W P43t+30% there; they are cheaper, but on the forums they write that they work with overheating and their service life is usually half as long. Therefore, I chose higher wattage lamps. I unscrewed the radiator grille, there were two more latches on the sides, one opened very easily, the second didn’t want to open at all, and the weather outside was cool, in the end I broke one latch, but the screws and one latch held the grille together normally. At first I tried to adjust the headlights using the adjusting screws; I raised the left headlight (more or less shining) just a little - by one turn of the screw. On the right headlight, I unscrewed the screw all the way, but the headlight still looked very down. Then I had to use a spacer from the tip of a plastic pen cap (see photo), cut off about 7-8mm
, put it on the pusher ball of the headlight hydrocorrector and it hit the mark exactly - both headlights began to shine with the upper edge of the beam in the same plane. I turned the hydraulic corrector, both headlights lower and rise in the upper range more or less equally, although the right headlight has a total stroke less than 1.5 times. I was very pleased with the light itself with the new bulbs! The light became brighter and yellowish. Light with a yellowish tint works very well in fog, rain or snow, just what you need! It became better visible in both low and high beams, and the beam became noticeably wider. The light patterns are clear, I've been driving around with these lamps for more than a month, driving around the region both empty and loaded with a trailer, I can see everything well, and people I met have never blinked at me, which certainly makes me very happy! Dad also immediately wanted the same light bulbs as mine for his Niva. I did not adjust my headlights more precisely, and it seems to me that it turned out not bad. One of the homemade ways to check is to drive up from behind (usually at a traffic light) to a Zhiguli/classic car at a distance of 5 meters, the upper limit of the low beam should not be higher than the upper limit of the rear license plate, mine is now near the lower limit of the license plate, but that’s not enough for me enough already. Now, in the dark, you can move more safely at a decent speed (up to 100 km/h) on roads with a complete lack of markings! In general, I was pleased with the purchase, I hope the bulbs will shine for quite a long time!
Lamps price 450 per piece + 215 rubles sent by mail for a total of about 1115 rubles.
Source
What headlights should I put on my car?
Niva 2121 4x4 headlights, sidelights, and other optics allow you to increase visibility on the road at night. Thanks to internal optics, the car owner has the opportunity to illuminate the interior of the 2121 4x4 and other components of the car. In addition, with the help of headlights, the driver can warn other motorists about what maneuver he plans to make. Accordingly, a lot depends on the quality of the headlights in the 2121 4x4 model, especially since each optical element performs a specific function.
Tuned lights and sidelights for Niva
The 2121 4x4 headlights or taillights can use a variety of bulb types.
As a rule, these are gas-discharge elements, which can be of the following types:
- incandescent or halogen, which today are considered one of the most common options, can be used for both low and high beam lighting;
- xenon - one of the most modern options, can also be used for high or low beam lighting;
- tungsten - the cost of such devices is the lowest, but their quality of light intensity is not high.
Recently, Niv 2121 4x4 car owners have been practicing the use of LED bulbs in crystal headlights. Moreover, they are used not only for signal options, but also as a source of main lighting. In fact, LED elements are brighter, unlike halogen and xenon, and by about 300%. Moreover, the density of light fill in this case is also higher. LED headlights are suitable for those Niva 2121 4x4, the headlight size of which is 7 inches.
Tuning headlight for Niva
Installing modern tuned headlights on a Niva 2121 is not a difficult procedure. Moreover, over time, many car owners of domestic SUVs come to this in order to improve head lighting. Indeed, recently more and more optics manufacturers have appeared on the domestic market, which can boast of high-quality flashlights. There are many options for purchasing from a Niva 2121 car owner - these can be either crystal or tank options; the choice of manufacturer depends solely on the preferences of the motorist and his financial capabilities.
As practice shows, many 21213 owners choose Wesem brand headlights. Such optics can be easily installed instead of standard ones. Such lights are ideal for domestic SUVs - they can be installed in ten minutes, especially since such optics are characterized by good lighting compared to traditional ones. Flashlights of this type are ideal for 21213 and 21214; they are equipped with 12 or 24 volt bulbs.
As for fog optics, the Wesem brand offers car owners such lights. If you believe the reviews, the anti-fog elements are characterized by a clear outline of the lighting boundaries - both lower and upper. Accordingly, thanks to this, the owner of model 21214 has the opportunity to correctly configure and adjust in accordance with GOST. In fact, fog lights practically do not blind drivers of oncoming cars; in combination with low beams, they can provide better lighting.
Niva headlight
Rear lights
Trouble-free installation of rear optics is only possible when choosing the factory option. Any similar solutions most often turn out to be larger or smaller in size. When purchasing Niva taillights, you should focus on the products of the following manufacturers:
- OSVAR, DAAZ. , and the consumables they sell are characterized by optimal brightness.
- ProSport - crystal headlights that provide bright illumination of the road surface due to the glass configuration.
You can change the rear lights in the following order:
- Remove the wiring harness.
- Unscrew several "8" nuts from the inside.
- Repeat the procedure outside.
- Pull the released optics towards you.
- Remove the bulbs from the headlight housing by pressing them and turning them counterclockwise.
- Replace the headlights with new ones and install in the reverse order.
Replacing low beam lamps on a Chevrolet Niva — Chevrolet Niva, 1.8 l., 2011 on DRIVE2
Hi all!
Yesterday the left low beam bulb burned out. Yes, left again. I don’t know why this happened, but the left lamp is always the first to go out. I always change both at once.
Not because I’m a bourgeois, but so as not to have to explain to the traffic police later “why my headlights are shining differently,” and not have to poke around again, proving that I didn’t “do anything illegal” there.
In addition, the second lamp also has a damaged filament and will not last long anyway.
So I change both. Last time it was Osram Night Breaker. As in the picture below. No complaints, except for the price of 1,700 rubles. They lasted for 2 years despite the fact that I did not install separate running lights.
I always turn on the low beams. I can also note that they shine with white light, which creates a certain comfort when driving at night. Well, the declared brightness of 120% seems to be fulfilled, although this is only “by eye”.
I did not measure with instruments.
Osram Night Breaker
This time I could have bought them too, but I found others on sale: Philips Racing Vision with a declared brightness of 150%. It’s not that I’m a fan of brightness, but it’s always nice when the headlights shine well, it’s easier on the eyes.
They say that this makes the lamps have a shorter lifespan, but judging by the Osrams, they lasted 2 years. I can’t say that the original lamps worked longer. Price for Philips = 1400 rubles.
Let's see how they shine and how long they last.
They look like this:
Full size
Philips Racer Vision
Full size
Philips Racer Vision
For those who are just studying the design of the Chevrolet Niva, I will say that replacing lamps is elementary. No trip to service required.
Remove the rubber boots from the back of the headlights (it’s impossible to make a mistake there), remove the terminals from the lamp (remember the colors of the wires, they are different), press the spring down and to the side and the lamp snaps off. Put the new one back in the same way (do not touch the glass! so as not to get it dirty).
It is inserted into the socket in the only correct way. There is a special “tongue” for this. Don't get confused. Then you snap it on. Put on the wiring. Close the anthers. To replace the right headlight, you will need to unfasten it for a while and move the barrel with the washer. Nothing complicated.
But you will be sure that you will have exactly your good, expensive lamps. And sometimes it happens that at the service they put not what you brought, but something “other”...
Thank you for your attention!
Issue price: 1,400 ₽
Replacement
Replacing the low beam lamp on a Chevrolet Niva can be done by service station specialists, but this replacement is simple, so many people do it themselves.
To do this you will need a standard set of tools and materials:
To get started, you need to disconnect the negative terminal of the battery. Take the key.
Then you need to remove the washer reservoir from its mountings and move it to the side.
We clean the protective cover from dirt with a rag and remove it
To disconnect the lamp contacts, you need to pull them firmly.
After this, press the latch and move it to the side.
Need to get an old lamp
When installing a new lamp, do not hold it by the glass. You need gloves and carry it by holding it by the plinth. If marks accidentally appear on the lamp while working, you need to remove them with a clean ladder.
When installing, you need to pay attention to the position of the lamp. It must fit into a special groove in order to be at the desired point under the diffuser
Then the new one is pressed with a clamp and the contacts are installed in place.
Then close the protective cover and proceed to installation on the other side
Source
Automatic correction
Even the most accurate manual correction is inferior to automatic adjustment. Using auto-correction, you can achieve better performance. This will also affect the subsequent operation of the Niva. Auto-correction is recommended when xenon or halogen headlights are installed.
The main advantage of an automatic corrector is that the light beam is set and maintained in accordance with road conditions. The nature of the vehicle's movement is taken into account. Namely:
- driving on uneven roads;
- turns right, left;
- braking;
- going uphill.
The automatic corrector consists of:
- 2-3 ride height sensors (installed front and rear);
- electronic unit;
- actuators.
Using the block, the ground clearance of different axles of the Niva is monitored. Those. it automatically detects body tilt. This data is processed and the headlight angle is adjusted.
How to install autocorrector on Niva:
- The headlights are removed.
- The old manual corrector is removed.
- The new sensor socket is secured with sealant.
- A headlight corrector is installed in it.
- The ground clearance sensor is attached to the bottom.
- The device wire is pulled through a tunnel with tubes.
No additional adjustments are necessary. The headlights will adjust themselves, taking into account the load of the Niva and the nature of its movement. The installation itself will take no more than 10 minutes. The only drawback of this device is its high cost. The cost of an electromechanical corrector starts from 1,700 rubles, but for installation you only have to buy a sealant.
As you can see, Niva owners can independently set the beams of light on the headlights without using improvised means. The main thing is to strictly follow the instructions and prepare the test site correctly.
On the one hand, we can agree with this, because what kind of security can we talk about if there is no decent coverage. But on the other hand, some cars have optics installed by the manufacturer themselves, which do not shine with quality and fine-tuning.
This applies to a greater extent to domestic cars. And if the car has a solid mileage, then there is no point in further discussion at all. We know that with every ray of sunlight, optics fade and become duller. The ability to qualitatively reflect the light of lamps in headlights is gradually decreasing.
Moreover, an accident or traffic accident can lead to damage to the body part and the geometry of the frame will be disrupted. Regardless of whether the optics are new or old, they will shine worse.
Do-it-yourself headlight adjustment Niva 21214 video
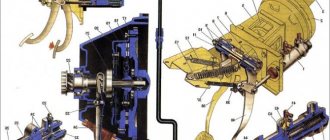
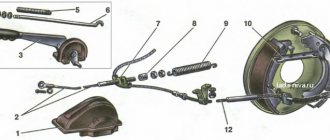
Niva all-terrain vehicle. Adjusting the headlights
| 1, 7 – screws for adjusting the direction of the headlight beam; 2 – optical element; 3 – screw for fastening the rim of the optical element; | 4 – decorative lining of the front of the body; 5 – screw for fastening decorative cladding; 6 – rim of the optical element |
The direction of the light beams of the headlights should be such that the road in front of the car is well illuminated, and oncoming drivers are not blinded when the low beam is turned on.
The headlights are adjusted by rotating screws 1 and 7, which rotate the optical element in the vertical and horizontal planes.
It is most convenient to adjust the headlights using mobile optical devices. If they are not there, then adjustments can be made using the screen.
Niva all-terrain vehicle. Headlight adjustment diagram
Place a fully fueled and equipped car, with a load of 735 N (75 kgf) on the driver’s seat, on a flat horizontal platform 5 m from a smooth wall or any screen (plywood panel measuring about 2x1 m, etc.) so that the axis of the car was perpendicular to it. Before marking the screen, make sure that the air pressure in the tires is normal, and then rock the car sideways to install the suspension springs.
Draw vertical lines on the screen: center line 0 and lines A and B passing through points E, corresponding to the centers of the headlights. These lines must be symmetrical with respect to the center line of the vehicle. At a height corresponding to the distance of the centers of the headlights from the floor, draw line 1 and 65 mm below it, line 2 of the centers of the light spots.
If the car has a hydraulic headlight leveler, then set its handle on the instrument panel to a position that corresponds to the vehicle load of one driver.
Turn on low beam headlights. Sequentially, first for the right headlight (the left one is covered with a piece of cardboard or dark matter or is turned off), and then for the left one (the right one is closed), adjust the light beams of the headlights with screws 1 and 7 (see Fig. Adjusting the headlights).
21.8.1.1. Removing and disassembling the headlight, replacing the lamp
Disconnect the negative cable from the battery. Remove the radiator trim (see Removing the radiator trim).
Using a Phillips screwdriver, loosen the three screws securing the rim of the optical element to the headlight housing.
By turning the bezel counterclockwise...
We take out the optical element of the headlight...
...and disconnect the block from the lamp.
Opening the two ears of the wire holder...
We take the lamp, suitable for use or new, only by the base, without touching the glass bulb. To remove the headlight housing...
...in the engine compartment we disconnect the headlight wire block.
Use a screwdriver to pry off the rubber plug of the mudguard...
...we take it out and push the block into the hole formed. Disconnect the hydraulic corrector from the headlight (see Removing the hydraulic corrector for headlights).
Using a Phillips screwdriver, unscrew the four screws securing the headlight housing to the body.
Remove the headlight housing.
Having installed the headlight on the car in the reverse order, we adjust it (see Adjusting the headlights).
Car enthusiasts have always wanted to improve their car, and this applies to many areas, especially lighting. Tuning headlights on a VAZ-2121 is no exception. The car's good cross-country ability allows it to be used in difficult conditions, where lighting is extremely important. With the help of fairly simple manipulations with minimal cost, you can significantly improve the illumination of the route.
Adjusting Niva fog lights
The Niva's fog headlights are also adjusted manually. To do this, we rotate each headlight vertically and horizontally until it meets our standard. Of course, you should first unscrew the mounting bolts a little for practicality and ease of setup.
After completing the procedure, do not forget to tighten the bolts again. Remember that it is strictly forbidden to adjust the light beams so that they blind oncoming drivers. For such an act, you can safely receive an administrative fine for obstructing the driving of oncoming traffic. The fine starts from 500 rubles. The amount is not large, but the human factor plays a greater role here.
Remember the main thing is that if the body of the Chevrolet Niva is not damaged, the optics are intact, then there is no special need to adjust the headlights. Sometimes they resort to tuning when the owner intends to tune the car with non-standard equipment.
In such cases, a new mounting socket can be cut out, optics with a completely new shape can be installed, and new electrical power cables can be pulled. But that's a completely different story.
The video below shows how to adjust the headlights of a Chevrolet Niva with your own hands, taking into account the angle of incidence of the headlights.
Over time, a Chevrolet NIVA car owner may be faced with the need to adjust the high and low beam headlights, as the quality of light reflection gradually becomes worse.
At night, visibility and vehicle control depend on how bright the optics are.
Therefore, the importance of the correct placement of lighting is very important for every driver.
How to adjust headlights
To adjust the optics on the Niva 2121, you must:
- Understand the design of lighting devices.
- Prepare tools and materials.
- Place the Niva on a flat surface.
- Draw a diagram using a test panel.
You can study the Niva optics using the manual. Instructions are issued when purchasing a car. If you are the owner of a used car, then the manual can be found on one of the thematic sites.
Required tools and materials
Tools you will need:
- Phillips screwdriver;
- shield to cover the headlight.
It is also recommended to check the tire pressure and fill the car with gasoline to a certain level. Add antifreeze and washer fluid. A load equal to the driver's weight should be placed on the front seat. Remove the spare tire and large, heavy items from the trunk. Those. it is necessary to bring the Niva into full “combat” condition, in which it is most often used.
In addition to the tools, it is necessary to prepare a site for testing. It will serve as an adjustment stand. She may find herself:
It is necessary to draw an adjustment diagram on the stand. It is the same for all vehicles.
Step-by-step instructions and work diagram
As already mentioned, the first step is to draw markings on the test bench. This is done like this:
- Draw an axis of symmetry in the middle of the stand.
- Draw two straight lines from the floor to the end of the stand. They should be exactly in the center of the headlights.
- Draw two parallel lines. The height of the first is equal to the level above the floor, the second is 120 mm. If a hydraulic corrector is installed, reduce the height by 65 mm.
- We set the hydraulic corrector handle to the minimum load position.
Make sure that the surface of the area where the car is located is flat, without slopes or elevations.
Now about how to adjust the headlights:
- We place the Niva in front of the stand. Distance – 5 meters.
- We clean the optics with ethyl alcohol.
- We start the car. Otherwise the battery may run out.
- Turn on the low beam.
- Open the hood.
- Covers one of the headlights with a special shield.
- We expose the beams in a vertical direction. Take a Phillips screwdriver and turn the adjusting screw. It is located on the side of the radiator grille. Turn the screws in the same direction by the same number of turns. Error allowed, maximum three clicks.
- Adjusting the horizontal plane. To do this, the same screws are used, only now they need to be rotated in the opposite direction. The first is counterclockwise, the second is clockwise. We make revolutions at the same time.
- During the rotation process, we achieve the effect of placing the light beam no higher than the horizontal line of the shield. The inclined line should intersect with the lines in the vertical direction at the centers of the right and left parts.
- We set the light on the second headlight of the Niva car.
- We check the adjusted elements first on the stand, then on the road.
Even the most accurate manual correction is inferior to automatic adjustment. Using auto-correction, you can achieve better performance. This will also affect the subsequent operation of the Niva. Auto-correction is recommended when xenon or halogen headlights are installed.
The main advantage of an automatic corrector is that the light beam is set and maintained in accordance with road conditions. The nature of the vehicle's movement is taken into account. Namely:
- driving on uneven roads;
- turns right, left;
- braking;
- going uphill.
The automatic corrector consists of:
- 2-3 ride height sensors (installed front and rear);
- electronic unit;
- actuators.
Using the block, the ground clearance of different axles of the Niva is monitored. Those. it automatically detects body tilt. This data is processed and the headlight angle is adjusted.
How to install autocorrector on Niva:
- The headlights are removed.
- The old manual corrector is removed.
- The new sensor socket is secured with sealant.
- A headlight corrector is installed in it.
- The ground clearance sensor is attached to the bottom.
- The device wire is pulled through a tunnel with tubes.
No additional adjustments are necessary. The headlights will adjust themselves, taking into account the load of the Niva and the nature of its movement. The installation itself will take no more than 10 minutes. The only drawback of this device is its high cost. The cost of an electromechanical corrector starts from 1,700 rubles, but for installation you only have to buy a sealant.
As you can see, Niva owners can independently set the beams of light on the headlights without using improvised means. The main thing is to strictly follow the instructions and prepare the test site correctly.
source
Lamp selection
Type
So, if the low beam light on your car does not light up, then most likely the reason for this is its burnout. Accordingly, before you decide to replace it, you need to select and purchase a new lamp.
To do this, first of all, you need to figure out which low beam lamp is installed on the Niva Chevrolet. There are two types:
| Lamp type | Peculiarities |
| H4 | Double-filament (high and low beam combined) |
| H7 | Single strand |
H7 standard halogen bulb
In our case, we will need an H7 low beam lamp - on the Niva Chevrolet, the headlight unit is divided into two compartments, respectively, separate single-filament bulbs are used for low and high beam lighting.
Xenon bulb H7
What to look for when choosing
Of course, in addition to the design type of the lighting element, it is also necessary to pay attention to some of its characteristics. The most important parameter is the luminous flux power
It largely depends on the operating principle of the lighting element.
Below is a comparison of the power of light fluxes per watt of power of different types of lamps:
| Lamp type | Luminous flux power, 12 lm/W |
| Incandescent | 12 |
| Halogen | 16 |
| Halogen with quartz glass | 24 |
| Xenon arc | 91 |
| Light-emitting diode | 132 |
| Sodium gas discharge | Up to 200 |
Not only the power of the luminous flux, but also its price depends on the operating principle of the lighting element. The most affordable are halogen bulbs, and the most expensive are xenon and LED.
In the photo - LED light bulb
It should be noted that in addition to being cheap, they also have other advantages:
- Good light penetration. Therefore, they illuminate the road better than others in bad weather.
- They do not require the installation of additional equipment, unlike LED and xenon ones. Therefore, it is not difficult to replace the light bulb yourself.
Therefore, despite the lower brightness and yellowish color of the light flux, they are the most common.
Headlamp diagram
Selection options
Domestic SUVs are equipped not only with external headlights, but also with interior lighting. Thanks to optics, a car enthusiast can not only illuminate the road surface while driving, but also warn other drivers about possible maneuvers that he wants to make.
Depending on the type of optics, different types of light sources can be used in flashlights; when choosing, you should decide what type of lamps will be used:
- The standard option is incandescent or halogen light bulbs. Currently, such lighting sources are among the most common among our car enthusiasts. Such lamps can be used to provide both low and high beam.
- Gas discharge lamps or xenon. This option is considered one of the most modern; it can also be used for both low and high beams. The use of xenon is allowed in optics that are designed for this purpose.
- LED bulbs. This option has only been gaining popularity recently. The main advantage of diode light sources is low energy consumption, as well as a long service life. Moreover, with relatively low energy consumption, diodes can provide lighting of no less quality than xenon, and more efficient than halogen lamps. When compared with halogen and incandescent light bulbs, the efficiency of diodes is 300% higher, and the filling density is also significantly higher. Diode lamps or strips can also be installed in fog lights, as well as rear brake lights and parking lights. Often diodes are installed in crystal lanterns.
Repair of fog light adjustment on a Chevrolet Niva
Until recently, I didn’t have fog lights; I only drove with the main headlights. Although no, I have a connector on the bumper for the PTF on my Chevrolet Niva, there are even fog lights, but they are rusty and have not worked for me since the purchase. I suddenly changed them for new ones, I just went to the store, bought a spare part, but it turned out that it was much cheaper than I expected, so I decided to buy fog lights with the rest. It turned out that they really help improve visibility, especially in bad weather conditions. And now there is no need to constantly turn on the low beam.
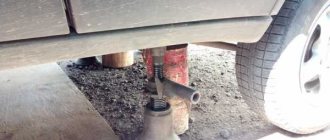
And during a hunting trip, I had to drive in very hard-to-reach places, and that’s where I broke my foglight adjustment. The PTF fasteners were also damaged, but I repaired them the very next day. The adjustment also needs to be fixed, because the bulbs themselves are very bright and, during normal driving, I point them down, but when driving through the forest, when there is not enough light, I lift the PTF up to give more light. We recommend:
I didn’t want to change the entire adjustment system; I needed to come up with some simple repair method. After thinking everything over, I realized that ordinary zip ties can help me with this. I dismantled the fog lights on the car, and replaced the main screw in place of the standard adjusting screw. After this, carefully place a piece of belt on the screw, bend it at the installation site and fasten it to the plastic with a so-called bug. After that, I manually checked whether the adjustment worked. The travel of the fog lights ended up being 5 millimeters. The entire structure was assembled and installed in place.
Now you need to adjust the PTF for civilian driving so that the lighting does not blind oncoming drivers. I made marks on the garage door, parked the car on an even level and turned on the fog lights. Yes, there is a slight flare left. Unfortunately, I did not take into account that the iron fastening of the PTF was also slightly adjusted as a result of the collision with the pit. Here everything is easily solved, you just need to bend the holder correctly with your hands and then the flare will disappear.
Review of LED optics, which we recommend for installation on the Niva.
Let's agree on the shore - the review goes from worst to best, we recommend headlights No. 5 for installation, but they are the most expensive, but the author of this review himself uses headlights number 1.
All compatible headlights can be found at this link.
Option 1 – CO LIGHT 50W 30W 7 Inch. (cost with delivery approximately 79$-5100r.)
You can order here - ru.aliexpress.com (delivery time is about 20 days, since there is delivery from Russia).
Dismantling
In some cases, in order to correctly adjust the light beam or as a result of mechanical damage, you need to remove the headlight, this is also due to the fact that over time the lamps become cloudy, as a result the power of the luminous flux deteriorates. If you don’t know how to remove a headlight on a Chevrolet Niva, you need to prepare a standard set of tools and do the following:
- Remove the terminals from the battery;
- The decorative lining of the radiator is removed; to do this, self-tapping screws are unscrewed from its mounting, which is located under the license plate;
- The power wires are disconnected from the light element;
- The wires from the hydraulic light corrector are disconnected;
- The front and right mounting screws are unscrewed from the headlight; for this, a ten key is used;
- The screws that secure the decorative trim of the headlight are unscrewed, after which it is removed;
- Unscrew the screws that are located under the cladding;
- The headlight is removed from the seat; if the fastenings are difficult to press out, you can use a screwdriver.
At this point, all work can be considered completed. Assembly is carried out in reverse order.
You should know that when replacing halogen lamps, it is not advisable to touch the bulb with your fingers, so you need to work with clean gloves, otherwise they will begin to become cloudy; if you do touch it, you need to wipe it with an alcohol rag.
Types of headlight tuning
Today there are a large number of manufacturers of high-quality optics, so choosing suitable flashlights should not be a problem. Here a lot depends purely on the personal preferences of the driver. You can install different types of light bulbs on the rear and front lights, which are divided into the following types:
- The most common are halogen and incandescent lamps;
- More modern xenon lamps;
- Tungsten lamps are considered the cheapest and least practical.
You can also use standard headlights from other cars. But for this you need to have specific knowledge in order to organize seats for lighting elements and adjust the luminous flux so that it does not dazzle other road users. This applies primarily to the front headlights, since the rear lighting elements are more aesthetic in nature and do not require adjustment of the luminous flux.
One of the ways to tune Niva 21214 headlights is to install so-called tank lights on the front bumper of the car. This tuning method is one of the most common not only among Niva owners, but also other SUV class cars. To make the car stand out from the rest of the mass of vehicles, a tint film is glued to the tank lights. You can also dim the headlights or create another eye-catching effect.
A few words about adjusting the light on the stand
All vehicle operating instructions recommend making such adjustments on a special stand. How to remove headlights on a Nissan Qashqai. However, in some cases this operation can be easily performed independently. In cases where body repairs were carried out to restore body geometry
, it is best to contact the service and perform this procedure using a special stand.
The photo shows one of these stands. It is a stand that rotates freely in any direction. A system for laser centering of the light beam, a glass lens with a lux meter, and a mirror for precise positioning are placed on it.
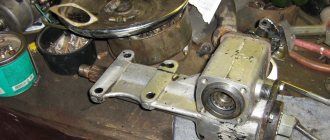
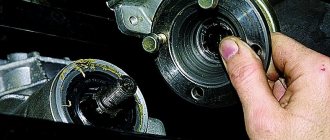
Now, on my third Niva, I am faced with the problem of the headlight beam being too low. Even in the highest position of the hydraulic corrector, the headlights on the low beam shine low, almost under the bumper. The solution came after removing the optical element. Having disconnected it from the block with wires and put it aside, we see the headlight housing. A hydraulic corrector is installed below:
It is clear that in order to raise the light beam higher, you need to lengthen the hydraulic corrector pin, which rests on the headlight housing. A cap from the cheapest ballpoint pen is ideal for this.
We take two identical caps (this is important because
different caps have different internal diameters and different tapers) and cut it into two parts about 3 mm above the place where the clothespin attachment ends on the cap (aka the pin for holding the pen in your pocket):
Then we put the cut off tips of the caps on the pins of the hydraulic corrector:
Before this, you need to lower the headlights as far as possible using the hydraulic corrector, otherwise the caps may not fit between the pin and the housing. All! Work is done. We install the optics in place. Now the hydraulic corrector can be set to the middle position. The headlights will shine optimally. At the same time, we have the opportunity to adjust the headlights both up and down. Since, as I said above, the internal diameter of the caps varies, it may be necessary to cut a little further from the pin, about 5 mm from it. This is already being done experimentally. That is, we first cut off at a distance of 3 mm, if after installing the caps on the hydrocorrector pins the light is too high, then remove the caps and trim them another couple of millimeters.
From the Lead FAQ. Such an operation should be performed only after the standard adjustment with the screws on the right and left of each headlight has proven insufficient. In this case, each pair of screws for each headlight must be screwed in the same way.
How to properly adjust Niva headlights
In total, there are three main methods that are used for adjustment:
- Seek help from experienced mechanics. Not in our case, since we want to learn how to do everything with our own hands;
- apply a special technique to adjust the headlights;
- adjust by eye to a spot on the road.
Also interesting: Niva tuning: 145 photos of ideas on how to improve the VAZ 2121 with your own hands
The second option is the most acceptable for all car owners.
The whole process can be described in three points:
- markings on the wall,
- applying headlights to the wall,
- line adjustments and fine superstructure.
There is no point in starting to adjust the Niva's headlights if there is deformation of the body.
Must be checked:
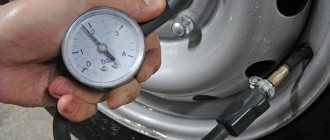
- tire pressure. It should be within the permissible norm - for a Chevrolet Niva it is 1.9 bar for almost all tire sizes;
- springs and transmission are in good condition;
- even distribution of load on the chassis. It is prohibited to carry out adjustment work if the machine is under a load that is unevenly laid on the chassis.
If you do not work through the above points, the setting will be completely incorrect and later you will have to redo the entire headlight setting again.
Algorithm for adjusting headlights of Niva Chevrolet
Before starting, you should thoroughly wash all Niva optics. It is necessary to wipe it, and if there are defects or damage, replace it with a new one. The slightest crack or chip will not give the desired result in adjusting the light.
From the inside of the hood we find two adjusting bolts on the body. One is responsible for horizontal adjustment, the second is responsible for vertical adjustment. Alternate twisting will lead to precise alignment of the light beam to the proper level. Sometimes it happens that a few millimeters are missing from the long-awaited level.
In this case, you should place several washers at the base of the housing mount. To do this, you need to dismantle the headlight, put a couple of washers on the plug mounts and install the optics again in their original place. Step-by-step instructions on how to adjust Chevrolet Niva headlights:
- We find a flat area with a flat wall;
- prepare tape and chalk for drawing lines on the wall;
- we drive up to a distance of 2 meters to the wall;
- do not turn off the engine, turn on the low beam;
- squeeze the handbrake for safety;
- set the headlight range control to the middle position, if available;
- Mark the center of the light beam of each headlight with chalk. This can be done either with chalk or in the form of crosses with tape;
- we drive away to a distance of 5 meters;
- We connect the previously obtained points exactly with a line;
- exactly in the middle of the resulting segment we draw a vertical line, indicating the middle of the body part of the technical device;
- below, at a distance of 7 centimeters, draw a line called a secant;
- turn on the low beam;
- in the hood we find adjusting screws in the headlight plastic housing. We begin to twist them little by little so that the light beam lies exactly between the horizontal line and the secant line;
- Now that the low beam is set, let's move on to the high beam. Ideally, the high beam will not have to be adjusted;
- Under normal operating conditions, the lighting quality should improve. If this does not happen, then look for the reason for the violation of the body geometry. There may have been an accident or accident that you don't know about.
Read more: 169 Which region of Russia
Installing headlights
Work on installing new optics begins with removing old headlights, incl. on Niva Urban. To do this, unscrew the 6 screws from the radiator grille.
- Unscrew the 3 screws securing the headlight unit
- Remove the unit together with the fastening ring and disconnect the power.
- If the new kit has non-standard dimensions, remove the headlight housing, remove the 4 screws and disconnect the wiring harness in the engine compartment.
- At the end of the process, adjust the light beam of the new set using the diagram.
Tuning of optical elements of Niva 21214
To clearly stand out on the road among similar cars, it is possible to install tank headlights. Today this tuning option is the most popular and effective. To install the front and/or rear tank headlights of the Niva 2121, it is necessary to remove the rim and remove the reflector itself. Work must be carried out carefully to prevent damage to the structure. To complete the task, you need to unscrew 4 bolts and disconnect the housing.
Also interesting: VAZ Niva 2121 tuning recommendations
The method is very popular, it can be performed in several stages:
- After completing the installation of the desired bulbs, you need to adjust the Niva headlights. If you have no adjustment experience, it is better to trust a specialist.
- When installation and adjustment are completed, you need to connect them to the power system.
- Before installing the rear light, you need to check whether the seal is present and ensure its quality. There should be no gaps visible at the connection point, otherwise condensation will appear inside, which will lead to lamp failure.
- If there are still gaps, you need to remove the headlight and treat the area around the contact perimeter with sealant.
It is recommended to replace lighting fixtures with similar ones from different manufacturers.
Regarding the installation of fog lights, everything is easy; you need to unscrew the plastic panels from the door in the trunk area and disconnect the connector. An optical element will be present from the inside; it should be removed, which will require unscrewing a couple of nuts.
What types of lamps are there?
Lamps with different parameters are produced. So, they choose not only the brightness, but also the light temperature in order to get optimal lighting when driving on a wet road, in fog or on a snowy road.
The low beam lamp of the Chevy Niva standard H7 consumes 55W. You should not install too powerful ones, as there will be a risk of overheating of the lampshade and wiring. Also, when using such light sources, there will be an increased discharge of the battery.
In addition to the quality of light, they are also distinguished by the type of device:
Initially, headlights for the Niva were developed to use halogen lamps. They are distinguished by low cost and good light. Usually this type is enough for many Chevy Niva drivers, since they have a good resource and do not require connecting additional expensive components.
The Niva Chevrolet low beam lamp is a glass bulb with a spiral enclosed inside. Gas is pumped inside, which slows down the oxidation processes of the spiral and maintains its condition longer. One of the disadvantages is the high temperature during operation. This affects the rapid failure of optical elements. But according to experts, this type of lamp is optimal.
Lighting system
Adjusting the headlights
Note
: The direction of the light beams of the headlights should be such that the road in front of the car is well illuminated, and oncoming drivers are not dazzled when the low beam is turned on.
Note
: Adjustment of headlight beams should only be carried out by qualified personnel at a workshop. Headlight adjustment is carried out using optical instruments. If they are not there, then adjustments can be made using the screen, as shown in the figure below.
- horizontal line corresponding to the centers of the headlights;
- a line passing through the centers of light spots;
- A and B – vertical lines corresponding to the centers of the headlights;
- O – center line;
- h – distance of the centers of the headlights from the floor
1. The headlights are adjusted by rotating screws 1 and 2 shown in the figure below, which rotate the optical element in the vertical and horizontal planes.
- screws for adjusting the headlight beam in the horizontal direction;
- screw for adjusting the headlight beam in the vertical direction
2. Place a fully fueled and equipped car, with a load of 735 N (75 kgf) on the driver’s seat, on a flat horizontal platform 5 m from the screen (plywood panel measuring about 2x1 m, etc.) so that the axis of the car is on it perpendicular. Before marking the screen, make sure that the air pressure in the tires is normal, and then rock the car sideways to install the suspension springs.
3. Draw vertical lines on the screen: center line 0 and lines A, B, C and E passing through the points corresponding to the centers of the headlights. These lines must be symmetrical with respect to the center line of the vehicle. At a height h corresponding to the distance of the centers of the headlights from the floor, draw line 1 and 55 mm below it, line 2 of the centers of the light spots.
4. Set the headlight adjustment control on the instrument panel to a position that corresponds to the load of a car with one driver.
5. Turn on low beam. Sequentially, first for the right headlight (the left one is covered by something or is disconnected from the wiring harness), and then for the left one (the right one is closed), adjust the light beams of the headlights with screws 1 and 2 (see the figure above). In this case, the displacement of the light beam of the headlight should not exceed ±3° in the vertical plane and ±2° in the horizontal plane.
6. For correctly adjusted headlights, the upper boundary of the light spots should coincide with line 2 (see the screen picture above), and the intersection points of the horizontal and inclined sections of the light spots should coincide with lines A and B.
Replacing lamps
Block lights
Note
: Before replacing the lamps in the headlight unit, remove the protective cover 3 (see figure below), which is fixed with a wire holder 2. To replace the low (or high) beam lamp, remove the block 5, remove the antennae of the spring latch 6 from the grooves and remove the lamp 4.
1. Turn cartridge 1 counterclockwise and remove it from the socket.
2. Remove block 5 of the low beam headlights to gain access to the side light lamp.
- turn signal lamp socket;
- holder;
- lid;
- low beam (or high beam) lamp;
- low beam (or high beam) lamp block;
- latch.
Replacing lamps
This article briefly describes replacing lamps on a car. For a more detailed description of replacing lamps of each type, corresponding links are given.
When replacing lamps, use the lamps indicated at the end of the page, or (more details with photos) here.
To replace the bulbs in the headlight, turn the socket from the engine compartment side counterclockwise and remove it, press the burnt out bulb, turn it counterclockwise and remove it from the socket. (more details)
the burnt-out lamp in the side turn signal after removing the lamp socket from the engine compartment side. (more details)
To replace the lamp in the headlight, unscrew the screws 1 (Fig. 39) securing the decorative lining 2 of the radiator and remove it, loosen the screws 3 securing the rim of the optical element, turn the rim counterclockwise and remove it. Take out the optical element 4, remove the block, remove the spring latch antennae from the grooves and remove the lamp. (more details)