March 03, 2017 Lada.Online 71 812 6
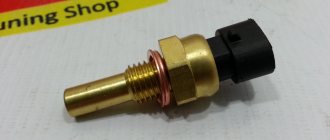
The coolant temperature sensor (CTS) is one of the elements of the engine management system. Its purpose is to control the temperature of the fluid in the cooling system. Based on these data, the engine control unit adjusts the composition of the fuel-air mixture, crankshaft speed, and ignition timing.
On all modern LADA cars (XRAY, Vesta, Largus, Granta, Kalina, Priora or Niva 4x4), replacing and checking the coolant temperature sensor is carried out in the same way.
What problems arise?
The coolant temperature sensor in the Priora 16 valves, as already mentioned, is no different from others, and therefore has the same problems, methods of treating and diagnosing them.
In the event of a malfunction of the detector communicating with the instrument panel, the only signal about this will be a missing or deliberately incorrect temperature value. The cause of the malfunction may be:
- breakdown of the indicator itself on the tidy;
- wiring fault;
- failure of the detector itself.
As can be seen from the list, the breakdown is not always caused by the meter itself, but as practice shows, much more often problems arise with the wiring. It is worn out or dirty.
Malfunctions in the operation of the second meter are more significant. Despite the fact that the causes of the malfunction remain the same, the ways to notice the malfunction are completely different and have a whole list of symptoms:
- increased fuel consumption;
- the engine stalls and may not start immediately;
- car power drops;
- You can hear the hum of constantly running fans of the propulsion system.
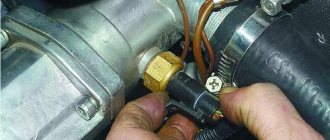
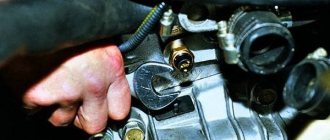
The Priora coolant temperature sensor is located above the flywheel housing and is inserted into the engine block near the thermostat. It is from there that it is necessary to begin checking the malfunction by inspecting the electronic cable and “ringing” its contacts.
To make it easier to work with the detector, it is best to remove the pipe connecting the air filter and the throttle assembly. After checking all the contacts, you can start working with the meter itself, and for this you should already turn off the power to the car and be sure to drain the antifreeze. If the antifreeze is not drained in advance, then when you unscrew the meter, it can come out on its own under pressure, and it will be good if it does not turn out to be hot at that moment.
After all the preparations, you can start removing it; to do this, you just need to disconnect the wires from the meter along with the terminal, and unscrew it using a 19mm deep socket. As soon as the meter moves in, you can then unscrew it and remove it by hand.
The old detector can be cleaned and tested in a glass of heated water. However, if you don’t have the necessary equipment or desire, you can simply insert a new meter and check how everything works. If it works, it means the detector was faulty, and there is no point in bothering with its diagnostics.
Since even if his death is accurately established, it still cannot be repaired and you will have to purchase a new device. And if there is no way to cure the patient, then there is no rational point in diagnosing him, except to satisfy his curiosity and the hope that after cleaning he suddenly came to life.
A new detector costs practically nothing, and losses from untimely repairs grow every day like a snowball. Don't neglect your safety and the optimal performance of your vehicle.
We recommend to buy
Operating principle and device of DTOZH
Previously, engineers used primitive thermal relays as temperature sensors. It was even installed on engines with a mono-injection power supply system. When the contact of this relay is open, the engine warms up. When the contact closes, the ECU thinks that the engine is warmed up.
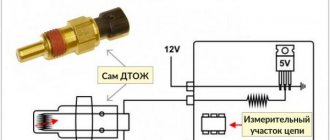
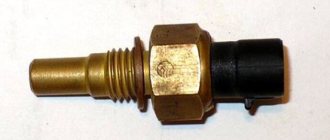
DTOZH VAZ is a thermistor. This is a thermistor, the resistance of which depends on the temperature of the antifreeze. Typically, the coolant temperature in the engine is monitored continuously. Therefore, thermistors are made of nickel oxide or cobalt (other metals are not used in the design). The peculiarity of these alloys is that as the heating increases, the number of electrons also increases (and therefore the resistance decreases).
The thermistor located inside the sensor has a negative coefficient. Its resistance is maximum when the engine is cold. The DTOZh is supplied with a power supply of 5 V (permissible error - 0.2 V). As it warms up and the resistance changes, the voltage drops. The ECU monitors voltage changes and, based on this data, determines the temperature of the power unit.
Sensors on other cars (for example, on Renault models) have a positive temperature coefficient. The element is designed in such a way that as the temperature rises, the resistance of the sensor does not fall, but increases.
Diagnostics
To check the DTOZH in a garage or at home, you will need a container with coolant. You also need a thermometer that can accurately measure temperature up to 120 degrees.
View gallery
It is necessary to replace the sensor resistance in different temperature conditions. Antifreeze must be heated during the diagnostic process. The data obtained on the multimeter is compared with the temperature on the thermometer.
So, at 100 degrees the sensor resistance will be approximately 178 Ohms. At 90 degrees - 239 Ohms, at 82 - 319 Ohms. At zero it will be about 7278 ohms.
Your advantages when purchasing at Autocompas.ru
- Huge selection of auto parts and low prices;
- Fast delivery, usually within 24 hours;
- Warranty and right of return;
- Emphasis on proven and branded manufacturers of all price segments;
- Safe and convenient online purchase with many payment options;
- Qualified support and advice + recommendations from experts when choosing and purchasing.
Range of auto parts in stock and on order
A wide variety of manufacturers and high-quality auto parts guarantee the mobility of your car and safety on the roads. A huge assortment is constantly available from stock online. Certified and reliable aftermarket suppliers, dealers, and regional market participants provide a full range of auto parts at reasonable prices. Our knowledgeable support staff is always available to assist you in your search.
Quality of service in our online store
The service and online offers from Autocompas.ru have already won several awards and made us a leader in the Russian market in the field of sales of auto parts for foreign cars, 40+ thousand people visit the site every day and many of them become our regular customers. Satisfied customers are our goal. Rely on Autocompas.ru as a reliable supplier of auto parts.
29.11.2019
A review section has been introduced on the site, using the latest technologies, now each client can write a review from their personal account.
01.01.2019
A completely new and intuitive returns system.
23.05.2018
Global update of the “Delivery” section! Track numbers in your personal account and convenient cargo tracking.
Location and characteristics
On the Priora, the sensor is located on the cylinder head on the right side near the thermostat (it is located above the flywheel housing in the engine block). Its connection is made directly to the engine control unit. It is there that he sends all the information about operating temperature indicators.
A specific feature of this car is the presence of two detectors that are not connected to each other. One works only with the instrument panel and transmits measurement information to it. The second coordinates its work with the car’s on-board computer. It is possible to comprehensively ensure high-quality engine operation, which is achieved by including additional cooling systems.
The operation of the detector is based on the principles of resistance. The resistance indicators of the device are directly related to temperature fluctuations of the coolant.
The device data is the basis for the on-board computer to make a decision about the need to supply oxygen and fuel to the engine. The pulse that comes from the detector forces the car’s “brain” to set the optimal number of idle speed control cycles.
At the same time, the supply of the fuel mixture is adjusted. This is why, when the DTO is faulty, fuel consumption increases.
Operating principle
DTOZh "Priora" is installed directly in the thermostat housing. This allows for maximum pulse accuracy. Since DTOZH is always in contact with antifreeze, it can almost instantly detect the slightest changes in temperature. It also quickly transmits signals to the ECU. Based on the information received, the car’s brain adjusts the engine operating parameters, changing the composition of the fuel mixture.
If the antifreeze level is too low, the controller will receive incorrect data and the engine may run rough. This is also observed due to sensor failure.
Features of DTOZh "Priors"
Most owners of these car models often confuse the coolant temperature sensor on the Priora with an element that measures the temperature in the environment and in the cabin. These are two different parts. The main task of the first device is to constantly monitor the temperature indicators of antifreeze in the cooling system.
Priors use two sensors. The first is mounted on the cylinder head - it is responsible for displaying information about the temperature of the power unit on the instrument panel. This is the most common pointer. The second element, which is precisely the Priora coolant temperature sensor, performs more important tasks. It transmits electrical impulses to the ECU and then activates the fan. DTOZH plays an important role in the process of formation of a combustible mixture, as well as during engine operation under load.
Replacing the coolant temperature sensor
Replacing and checking the coolant temperature sensor on a Lada
Drivers rarely pay attention to this element of the system until the internal combustion engine begins to malfunction. Actions begin only after its breakdown
However, it is recommended to change the DTOZ every time the engine is disassembled, because during operation the temperature sensor is subject to intense wear in aggressive conditions. A worn-out device may produce incorrect or inaccurate signals. The only way to get rid of this is by replacing the device.
In addition to engine repair, it is recommended to change this electronic indicator along with the thermostat after significant engine overheating, during which both elements of the cooling system usually fail. When replacing, you need to drain the refrigerant to such an extent that its level drops below the sensor hole.
Simultaneously with replacing the sensor, the coolant is often updated. Its service life is usually about 3-5 years. Contaminants dissolved in it can distort the transmitted data, and they also reduce the efficiency of the entire system. It is customary to lubricate the thread with sealant before screwing. After installation, fill in new coolant.
DTOZH design and principle of operation
This sensor has a simple design without any complex electronic elements. A thermistor acts as an actuator.
It is the thermistor that regulates the quality and quantity of the fuel mixture during engine starting. That is, when starting in the cold season, the engine needs more fuel; this is built into the electronic engine control unit (ECU). Based on the DTO readings, the ECU passes the required amount of fuel through the injectors for normal engine operation in low temperature conditions.
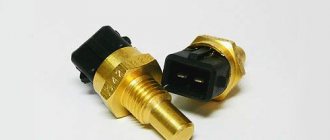
The operation of the sensor can be noticed by increased engine speeds after start-up, which return to normal as they warm up to operating temperature. The thermistor is sharpened into a metal sensor housing with a thread and has two terminals for the ECU connector.
Also, based on the DTO readings, the ECU adjusts the ignition timing (IAF). The sensor receives power via one of the marks from the ECU with a voltage of 5V, while the second mark is connected to ground.
Since the sensor is in direct contact with the coolant, it estimates the engine temperature directly from the coolant temperature.
Signs and consequences of DTOZh malfunctions
If the Priora 16-valve coolant temperature sensor fails, this will immediately lead to a lot of trouble. Fuel consumption will increase significantly. Also, due to a richer mixture, the amount of harmful emissions will increase. For the same reason, the motor may be bad. If the mixture is too rich, there is a risk of piston burnout.
At the same time, the vehicle's dynamic characteristics and handling will deteriorate. The engine will need more time to warm up to operating temperature, since due to incorrect signals from the sensor, the ECU will turn on the cooling system fan. In this case, there is a high risk of overheating.
The sensor does not always fail completely. All of these symptoms can be caused by oxidized or damaged contacts. Often the cause is wiring or antifreeze leaks. Therefore, you need to remove the sensor and change it only after a thorough inspection of the contacts.
see also
For the cooling system of any car, including the popular Lada Priora, it is not the most pleasant moment to be stuck in a traffic jam for a long time. When the car moves without long periods of downtime, the temperature load is removed by the oncoming air flow. There is no such flow when idling. When overheating, the radiator fan automatically turns on, but only if the coolant temperature sensor is working properly. This is a very necessary functional device for a car. If the sensor does not work, replacement is required. In this material we will analyze in detail how the device works and where it is located. No less useful will be information on how to change this sensor on a Lada Priora. To replace, you will need a certain set of tools; such a tool is not a problem for a hundred; it is available in any car service center.
How to replace sensors yourself
- Open-end wrench set to “22”;
- Additional lighting as needed;
- New DTOZH;
- Rags;
- Multimeter.
Step-by-step instructions for replacing the coolant temperature sensor:
- We install the machine within the perimeter of the repair area;
- We provide priority safety measures: squeeze the parking brake, wedge the rear row of wheels with wheel chocks;
- Open the hood, turn off the engine;
- We remove the terminals from the battery to avoid short circuits during repair work;
- We disconnect the limit switches from the DTOZH, unscrew it from its regular place;
- We carry out preventive maintenance of the thermostat, inspect the integrity of the housing, the absence of defects;
- We screw in the new measuring device and put on the power terminals.
We start the engine and check the accuracy of the temperature display. Checking the antifreeze level. We replenish the missing amount as needed. For a model with a pre-installed air conditioner, it is necessary to additionally remove the air filter housing along with the air element itself.
Causes of terminal oxidation
As a rule, there are 2 main reasons:
1. Leakage of filled electrolyte is perhaps the most common problem. The electrolyte is an acid, which, when it hits the surface of the terminal, enters into a chemical reaction with it, as a result of which oxidation begins.
As a rule, such problems are not typical for new batteries. After all, these are closed-type batteries in which the electrolyte is in a sealed container, where it evaporates and precipitates. However, the design of the battery prevents it from entering the environment.
However, as the battery wears out, its casing cracks and electrolyte in the form of steam begins to escape into these microcracks. So it settles directly on the terminal, as a result of which a reaction begins. The car owner should consider such a phenomenon as a sign of malfunction and wear of the battery.
If the battery terminal is not fully tightened, this may cause oxidation.
2. Tightening of the terminal - such situations arise from time to time. This means that car owners simply place the terminal on the electrode, and then immediately get behind the wheel without tightening it with bolts. Insufficient quality of fixation leads to poor contact and oxidation on the electrode and terminal. In this case, it is enough to remove the terminal, thoroughly clean both it and the electrode, then put it on and tighten it thoroughly. Just not with all your strength, otherwise you can tear off the fasteners.
In this case, it is necessary to use 2 wrenches at once, tightening the nut with one of them, and holding the bolt with the other. But it is not recommended to pull with all your might on one side, because this can lead to deformation of the plastic. You should also be wary of another common problem - the gradual loosening of the pin seals. This occurs as a result of poor quality removal of clamps from wires. Therefore, it is necessary to accurately dose the force.
Consequences of oxidation
They manifest themselves in a noticeable deterioration of the stain and quality of contact. As a result, the battery is not able to charge and work properly. Subsequently, this will lead to serious discharge of the battery, which has an extremely negative effect on it. In addition, this is reflected in the difficulty of starting the power unit, or even in the absence of a response to turning the key.
How to check
There are two options for checking the functionality of the sensor:
- With the need to remove;
- With thermometer;
- Without thermometer;
- Right on the spot, without taking off.
But first you need to make sure that the sensor is receiving power. Remove the chip from the DTOZH and measure the DC voltage with a multimeter. It should be about 5 V. If it is approximately within these limits, we check further.
Without removing the sensor, you can check its performance in the following way. We disconnect the chip. We measure the resistance between the sensor contacts. When the engine is cold, the resistance will be higher, and when the engine is hot, it will be lower. For example, let's give a data table for the VAZ-2110 car. For other cars that use similar sensors, the numbers will be approximately the same.
| See all advertisements in the archive |
| Water temperature, °C | Resistance value, Ohm | Water temperature, °C | Resistance value, Ohm |
| +5 | 7280 | +45 | 1188 |
| +10 | 5670 | +50 | 973 |
| +15 | 4450 | +60 | 667 |
| +20 | 3520 | +70 | 467 |
| +25 | 2796 | +80 | 332 |
| +30 | 2238 | +90 | 241 |
| +40 | 1459 | +100 | 177 |
To remove the sensor, a simple wrench will be enough. After removing it, you need to take several measurements with water of different temperatures. We heated the water and poured it into a glass. We also lower the thermometer and sensor there. More precisely, its sensitive element. We connect the multimeter probes to the electrical contacts. We measure the water temperature and sensor resistance. We record the data. Then we heat the water a little more and repeat all the steps. And so several times, for example, record the indicators at a temperature of +15 °C, +20 °C, +25 °C and so on. And then just compare these numbers with the numbers in the table above. But it’s better with technical documentation.
How to test the sensor for damage without using a thermometer? We do the same thing, but bring the water to a boil. And, referring to the table above, the sensor resistance should be ~177 Ohms. Of course, errors are possible here, since while you are getting ready to take measurements, the water will be a couple of degrees colder, which means the resistance will be a little less. This is also worth considering.
If the sensor gives you very different numbers, urgently replace it.
How to check
After removing the sensor, it should be visually inspected for damage or corrosion. The easiest way to check the DTOZH is to replace it with a known good one.
- multimeter (in voltmeter mode, ohmmeter with a measurement limit from 100 Ohm to 10 kOhm);
- thermometer (with a measurement limit of at least 100 o C);
- heat-resistant container with a volume of 0.5 l.
The procedure for checking the power supply circuit of the DTOZH:
- Switch the multimeter to voltmeter mode;
- Remove the block with wires from the sensor and turn on the ignition;
- Connect the negative probe of the multimeter to the engine ground, and the other to terminal No. 1 of the block;
- The voltage at the output must be at least 12 V.
If there is no voltage or they are less than 12 V, it means that the battery is discharged, the power circuit or the computer is faulty.
Procedure for checking DTOZH:
- Switch the multimeter to ohmmeter mode;
- Prepare a container with hot water (about 100 o C);
- Connect the multimeter probes to the sensor terminals and lower its working part into water;
- We measure the resistance of the DTOZH as the water cools.
The sensor resistance should be close to the data shown in the table:
| Coolant temperature, °C | DTOZh resistance, Ohm |
| 100 | 177 |
| 90 | 241 |
| 80 | 332 |
| 70 | 467 |
| 60 | 667 |
| 50 | 973 |
| 45 | 1188 |
| 40 | 1459 |
| 35 | 1802 |
| 30 | 2238 |
| 25 | 2796 |
| 20 | 3520 |
| 15 | 4450 |
| 10 | 5670 |
| 5 | 7280 |
| 9420 |
The verification process is also shown in the video:
If the DTOZH turns out to be in good order, the cause of the malfunction may be poor connector contact, broken wiring, or a faulty ECU.
Do not forget to change the antifreeze/antifreeze in the cooling system on time, and use the coolant recommended by the manufacturer.
Priora temperature sensor
Lada Priora includes an external air temperature meter. It does not have the same effect as DTOZH on the operation of motor valves, but, nevertheless, it is no less important.
Based on the readings of this device, the driver receives timely information about ice forming overboard. An air conditioner installed in a vase allows you to avoid thermal discomfort. However, it is turned on and off according to the driver’s reaction. There is no proper automation in his device.
The Priora temperature sensor allows an experienced driver to reduce the risk of getting into an accident. Allows you to save fuel and provide yourself with comfortable conditions while in the car. This especially affects the passage of long routes and the intersection of different climatic regions. This is especially noticeable when traveling around Russia, where the climate can change several times during a day’s travel. From icy to warm and back again.
The sensor is located at the bottom of the radiator frame. This allows the sensor not to visually spoil the style of the car. Avoid physical damage and remain in contact with outside air at all times. It is replaced and diagnosed in the same way as DTOZH. Rarely, it can be physically deformed mainly as a result of accidents and collisions, but the problem is mainly caused by the wiring connected to it.
YouTube responded with an error: The provided API key has an IP address restriction. The originating IP address of the call (87.236.20.136) violates this restriction.
How to find the location of the temperature sensor on a Priora?
The antifreeze temperature detector, regardless of the car model, performs the same functions:
- How to understand that the DTOZH is out of order?
- Replacing the detector
- measuring the coolant heating level;
- transferring data to the on-board computer.
At its core, a DTOZH is a resistance device (thermistor), which determines the temperature level readings, depending on the numbers of its own resistance. Priora cars use detectors with a negative coefficient, which means that as the heat of the coolant increases, the resistance of the sensor drops.
Checking the serviceability of the detector occurs precisely by comparing temperature and resistance.
To do this, you need to have a thermometer and a multimeter on hand.
The DTOZH is connected to a meter set to ohmmeter mode, after which it is immersed in a container with coolant, which gradually heats up. We also immerse a thermometer there, which can show temperatures up to one hundred degrees.
Next, as it heats up, you need to compare the readings with the table, which will give you an idea of whether the device is working properly.
For comparison, we can give the following indicators - at 20 degrees Celsius, the number of Ohms on the multimeter screen will be approximately equal to 3520. When the liquid is heated to one hundred degrees, the resistance indicator will drop to 177.
Based on the sensor readings, Priora regulates the fuel enrichment level, fan operating mode, and engine speed.
It is worth distinguishing between the coolant temperature sensor and the coolant temperature indicator sensor.
DTOZH - located in the thermostat housing and transmits data to control the ventilation system, as well as the level of fuel enrichment.
The second device is installed in the cylinder head and its job is to transmit data to the dashboard.
It should be remembered that for the most accurate operation, the coolant temperature sensor must be in direct contact with the measurement medium, that is, the same liquid. If it is not immersed in coolant, it will turn out that it will transmit data from the surrounding air, and not the necessary liquid.
How to make a replacement yourself
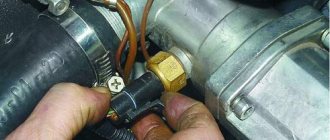
Replacement of the Lada Priora DTOZH is carried out only after the preparatory work described above. For this purpose, disconnect the wires from the part along with the terminal and unscrew it. The most convenient way to do this is to use a 19 mm deep socket. As soon as the sensor begins to give in, it is unscrewed and removed manually.
Sequence of actions when replacing a temperature detector:
- Find the negative wire and remove it from the battery;
- A little antifreeze needs to be drained;
- Press out the plastic clips;
- Disconnect the wires;
- Loosen the tension a little and carefully unscrew it;
- Replace the sensor and perform all steps in reverse order.
- Add antifreeze back.
Change this spare part at least once, and it will become clear that the procedure does not present any particular difficulties.
Replacement
If diagnostic procedures have shown that the element is in working condition, but the symptoms of the malfunction still actively appear, then you need to carefully check the contacts, wiring, and connection quality again. If it turns out that the device does not work, the Priora coolant temperature sensor needs to be replaced. Even novice car owners can handle the replacement process.
There are two Priora engines. Some people think that the replacement procedure will be different on different engines. However, this is not at all true. On both 8 and 16 valve engines, everything is done the same way. The thermostat housing is installed in the same place. The only difference is that you need to dismantle the line connecting the air filter to the throttle in advance.
The first step before replacing is to turn off the power to the on-board network. To do this, you can remove the negative terminal from the battery. Next, drain some antifreeze from the radiator. This is necessary so that the coolant does not spill when the DTOZh is unscrewed.
After completing the preparatory procedures, you need to get close to the sensor. If the pipe between the throttle and the air filter causes inconvenience, it should be removed. To do this, disconnect the clamps with a screwdriver. Next, the terminal and its fastening are disconnected from the device. After this, take a suitable head and a knob under it and unscrew the element, after which the part is carefully removed from the seat.
Next, the new Lada Priora DTOZ is installed in the reverse order. To ensure that it sits securely in its intended place and does not turn out, it is better to use thread lockers. These products are sold at any auto store. Having completed these steps, connect the connector, add antifreeze or antifreeze to the system (depending on what kind of coolant was used previously). As a rule, liquid is poured to the middle level in the tank. Next, check the part for functionality. At +40 degrees the needle should move.
Where to buy car accessories
Spare parts and other products for the car are easily available for purchase at auto stores in your city. But there is another option that has recently received significant improvements. You no longer need to wait a long time for a parcel from China: the AliExpress online store now offers the opportunity to ship from transshipment warehouses located in various countries. For example, when ordering, you can specify the “Delivery from the Russian Federation” option.
Follow the links and choose:
Preparatory stage
Before you start, you should do the following:
- choose and buy a suitable cooler;
- stock up on a new cover mount in case the old one is damaged;
- take the wrench;
- find a container where you will send the waste liquid;
- buy rags.
Algorithm of actions
To replace antifreeze in Priora, follow the instructions:
- Send the car to a garage with plenty of free space to work on. Cool down the engine. All actions must be performed on a cold engine system.
- Get rid of high blood pressure. Open the cap of the reservoir containing the antifreeze. If the engine is hot, fluid may splash out. Use a cloth and gloves for protection.
- Remove the protection that is installed on the propulsion system. Unscrew the bolts on the mount. The latches do not need to be removed. They will not interfere with the process.
- If a transmission with cables is installed, it must be removed. To do this, disconnect power from the battery. Remove the protective coating with a wrench.
- Now you need to drain the entire volume of liquid. To do this, unscrew the fixing cap. Place a container below where the waste material will be drained. Wait until all the refrigerant has left the tank. Assess the condition of the latch. If signs of wear are noticeable, replacement is recommended.
- If there are any cloudy traces in the coolant, it is recommended to flush all the channels in the car. To do this, add purified water. Add citric acid or vinegar to remove any remaining dirt. Flush the system until the water runs clear. Only after this can you fill the coolant into the tank.
- Assess the condition of the hoses. If they are worn out, replace them.
- Using a hose, pour new fluid into the container. Avoid high internal pressure.
- Refrigerant is added until the tank is filled to the optimum level.
- All disassembled parts are reassembled in reverse order.
- Start the engine and take it for a test drive. After this, check if all systems are normal.
It became interesting about the temperature sensor
+1 it is. I don’t know how, but it works. Tested on the basin. The pipe burst and a ton of antifreeze came out. Well noticed on time. And then the pipe broke 1500 km after the capital)))) It would be very sad to return to the service again.
I’m asking for a reason. There is an article where a man describes exactly this situation. He claims that everything was driving in a hurry and the temperature was high, then bam - the check light is on and the speed drops. I stopped, there was a small amount of antifreeze under the wheelbarrow, and the tank was almost full. We took the tow truck to the service center, and after the repair they said that the engine was screwed and that white smoke was pouring out. Car: X-Trail under warranty. So I'm wondering if this could be the case?
Air will not circulate in the system. The arrow will begin to rise immediately.
The only question left is, will the pump not circulate air? The idea is cool, there is a hole for suction (in the radiator).
Checking the water heater safety valve
The safety valve is an important part in the operation of the water heater.
You can check the operation of the safety valve as follows:
- First you need to turn on the water heater and make sure that the hot water supply tap is not open until the water is heated to its maximum. If the valve is working properly, excess water should begin to drip through it.
- If water does not drip from the valve, then most likely it is faulty and will have to be replaced.
Do not proceed with replacement without checking the hot water tap. It should not leak, since excess water can leak through it, and therefore the valve will not work.
The valve may not work if the thermostat is installed incorrectly, namely for incomplete heating of the water, and also if water is drawn from the water heater, which reduces the pressure in it.