Principle of operation
The standard Lanos heater is located in the central part of the front console of the car. During the circulation process, heated air is supplied from the heating radiator. For maximum efficiency, the Chevrolet Lanos interior heating system must be sealed and without damage. Heating begins when the car engine is started. The heat exchanger and evaporator are installed in one block.
The driver activates the control lever, adjusts the speed and temperature indicators. An air flow of a given degree is supplied for heating through channels and deflectors.
Design and diagram of the Lanos stove
Note that most of the structural elements of the stove function precisely when the air conditioning system is turned on, since the heat exchanger of its evaporator, as well as some parts of the heater, are located in one block.
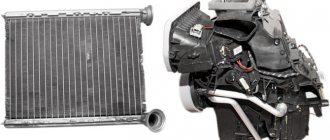
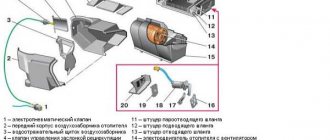
The main heating elements from which the Chevrolet Lanos stove circuit is assembled are:
- Stove radiator. Its purpose is based on heating the air through constant circulation of heated coolant inside its heat exchanger.
- A blower of warm air into the cabin, which is represented by a fan (an electric motor with an impeller made of durable, heat-resistant plastic located on its shaft). It has several operating positions, making it possible to regulate the amount of flow supplied to the dampers.
- Regulating, which allows you to increase or decrease the heating temperature. Depending on its position, the size of the air stream passing through the heater radiator and blowing the heat exchanger changes.
- Distribution flaps, which are responsible for changing the direction of the flow of warm air in the cabin (blowing the windshield and side windows, the foot area, the central part and other areas).
Despite the differences between these structural and functional elements, they are completely interconnected with each other. Because of this, some problems arise during fault diagnosis, since the cause of the same breakdown can be either the incorrect position of its actuators (heater dampers).
The device of the heater control panel in a Lanos car
The operation of the interior heating and window defrosting system is controlled using regulators and switches located on the center console. The heater controls include:
- warm-up temperature controller;
- speed switch for blowing warm air into the cabin and blowing the viewing windows;
- air jet control regulator;
- air conditioner on/off button;
- air flow distribution regulator (heater damper control slider);
- rear window defroster switch;
- recirculation system control slider.
The fan speed switch operates regardless of the selected positions of the heating temperature regulators and the direction of its flow. Its operating principle is to change the speed of the shaft with the impeller located on it by increasing or decreasing the voltage supply to the terminals of the electric drive.
Heating system elements
- Radiator: warms up the air flow by circulating cooling system fluid inside the heat exchanger.
- Electric drive – supercharger: takes air flow into the car interior. Sometimes it is called an impeller or a motor. The preset regulator allows you to mechanically select the optimal position and number of revolutions.
- Heater damper: air flow regulator, with its help we increase or decrease the air temperature inside the cabin.
- Distribution regulators: adjust the airflow to a specific area or the interior as a whole.
Chevrolet Lanos heater device
Causes of poor heating
Chevrolet Lanos car owners sometimes encounter the fact that the heater blows cold air. The reasons for this “behavior” are different. To correctly identify, you will need experience in servicing the equipment. Otherwise, you risk causing harm with unprofessional intervention. Visit a service station for preventative measures.
Common reasons:
- the critical fuse has blown: the electric motor does not start, no current flows;
- air lock in the system: an obstacle is created to the natural circulation of antifreeze through the channels. The heat exchanger does not receive the required temperature, the air flow does not warm up, so the Lanos stove heats poorly;
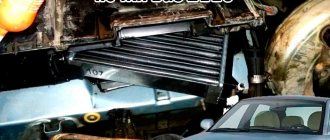
- breakage of the standard radiator fasteners: the cause is either mechanical damage, an accident, a collision, or a natural factor. Lanos models produced after 2000 are “endowed” with a similar defect. The radiator moves to the side, the main flow passes by the honeycomb, so the stove does not heat well. Prompt repair of the Lanos stove and cooling system radiator is required;
- clogged antifreeze supply channels: the word “garbage” should not be taken naturally. In relation to cars, we are talking about sediment, the presence of third-party impurities in the composition of the liquid. Poor manufacturing or natural aging leads to the formation of subsidence and cloudiness. A large amount of “garbage” contributes to the formation of clots that block the antifreeze supply and circulation channels;
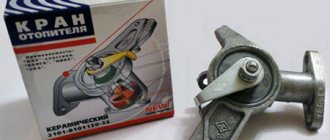
- mechanical cable break: the last, but most common malfunction due to which the stove does not work. The disadvantage of the design of the Chevrolet Lanos heating system is the absence of an autonomous tap that would shut off the centralized supply of coolant to the heater. Systematic contact with hot antifreeze leaves a negative imprint on the service life. Due to the formation of fossils, the cable's travel is limited and it breaks under force.
Video: Why the Lanos stove does not heat, Sens
In what modes do heating and air conditioning systems operate?
Combinations of switches and sliders on the control panel allow you to set one of its operating modes:
- Maximum cooling. The use of this position is recommended at elevated air temperatures in the summer or when the car is left idle for a long time under the rays of the scorching sun.
- Normal cooling. It is turned on mainly in warm weather, during long trips, since this mode helps maintain a moderate temperature inside.
- Ventilation. It is mainly turned on to ventilate the interior. It is used extremely rarely as a full-fledged mode, which is why most car owners completely ignore this system function.
- Maximum heating. Its use is preferable in conditions of low temperatures in winter, as well as for accelerated heating after a long period of time the vehicle has been at sub-zero temperatures.
- Normal heating. Thanks to the choice of this mode, regardless of the sub-zero air temperature outside the car, the warm-up value set by the driver is always maintained inside it, which allows you to get maximum comfort when moving in a car in winter.
- Window blowing. Allows you to quickly get rid of fogging of side windows and windshields in vehicles. Can be used as a mode for heating or cooling the air in the cabin.
As you can see, the design of the Lanos stove is not particularly complicated and is in many ways similar to the design of the heater of most models of the automotive industry, and this greatly facilitates the diagnosis and elimination of its malfunctions.
Unlike other brands in the budget segment, the Chevrolet Lanos is equipped with an autonomous heating system. Heating of the windshield and interior with a flow of warm air together with the air conditioning system. This design has advantages and disadvantages. Let's take a step-by-step look at why the stove on a Chevrolet Lanos does not heat well.
How to solve the problem of poor heating
If the Chevrolet Lanos stove does not heat up, then you can eliminate the defect in two ways: by contacting a workshop or by yourself modifying the Lanos stove yourself. Each owner chooses stove repair methods based on financial capabilities and availability of free time.
Troubleshooting algorithm
- The car is in transport position, open the hood and check the level of antifreeze in the cooling system. If necessary, add to the o.
- We start the engine, activate the heater lever, check the uniformity of heat flow through the channels (hoses).
- We start from the upper radiator supply circuit and gradually move into the interior. If the hoses are uniformly warm and there are no cold sections, then the heater radiator is clogged and needs to be cleaned. You can dismantle the radiator without disassembling the torpedo. We remove the gearbox rocker and the central tunnel. We wash the product and install it in the reverse order.
- If the motor does not start: check the integrity of the fuse in the block. Replacing it with a new one will not be a problem. Exceeding the permissible current contributed to burnout.
- The worst option is a break in the heater damper cable: there is nothing to recommend other than complete dismantling and disassembly.
Cable replacement process
- remove the plastic trim on the central part of the dashboard, in the area of the radio;
- carefully remove the insert made of polymer material on which the mechanical levers of the stove regulator are installed;
- From the inside, remove the cable end from the attachment point. We carry out a similar procedure in the lower part of the stove heater, near the damper. It's inconvenient, but it can be removed;
- pull out the damaged cable, insert a new one, and assemble in the reverse order.
We visually diagnose adjacent parts and mechanisms for damage. If necessary, we replace with new spare parts. With this simple preventative measure we restore the functionality of the stove heater. Do not forget to carry out technical inspection of the car in a timely manner, this will extend its service life.
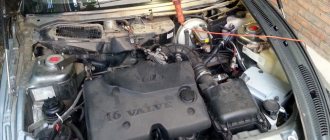
Many owners have probably already noticed that the stove on Lanos does not heat well. The reason for this, as a rule, is the heating design, which is designed for a milder climate compared to the Russian one, therefore, even if all the components in the system are working properly, there is no need to rely much on warmth. Moreover, according to the Zhiguli radiator, the dimensions of which are 285x225 with a thickness of 85, here it is 220x228 in size with a thickness of 28 millimeters. Even if it occurs to someone to replace the standard radiator with a more powerful one, then nothing will come of it, since a different, “thicker” radiator simply will not fit here. You can, of course, try, but to do this you will need to remove the panel and the ventilation duct. And here you can’t do without depressurizing the air conditioning system. Then you will still need to rework the internal boxes of the stove device. In general, you will have to practically do everything all over again.
Such deposits are caused by poor antifreeze Many. quality, owners make attempts to wash these deposits with a solution of orthophosphoric acid, descaling agents, Coca-Cola, and so on. Cleaning Sometimes it helps, sometimes it doesn’t. At home, you can wash the stove radiator using three pieces of hose of the required size and a citric acid solution heated on the stove. You can also check at home how much the antifreeze parameters affect cooling. Then pour up to 50 milliliters into two containers, pour soda into one container (the other), and add any acid (a few drops) into a pinch. You don’t have to worry about the cleanliness of the cooling system if no reaction occurs in both containers. 2. The radiator is clogged from the outside of the stove. Such a malfunction is accompanied by the same temperature of the stove hoses and a reduced air flow through the diffusers. In this case, the blockage does not occur overnight, but often over time the air flow does not decrease, therefore, a noticed malfunction is better checked if another machine is compared with it. This car does not have a cabin filter installed, so the heater radiator and evaporator of the air conditioner can easily become clogged with various leaves and other fluff. This blockage prevents air from passing through the radiator.
Features of the heating system
Chevrolet Lanos - thanks to its successful layout, unpretentiousness and relatively low cost, it quickly gained popularity among Russian car enthusiasts. According to statistics, this car entered the top 25 (in 24th place) best-selling cars in Russia.
However, the car has a significant drawback. The stove does not heat as well as we would like in the harsh Russian winter. The reason is that it is designed for milder climatic conditions. Changing the situation is also problematic. The fact is that the radiator, with dimensions 220x228, is only 28 mm thick. For comparison, we give the Zhiguli analogue. With overall dimensions 225x285 it has a thickness of 85 mm.
The first thought that comes to mind is to change the radiator to a thicker one. But it’s incredibly difficult to install anything else. A larger device simply won’t fit. In order to “shove” it in, you need to remove the ventilation duct, and this will depressurize the air conditioner. You will have to tinker and redo the internal structure of the stove boxes. All heating will have to be changed. In order to carry out such work, you need to spend a lot of time and effort and be a very experienced mechanic.
It is much easier to come to terms with the small drawback of your favorite car and maintain its heating system in good condition. Repairs will now cost a pretty penny. The Lanos heater damper drive guide alone costs about 900 rubles. In order to avoid unnecessary expenses, treat your favorite car with care. And you need to start with the correct adjustment of the dampers.
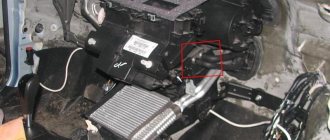
Poor sealing
most of One common reason for low temperatures in the car interior in winter is insufficient tightness of the ventilation joint box. It is enough to check this at: just a low temperature outside, turn the heater fan control to position 4, direct the windshield air flow onto the glass and simply run your hand at the joints of the ventilation duct parts. If we feel cold in certain places, then you can be sure that there is a strong cooling of the interior with cold air from outside. The problem is solved without any difficulty: we simply coat all the seams accessible with any sealant, and for maximum effect the damper lever can be attached to the axis (the corrugation can come from the handle for changing the position of the mirrors, you will have to struggle a little with the installation, but a stationery knife and a little sealant will help you ).
air duct Cold
The air, before entering the radiator heaters of the car, passes through a rather long air duct along the path. During cold periods of the year, its walls are cooled to such an extent that they directly reduce the temperature in the cabin no worse than an air conditioner.
To minimize this effect, it is enough to cover the air duct as much as possible with heat-insulating material. Ideally, this work should be carried out after the tightness problems have been eliminated. The process itself is simple, but it requires preparation in the form of removing the panel. You can, of course, try to avoid these difficulties, but the result may turn out to be disappointing and you will have to redo everything all over again. 8. Lack of tightness in the radiator itself. The reason that the heater in the Chevrolet Lanos does not heat well may be a defect itself, and the radiator is insufficiently tight. This is especially true for models in which the inlet and outlet openings are located on the same side. Normally, they should be separated by a solid partition, otherwise the air will simply pass from the incoming fitting to the outgoing one, without increasing the temperature of the radiator itself.
Instructions for removing the Lanos Sens Chance dashboard
To remove the dashboard on Lanos, you don’t need to put in a lot of effort. This procedure is not difficult and does not take much time. In any case, if you need to repair, tune or replace the instrument panel, you need to understand the issue of dismantling it. We will look at how to remove the Lanos tidy in a detailed description with a photo. First of all, let's prepare the necessary tools for the work. To do this, you only need a set of screwdrivers. Make sure you have a short Phillips screwdriver or flexible shaft in the kit, otherwise you will have difficulty removing the two screws.
Now you can begin the procedure for removing the dashboard on Lanos. It is recommended to follow the sequence described in the instructions:
- The first step is to turn off the power to the car in order to prevent a short circuit. To do this, simply disconnect the negative terminal from the battery.
- Next, you need to remove the top part of the plastic steering wheel cover. It is secured with two screws located behind the steering wheel. Unscrew the two mounting screws by turning the steering wheel to the left and right
- Now you need to remove the headlight range control panel. To do this, you can pry it off with a screwdriver, but this method is dangerous because you can damage the plastic case. That is why you should unsnap the plug on the side of the dashboard and stick your hand through the resulting hole to remove the headlight range control unit
- Under the removed panel there are two bolts that need to be unscrewed with a Phillips screwdriver
- Next we move to the central part of the torpedo. The plastic plug in the shape of the letter U is dismantled by prying it off with a screwdriver. The plug must be removed carefully so as not to damage it and the mounting latches.
- We remove the plastic frame from the radio. There are 2 screws at the top that need to be unscrewed with a Phillips screwdriver in order to disconnect the control unit for the microclimate system or PUP heater (there is no need to remove the radio). It is recommended to unscrew the screws using a screwdriver with a magnetized tip.
- There is no need to completely remove the control unit, but it is disconnected in order to unscrew the two bolts in the upper part securing the plastic cover of the instrument panel
- Disconnect the power supply chips for the emergency lights, clock and fog lights (some models may not have a clock)
- Using a short screwdriver, you need to unscrew the two screws securing the plastic dashboard trim. They are located on top in secret channels
- After this, the plastic lining is dismantled
- Now you can begin the final stage of dismantling the dashboard of Lanos, Sens and Chance. To do this, unscrew 4 mounting screws located around the perimeter
- To remove the device, you will need to tilt the top part down and then pull it towards you. Pull the device towards you and disconnect the 3 power plugs
This completes the procedure for dismantling the dashboard of Chevrolet, Daewoo and ZAZ. Now you can carry out the necessary repairs, replace light bulbs, clean or tune the tidy, and put it back in place. Installation is carried out in the reverse order of removal. If you install a new dashboard with a tachometer on Lanos, Sens and Chance, then do not forget to adjust the actual mileage.
In conclusion, it should be noted that the procedure for removing the tidy on Lanos is not complicated. You don’t need to devote a lot of time and waste your nerves for this. If the backlight lamp has burned out or the arrow of one of the indicators does not work, then these breakdowns can be eliminated after dismantling the device. You will find a separate article on how to install an instrument panel with a tachometer on a Lanos.
there will be a cooling system
If you have eliminated all the points described above, but the stove still does not heat well in Lanos, then you need to move on to improving the cooling of the system. An excellent solution would be to transfer the hose to the thermostat and then take the coolant directly to the stove from it. This method was previously described thematically on automobile forums, but has now undergone an improving modification. The key here is to take the coolant directly from the thermostat. In this way, we get rid of premature opening of the thermostat and reduce the resistance to the movement of coolant (the flow is slightly affected by the opening of the fitting and the movement through the heating). It is better to leave the throttle tee at the factory to avoid the formation of stagnant zones in the standards. The only drawback will be the need to install an adapter for connecting hoses with diameters of 10 and 12 mm, respectively. As a result, we achieve significant stabilization of engine temperature. Without modifications, the thermostat turned on at a temperature of approximately 75-76? C, after them - at 90? C, which resulted in more warm air from the stove.
Other improvements in heating methods
In some cases, an increase in temperature can be achieved by installing an additional pump for increasing the volume of liquid cooling the stove. However, it is unlikely that the effect will be very noticeable, because no matter how you accelerate the movement of a coolant at a low temperature, you will not get much heat out of it. Installing an additional radiator complete with Useful may become more effective. With the pump, the radiator area will become larger and heat transfer will improve several times. However, it is worth remembering that it is not always possible to install an additional radiator without the accompanying complex structural components. changes, a good result can be obtained by using the method of taking air from the engine radiator directly. After all, heating already warm air is much more practical than cold air from the street. here, however, there are significant drawbacks: in the event of any engine failure, accompanied by unpleasant air, odors in the cabin will become unsuitable for even breathing and dangerous. It is also believed that the stagnant area in the zone of the fourth cylinder has a negative effect on the heating system. However, troubleshooting this problem is quite a painstaking task, requiring certain qualifications, so we will not dwell on it now.