05.09.2019
| (Votes: 4, Rating: 5) |
Issues discussed in the material:
- Why do you need a brake caliper?
- What types of brake calipers are there?
- How to replace a brake caliper
- What problems do brake calipers have?
The brake caliper is the best-selling car part. It is responsible not only for the performance of the car, but also for the safety of the driver and passengers. There is high competition in the market among sellers of these parts, because each manufacturer strives to improve the reliability of its products.
Replacing the caliper piston
Replacing a caliper piston using a real example with photos and videos. Replacing a caliper piston is not a complicated procedure, but it requires the correct selection of lubricants and care.
The brake caliper is a reliable and durable mechanism. If you regularly monitor the condition of the anthers and periodically carry out preventive maintenance, then the caliper will last a very, very long time.
It is also very important to carry out this prevention correctly and use the right lubricants. But as practice shows, car owners, due to inexperience, lubricate calipers with completely wrong lubricants, which lead to jamming of the piston and guides, as well as to destruction of the anthers.
In the end, you will see what a worn caliper piston boot that is not noticed in time can lead to.
In order not to spend quite a lot of money in the future on replacing the caliper piston, you must always fulfill these simple conditions:
- Replace brake fluid every 2-3 years. Brake fluid is very hygroscopic and therefore absorbs a lot of moisture. After two years, the moisture in the brake fluid reaches levels at which corrosion of the brake system, including the piston, begins.
- Regularly lubricate the caliper piston and guides with the correct lubricants. How to lubricate the caliper is described in detail on this page. You can see how to lubricate a caliper using the example of this article.
- If swelling or destruction of the boot is detected, then it is necessary to urgently replace the boots to avoid corrosion of the piston. How to do this is shown on the page Do-it-yourself caliper repair
But if these moments are missed and the piston has already become unusable, then the only option left is to replace it.
Malfunctions and repairs of brake calipers
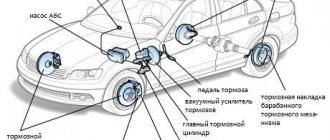
In most cases, cars are equipped with single-piston calipers with a floating caliper. On high-power vehicles, fixed-type mechanisms with two or more pistons are installed. The rear brakes often include a parking brake system, which in most modern cars operates through working pads.
These systems have moving parts, which in the minimum configuration include hydraulic cylinders (one per clamping mechanism) and guides. If there is an integrated parking brake, this also includes a mechanical pad pressing system. In addition to moving elements, hydraulic shut-off valves are subject to wear. As a result of constant temperature influences, the coating of the caliper surface is gradually erased, which entails its oxidation.
The guide pins and anthers of hydraulic cylinders, which act as shock absorbers and elements of the self-supplying system, are most sensitive to wear. As soon as these parts wear out, the brakes begin to jam, overheat and make characteristic sounds.
In addition to the wear of these elements, other problems arise. A worn boot can lead to corrosion of the working piston and cylinder surface. In addition, the geometry of some elements of the caliper (especially light alloy), in particular the floating caliper, may be disrupted. This is caused by uneven cylinder pressure on the brake disc, significant overheating or mechanical impact of a foreign object.
Separately, it is worth mentioning the rear devices with an integrated hand brake. Having appeared in the 1980s, systems like Teves/ATE have today practically replaced other types of parking systems. In these mechanisms, in addition to the main working elements, housing elements, fasteners, studs and rods damaged by corrosion, as well as other components may require repair.
The service life of a brake caliper, as a rule, exceeds 7-8 years, even when operating in our climatic conditions. Exceptions are calipers with light-alloy pistons, devoid of anthers. For example, these are multi-piston Lockheed/AP Racing mechanisms, which are installed in powerful SUVs and crossovers, as well as sports cars. Repair of this type of brake calipers (especially those with original chrome-plated aluminum pistons) is often required much earlier.
Erroneous actions of car service specialists can also cause breakdowns and repairs of brake mechanisms. This situation most often occurs with rear calipers equipped with a parking brake. Repair is usually required after the wrong choice of pads, their incorrect installation, or dirt getting into the mechanism. And all sorts of sounds made by the brakes, in this case, are not a signal for urgent action. Instead, you should pay attention to uneven braking, insufficient efforts of the braking system and incomplete release of the brakes, and fluid leakage from the system.
We recommend
“Which lubricant to use for calipers: making the right choice” Read more
Repair begins with disassembling and cleaning the device. Disassembling this mechanism is not always easy, and if there is an integrated parking brake, special tools and appropriate skills in working with it may be required. Cleaning is carried out in an equipped service center using shot blasting; much less often, chemical cleaning or mechanical treatment with special brushes and drill attachments is used.
The channels of the hydraulic system are separately cleaned of rust. In this case, fittings and shut-off valves must be replaced. On multi-piston calipers, the external connecting tubes must be cleaned and inspected. If necessary, they can also be replaced.
Complete disassembly of the brake mechanism allows you to decide whether it can be repaired. It makes no sense to repair the caliper if there is deep corrosion of the cylinders or mechanical damage, but only if the mechanism is unique.
If you decide to restore the mechanism, it should first be thoroughly cleaned. In some cases, when creating new attachment points, additional metal is welded on, which is painted if necessary. Then you need to select or make pistons. When steel is used for manufacturing, the pistons are subsequently chrome plated.
Next, the anthers are attached to the new pistons (if they were previously installed), after which the hydraulic system is assembled. The process is completed by installing the remaining elements of the mechanism, including the parking brake (if equipped). The assembled mechanism is checked with a pressure of 200 kgf/sq.cm, identifying possible leaks.
Does it make sense to resort to repairs or is it easier to purchase a new mechanism? The financial component plays a major role here. Even the simplest original calipers will cost at least 15–20 thousand rubles, while the cost of multi-piston devices can reach 170 thousand. It should be taken into account that such mechanisms change in pairs.
Compared to buying a new mechanism, repairs will be cheap. For example, the cost of repairing popular Bosch models in specialized workshops varies in the range of 1,500–2,000 rubles. And taking into account the fact that parts subject to wear are replaced with new ones, the total service life of the mechanism will not be much lower than a completely new analogue.
Replacing the brake caliper piston
For work we will need the following tools and materials:
- A set of keys for removing the caliper from the car. How to do this is described here
- Repair kit consisting of a piston, sealing collar and boots
This kit for repairing the front caliper cost 330 UAH. A kit without a piston will cost 100 UAH. Please note that, for example, the Lacetti hatchback offers a 48 mm piston, although in fact it usually has a 54 mm piston, just like the sedan and station wagon!
The kit also includes lubricant, but I don’t use it, I use proven materials.
- Caliper piston lubricant
- Caliper Guide Lubricant
- Guide block lubricant
- Small plastic bag
- Clean rags
- Some kind of cleaner
We place a bag under the brake reservoir cap so that when the brake hose is disconnected, the fluid does not escape too much
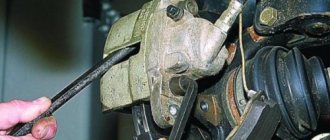
We remove the caliper from the car. How to do this is shown in the links above.
Through the hole where the brake hose was screwed, we squeeze or knock out the piston from the cylinder. If there is a compressor, then you can supply air through this hole and the piston will come out
How to choose a new brake caliper
To select a new mechanism, you can use three methods:
- Search by VIN code. This method can easily be used to find both original products and their closest analogues. Many experts recommend searching for a spare part by VIN code due to the almost zero risk of making a mistake with the choice.
- Search technical information. More specifically, you can search by make, model and configuration of the vehicle, which is also a good option. It is especially convenient to search in electronic systems, where these search parameters are set explicitly.
- Search by caliper code. In this case, you need to find out the code of the existing mechanism or find it out from other car owners.
In addition to this, it is advisable to have detailed information about the manufacturers. It is confirmed by facts that there are unscrupulous manufacturers of such important elements of the brake system, who, unfortunately, produce fakes of extremely low quality. Such products fail quite quickly, overheating during operation. In some cases, they can only be installed with a hammer.
Nevertheless, you should not refuse non-original devices. Unlike, for example, automotive sensors, the quality of calipers on the secondary market is often not inferior to original products. Here it is important to choose the right manufacturer, and the best at the moment are:
- NK (Denmark);
- Pagid (Germany);
- DelcoRemy (USA);
- ABS (Netherlands);
- Textar (Germany).
We recommend
“What kind of lubricant to lubricate calipers: choosing the best composition” More details
You can choose cheaper analogues, but the service life of such a mechanism will be incomparably lower. This option should only be considered as temporary if finances are limited at the moment. Replacing this part with a better one will still be inevitable, including as a result of a malfunction. Here are some other companies worth paying attention to:
- Profit (Czech Republic);
- Febest (Germany);
- JP Group (Denmark).
If you focus on the price/quality ratio, then the best option would be products from Febest (Germany). The quality of calipers produced by this company has increased dramatically in the last few years. Perhaps the reason for this jump lies in the increase in the volume of supplies not only to European countries, but also to Asia, which is generally characterized by increased requirements for the quality of spare parts for cars. Therefore, if you are looking for a quality mechanism but are on a budget, Febest will be the best choice for you.
The following companies produce fairly good brake caliper repair kits:
- Meyle (Germany);
- Autofren (Spain);
- Frenkit (Spain);
- Ert (Spain).
This predominance of Spanish manufacturers is confirmed by practice. It is this country that is distinguished by affordable prices for fully equipped and high-quality repair kits.
DIY caliper repair
With the end of the cold weather, patience also ended. I couldn’t stand the smell of burnt dust, the whistle and stench of overheated pads from jammed caliper cylinders and the “nodding” when stopping, so we bought everything we needed and went to my father-in-law’s garage (I did the front and back with a break of a week). Unfortunately, there are no photographs, because I was very passionate about the process. What you need: 1. Rem. sets of calipers 2. Brake fluid Castrol DOT-4 1 3. Construction gloves 2 pairs 50 rubles, rubber gloves 4. GOI paste 5. A lot of unnecessary lint-free rags. 6. Plumbing thread. 7. Half a 5 liter bottle 8. Rust converter 9. Medical dropper 10. Medical syringe 20 cc
The first step was to disassemble the problematic right rear caliper. 1. Jack up and remove the wheel. 2. Remove the handbrake mechanism. To do this, we bend and pull out the spring (although I am not small in caliber, I am also not a master of sports in arm wrestling, I was able to do this with my fingers to my surprise), then unscrew the bolt securing the swing and disconnect the cable (I immediately discovered the reason for the handbrake freezing in winter - a torn boot on a cable, this still needs to be sorted out, not sold separately, only assembled with a cable, will have to be farmed). 3. Next, loosen the bolt securing the hose to the caliper body (after removing the caliper, this will be more difficult to do). 4. Next, we unscrew the bolt that secures the caliper and fold it back, helping ourselves with a screwdriver and swear words, because the pads are jammed by the cylinder. We remove it from the guide and see the reason - a torn boot on the cylinder. 6. Place a 5-liter bottle sawn in half under the scene of action to avoid clogging everything with brake fluid. 5. Next, you can try to unscrew the brake cylinder with pliers, inserting it into the groove for the special device counterclockwise (or with a mythical special device that could not be found in the city), but I did it easier - I drove my father-in-law into the car, he started it and, progressively, without quickly pressing the brake pedal has been pressed out by a cylinder from the caliper body, but it is still under the boot. 6. Next, unscrew the bolt securing the hose and try not to lose the two copper sealing washers. We wrap the bolt with plumbing thread and insert it into the coupling with a hose to prevent brake fluid leakage. PS It is better to remove the pads with the springs and put them in a secluded place so as not to lose the latter, it will be very difficult to then look for steel wire to make the springs. 7. Now we have the caliper with the almost disconnected cylinder at our disposal, we can work on it. We take a screwdriver with a small, non-sharp tip and look for a locking open ring above the boot, pry up the end and carefully remove it. Then we remove the stuck boot and cylinder. Next, the cause of the jamming was visible - the internal cradle where the edges of the boot are inserted, as well as the edges of the hole for the piston, as well as part of the piston, are covered with corrosion. There is nothing to do, we begin a long, stubborn and inconvenient cleaning of corrosion using rags, rubber gloves, a rust converter and in non-working places (not the cylinder and not the hole under its walls) - with a screwdriver to remove the converted corrosion. Next, we thoroughly rinse everything with the old drained brake fluid and wipe it off. It's time for the top hat. We rub the rags with GOI paste, firmly clamp the cylinder in a vice and begin polishing the surface free of corrosion. After some time, the cylinder shone like a cat's bells and became much smoother. We change the sealing collar in the caliper body (the old one seemed to be good, well, since we took it apart...), lubricating it on all sides with red grease from the repair kit (the Chinese Germans are great - they put enough grease and 2 types, red and yellow, red as times for internal parts). We lubricate the cylinder itself and the boot with it on all sides. We put the boot on the cylinder (just throw it on), insert the cylinder into the caliper, take the pliers and begin to twist the cylinder into the body clockwise with moderate dosing of pressure and rotation. We are approaching the end of the year - carefully use a screwdriver to tuck the edge of the boot into the groove, take the open ring and no less carefully place it in the groove where the edges of the boot have just been pushed. Apply yellow grease to the caliper fixing bolts and reassemble in reverse order. 8. Afterwards, repeat the operation on the left caliper. 9. After completing the repair of the calipers, it is necessary to bleed the brake system to remove all the air. With the help of my father-in-law, we pump all the wheels one by one (even the front ones, which I only got to in a week). To do this, remove the cap from the bleeder fitting, place the key on the 8th ring side, and put a hose on top with a rubber band from the dropper (fits perfectly). On command, the Father-in-law pumps up the pressure with the brake pedal until it becomes stiff, and holds his foot in this position. At this moment I open the fitting with a key, bleed air and liquid and control the air outlet through the transparent dropper hose. As soon as the brake pedal goes to the floor, he commands, I close the fitting, after which he releases the pedal. Next, we repeat the operation, and every 2 such times we run to add brake fluid to the reservoir so that more than a quarter does not go away, as recommended. We repeat until liquid comes out without air, make another control pass, and tighten the fitting. We carry out the operation on all 4 wheels in turn from the closest to the farthest wheel from the place where the hose is disconnected. After the operation was completed, it was already evening. But you need to check it. I sit down, drive out onto the alley of the garage cooperative, accelerate to 20, press the pedal, it’s soft (It brakes well, but there is a treacherous idle to the point where it starts to grip confidently. The cylinder doesn’t jam, there’s no stink, it doesn’t bite. A profit is made, but and I got an inconvenience in the form of a soft pedal (I thought about the air in the system, but after the second pumping after repairing the front calipers, which I will write about later, the situation remained the same).
Detailed instructions for repairing calipers
The most common cause of brake caliper failure is its souring and subsequent jamming.
If the caliper is regularly maintained and lubricated, it can last for decades without any repairs. But the main thing is to choose the right lubricants!
If interested, read about choosing lubricants. In this article we will work with them, but I will not spend letters in this article describing these lubricants.
Caliper repairs can be divided into three categories:
- Mandatory caliper lubrication when replacing pads
- Reanimation of the caliper if the wheel is already heating up
- Complete disassembly of the caliper and replacement of worn elements
The first two categories can be viewed via the links. And in this article we will look at the third category, when it is too late to drink Borjomi and surgical intervention is necessary.
Most often, the reasons for complete caliper failure are two things:
- The caliper has never been lubricated or serviced. As a result, the piston and guides were severely corroded.
- The caliper was not lubricated with what was needed. As a result, the lubricant turned into plasticine or powder, and the anthers and cuff mercilessly swollen.
In these two cases, you can no longer get by with half measures and you will have to do the job thoroughly.
Brake caliper replacement procedure
If you decide to do this type of work yourself, here are brief instructions. But we still recommend following video tutorials or turning to professionals.
- Place the car on a flat surface and loosen the wheel bolts;
- We remove the wheel and pump out the existing one;
- Use a screwdriver to pry it off and remove the bracket;
- Expand the guide brackets;
- We unscrew the bolt and disconnect it from the disk;
- Hanging;
- Remove the piston;
- We wipe it, lubricate it with a special liquid, change the piston and boots;
- Assembly.
Some people make small mistakes when replacing a brake unit, which can delay the process. At a minimum, this is the untimely preparation of the necessary tools that will be needed during the work.
Advice! When replacing the brake caliper yourself, lock the parking brake.
Before installing a new mechanism, be sure to clean the surface.
Read the article - replacing brake discs .
Replacing the front and rear brake caliper piston
Sometimes the piston “sticks” and it is motionless. Then you need to do the following:
- Try to revive it, put it in a special lubricant or gasoline;
- Perform replacement.
Replacing brake caliper guides
Guides are bolts that screw into the housing ears. If corrosion is observed and cannot be removed, special cleaning steps will be required. We unscrew them from the ear mount and insert new ones.
Don’t forget to put on the boots and check them for leaks, there should be no leaks.
What is included in the repair kit?
If there is any creaking or squealing, it's time to intervene. It is necessary to disassemble the caliper and clean all parts.
Each car must have a separate approach, since the structure of different brands of cars is different. But the standard repair kit for the rear and front caliper includes the following parts:
- Seals;
- Guides;
- Adjustment screws;
- Adaptations.
In our car services you can replace the repair kit at a competitive price, just leave a request.
Signs of caliper malfunctions
The breakdown of the caliper components and their impending repair can be understood by some signs that occur during braking:
- The car pulls and pulls to the side when braking.
- It feels like when braking you have to put more force on the pedal or, conversely, less.
- The brakes rattle or knock when driving over bumps or when stopping.
- The brakes are jamming, which will be indicated by possible skidding.
- The appearance of brake fluid leaks on the wheel.
- Feedback in the pedal, expressed in a strong pulsation when pressing the brake.
If these symptoms appear, you should not delay repairing faulty caliper elements. You must first figure out why this happened and make repairs immediately.
If the brakes rattle
This type of brake has pressure springs or floating calipers.
They are responsible for securing the pads to the caliper body. The reason for their failure is metal fatigue or poor quality. As a result, they lose their elasticity and stop pressing the pads against the body. Because of this, the pads rattle at the slightest passage of irregularities and may come into uneven contact with the disc, which will lead to the appearance of a shoulder or grooves on it. Also in this case, the staples themselves may rattle.
What should you do when your brake calipers or pads rattle? If it is not possible to replace them, then you should try to loosen them with your own hands using pliers to make them more rigid. To do this, you need to pull them out of their seats, unclench them and insert them into place, after which they will stop rattling for a while.
Caliper repair
- The housing in which the piston (cylinder) is mounted.
- Bypass valve.
- Sealing ring.
- Piston (cylinder).
- Cylinder boot.
- Retaining ring.
- Frame.
- Pressure bar.
- Pads.
- Guide boot.
- Guides.
- 14. Fastening bolt.
- Brake hose.
To repair calipers we will need the following materials:
- Caliper piston lubricant
- Caliper Guide Lubricant
- Guide block lubricant
- Brake cleaner or any cleaning agent
- Brake Caliper Repair Kit
- Copper brake hose O-rings. If new ones are not found, and the old ones are not very compressed, then you can go over them with a file and grind off the protrusions. But it’s better, of course, to have new ones in stock.
- If it turns out that the piston or guides of your caliper have large holes and pockets of corrosion, then you will need to purchase them as well.
- Possibly brake fluid for topping up
The kit includes two guide boots, a piston boot, a cuff and a cap for the bleeder fitting.
To repair the caliper with your own hands, we will need the following tools:
- metal brush
- medical syringe
- spanners. In my case, 10 and 12 mm
- clean rags
- a good screwdriver or a small tool
- two small packages
- soft wire
- preferably an assistant. We don’t need it for work, but cleaning the ram with clean hands and bringing beer at the right time will be just right. Also, at the very end, he will help you press the brake pedal a couple of times to bleed the brakes to make sure there is no air in the system.
Rear caliper repair
Actually, let's look at the process using the example of the rear caliper of a Chevrolet Lacetti
The first step is to open the brake reservoir cap, place a bag on the neck and screw the cap into place.
This is necessary in order to limit the access of air into the tank. This will prevent the brake fluid from quickly flowing out of the hose when we unscrew it.
Jack up the car and remove the wheel.
Use a metal brush to clean everything that can be cleaned.
After this, apply penetrating lubricant to the brake hose bolt.
We wait a little and try to unscrew the bolt with a 12 mm wrench.
If it's good, that's good. And if it doesn’t work out, then that’s bad and I don’t envy you.
We wrap the unscrewed hose into a “finger” from a rubber glove and wrap it with wire. During repairs, these measures will be enough to avoid brake fluid leakage.
There are craftsmen who clamp the brake hose for these purposes, but I don’t want to do that. Who knows what will happen to this hose later. It's better not to take risks.
We remove the unscrewed bolt to the side and at the same time try not to lose the copper sealing rings. There are two of them.
That's it, the caliper is disconnected from the system and we now need to remove the caliper cylinder itself. To do this, use the same 12 mm wrench to unscrew the lower bolt of its fastening.
After this, lift the cylinder up. If it is very jammed, then you can help yourself with a large screwdriver or a pry bar.
We take it out together with the upper guide. We look into the hole where the brake hose was previously screwed in and see the back of the piston.
Using something, we need to squeeze out this very piston through this hole.
If it’s really tight, then you can help a little with a hammer, or better yet, with a vice.
After the piston has come out, we assess the situation. If the piston is full of holes and pockets of corrosion, then it is better to replace it. If the corrosion is not significant, then you can polish it with felt and Goya paste. In my case, there were pockets of corrosion, but it was not possible to purchase a new piston. Therefore, after a little polishing, I left it to serve further.
We clean and wash all the grooves in the cylinder.
The far groove is the seat of the sealing collar, and the near one is the boot
After this, lubricate the cuff groove and the cuff itself with piston lubricant. The groove must be lubricated to avoid corrosion under the cuff. Install the cuff into the cylinder. This is done quickly and easily.
Now the most important thing. It is necessary to put on the piston boot and insert the piston itself. To do this, lubricate the piston with the same grease and put the boot on the piston from the back side.
I was filming a video and forgot to take a photo. That's why I inserted a still from the video. It looks bad, but the essence, I think, is clear. The part of the boot that is inserted into the cylinder groove hangs slightly from the piston.
Now, when installing the piston, the boot will fall into its groove in the cylinder. In this case, the piston can be rotated slightly so that the boot placed on it falls into its groove completely. If the boot is bitten a little, then you can help it get into the groove with a screwdriver. But be careful not to tear the boot.
There is nothing complicated. You can easily figure out the place.
Now you can push a little more grease under the boot. This can be done more conveniently using a syringe.
Squeeze the lubricant into the syringe.
We push the piston into the cylinder and excess lubricant will be squeezed out from under the boot.
The piston should move easily and move with bare hands. If it doesn’t move, it means something went wrong or you didn’t eat enough porridge as a child. If the problem is a mess, then you can use this device to recess the piston.
Now you need to wash the seats of the guide pins.
If there is severe contamination, then it will be more convenient to dismantle the whole thing and wash it on the table.
After that, apply a little grease for the guides there. You can insert the guide and use rotational movements to evenly distribute the lubricant.
We install the anthers so that they fit into their grooves. And insert the bottom guide
Clean the pad guides and lubricate them with a thin layer of high-temperature grease
We lubricate the ends of the pads with the same grease.
We do the same with the back side of the block.
It is better not to lubricate the second pad, which faces the piston, so that the lubricant does not get on the piston boot.
We install the pads in place, first making sure that the lubricant does not get on the working area of the pads.
Lubricate the second guide that remains on the cylinder
And install the cylinder in place.
Screw on the brake hose. We remove the bag from the brake reservoir, but do not screw the lid on yet.
We unscrew the bleeder fitting and wait for brake fluid to flow out of it.
It is located at the top of the cylinder and the liquid, filling the volume of the cylinder, will displace the air from it.
After the liquid begins to come out, you can tighten the fitting. To ensure that there is no air in the system, you can have an assistant press the brake pedal several times and bleed the system. If your assistant cleaned the ram properly, ask him not to touch the steering wheel with his hands while pumping the brakes.
That's all you need to do to repair the caliper yourself.
1306 words written... In general, restoring a caliper is much faster than writing about it.
What happens if you don’t service the caliper and don’t notice a worn boot in time.
Don't forget to check the brake fluid level and tighten the reservoir cap. Before leaving, press the brake pedal several times until the piston reaches its working position.
Recommendations for maintenance and repair of calipers
Often the guides or pistons in calipers become sour. The problem with the latter arises due to untimely replacement of the brake fluid. Water accumulates in the old fluid, which contributes to the rapid oxidation of parts. And the less often the car is used, the higher the likelihood of souring the pistons.
To prevent such a situation, you need to promptly change the brake fluid and bleed the brake system, regularly checking its operation. When changing the front pads, evaluate whether the pistons move normally. If recessing them requires significant effort, this is a reason to be wary.
There is a chance to rehabilitate pistons that are not completely soured by soaking them. To do this, brake fluid is supplied into the space behind the seals using a syringe. In order for the piston to come out of the cylinder, you need to press the brake pedal many times, then the piston is retracted again. Repeat the operation until the piston moves freely. To prevent the piston from completely falling out of the cylinder when extruded, you can make a stop, for example, from old pads that are placed directly in the caliper.
We recommend
“How to improve brakes (vacuum from Priora)” Read more
Acidification of the guides can be eliminated by removing them and cleaning them from dirt and traces of oxidation. Then the guides are treated with a suitable lubricant (litol or its analogues). It is necessary to process not only the guides, but also the holes in which they are placed. If the anthers and springs are significantly worn, it is more advisable to replace the pins with new ones.
Fill only with fresh fluid. If the brake fluid reservoir has been left open for some time, moisture may have entered, which may subsequently cause corrosion of surrounding metal parts.
Keep in mind that on most car models, approximately 70% of the braking force is produced by the front brakes. It follows from this that the secondary replacement of the front pads will most likely require replacement of the rear ones.
