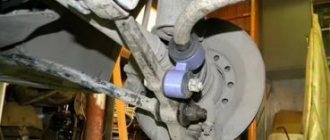
I decided to change the injector rings. And not because there is nothing to do, but because the car continues to suck in air. During all the time that I have been struggling with this, the receiver has removed it for the 3rd or 4th time. Now for me to remove it, like unscrewing 2 terminals on a battery, it’s a piece of cake. The ramp came off quite tightly, but what I saw, at first I couldn’t even believe my eyes.
The main word is “former.” I honestly forgot when I was assembling the engine what kind of ring it was. I went online and saw that there really should be a ring there, and not this one!
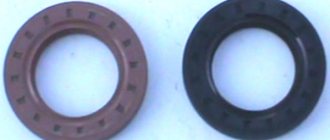
When I assembled the engine, I installed graphite rings because I simply couldn’t find any others. Although I heard that a red heat-resistant ring should be installed at the bottom of the nozzle. Apparently just to avoid such cases of drying out.
Before I started “pushing” the ramp into the head, I lightly lubricated the rings with oil so that it would be easier for them to fit into the holes and not accidentally lift them up. Everything came back together easily and without force. Removing the receiver is not as scary as many people think. It’s much worse on 14x or Kalina 16ve. That's all.
Detection of suction is carried out by inspecting the intake manifold gasket, connections and hose body. It is possible that air may be sucked in due to breakdowns of the cylinder head gasket (cylinder head) or the injector ring seal. Problems of this type occur more often on cars with a long service life. The engine loses power at low or high speeds, depending on the type of fuel the machine is running on.
Replacing injectors on a 16-valve valve
From the manufacturer's factory, VAZ-2112 cars were equipped with injectors from “Bosch” and “Siemens” ( mainly Bosch 0 280 158 996 – approx.) the service life of which before the first cleaning is within 50 thousand kilometers.
Step-by-step work order
- First of all, we remove the air filter housing, the mass air flow sensor (MAF – approx.) and the pipe.
- Then you need to relieve the pressure in the fuel system. In order not to suffer, and to do this work easier, we place a rag under the pipes and unscrew the connections. This will release the pressure quickly, and the remaining gasoline will flow out onto the rag.
Using two wrenches, unscrew the fuel line.
The power supply is disconnected.
Place the loosened bolts in a safe place.
To remove the ramp, you will have to make an effort.
When the fuel rail is removed, we carry out work to dismantle a specific injector:
- We remove the power supply from the injector, first moving the block to the side.
We remove the pads one by one.
A practical look at diagnosing and replacing an injector
Injectors for VAZ 2110 8 valves
Objective reasons for malfunctioning injectors:
- the engine starts with great effort;
- the engine is extremely unstable;
- in case of idle operation, the engine immediately stops functioning;
- the crankshaft rotates at an increased speed if the engine is idling;
- the car engine is not able to produce the maximum degree of its power;
- while moving, some jerks and dips in the functioning of the engine are objectively noticed;
- fuel consumption has increased sharply, without objective reasons;
- exhaust gases contain an increased concentration of CH and CO;
- Due to the loss of tightness of the injectors, a glow ignition effect is observed.
Note. If at least one of the above reasons occurs, then there is only one way out - cleaning the injectors, and general cleaning at that.
Car service specialists and the manufacturer itself recommend cleaning the injectors every 120 thousand kilometers.
Replacement or cleaning?
In order to understand what needs to be done with the nozzle, change it or simply clean it, it is better to diagnose them on a special stand. Under such conditions, you can test it in operation under different pressures, and also visually see how tightly it closes, and whether it is “snotty.”
If any of the injectors needs to be replaced, then you should buy a new one with exactly the same part number as the old one. Also, during installation of cleaned injectors, all O-rings should be replaced (2 pieces on each injector - approx.).
Installation is carried out strictly in the reverse order, similar to the removal procedure.
Video about cleaning injectors
Attention! When working with injectors, observe all fire safety measures, since gasoline vapors are highly flammable and pose a high fire hazard.
Replacing fuel injectors on VAZ 2108, VAZ 2109, VAZ 21099
Welcome! Are you looking for instructions for replacing engine injectors on fuel-injected cars of the Samara family? If yes! Then, in this case, today we will familiarize ourselves with detailed instructions for replacing injectors. For clarity, the progress of replacing the injectors will be supported by photographs, and at the end of the article you will find a short video clip that talks about how quickly you can remove the injectors from the car.
Summary:
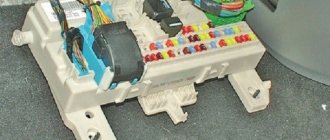
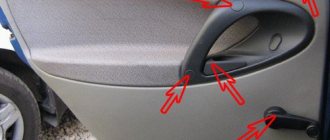
Where are the injectors? The injectors themselves are located on the fuel rail in number of four, that is, one injector sprays fuel strictly onto one cylinder. Below is a photo of the same fuel rail and the injectors that are located on it. The injectors are indicated by red arrows.
What are injectors?
An injector is a special mechanical sprayer located in the “head” of the engine, through which fuel is supplied to the cylinders under high pressure.
Injector malfunctions
Among the most common causes of injector failure may be the following:
- The injector nozzle is coked - in this case, increased fuel consumption may be observed, vehicle dynamics will decrease, and engine starting will be difficult at subzero ambient temperatures. Otherwise there are no differences.
- The injector valve does not close hermetically (“the injector is snotty” - note) - here there may be increased fuel consumption, “tripleting” and increased detonation (about checking the knock sensor here), unstable idling.
- Valve sticking - engine troubles. In order to diagnose it, with the engine running, turn off the power supply to each injector in turn. With a non-working injector, no changes in engine operation will be observed, but with a working injector, the speed will drop.
If you find a non-working injector on your car, or they need cleaning, you need to know how to properly dismantle them. You could already read more about this above.
Injection vehicles VAZ 2110, 2111, 2112 are equipped with imported injectors. This gives the models increased resistance to low-quality fuel and increases engine life. Owners of cars of the tenth VAZ family can independently repair and change injectors if necessary. The valve replacement steps are not particularly difficult even for beginners.
Types of injector sealing rings
Inlet or upper o-rings are found on both gasoline and diesel injectors. They serve to eliminate air leaks and fuel leakage at the point where the injector is connected to the fuel line. Most often they are made of rubber, because:
- no large mechanical loads;
- the temperature effect is small due to the distance to the hot engine;
- rubber is characterized by high elasticity;
- slow loss of properties under the influence of an aggressive environment.
The lower seal operates under more severe conditions, so the following options are possible:
- metal ring;
- alloy seal;
- rubber, made of a special composition, capable of withstanding temperature and mechanical stress.
To increase reliability, it is possible to simultaneously use a metal and elastic seal. In this case, the lower ring is made of a resistant material, for example, copper, and serves as a flame arrester. The upper ring is in this case protected from adverse influences. It is made of rubber, which ensures the tightness of the system at the proper level.
What injectors are installed on VAZ 2110–2112 cars
The main advantage of injectors for VAZ cars of the tenth family is that they are interchangeable. There are only two types of sprayers - produced by Bosch and Siemens. And each of them, regardless of marking and year of manufacture, can be replaced with another.
Bosch injectors are traditionally manufactured in black housing
When selecting, there is only one limitation - engine size. 1.5 injectors are not suitable for 1.6 liter engines.
The Siemens injector has a blue tip
Both Bosch and Siemens injectors of any marking can be installed on 8-valve and 16-valve engines.
Table: how to select injectors for VAZ 2110–2112 by marking
| Siemens | Bosch |
| Injector DEKA VAZ 6238 | 0 280 150 996 and 0 280 158 110 |
| Injector DEKA VAZ 6393 | 0 280 158 502 |
| Injector DEKA VAZ 20734 | 0 280 158 017 |
| Injector DEKA VAZ 20735 | 0 280 158 022 |
| Injector DEKA VAZ short 20734 | 280158017 |
| Injector DEKA VAZ short 20735 | 0 280 158 022 |
How to replace injectors on a VAZ 2108-VAZ 21099?
Note! All four injectors are removed and installed identically, so for clarity, we will show the removal of only one injector!
1) At the very beginning of the operation, remove the fuel rail from your vehicle. (How to remove the rail, see the article: “Replacing the fuel rail”)
2) When the ramp is removed, place it on a flat surface and then disconnect the wire block from the injector you need.
Note! In order to disconnect the wiring block, squeeze the spring clip that secures it and only then disconnect it!
3) Now, using a screwdriver, move the metal clamp that secures the fuel injector in the direction of the ramp.
Note! There is no need to completely remove the clamp from the ramp, just moving it to the side is enough!
4) Next, grab the nozzle with your hand and shake it, as a result of which you remove it from the ramp.
5) Next, check the condition of the sealing ring of the injector body and the sealing ring of the spray part of the fuel injector, for this:
• Taking a screwdriver in your hands, use it to pry off both o-rings and check their condition.
Note! If the rings are in good condition, then in this case they can not be thrown away, but left as a spare and later used on a new injector. Before installing old rings, be sure to lubricate them with engine oil!
Installation: Installation of new injectors occurs in the reverse order, that is:
1) First, check the condition of the injector O-rings.
Note! The condition of the rings is checked only if you are going to install a used injector on your car!
2) Next, the fuel injector is inserted into the hole in the ramp, and after installation it is fixed with a clamp.
3) And finally, a block of wires is connected to the fuel injector, and after connection, the fuel rail is installed in its place.
Additional video materials: Just below you will find a video in which the replacement of fuel injectors will be carried out in detail. And the most important thing is that the replacement will be carried out quickly, that is, without removing the throttle assembly, in general, watch the video:
Method for replacing injectors on 8- and 16-valve engines
Car owners cannot always diagnose faults in the fuel system. Often, failures in engine operation or unstable idle speed can be explained by completely different reasons, and not just interruptions in the fuel supply.
Symptoms of a problem
If all car systems are operating normally, then the following symptoms will directly indicate injector problems:
- failures in engine operation;
- increased fuel consumption;
- instability of idle speed;
- loss of power;
- black exhaust gas, etc.
Revealing
Let's look at different ways to detect air leaks into the engine through the injectors.
Spraying
Signs of suction are determined by spraying water (using a syringe) onto the hoses of a running engine. Liquid getting into cracks, holes, cracked hoses or a broken gasket causes a decrease in engine speed .
Another similar method is used to irrigate the same segment of nodes with ether, which leads to an increase in speed . So, when identifying leak points, you should carefully monitor the cleanliness of the engine. To find the location of the leak, you can use the measurement of the degree of vacuum behind the throttle. In this case, the removed hose is connected to the throttle valve control element.
Video about identifying leaks using the spraying method
Smoke or steam generator
The duct locations are identified by a so-called steam generator, which is capable of detecting any breakdowns, cracks, or holes. An analogue of this device, often used by specialists, is a smoke generator.
The device detects leaks in internal cavities where there is air. Closing the throttle valve with some kind of plug, connect it to the intake manifold. Streams of smoke begin to leak through leaks and cracks.
Checking air leaks using a smoke generator
The device also checks for leaks in the exhaust system by plugging the exhaust pipe of the muffler. This is achieved by setting the piston of any cylinder to TDC and ensuring that the valves overlap. In this case, the smoke, having passed the open valves, flows into the exhaust system, revealing defects in the density of this area. For this purpose, the engine is started and in idle mode the possible appearance of a hiss or a specific whistle is heard.
Video about checking air leaks using a steam generator
Possible faults
Knowing possible areas of leakage, faults are identified:
- Crack in the exhaust valve connection.
If you do not hear any sounds, you can begin the process of pinching the hose going to the intake manifold.
The pinch operation is performed only with round nose pliers to avoid damage to the working sleeve.
By squeezing the sleeves of the VUT (vacuum brake booster) or mixture pressure regulator, you can hear stable engine operation. When you remove the tool (pliers), you feel a drop in speed. This defect indicates the presence of holes or cracks in the hose being tested . There may be malfunctions of the amplifier or the adsorber valve.
Procedure for removing oil injectors
Before you begin removing injectors from any car of the tenth VAZ family, you will need to relieve the pressure in the fuel system. Removing any element that is under pressure in any way can result in personal injury.
How to get rid of excess fuel
To relieve the existing fuel pressure, you need to turn off the fuel pump and exhaust the remaining gasoline:
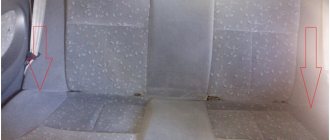
- Fold down the cushion from the back row of seats.
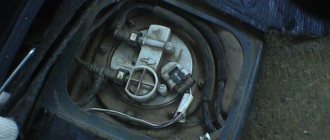
- Below it is the fuel tank hatch.
- Unscrew the screws securing the hatch.
- Disconnect the wiring harness from the pump housing (the wires supply power).
After this, start the engine and wait until it stalls. It is recommended to turn the ignition on several times to ensure that there is no gasoline left in the system.
Next, you can begin to remove the injectors. It is recommended to prepare the necessary tools in advance:
- open-end wrench 17;
- a flat screwdriver with a narrow blade;
- Phillips screwdriver;
- hex key 6;
- rags.
All elements of the repair kit are usually at hand for any driver
How to remove parts from the engine
- Remove the air filter box (it will interfere with free access to the engine).
- Remove the wiring harnesses from the injectors.
- Then you will need to disconnect the wires from the idle speed control and from the throttle sensor.
- Next, remove the vacuum seal from the pressure regulator (it has a white braid).
- Using a 17 key, unscrew the bolts that secure the fuel frame to the body. To make it more convenient, you can remove the gas cable.
- It is better to unscrew the fasteners of the plate with which the ramp is pressed using a hexagon.
- The fuel rail must be removed very carefully, with the nozzles facing up.
- On a 16-valve engine, dismantling will take longer, since the ramp has a more complex structure and several types of fasteners.
- Next, you can remove the injectors themselves - to do this, disconnect the fastening brackets of the electrical connector with your finger, and then the injector bracket. During removal, gasoline may leak; it is recommended to place a cloth under the ramp.
To install a new injector, the socket is first thoroughly cleaned of dirt and fuel, and only then can the product be screwed in. It is better to drop a few drops of gasoline onto the rubber ring before installation - this will make the nozzle fit into the mounting hole more easily. All work is then carried out in reverse order.
Injector sealing elements
The days of carburetors in car engines are behind us. At first they were replaced by mono-injection. Instead of a complex system of jets and flaps, an electronically controlled nozzle appeared, precisely dosing fuel to the cylinders. With distributed injection, each engine cylinder has its own injector; in addition to an electrical signal, a fuel line must be connected to it and a tight fit into the cylinder head or intake manifold must be ensured. It is at this stage that various sealing washers and rings are needed.
Repair of injectors VAZ 2110–2112
Repairing injectors means cleaning the product and replacing the O-rings. Simple measures to restore the functionality of the injectors can significantly increase the car’s power and make cold starts easier. Injector repair is possible in the following cases:
- there are no visible deformations on the body;
- the nozzle has not yet exhausted its service life;
- the car owner wants to optimize the operation of the power unit.
In all other cases (cracks and deformations, long service life), it is recommended to replace the nozzles with new ones.
How to blow out and clean oil molds
On cars of the tenth family, injector cleaning may be necessary after 40–50 thousand kilometers. In this case, it is best to carry out the procedure yourself, since you can always observe for yourself the true condition of the motor and its elements, and also save a significant amount on service station services.
Many drivers prefer to use the simplest method of cleaning injectors - fuel additives. Special liquids, along with gasoline, are poured into the tank and pass through all elements of the fuel system, cleaning them. This measure is justified for new cars in which the degree of pollution is at a minimum level. But additives will not be able to properly clean injectors and other elements of the system.
Video: a simple way to clean injectors using a repair kit
Where and what seals to buy
When purchasing a new nozzle, its kit always includes additional elements: a mesh filter, a set of necessary O-rings, rubber mounting sleeves, and plastic plugs.
Auto parts stores sell rings:
- piece by piece;
- repair kit for one injector (lower and upper);
- repair kit for the engine (the number of cylinders is taken into account).
The color of rubber O-rings can be any color and has nothing to do with size or quality.
Copper washers are sold in sets of several pieces.
Bosch injectors of various modifications are used on domestic and imported cars. Since the 90s, they have been unified, including by seat, and allow everyone to use the same O-ring.
If it is impossible to purchase original rings for rare or old foreign cars, replacements can be selected from seals from domestic engines.
Procedure for cleaning and replacing rubber seals
It is best to remove the injectors from the fuel rail and blow and clean each of them, and at the same time inspect them for wear on the rings. This method has a huge advantage over using an additive, since you can visually check how well the restoration work was carried out.
What tool can you use to make repairs?
To dismantle and replace seals you will need:
- diamond key 8;
- carburetor cleaner;
- a can of compressed air;
- rubber hose (you can use a vacuum cleaner);
- syringe with outlet diameter 10 mm;
- wire approximately 2 meters long;
- standard set of rings for injectors (includes eight products);
- rubber seals for fuel lines.
The repair and cleaning process is as follows:
- Remove the rubber seal from the nozzle.
- Place the rubber hose on the tail part of the nozzle.
- Connect the wire to the battery (you can choose any terminal).
- On the reverse side of the hose, connect an aerosol tube through a syringe to flush the carburetor.
- Holding the entire structure with your hands, spray the cleaner several times until the jets emitted become uniform.
- After cleaning, it is recommended to use the same principle to blow out the injectors with air from a can.
- Next, it is recommended to immediately put new rings on the product, after moistening them with gasoline.
In the photo the nozzle is in critical condition
The injector repair procedure can be considered accessible to beginners and inexperienced drivers. The only difficulty is dismantling the fuel rail, since you will have to first relieve the pressure in the system. Cleaning and replacing the rings on the injectors with your own hands gives the driver the opportunity to carry out the highest quality repairs of these elements and be confident that repeating the procedure will not be necessary for a long time.
Injector seals
#1 nivelep
- Users
- 4 messages
- Car make: VAZ 21102
- From: Omsk
Hi all! I'm new here, this is my first topic. I have had a car not long ago (VAZ 21102), and a problem arose in winter conditions. During a cold engine start, gasoline leaks through the injector seals; the rubber seals apparently shrink from the cold. Once the engine warms up, everything is dry. With auto start or electric heating, everything is fine and dry, but there is no desire to stand and wait for the heating to warm up the engine in a cold garage in the cold. I changed all the rubber sealing rings on the injectors, on a couple of injectors the fuel stopped leaking, but on one, on the contrary, it sprayed like a fountain. I turn off the engine, warm it up with the heater, everything is dry.
Tell me how to solve the problem? I bought eight silver rubber sealing rings (apparently covered with graphite), maybe there are others and what is the difference?
Injectors for VAZ 2110–2112 cars
Cars of the “tenth” family are equipped with various injection engines, each of which is designed to work with a specific model of injectors. Despite the fact that they have their own “names,” motorists usually use a “folk” classification based on color and thickness. For example: black thin ones.
This simplification usually works, but does not fully guarantee the compatibility of the injector with the engine. To avoid having to contact the chip tuner once again to correct the firmware of the electronic injection control unit, check the part number before purchasing.
Table: compatibility of injectors and engines of VAZ 2110–2112 cars
| Engine | Volume (l) | Number of valves | Controller (ECU) | Firmware | Injectors | |
| Siemens | Bosch | |||||
| VAZ-2111 | 1,5 | 8 | M1.5.4 | January-5.1 | VAZ6238 (thick gray) | 0 280 150 996 (turquoise thick) |
| VAZ-2111 | 1,5 | 8 | M7.9.7 | January-7.2 | VAZ6393 (beige thick) | 0 280 158 502 (black thin) |
| VAZ-21114 | 1,6 | 8 | M7.9.7 | January-7.2 | VAZ20734 (orange thin) VAZ20734 (yellow thick) | 0 280 158 017 (black thin) |
| VAZ-2112 | 1,5 | 16 | M1.5.4 | January-5.1 | VAZ6238 (thick gray) | 0 280 150 996 (turquoise thick) |
| VAZ-21124 | 1,6 | 16 | M7.9.7 | January-7.2 | VAZ20735 (blue thin) VAZ20735 (pink thick) | 0 280 158 022 (black thin) |
Photo gallery: injectors for VAZ 2110–2112 cars
Differences between injectors for eight and sixteen valve engines
Among some motorists there is an opinion that the injectors for the “ten” differ depending on the number of engine valves. Others believe that the determining factor is the volume of the cylinders.
Clogged injectors can cause the car to jerk when driving. Details: https://vazweb.ru/desyatka/pitanie/dergaetsya-pri-dvizhenii.html
In reality, neither one nor the other is wrong. The parts must match the engine design, model and firmware of the electronic control unit.
When replacing, it is best to install the same ones that were installed previously. Otherwise, there may be difficulties with startup and operation in transient conditions. To eliminate the shortcomings, you will have to adjust the firmware, which is almost impossible in a garage environment.
In-cylinder fuel injection has been known since the very dawn of the automobile industry. In the early 1890s, the German Rudolf Diesel and the Englishman Herbert Ackroyd-Stewart secured the rights to their own designs for an internal combustion engine running on fuel oil.
Vladimir Bekrenev
bvy.su
Replacement technology
On VAZ 2110 cars, replacing injectors is carried out as follows. The first step is to disconnect the battery. Then you will need to remove the air filter. After this, disconnect the vacuum hose from the fuel pressure regulator. Next, press the plastic latch of the throttle position sensor connector and disconnect this connector. The same is done with the connector going to the idle air control regulator.
Now you need to unscrew the two bolts that secure the fuel rail, as well as the screw securing the fuel pipe holders. Then remove the holder itself. The fuel rail will need to be carefully moved along the axis of the injectors. The ramp should be removed from under the receiver with extreme care, as there is a risk of damaging the injectors.
The next stage of work is to check the condition of the injectors. It is best to place them in transparent containers, first connecting them to the battery via wires. Next, you will need to turn on the starter and check the atomization of the fuel injectors. Each of them should spray the same amount. If one of the nozzles sprays less than the others, then most likely it needs replacement. In addition, it will be necessary to conduct a thorough inspection of the remaining devices for leaks.
A fuel injector that does not spray fuel needs further inspection. Perhaps it simply does not receive electrical power. It is necessary to disconnect the connector with wires from it. After this, you should directly connect the battery to the injector contacts and turn on the ignition. If in this situation the device begins to spray fuel, this will mean that the malfunction is hidden in the electrical circuit.
Experts advise measuring the resistance of the device windings. It should be in the range of eleven to fifteen ohms. Otherwise, such a fuel injector for VAZ 2110 vehicles is faulty. She needs replacement.
The process begins by reducing the pressure in the power system. Disconnect the wire connector from the fuel pump, and then turn on the starter and crank the engine with it. The starter is turned off when the fuel stops spraying. After this, the battery is disconnected on VAZ cars. Next, disconnect the connector with wires from the injector that needs replacement. Then move its lock to the side and remove the injector from the fuel rail.
Install the device in the reverse order, first lubricating the O-rings with gasoline. If the clamps do not hold the injectors securely, then they also need to be replaced. To do this, you just need to move them to the edge of the ramp. If on a VAZ car the ramp itself needs to be replaced, then the connector with wires, as well as the hoses, are disconnected from it.
Repair
Before removing the injectors from the dismantled rack, it is advisable to check their functionality. To check you will need:
- four identical containers,
- tester,
- wires.
Functionality check
- Connect the gasoline supply and drain hoses and the power connector to the rail with injectors.
- Place the rack over the measuring cups.
Place the rack over the measuring cups
The shape of the cloud should be approximately the same for all nozzles
After the war, Germany received a ban on the development of injectors for aircraft engines. And engineers began adapting direct injection systems for passenger cars, discovering another important advantage compared to carburetors - efficiency.
Vladimir Berestenev
Cleaning
There are two ways to clean fuel nozzles, each of which has its own nuances. Choose for yourself which one you like best or is more affordable, taking into account the available funds.
Spray to the rescue
Cleaning method
Necessary materials
Features of the event
- Injector cleaner;
- Carburetor cleaner in spray form;
- Spare O-ring
- Carburetor cleaning spray;
- Pump;
- Pressure gauge;
- Sealing ring
A simple cleaning method
Both operations take approximately 2-3 hours, but cost several hundred rubles. This is ten times cheaper than replacement and about the same amount more affordable than service stations.
After cleaning the injectors, check their operation. If this does not work, you will have to change it.
Basic faults
Faulty injectors are the main cause of car engine stalls and breakdowns. When the engine is running, such malfunctions are very easy to notice.
Signs of injector failure:
At partial loads, a smoky exhaust appeared (toxicity increased).
Engine power has decreased.
High temperature and knocking of exhaust gases.
With increased loads, jerks and dips in engine operation appeared.
At low speeds, engine operation became unstable.
A malfunction of the injectors can lead to a loss of its properties: the tightness will be broken, leaks will appear, the fuel spray angle will change, any supply of fuel to the combustion chamber will stop, and the fuel will be unevenly distributed in the chamber.
Operational faults are divided into two categories:
Malfunctions are caused by the use of low-quality fuel, which disrupts atomization and causes overheating (wear of injector elements, needle sticking, metal melting, etc.).
Malfunctions caused by incorrect assembly of the equipment or its incorrect installation (misalignments of parts, blockage of fuel channels, lack of tightness of connecting parts, pinching of the needle, etc.)
Let's look at the main options for injector malfunctions.
The most common malfunction of injectors is their contamination. Since they are exposed to high temperatures, when low-quality fuel is used, solid deposits form on them, blocking the holes and breaking the seal. General contamination of the fuel system leads to clogging of the filter and injector channels. To restore normal operation of the injectors, they should be washed.
Failure of the needle seal is also a fairly common cause of injector failure. It is caused by needle wear. This problem can be solved by replacing the needle and sprayer.
Violation of pressure regulation - occurs due to wear of the spring and its weakening or wear of the needle and rod. This problem can be eliminated by changing the spring tension using the adjustment screw.
A stuck needle is a consequence of overheating or working with a needle that does not close tightly. Therefore, gases from the cylinder enter the nozzle space. To solve this problem, either clean the parts or replace the needle.
It is recommended to replace injectors after every 100-150 thousand kilometers. But, as a rule, they can still work for 30-50 thousand km after the official warranty expires.
To ensure that the injectors do not become clogged and work properly, they must be serviced periodically. The maintenance intervals for diesel injectors vary for different engines and range from 500 to 5000 hours.
Seals on different types of injectors
Injectors have always been installed on diesel engines. Self-ignition of the working mixture occurs due to the high degree of compression; the load on the cylinder-piston group is high. A common mechanical pump injector is screwed into the cylinder head; to ensure a tight seal, a soft metal washer is used, installed on the bottom of the landing well. Copper is most often used, less often aluminum alloys. The metal must be soft and deform when tightened to ensure a tight seal.
Injection is carried out through a mechanical drive from the camshaft through pushers with rocker arms. Fuel is supplied through a metal pipeline; the return drain line is sealed with copper washers on the fittings.
Modern injectors are controlled electronically, there is no mechanical drive, but we had to significantly increase the fuel pressure at the inlet. This led to the need to use additional seals.
Upper or inlet sealing rings are available on all types of gasoline and diesel injectors and serve to prevent air leaks and fuel leakage. They are made of rubber, the mechanical and temperature loads are low, but the requirements for the material of the rings are high in terms of elasticity and its preservation throughout operation.
O-rings for injectors
On the bottom, depending on the model, there may be:
- one metal ring;
- one rubber;
- metal and rubber at the same time;
- no one.
The copper washer is always located below and serves as an additional flame arrester; the rubber seal ensures tightness.
Cleaning the fuel injector
This procedure is nothing more than an imitation of the operation of an injector on an engine, with the only difference being that flushing liquid is supplied to the injector under pressure in place of the fuel.
After pressing the spray gun, the flushing liquid is supplied under pressure to the nozzle and does not pass through it until we open the nozzle. We apply current to the nozzle by pressing the button so that it opens. The nozzle will open and liquid will begin to spray out from the back of the nozzle due to pressure.
Pay attention to the nozzle spray. It should be uniform
If a stream flows from the nozzle, run the flushing liquid until the stream turns into a uniform spray. If the spray was initially of the correct geometry, this indicates that the nozzles were clean. Surprisingly, my injectors turned out to be clean, although their initial appearance allowed me to doubt this.
We rinse each nozzle in this way for 2-3 minutes with short breaks. After all nozzles have been cleaned, repeat the procedure for each nozzle again. While the remaining nozzles are being cleaned, the residual liquid in the first cleaned nozzle eats away unwashed deposits and during the next flush, all residues are washed out.
Uniform torch
Perhaps this is all that can be said on this topic. After washing the injectors, we assemble everything in the reverse order. If the rubber injector seals are in good condition, put them back after lubricating them with engine oil. Otherwise, stock up on a set of new rubber seals, preferably in advance. Deformed rubber bands can cause fuel leaks or air leaks into the intake manifold.
Having finished assembling the disassembled one, without starting the engine, turn on the ignition in order to activate the fuel pump for a couple of seconds and increase the pressure in the power system. We repeat turning the ignition on and off several times to build up more pressure. Then we check the fuel line and injectors for fuel leaks. It would be a good idea to replace the fireproof injector washers (relevant for diesel engines) and rubber seals, if any. If no leaks are found, you can safely start the engine. Typically, cleaning fuel injectors is combined with cleaning the throttle valve. In the next article we will discuss exactly this.
| Vehicle air and fuel systems. Theory: Cleaning the throttle valve. Roll up your sleeves ECU: fuel injection control, fuel maps |
Operating principle of a mechanical nozzle
The operating principle of a diesel power system with mechanically controlled injectors is as follows. The high pressure fuel pump (HPFP) is supplied with fuel from the fuel tank. The feed pump is responsible for the supply, which creates the low pressure necessary to pump diesel fuel through the fuel lines.
Next, the fuel injection pump, in the required sequence, distributes and pumps fuel under high pressure into the lines leading to the mechanical injector. Each nozzle of this type opens for the next injection of diesel fuel into the cylinders under the influence of high fuel pressure. The decrease in pressure causes the diesel fuel injector to close.
A simple mechanical injector has a body, a nozzle, a needle and one spring. In the device, the shut-off needle moves freely along the guide channel of the sprayer. The injector nozzle closes tightly at a time when there is no required pressure from the injection pump. At the bottom, the needle rests on the atomizer seal, which has a conical shape. The needle is pressed using a spring attached to the top.
Simple diesel engines that have a split combustion chamber often have a single-hole atomizer with a needle. Diesel engines, which are based on direct fuel injection, are equipped with injectors with several spray holes. The number of holes in such a sprayer ranges from two to six.
The fuel supply is regulated depending on the design of the atomizer, since there are two main types of such solutions:
- sprayer with the ability to block channels;
- sprayer with overlapped volume;
In the first case, the injector needle shuts off the fuel supply by blocking each hole. The second type of nozzle means that the needle covers a kind of chamber at the bottom of the atomizer.
The fuel pressure pumped by the injection pump forces the needle to rise due to the presence of a special step on the surface of such a needle. Diesel fuel penetrates the housing under the specified step. At the moment when the fuel pressure is stronger than the force created by the pressure spring, the needle moves upward. This opens the nozzle channel. Diesel fuel under pressure passes through the atomizer and is sprayed in the form of a torch. This is how fuel injection is implemented.
Next, a certain amount of fuel, which is supplied by a high-pressure pump, will pass through the atomizer and enter the combustion chamber. After this, the pressure on the needle step begins to decrease, as a result of which the needle, under the force of the spring, returns to its original position and tightly closes the channel. Then the supply of diesel fuel to the sprayer stops completely.
Electro-hydraulic fuel injector
The electrohydraulic type of injector is most often used in diesel engines. Structurally, it consists of a control chamber, an electromagnetic valve and two throttles: for inlet and outlet. The operation is based on the principle of applying fuel pressure during injection and stopping it. At the beginning, injection does not occur because the solenoid valve is closed and de-energized, and due to the fact that fuel pressure is exerted on the piston located in the control chamber, the fuel injector needle is pressed against the seat.
The difference in contact areas corresponds to the fact that the pressure on the piston is greater than the pressure on the needle. The valve is activated by a signal from the electronic unit. This valve, in turn, opens the drain throttle. Through it, fuel enters the corresponding line from the control chamber. Moreover, the intake throttle does not allow the pressures in the intake line and the control chamber to sharply equalize. As a result, the pressure exerted on the piston decreases, while the pressure on the needle remains unchanged, it begins to rise and fuel is injected.
Here you see the arrangement of electro-hydraulic injectors. Photo: carnovato.ru
The accuracy of the fuel dosage is checked using the response time. During injection, the valve will be open for only 1-2 milliseconds.
Electromagnetic injector
This type of injector is usually used on gasoline engines.
The design has a nozzle and an electromagnetic valve with a needle. Photo: Childhood-empire.ru
Due to a predetermined algorithm, the control unit transfers voltage to the exciting winding of the solenoid valve at the required moment. As a result, an electromagnetic field appears that can overcome the spring force. It also draws an armature with a needle into the free nozzle and fuel is injected. After the voltage supply is completed, the fuel injector needle moves back into the seat with the help of a spring.
Piezoelectric injector
The most advanced type of such devices today is the piezoelectric type of injector, which is installed on diesel engines. Structurally, the nozzle consists of a pusher element, a piezoelectric element, a needle and a switching valve. The operation of such a nozzle is based on the hydraulic principle. Initial position: the needle is on the seat due to high fuel pressure. When an electrical signal is applied to the piezoelectric element, it grows in length and delivers the required force to the pusher piston. When the switch valve opens, fuel begins to flow into the drain line. The pressure begins to decrease above the needle. In this case, the pressure below raises the needle, due to which fuel is injected.