What are deflectors and the reasons for their failure?
Before considering the main topic of how to remove the air ducts of a VAZ 2114 and their nozzles, you should first briefly talk about what they are.
The deflector (otherwise called an air duct nozzle or air deflector) is designed to reflect the flow of air moving from the stove through a special channel (air duct) and deflect it in the desired direction (in the direction that the driver or passenger wants; for this, it is possible to deflect the deflector guides) .
Due to the peculiarities of their design and location, side deflectors are often damaged as a result of mechanical stress (for example, when accidentally pressed). In addition, they can break if you try to clean them with a hard object (screwdriver or knife) using significant force.
Problems with the stove on a VAZ 2115
The VAZ-2115 is an updated version of the earlier G8, Nine and VAZ-21099. The same characteristics are available for the three- and five-door hatchbacks VAZ-2113 and VAZ-2114. The interior heater design in these cars is the same, so if you are the owner of one of the listed models, then this article should be of interest to you.
Let us also recall that we have already discussed on our website Vodi.su the question of how to fix problems with the stove on a VAZ-2109.
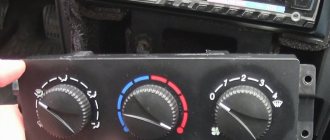
The device of the interior heater of the VAZ-2115
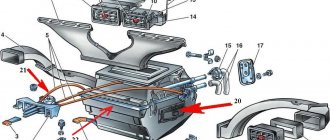
The stove design here is standard:
- fan - it directs the air flow;
- radiator - heated antifreeze from the engine enters it for cooling, and the heat generated during this is sent to the passenger compartment;
- heater tap - when you turn on the heater, the tap opens and antifreeze begins to flow into the heater radiator;
- damper rods - used to regulate the air supply, as well as to heat the legs and windshield;
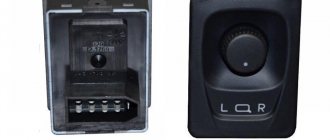
- heater resistor - serves to create additional resistance so that you can select the operating mode of the stove.
How to dismantle central deflectors and install new ones
Removal of deflectors may be necessary in one of the following cases:
- they are clogged and require cleaning;
- a deeper cleaning of the system with removal of the air ducts is necessary;
- the deflectors were pressed into the air duct;
- The deflectors are broken and need to be replaced.
In any case, whatever the reason for dismantling them, it is quite simple to do and does not require a lot of free time or special tools. The entire process of removal and reinstallation takes place in just a few steps, the first of which is removing the dashboard panel.
In order to do this, you need:
- disconnect the battery;
- remove the receiver/radio tape recorder, disconnect the cable harness from it;
- remove the center console screens;
- remove the cigarette lighter by disconnecting the harness of suitable wires;
- remove the ashtray light bulb and disconnect the wires that go to it;
- remove all protruding buttons and adjustment knobs (to do this, carefully pry them off with a screwdriver);
- Use a Phillips screwdriver to unscrew the screws holding the instrument panel panel (one each on the left and right);
- Unscrew two screws located above the dashboard and two screws located under it;
- pry and remove the rear window heating plug;
- Unscrew the self-tapping screw located under this plug with a Phillips screwdriver;
- move the panel back and to the right;
- disconnect all blocks with wiring harnesses from the switches and on-board computer.
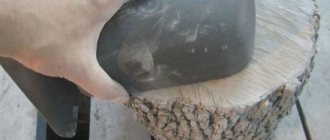
Heat from side deflectors
We return heat from the side deflectors
using pliers. VK group: Instagram: .
How to remove double-sided tape and replace window deflector
Once the panel is completely detached, the deflectors themselves can be removed. To do this, you need to unscrew the three screws responsible for fastening the central deflectors. One of them is located under their body, the other two are on its sides. After this, all that remains is to remove the deflector , clean it (if necessary), and install it back.
Assembly of the front panel and its installation are also carried out according to the above described scheme, but in the reverse order.
Before installing the deflectors in their place, it will be very useful to cover their perimeter with sound-absorbing material, such as modelin.
Dismantling of air ducts
Sometimes, in addition to removing the deflectors, you also have to remove the air ducts themselves (this may be necessary if they are damaged or severely clogged).
In order to dismantle them, you need:
- remove the deflectors (how to do this was described above);
- remove the dashboard by unscrewing the fastening screws;
- disconnect the side air ducts (left and right) by unscrewing two screws securing them to the central air duct;
- disconnect the central air duct by unscrewing three screws - one in the center and two at the edges.
After the air ducts have been cleaned or replaced with new ones, their installation and assembly is carried out according to the specified scheme, but in the reverse order
If you find an error, please select a piece of text and press Ctrl+Enter.
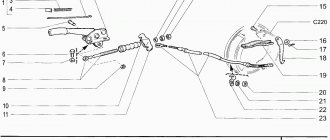
Replacing side deflectors
Now let's look at how to remove the VAZ 2114 interior air deflectors located on the sides (and this is quite easy to do; they are attached without the use of screws at all, but are held in place by eight latches). The first 4 of them are located on the outside, two in the upper part under the overlay and two in the lower part.
In order to squeeze them out, you should use a thin screwdriver or a strong knife blade. Also, in order to avoid scratches on the surface of the reflector, you should place a soft cloth under the instrument. Once the outer latches are open, all that remains is to disconnect the deflector housing from the duct body (which is held in place by the remaining four latches) and remove it.
Installing the reflector in place is done in exactly the same way, but in the reverse order. A very useful action before installation (both in the case when replacing the heater deflectors of a VAZ 2114 with new ones, and when installing old ones in their original place after cleaning) would be to glue the entire perimeter of their body with a noise-insulating material, which at the same time plays the role of a seal (for example, modelin or its analogues).
When opening the side reflector latches, you should place a soft material under the screwdriver or knife; this will protect the housing from damage and scratches.
Removal and replacement instructions
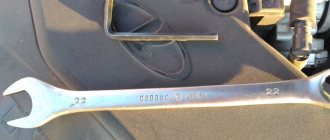
If you need to dismantle the heater, you will need to completely remove and disassemble the dashboard. As for directly replacing the radiator device, it will be enough to only partially disassemble the console. Repairing such a plan is not a particularly simple undertaking, however, if you have patience and strength, you can do everything yourself. To perform the work, you will need standard plumbing tools, including screwdrivers, wrenches, and pliers.
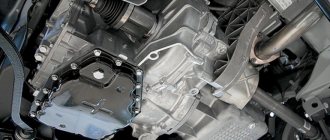
Replacing the VAZ 2114 heater radiator is performed as follows:
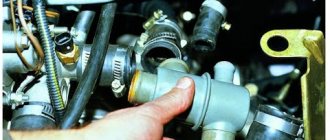
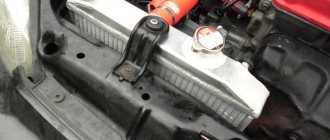
First of all, the antifreeze is drained from the heating system. To do this, you need to unscrew the filler cap of the expansion tank and drain the consumables from the main radiator assembly into a previously placed container under the drain hole. When the liquid from the radiator is drained, it is necessary to unscrew the cap in the cylinder block, which will allow the liquid to be drained from the BC. If you notice that the antifreeze has become dark and contains sediment and deposits, then most likely the consumable has already reached the end of its service life and it’s time to change it. Next, you need to remove the audio system from the center console. Remove the frame, pull out the radio itself and disconnect the connectors and wires from it, after which the device can be dismantled. Next, remove the plug and unscrew the screws of the frame that secures the dashboard - in total you need to unscrew 4 screws - two on top and two on the bottom. It is not necessary to dismantle the device itself. After completing these steps, you will need to remove all control levers and sliders from the heating system control unit. Next, the protective cover on the steering column is dismantled; the clamps are located at the top and bottom. The next step is to remove the diagnostic connector cover; it is located in the center console, under the cigarette lighter. To do this, you need to unscrew the screws that secure the connector itself, after which the cover can be removed without any problems. During this step, be careful not to damage the connector. Having done this, you can disconnect the connector from the cigarette lighter. After completing these steps, you need to disconnect all connectors and plugs that are on the center console. At this stage, be careful - it is better to mark all the connectors in advance, otherwise you can confuse them during panel assembly. Next, the signaling unit is removed; to do this, you need to unscrew two screws. This will leave the center frame of the dashboard free so it can be removed. Having done this, you will be able to get to the cigarette lighter illumination connector; it will also need to be disconnected. The next step will be to dismantle the glove box. It is attached to six self-tapping screws; they need to be unscrewed. There are fasteners on the sides of the control panel - self-tapping screws; they will also need to be unscrewed. Remove the screws that secure the ECU mount. Then unscrew a few more screws that secure the heating system control unit. Next, there are plastic trims on the A-pillars; they will need to be dismantled; to do this, again, you need to unscrew the screws. There is a special screw between the steering column and the panel, which also needs to be unscrewed. Having completed these steps, you have loosened the center console, now all that remains is to lift it up and towards the seats. It is not necessary to completely remove the console - you just need to have it pulled back enough to remove the radiator. The panel must be fixed to the side. Now you need to get to the clamps installed on the hoses of the heating unit; use a screwdriver to loosen them. Remove the hoses, but before doing this, wrap them with a rag, since they will most likely release residual antifreeze.
Pay attention to the condition of the pipes - if you see that they are worn out or heavily clogged, or there are signs of damage, then it is better to replace them immediately. The radiator is directly fixed to the heater body using three self-tapping screws - they need to be unscrewed, and the device itself must be removed
After dismantling, the device is replaced with a new one, the assembly procedure is carried out in the reverse order.
Price issue
Prices for radiators vary, but they vary roughly within the same range. The cost of devices depends on the quality of the product, the manufacturer, and the place where it is purchased. For example, Luzar products for the VAZ 2114 on average cost on the market from 900 to 1300 rubles. Aluminum radiators from the manufacturer DAAZ cost on average about 1 thousand rubles.
Loading …
Dashboard VAZ 2114
Cars of the Samara 2 family are equipped with a modern VAZ 2114 instrument panel, which is also called the “European panel”. The designers worked on it so that it allows for good forward visibility, a pleasant appearance, combines information content and ergonomics, and at the same time helps the driver cope with ordinary everyday needs. And they mostly succeeded. A block of instruments and sensors installed in front of the driver’s eyes, behind the steering wheel, provides him with the maximum possible amount of information:
- In the central part there are two dial instruments, on the left there is an engine speed indicator, by which the driver determines what load the power plant is working with at a particular moment and, if necessary, corrects this process by switching speeds; in the window under the arrow there is a digital clock. On the right is a speedometer or an indicator of the current speed of the car, in the window under the arrow there are digital readings of the kilometers traveled for the entire period of operation of the car and for the last trip;
- In the upper part, between the dial instruments, there is a turn signal indicator lamp with green arrows pointing left and right;
- In the lower central part there is a red “stop signal” triangle, and below it CHECK ENGINE is a red signal for engine emergency conditions according to information from the electronic on-board unit;
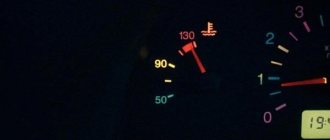
- In the left middle part of the instrument block there is a dial gauge for the engine temperature, or as it is called in the literature, a coolant temperature sensor, above it there is an icon that lights up when the engine overheats. Below it are icons for the throttle, oil pressure, handbrake and battery;
- In the right middle part there is a dial indicator for the presence of fuel in the fuel tank, above it is an icon for a fully filled tank, below it is an icon for the minimum amount of fuel in the tank, as well as icons for low beam, low brake fluid level and high beam.
Ergonomics is ensured by the convenient arrangement of instruments and information icons for visual perception of information, as well as keys, buttons and levers for manipulating them. A standard on-board computer is installed in the central part of the panel, usually a Gamma, Multitronics, Prestige or State computer. The location for its installation was chosen very well and with its help the driver receives expanded information about the state of the operating engine systems and vehicle components.
This information is reflected not only on the BC display, but is also transmitted through other control or information lamps and signs located on the instrument cluster and in other places on the dashboard. In addition, the on-board computer display displays other information, for example about the timing of the next inspection or maintenance.
The glove box, which can be closed, is conveniently located and has a backlight and a fairly large niche underneath it. The central beard also has a niche for storing something and an ashtray. The air duct outlets are quite well made, allowing for efficient glass blowing and preventing fogging.
During the operation of a car, problems constantly arise with malfunctions or failures in various systems. In order to get to some of them, it is necessary to remove the VAZ 2114 panel. Even to remove the instrument panel, you need to figure out how to remove the dashboard on the VAZ 2114 (instrument panel).
In addition, on the VAZ 2114 the panel must be removed completely if there is a need to repair air ducts and the stove, or the car owner wants to completely glue and seal the joints of the panel structure so that it does not creak.
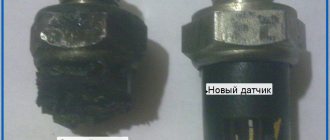
Heater motor malfunctions
Troubleshooting in the heating system of front-wheel drive VAZs should begin with the heater motor:
- turn on the ignition, start the engine;
- On the heater control unit we check the operation of the motor in all positions. If you can hear the stove motor changing speed when switching, it is most likely working.
The heater motor may not work for several reasons:
- the fuse responsible for the operation of the electric motor has blown;
- the contact in the mounting block has oxidized;
- the switch itself is faulty;
- there are breaks in the electrical wiring;
- The furnace electric motor burned out.
If the motor only operates at maximum speed (third position), the resistor is most likely faulty.
When the heater motor burns out, it needs to be replaced. We carry out the work of replacing the part as follows (using the example of 2114):
- remove the decorative trim on the driver's side of the cabin;
- disconnect the black-blue power supply wire of the motor, unscrew the ground mount;
- open the hood, remove the wiper arms;
- unscrew the fastenings of the frill (windshield wiper panel), remove the rubber seal;
- unscrew the four screws securing the upper motor casing;
- we pull the power wires of the electric motor through the rubber seal;
- to remove the motor itself, the housing must be halved;
- Having turned half of the housing with the motor, we dismantle the assembly.
Removing the deflector on VAZ cars: step by step
The most common problem faced by owners of VAZ cars is the breakdown of the plastic curtains on the central deflector, as well as the air intake clogged with debris and dust.
On VAZ 2106
The rotary air duct deflectors on the VAZ 2106 are round and are located on top of the instrument panel. It is held in place by three plastic snap fasteners.
Kia Rio
But with this model you will have to seriously tinker. Since the deflector is attached to screws that are hidden by the visor. It must first be removed.
The tools you will need are Phillips and slotted screwdrivers, a flashlight and a construction spatula.
The process involves some combination of activities. Watch in detail how this work is done in the video.
Video: removing the instrument panel visor on a Kia Rio
;
Only then can you remove the central deflector. It is attached to pistons and screws. Two screws at the top, two pistons at the top and one at the bottom. After the deflector is removed, you need to disconnect the plug.
Before dismantling the left deflector, remove the left panel and the panel under which the fuse box is located. The deflector is attached to the side with two self-tapping screws. Before dismantling the right panel, open the glove compartment and remove the right panel, unscrew the screws. Now, by prying with a screwdriver, you can remove the deflector.