Replacing the wiper motor on a VAZ 2107
In winter, owners of a VAZ 2107 often encounter such a problem as a breakdown of the windshield wiper motor. Often the motor simply burns out; this happens when the wipers simply stick to the windshield in sub-zero temperatures. A large load is placed on the wiper motor and it simply breaks down. Today we will tell you how to replace the windshield wiper motor on a VAZ 2107
with your own hands.
— open-end or socket wrench 22; - socket head 10; - small extension cord; - a crank or ratchet handle.
It is worth noting that quite recently we considered how a beginner could cope with replacing the thermostat on a VAZ 2107 with his own hands in a garage. The instructions are detailed, so all you need is the necessary tools and desire.
Replacing the wiper motor on a VAZ 2107
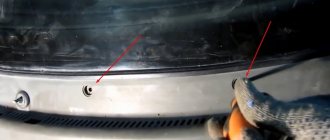
The first step is to unscrew the nuts securing the wiper arms, as shown in the photo below.
Then bend the lever and remove it from its seat.
Next, take a large 22mm wrench and use it to unscrew the trapezoid fastenings on both sides of both the right and left windshield wipers.
Now you need to remove the hood seal, which is shown below.
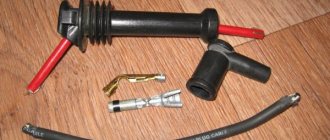
And disconnecting the power plug from the wiper motor.
Remove it together with the wire from the hole in the body.
Next, we proceed to removing the motor, or rather, unscrewing the nuts that secure it, which become easily accessible after we bend the protective cover.
It is most convenient to unscrew using a ratchet handle.
After this, we press on the protrusions of the slots on the reverse side, on which the wiper arms sit, so that they fall inward, and after small manipulations with turns in different directions, the trapezoid assembly with the motor should be removed without much difficulty.
The final result of the removal procedure is shown in the picture.
If you decide to make a replacement, then the new part will cost you around 1,600 rubles completely assembled, that is, both the motor and the trapezoid.
The procedure for removing wipers on a “classic”
Using a 10 mm wrench or a socket with a wrench, unscrew one nut securing each of the wipers:
Then we remove the levers together with the windshield wipers, tugging them a little so that they come off the slots:
How to replace the windshield wiper motor VAZ 2101-2107 (classic)
Now take a 22mm wrench and use it to unscrew the trapezoid mount from above:
And take out the plastic pads with washers, which are visible in the picture below:
Removing and installing the windshield wiper gear motor - VAZ 2107
Removing the windshield wiper gear motor from a VAZ 2107 car
1. Prepare the VAZ 2107 car for operations (see “Preparation of the VAZ 2107 car for maintenance and repair”).
2. On a VAZ 2107 car, disconnect the wire from the negative terminal of the battery (see “Battery for a VAZ 2107 car - removal and installation”).
3. Using a 10 mm socket wrench, unscrew the union nuts securing the windshield wiper blade arms.
4. Using an open-end wrench or other suitable tool, remove the levers of the windshield wiper blades from the conical splines of the drives. If it is difficult to remove the windshield wiper blades, apply a penetrating lubricant to the splined surface of the drives.
5. Using a 21 mm socket wrench (or a spark plug wrench), unscrew the nuts securing the windshield wiper arm drives.
6. Remove the plastic bushings and rubber gaskets from the wiper arm drives.
7. Disconnect the windshield wiper wiring harness block.
8. Lifting the edge of the seal, remove the windshield wiper wiring harness from the slot in the engine compartment partition.
9. Using a 10 mm socket wrench, unscrew the two nuts securing the windshield wiper gear motor to the body of the VAZ 2107 car.
10. By removing the windshield wiper arm drives from the holes in the body, remove the windshield wiper from the VAZ 2107 car.
11. Using a slotted screwdriver, remove the spring retainer and washer from the wiper rod axis. Disconnect the windshield wiper rod.
12. Using a 10 mm socket wrench, unscrew the nut and remove the crank from the drive splines of the windshield wiper gear motor.
13. Using a 10 mm socket wrench, unscrew the three bolts securing the windshield wiper gear motor to the bracket.
14. Remove the bracket along with the rods.
15. Having unfastened the tensioning belt, remove the dirt cover for the windshield wiper gear motor.
Installing a windshield wiper gear motor on a VAZ 2107 car
1. Before installing the windshield wiper gear motor on a VAZ 2107 car, we wash the rods with levers from dirt. Lubricate the hinges of the windshield wiper arms with grease.
2. Connect the connector block of the new windshield wiper gear motor to the wiring harness block. We connect the wire to the negative terminal of the battery. Turning on the ignition, turn on the intermittent operation of the windshield wipers for a short time. In this case, the windshield wiper gear motor drive will be installed in a position corresponding to the extreme left position of the windshield wiper blades. Turn off the ignition and disconnect the wire from the negative terminal of the battery.
3. Disconnect the wiper gear motor connector.
4. We connect crank A with rod B. Install the windshield wiper lever on the splined drive of the gear motor, orienting it in a position so that the crank and the wiper rod are parallel.
5. Further installation of the windshield wiper gear motor on a VAZ 2107 car is carried out in the reverse order. Before installing the wiper blade drives into the body holes, lubricate the threaded and splined parts of the drives with grease.
Windshield wiper motor, malfunctions and replacement
Welcome, friends, to the DIY car repair website. Windshield wipers are an indispensable attribute of any car.
Whatever the car is - cheap or expensive, domestic or foreign, passenger or truck, it must have wipers.
The main thing is that they are in good working order and ready to work. In this case, the main element that is responsible for the motor function is the windshield wiper motor.
Motor malfunctions and solutions
Let's look at what to do if the motor
windshield wiper, and what can cause such problems. There are several options:
The electric motor does not work, the bimetallic fuse is inactive, and the fusible insert responsible for powering the wipers is intact. In this case, you need to check the serviceability of the wiring, the quality of connections of all contacts, determine any existing damage and eliminate them.
If everything is fine with the wiring, then you should check the wiper switch. If it acts up, just replace it. The engine itself may not work - this often happens when brushes stick or contact connections burn.
In this case, you need to repair the windshield wiper motor - inspect it, replace faulty elements, and clean dirty components. It is important to check the integrity of the wiring that connects the electric motor and the block.
The next step is to check the bimetallic fuse, which needs to be cleaned, and if repair is impossible, simply discarded and replaced with a new one. If this does not help, check the motor armature winding for integrity. If there is no chain, then it is necessary to replace the armature or the entire mechanism as a whole.
The bimetallic fuse works, the motor does not start, and the power fuse constantly blows. The first thing to do is check the integrity of the levers. Often they do not work due to deformation or freezing of the brushes to the windshield.
The worst thing is if the cause of such a problem is a short circuit in the armature circuit. Here, repairing the fault is possible in only two ways - by installing a new armature or replacing the gearbox.
Interrupt mode does not work. Here the problem is either the relay or the wiper switch. In the first and second cases, it is better to replace the faulty element.
The wipers do not stop in interrupt mode. The reason is a relay failure or a malfunction of the limit switches. In the latter case, the gear cam of the gearbox simply does not press the spring plate. The problem is solved by bending it a little.
Spare parts catalog VAZ-2107
- Body Body 77 Body
- Shields and sealing parts 28
- Facing overlays 17
- Thermal and noise insulation 8
- Upholstery 13
- Trunk lining 6
- External elements 5
- Front body floor 5
- Windows 11
- Instrument panel 24
- Internal rear elements 3
- Trunk lid 16
- Front doors 17
- Rear doors 16
- Front seats 9
- Ventilation and heating system 12
- Interior accessories 40
- Hood 28
- Engine 642 Engine
- Fuel tank (version 13, 37, 38, 42, 50) 10
- Exhaust pipes and mufflers 56
- Radiator 21
- Clutch 113 Clutch 17
- Gearbox 44
- Cardan transmission 42
- Rear axle and axle shafts 24
- Frame, bumpers and engine mudguards 126 Front buffer 41
- Front suspension arms 53
- Steering knuckles 28
- Wheels 5
- Steering control 49 Steering mechanism 34
- Front brake calipers 35
- Electrical equipment 728 Generator 12
- Devices 47
- Tools and accessories 62 Driver's tools 62
- Standard parts 390 Studs, bolts, screws 142
- Oil seals 15
- Layout of rolling bearings (variant with four-speed gearbox) 76
- Plug installation diagram 5
5a773f7a387a42c3d638ae1b02d3b336
How to remove the wiper motor on a VAZ 2107 – Replacing the wiper motor on a VAZ 2107
How does a windshield wiper motor work?
Most cars have two blades that provide more effective cleaning of the windshield. A single wiper is usually mounted on the rear window.
The device operates in two or three modes, which allow the brushes to provide intermittent, slow or fast cleaning.
The overall design includes a motor
wipers (a small motor with a gearbox), a brush return mechanism, a lever system and the cleaning rubber bands themselves. In parallel with the cleaner, you can use the windshield washer, which supplies water in the form of a directed jet.
One of the most unreliable elements of the system, which often fails, is the motor. If it breaks down, motorists do not know what to do and what the reasons may be.
How to replace a windshield wiper motor?
The biggest problem is the failure of the mechanism that drives the wipers on the windshield. In such a situation, it is necessary to dismantle the engine, repair it, and in some cases, replace it. Let's look at how to remove the windshield wiper motor (using the VAZ-2109 as an example).
The replacement algorithm is as follows:
Many motorists want to save money when buying a car, and companies that import cars from the USA promise to help them with this. In fact, it may turn out that instead of saving up to 30% of the cost, the driver receives additional expenses and problems, and the purchase becomes not so profitable.
Help from intermediary companies. Typically, companies promise to help you save up to 30% of the cost when purchasing a car, but in reality everything turns out to be far from being the case. During the process of completing documents, buyers are offered additional options that are not at all necessary, they are required to pay for additional services that were not mentioned from the very beginning, and services are imposed on them.
As a result, the purchase does not seem so economical and drivers are thinking about taking a closer look at the domestic market. Additional expenses prove that bringing a car from overseas is not so “transparent” and economical.
The final cost of the car. First of all, buyers wonder whether it is possible to calculate the final cost of the car in advance. The price consists of several factors that should be taken into account, and therefore the final amount is quite possible to calculate:
- The cost of the model at auction in the USA
- Auction fee for the organization, it is always announced before completing the purchase procedure
- Cost of delivery
Upon arrival of the car in Russia, the buyer will be asked to pay:
- customs duty
- Warehousing warehouse and customs services
- Recycling collection
- Repair work
Cost of company services. When the cost of the car has been calculated, it is also worth taking into account the price of the company’s services. Depending on how exactly the organization operates, it may be different. For example, a company can work directly with partners from the USA, then you need to pay less, or act as an intermediary - the amount will increase.
Companies sometimes offer additional services. For example, having trained, experienced employees place the car in a container or providing photographs of the vehicle during transportation. What exactly to choose, the client decides for himself.
In most cases, there are only a few large companies in the United States involved in car transportation, and representatives of organizations in Russia often work with them directly. Thus, cooperation with American partners directly can help reduce the cost of purchasing a foreign car.
Bottom line. Many motorists are thinking about purchasing a car from the USA, but do not know how “transparent” the purchase will be. It is worth considering that the cost of a future car is easy to calculate in advance, even if you take into account the delivery services of the organization.
It is better if the organization cooperates directly with partners from the USA, so that you can really save money when buying a car from abroad.
If power is supplied but the engine does not run
There are several reasons why the engine may not work when power is applied. The most common are shearing or wear of brushes or failure of windings. The brushes can wear out over time, or they can freeze to the contacts and break when the VAZ 2107 wiper relay is turned on and power is supplied to the engine. The winding most often burns out when the motor is overloaded. To check, repair and replace the gearbox with the windshield wiper motor, it is necessary to remove the unit from the vehicle.
If the wipers do not work intermittently
This problem is associated exclusively with a malfunction of the VAZ 2107 wiper relay. The cyclic operation of the wipers is ensured by closing/opening the relay contacts and, accordingly, the power supply circuit of the wiper motor.
The test should begin by monitoring the power supply to the relay block. This is done like this:
- remove the relay;
- turn the wiper switch to the intermittent position;
- Use a control indicator to check the presence of voltage at the terminal.
If there is no voltage, it is necessary to replace the switch or repair the open circuit. If voltage is supplied but the relay does not work, the latter must be replaced. The design of the relay does not provide for the possibility of repair.
Windshield washer does not work
To remove dirt from the windshield, the washer is used together with the windshield wiper. The device sprays water or a special liquid. The main elements of this mechanism are:
- fluid reservoir;
- motor;
- nozzles;
- connecting tubes.
The washer pump is located in the reservoir and supplies fluid through tubes to the nozzles
During the operation of a car with a washer, various problems may arise that lead to its inability to work:
- motor failure;
- fuse blown;
- kinking of tubes;
- breakdown of the steering column switch;
- poor contact on the power supply circuit.
Checking the motor
It is easy to check if the washer pump is not working properly. To do this, just open the hood and pull the lever of the steering column switch, which is responsible for the function of supplying fluid to the windshield. At this moment, the operation of the motor will be clearly audible. If this does not happen, then the malfunction may be caused either in the pump itself or in the fuse or other part of the electrical circuit. To make sure that the problem lies in the motor, we use a multimeter to measure the voltage when the washer is turned on. If there is voltage, but the pump does not work, then you need to take care of replacing it.
Video: checking the wiper motor on a “classic”
Injectors
If the motor is running, but liquid is not supplied through the nozzles, then the problem will not be difficult to identify, since there are only a few reasons for this phenomenon:
- clogged injector fittings;
- the supply tube has come off;
- kinking of the tube.
The malfunction can be determined by inspecting the tubes from the motor to the injectors. If there are no areas with kinks and the tube has not fallen off, then the reason lies in clogged nozzles, which can be cleaned with a sewing needle and blown out with a compressor.
If the motor and washer tubes are in good condition, then it is worth cleaning the nozzles using a needle and a compressor
Fuse and mounting block
The integrity of the fuse is checked in the same way as for windshield wipers. The same protective element as for the wipers is responsible for the operation of the washer. In addition to the fuse, sometimes the track in the mounting block through which power is supplied to the washer burns out. In this case, you need to disassemble the fuse box and restore the current-carrying element by soldering, having first cleared the varnish from the track.
Sometimes a track burns out in the mounting block, which can be restored by soldering
Understeering's shifter
You should start checking the steering column switch on a VAZ 2107 if the fuse, motor and the entire electrical circuit through which voltage is supplied to the pump are in good condition. In this case, the wiring should not have breaks, melted insulation or other visible damage. To check the steering column switch, only a multimeter will be enough. Having disconnected the connectors from the device in question, we connect the probes of the device in the dialing mode with a two-pin block. If the switch is working properly, then when the washer is turned on, the device will show zero resistance. Otherwise, the mechanism will have to be replaced.
Video: checking the wiper mode switch
Main malfunctions of the mechanism and ways to eliminate them
When is windshield wiper motor repair required?
Before you take it off
, how to check the motor and replace it, familiarize yourself with the main malfunctions of the unit:
- The device does not function, the safety element does not work either, but its integrity does not work. In this case, you must first diagnose the integrity of the wiring and contact connections, and if damage is detected during the diagnosis, they must be eliminated. If everything is fine with the wiring, then you need to check the steering column brush switch; it is quite possible that it has failed. Naturally, the problem may also lie in the electric motor, for example, its contacts are burnt or the brushes are acidified; if this is the case, then it will need to be repaired or replaced. It would not be superfluous to diagnose the wiring that goes to it and the block. It is recommended to clean the safety element or replace it if cleaning does not produce results. If after performing all these steps the system still does not work, then you will need to diagnose the integrity of the winding of the so-called motor armature. If the diagnostics show that the circuit is missing, then either the armature or the entire electric motor assembly is replaced.
- The brushes do not work, while the safety element is working, and the fuse in the power circuit regularly fails. In this case, the levers are diagnosed - perhaps they cannot work as a result of deformation or freezing of the brushes to the windshield. It is much worse if the failure of the unit is caused by a short circuit in the armature circuit, then you will have to decide what to change specifically - the armature or the gear unit.
- The device does not operate in intermittent mode. As a rule, such a malfunction is caused by a failure of a relay or switch. In both cases, it is better to replace the failed mechanism.
- The wipers operate intermittently but do not stop. In this case, the problem, as a rule, lies in the inoperability of the relay or limit switch. If the reason is the switch, then most likely the spring plastic is not pressed to the end by the gear, and in this case it will just need to be bent (the author of the video is Igor Ivanov).
We repair the device
In the VAZ-2107, the switches are located under the steering wheel of the car. If you suspect a malfunction, the first thing you need to do is find out the reason why this or that function does not work.
Repairing the switch
We remove the steering column switch on the seven. Having removed the first ring, then the headlight, stop and wiper levers, we get to the mechanism by which the turns are automatically turned off. We take it out and here lies the cause of all the troubles: between the reeds there is a spring that breaks off and does not move the reeds in different directions. It is necessary to replace the spring; you can use a regular spring from a ballpoint pen. Next, we begin collecting all the rings and levers in reverse order. After finishing the work, we check how the levers and the turning mechanism work. To do this, we connect the pads and place the terminals on the battery; if all functions work, then we have completed the repair.
Also, the cause of a malfunction of the turn switch may be contamination or oxidation of the contacts. You can clean dirty or oxidized contacts; to do this, you need to slightly bend the “sagging” springs and other accessible parts. As a rule, after carrying out such cleaning manipulations, it is possible to restore the functionality of the switch.
Video on replacing the steering column switch
Source
What is a windshield wiper motor?
All cars, trucks and other vehicles are already equipped from the factory with mechanisms for cleaning glass, including windshield wiper blades. In its standard form, it consists of two holders with rubber bands on the windshield and one holder on the rear window (for cars with a station wagon or hatchback body). All windshield wipers have three modes of operation, during which they move quickly, slowly or at an intermittent pace.
All windshield wipers are equipped with a special electric motor with geared torque transmission. Two mechanisms designed to operate the windshield wipers are attached to the motor shaft. One rotates the wipers to a certain position on the windshield, and the second is responsible for moving the wipers to their original position. The lever system supports the wipers throughout operation.
READ Where is the engine number on the Skoda Octavia
In fact, the electric motor rotates without stopping, and a special mechanism is responsible for moving the wipers, which allows them to rotate and quickly return to their original position. This mechanism is called a trapezoid wiper. It consists of a set of levers that move the wipers across the windshield.
In addition to the windshield wipers, the glass washer system is also responsible for a normal view of the front of the road. It is a tank with a special liquid, which, under the action of a pump installed in the tank, is pumped into the system and sprayed on the windshield. It is extremely important that these mechanisms are always in good working order. This is due to the fact that on the planned day of the trip the weather can easily turn bad and driving with a faulty windshield wiper system can become very dangerous.
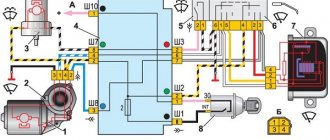
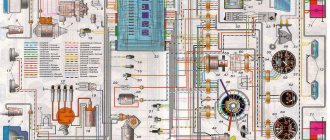
Schematic diagram of a glass cleaner on a VAZ 2107
- fuse;
- wiper motor;
- windshield washer motor;
- relay and fuse box;
- washer switch (water supply to glass);
- three-lever cleaning speed switch;
- VAZ 2107 cleaner relay. Type RS-514. Its mounting location is under the dashboard on the left, attached directly to the body;
- egnition lock;
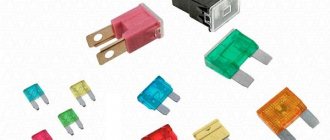
The standard wipers on the VAZ 2107 operate in intermittent and continuous modes. If they do not work at all, then first we do the simplest thing: before starting repairs, we check the fuse and the degree of oxidation of its contacts in the mounting block (location F2 for 10 A). The fuse is shared with the washer pump motor. So if the fuse is at fault, then water will not splash on the glass. When changing a fuse, pay attention to the size and color.
If the wipers do not work in rare rain mode, then most likely the relay in the mounting block or the steering column switch itself is to blame. The diagram shows that if there is power on the wire suitable for the relay and the control light is on, or the ammeter deflects the arrow, then the relay is at fault, adjustment will not help, replacement is needed. If there is no current, then there is an open circuit in the steering wheel, and the switch is to blame.
Why did the wipers stop not at the base of the windshield, but “just anywhere”? The gearbox is to blame for this. What should we do with it?
Replacing the gearbox is an alternative, since due to its design, adjustment and repair are difficult, and spare parts are not sold; repair and replacement of its parts (although the size allows) is not carried out, with the exception of the gearbox gear.
What are the most common reasons why a gearmotor fails?
In winter, the wipers of the classic and VAZ 2107 often freeze to the glass after work, since it was warm in the cabin. Sometimes the next morning the driver tries, either by accident or because he is too lazy to get out, to “at random” move them from their place using the cleaning lever.
When stationary, the load on the motor sharply increases, since normally the heat generation scheme is compensated by conversion into mechanical energy, and when the shaft is stationary, the motor burns out very quickly. It is then that repairs are required, or rather, replacement of the gearmotor; adjusting it does not make sense.
Let's look at how this is done on a VAZ 2107.
- We unscrew the wiper levers with an open-end wrench, size 10 or a socket head, then carefully remove the levers from their seats, having first bent them./
- Using an open-end wrench (size 22 mm), unscrew the trapezoid attachment points and remove the plastic bosses - inserts:
- After this, carefully remove the rubber profile - seal on the hood, and disconnect the power supply to the wiper gearbox:
- then we pull it and the wire out of the special hole in the body under the seal, unfold the cover, which performs a protective function, on the motor...
- and unscrew the gearbox mounting nuts, size M10. The most convenient way to use a wrench is:
- now you need to remove the bracket with the rods going to the lever drives together with the gearbox; you need to press the protrusions of the levers inward. They fall down, and after shaking a little - twisting carefully in different directions, the job is done!
- All that remains is to disconnect the gearbox and crank using the end nut (size 10 mm), and also unscrew the 3 nuts with which the trapezoid (bracket) is attached to the gearbox, now you can replace the motor.
We advise: if you have good knowledge in electrical engineering, the circuit diagram is no secret to you and you read it, are comfortable with a soldering iron - you can take on the wipers of the VAZ 2107. Repairing and adjusting them will not be difficult for you; if not, then actions such as replacing the gearbox and fuse, as well as the relay are quite accessible to you.
Operating principle and purpose of the motor
The windshield wiper motor is one of the main components of the entire system. Its purpose is to ensure the movement of the brushes along the windshield and rear window (if we are talking about a hatchback or station wagon). The windshield wiper motor itself supports operation in several modes - slow, intermittent, and the fastest.
In general, the design of the wipers includes an electric wiper motor with a gearbox, a unit that returns the blades to their place, as well as levers and the brushes themselves. As a rule, a washer device also functions with the brushes, providing water supply to the glass. The windshield wiper motor itself is considered one of the most unreliable components, which fails quite often.
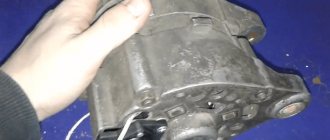
Electric motor for the domestic "ten" in removed form
If power is supplied but the engine does not run
There are several reasons why the engine may not work when power is applied. The most common are shearing or wear of brushes or failure of windings. The brushes can wear out over time, or they can freeze to the contacts and break when the VAZ wiper relay is turned on 2107
and supplying power to the engine. The winding most often burns out when the motor is overloaded. To check, repair and replace the gearbox with the windshield wiper motor, it is necessary to remove the unit from the vehicle.
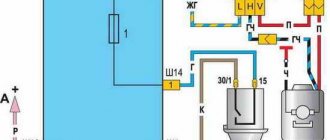
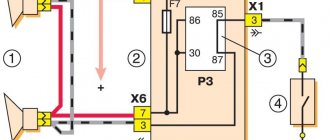
Where does which wire go, or just a diagram
Connecting wipers and washer
“Plus” power is supplied from the ignition switch through fuse No. 2 at 10 Amp of the mounting block. The permanent “plus” goes along the black and yellow wires to contacts “4” of the connectors of the gear motor and the steering column switch. It should not disappear even when the switch is in the “off” position. The blue wire supplies “+” 12 V power to the motor when the switch is in “continuous mode” position. On the blue-white wire, in the “off” position there should be a “minus”, and in the “continuous mode on” position the “minus” is turned off. This is done to slow down the motor when the power to the closer is turned off.
The red wire supplies the relay with “+” 12 V from the switch when the intermittent mode is turned on. At the moment of operation, contacts “2” and “4” close, and “1” and “3” open, the motor starts working and the brushes make one or two movements. Then “+” 12 V is turned off, and contacts “1” and “3” are closed to each other and to “minus”. The motor stops for a few seconds and then the cycle repeats.
The washer pump motor is connected to “+” 12 V constantly with a black and yellow wire through the same fuse No. 2. “Minus” is applied when you press the windshield wiper lever from bottom to top.
Video about how a windshield wiper works
Removing and replacing the trapezoid and wiper motor on a VAZ-2107 - detailed instructions
Procedure for replacing a faulty motor
Unscrew the nuts that secure the brush levers. After this, they are dismantled from special slots in the form of a cone. To facilitate the work process, you can use WD-40 liquid.
Pull out the plastic brush bushings and rubber gaskets.
Lift the seal, which is located in a small slot in the engine compartment, and remove the wiring harness.
Unscrew the windshield wiper, which is secured with nuts and washers. Then unscrew the motor mounting bolts and remove it.
Install a new electric motor and reassemble the components in the reverse order.
During the external inspection, you need to make sure that all other components are in good condition, and if possible, replace all rubber and plastic bushings. Once everything is assembled, the motor replacement is complete.
Sources:
https://tuning-vaz2106.ru/6/kak-snyat-motorchik-dvornikov-vaz-2107-zamena-motorchika-dvornikov-na-vaz-2107.html https://moto-sol.ru/diagnostika-i -remont/kak-snjat-motorchik-dvornikov-vaz-2107.html https://my-zenit.ru/remont/snyatie-i-zamena-trapetsii-i-motorchika-dvornikov-na-vaz-2107-podrobnaya- instructions