Thank you all for your response!
yaris
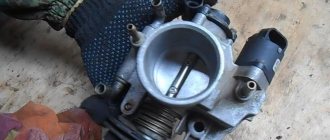
I have self-feeding cylinders.
It's all about the gap between the GTZ and the VUT rod! I have not seen anyone write about adjusting it in any article!
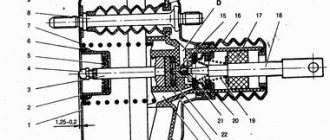
I quote: Before installing the master brake cylinder, we control the protrusion of the head of its adjusting bolt relative to the mounting plane of the master brake cylinder flange, which should be 1.25-0.2 mm
. To adjust the protrusion of the bolt head, turn it with an 8-point wrench.
This was the reason for the brakes being applied almost to the floor! But the “instructions” don’t say a word that the rod itself needs to be held with pliers and the “head” itself must be turned. And the key is not "on" 8
"But still "at
7
". I removed the GTZ three times to adjust the rod. And then this rod needs to be “inserted” back! I will say this is not very easy, since the pipeline is already connected and laid! It’s good that I didn’t leave the original brake fluid reservoir with its rubber hoses. I feel like I suffered even more then! The pedal began to take where it should be - in the middle! But “the music didn’t play for long!” Still, I guessed wrong.
Thanks again to Deeptown
for the hint where to dig, for the consultation at the moment when I stopped near the Dorogozhychi metro station with an oak pedal and almost blocked brakes. I had one adjustable wrench with me, thanks to it I unscrewed the GTZ and relieved the pressure. Then, on the floor with live brakes, I drove to the garage. There, within 5 minutes I removed everything, tightened the rod 5 turns and calmly drove home. But I see that I can add a couple more turns.
The braking system of a VAZ 2115 car is an important component, without which you cannot drive on the road. A self-respecting driver should adjust the brake drive after replacing brake pads or other repair work.
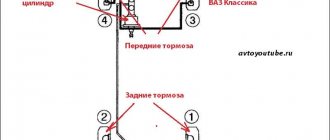
Brake drive:
1 – main cylinder; 2 – tank; 3 – emergency liquid level sensor; 4 – vacuum booster; 5 – pusher; 6 – brake pedal; 7 – brake light switch buffer; 8, 9 – brake light fastening nuts; 10 – brake light switch; 11 – pedal return spring.
The free play of the brake pedal when the engine is not running should be 3–5 mm. The adjustment is carried out by moving the brake light switch 10 with the nuts 8 and 9 loosened.
Attention!
Adjust the brake pedal free play when the engine is not running.
Adjustment and repair of the unit after checking the vacuum brake booster
In general, adjusting the VUT comes down to adjusting the free play of the brake pedal.
To set it correctly, you need to adjust the length of the rod. The adjustment bolt controls the gap/protrusion. Correctly adjusting the position of the bolt itself will allow you to set the ideal timing of the valves. When the leak test is completed, do not forget to adjust the free play of the brake pedal. Adjusting the rod length creates a gap that determines the amount of pressure on the brake cylinder
Therefore, it is very important to set the rod length correctly and set the appropriate gap. The free play of the pedal when the engine is not running should be from five to fourteen millimeters
This gap is controlled by a bolt located above the plane of the vacuum brake booster. A small gap leads to jamming of the working cylinder, resulting in rapid wear of the pads and increased fuel consumption of the car. In addition, the car begins to slow down randomly, as if you were driving with a handbrake. A large gap, on the contrary, leads to an increase in pedal travel, which indicates a violation of the tightness in the assembly
The free play of the pedal when the engine is not running should be from five to fourteen millimeters. This gap is controlled by a bolt located above the plane of the vacuum brake booster. A small gap leads to jamming of the working cylinder, resulting in rapid wear of the pads and increased fuel consumption of the car. In addition, the car begins to slow down randomly, as if you were driving with a handbrake. A large gap, on the contrary, leads to an increase in pedal travel, which indicates a violation of the tightness in the assembly.
Above we described how to check the operation of the brake vacuum device and adjust its operation if necessary. Now let's say a few words about its repair.
To ensure your own safety if your amplifier breaks down, take immediate action to repair or replace it. And if you can replace vacuum hoses in gasoline cars or pumps in diesel cars yourself, without resorting to the services of a car service, then it is recommended to entrust more serious work to professionals.
Of course, it costs some money, but when your own safety is at stake, it is better not to skimp. Contact the specialists. They will not only carry out the inspection competently, but also perform all the necessary work efficiently and with a guarantee.
It should be noted that after repair, it is important to synchronize the wheels when braking and check the ABS/ESP system. This requires a diagnostic stand and specialized equipment.
There are times when it is more expensive to repair a vacuum cleaner than to purchase a used amplifier that is in good condition. Therefore, it is recommended to look for the device at a disassembly site if necessary.
If you feel confident in your own abilities and, after checking, decide to repair the faulty vacuum booster yourself, then proceed as follows.
To begin, remove all the upholstery in the engine compartment and remove the windshield trim. Do not remove the tubes leading to the GTZ. This may allow air to enter the system.
Next, unscrew the cylinder from the vacuum booster and carefully tilt it forward to prevent deformation of the brake pipes. Before doing this, the vacuum transfer hose must be removed from the amplifier fitting
Carefully study the recommendations given by the manufacturer and proceed to dismantling the amplifier. Unscrew the mounting bolts and disconnect the terminal of the wire going to the brake light.
Only then remove the pedal using a special tool. If you are well versed in the design of the car, you can cope with checking and repairing the VUT. However, it is better to first go online and find instructions with an amplifier circuit. This will significantly speed up the implementation of the task and increase your chances of success.
How to check the vacuum brake booster
A logical question arises: how to determine whether the vacuum brake booster is faulty. In fact, this is quite simple to do, and without the use of additional equipment, the test can be performed in a garage or even on the street.
The simplest check is performed using the following algorithm:
- With the engine off, it is necessary to pump up the vacuum booster (brake system). This is done by pressing the brake pedal about 4...5 times.
- At the end of the last press, the pedal must be locked in the pressed position.
- Start the engine at idle speed.
- If the “vacuum reservoir” is working properly, then when the engine starts, a vacuum will immediately enter it, as a result of which the brake pedal will move down a little, which will be clearly felt when your foot is placed on it.
- Accordingly, if the pedal does not move and does not respond to starting the engine, then there is a depressurization in the system.
It makes sense to perform another check if the brake system seems to be working properly, but when you press the brake pedal, a change in the operating mode of the internal combustion engine is observed. So, the check is performed according to the following algorithm:
Disconnect the pipe from the intake manifold.
- Its fitting must be hermetically sealed. To do this, you can use a clamp or a tightened rubber tube with a clamp.
- Start the engine and let it warm up a little.
- Press the brake pedal several times.
- If, at the moment of pressing the corresponding pedal, no changes occurred in the engine operating mode (its speed did not increase or decrease), it means that there is depressurization in the vacuum brake booster system.
- Accordingly, if the engine begins to “choke” when you press the pedal, it means that the “vacuum reservoir” and its system are working normally.
Please note that the described check must be carried out with the car stationary, since in this mode the vacuum brake booster will not work with all the ensuing consequences.
If the check reveals the presence of depressurization, then the next step is to localize the location of the damage. This is not always easy to do, since the crack or leak can be very small and sometimes located in the most unexpected places. However, as a check and preventative measure, it is necessary to check the following elements of the vacuum booster system:
- tightening and general condition of VUT pipeline clamps;
- VUT sealing tube at the clamping points and along the entire length (if possible), often the cause of depressurization is the appearance of a crack in the said tube;
- condition of the vacuum booster check valve seal, this is also a common cause, especially on older cars (for example, VAZ classic).
If the check does not produce results, then it makes sense to simply replace all the vacuum booster tubes with clamps.
Check valve
You can check the VUT check valve using one of two methods. The first of them involves dismantling the specified element, and the second involves holding the brake pedal with the engine running.
How to check a removed brake booster
After the valve is removed, you just need to blow into the fitting that was connected to the amplifier with your mouth or using an air compressor. If the valve is working properly, then air should flow freely. The next step in this case is to draw air from that fitting. Best by mouth. Accordingly, the valve should not let air back in. Otherwise, the check valve is partially or completely damaged and must be replaced. Instead of a mouth, you can use a thick rubber bulb, for example, from a hydrometer.
However, removing the check valve is not the best solution, since the process of removing it can damage the seal of the vacuum brake booster system. It is better to check the brake booster check valve on a car in the simplest way. In accordance with the second verification method, it is recommended to proceed as follows:
- start the engine and let it run for about one to two minutes;
- press the brake pedal all the way and turn off the engine;
- if the check valve is working properly, it will close, since there is no vacuum on the side of the manifold, and a vacuum will remain in the chamber, accordingly, the pedal will not press up (there will be no need to exert additional force to hold it);
- otherwise (if the pedal is pulled up sharply), the VUT check valve is damaged.
As in the case of a pipeline, it is easier and faster to replace the check valve with a new one, since this unit is usually non-removable and cannot be repaired, and its price is relatively low.
How to check the vacuum brake booster of a VAZ 2109?
The vacuum brake booster (VBS) is the main mechanism in the operation of the vehicle braking system. The process of braking the car and the safety of the driver and passengers depend on its performance. VUT requires periodic inspection for malfunctions or defects in its operation.
Causes of VUT malfunction:
- The diaphragm has ruptured;
- There are cracks in the hose that goes to the amplifier or it has broken;
- The spring is broken.
The device can be repaired in technical centers that have the necessary tools and specialists who know their job. If a trip to a service station is beyond your means, you can do it on your own by replacing the device in full accordance with the instructions supplied with it. But before you make a replacement, you should make sure that the cause of the breakdown is in the VUT.
Bleeding the system
After carrying out any work related to the replacement or repair of brake system parts, the brakes should be bled. This will remove air from the line and equalize the pressure.
- jack and wheel wrench;
- key to "8";
- rubber or silicone hose with a diameter of 6 mm;
- a small, clean, dry container (preferably transparent);
- brake fluid (to top up).
In addition to all this, you will definitely need an assistant to bleed the system.
- Place the car on a horizontally flat surface. Loosen the nuts securing the front right wheel.
- Raise the car body with a jack. Unscrew the nuts completely and remove the wheel.
- Remove the cap from the fitting of the working brake cylinder.
Signs of a faulty vacuum brake booster - self-diagnosis
How should you check the VUT for serviceability without resorting to an inspection hole? This is done like this: when the engine is not running, you need to press the brake about 6 times. Then, holding this pedal, start the engine. The pedal should move forward a little, and if this does not happen, first of all you need to check the tightness of the hose connections and the operation of the check valve.
If your vacuum brake booster hisses, then you definitely need to check several places. The most common problem with VUT failure is the hose that connects it to the engine intake manifold. It is imperative to check whether there are any cracks or tears on it; you need to check whether the clamps are tightened. Also, the amplifier may fail due to internal parts, such as a valve. Over time, this valve becomes hard due to rubber wear, so the elastic septum may rupture.
Signs of a malfunctioning vacuum brake booster include the case when the engine starts to stall. The first thing many car enthusiasts do is buy spark plugs and adjust the valves, but the engine still runs poorly. In such cases, it is worth carrying out a small check: close the amplifier hose so that it does not allow air into the engine. If the engine starts to work properly, then the problem is in the brakes.
Expert opinion Ruslan Konstantinov Expert on automotive topics. Graduated from Izhevsk State Technical University named after M.T. Kalashnikov, specializing in “Operation of transport and technological machines and complexes.” More than 10 years of professional car repair experience.
The vacuum brake booster itself is a simple unit, but there is no point in repairing it. To make sure that this particular part is faulty and not some other, it is enough to carry out simple tests. Even a complete beginner in car repair can do the check. There is no need to remove anything. 1. After starting the engine, you need to let it idle for some time, then turn off and press the brake pedal all the way, thereby creating a vacuum. After this, you need to release the pedal and immediately press it all the way. If the VUT is faulty, pressing it again will have a noticeably shorter stroke, since insufficient vacuum is created. If no differences are observed in the pedal stroke, we can conclude that the system is working properly. If in doubt, you can move on to another test. 2. The next check is carried out with the engine turned off. You need to press the brake intensively several times, then squeeze it all the way and start the engine. In a working system, a vacuum will begin to create, and the pedal will drop slightly lower, since the amplifier membrane puts pressure on the rod, and it, in turn, pulls the pusher and the pedal mechanism. If it does not drop lower after starting the engine, it means that a vacuum is not created and the amplifier is faulty. 3. This test will help determine if there is an air leak. After starting the engine, you need to press the brake pedal all the way and turn off the engine. In a working system, the pedal should not return. If, after stopping the engine, the pedal rises under the action of the return spring, it means that the VUT is faulty, since the pressure in the working chamber increases.
Features of repair of UAZ vacuum amplifiers
Unlike the vacuum amplifiers of VAZ cars, the VUT housing on UAZ cars is very durable, and it is not at all easy to halve it. You can bend the protrusions using a pry bar and a hammer, but this way the work is done in violation of the technology - according to the instructions, you need to rotate one half relative to the other. The biggest problem during disassembly is the “halving” of the body - sometimes these parts boil so much that it is impossible to disassemble the assembly. Car owners are advised not to press one body into another under any circumstances - then turning will definitely not work.
Another problem in repairing “vacuum units” is the low quality of spare parts in the repair kit; sometimes the installed parts are not enough for six months. Motorists advise not to do repairs, but to buy a new spare part, although there is another disadvantage - VUT for cars like UAZ-469 or UAZ-452 is not cheap, about 3 thousand rubles. As an option, you can pick up a “vacuum” from a foreign car at a car disassembly shop, whose mountings fit the main brake cylinder, and install it on the car by fitting it. The result is cheaper and more reliable - imported parts, even in used condition, last for several years without any complaints.
Repair or replacement
Having discovered a faulty vacuum brake booster, you can go in two ways: replace it with a new one or try to repair it. It should be noted here that a new VUT without a master brake cylinder will cost approximately 2000–2500 rubles. If you don’t want to spend that much money and are determined to repair the unit yourself, purchase a repair kit for the old “vacuum unit.” It costs no more than 500 rubles and includes those parts that most often fail: cuff, shank cap, rubber gaskets, valve flanges, etc. Repairing an amplifier itself is not a very complicated process, but it is time-consuming. It involves removing the device from the car, disassembling, troubleshooting, replacing faulty elements, as well as adjustment.
Change the vacuum booster or repair it, the choice is yours. We will consider both processes, and start with replacement.
Replacing VUT with VAZ 2106
- thin slotted screwdriver;
- spanner set to “13”;
- socket wrench set to "13".
- Place the car on a flat surface and put it in gear.
- In the interior, we bend the carpet under the pedal bracket. We find there the junction of the brake pedal and the booster pusher.
- Using a slotted screwdriver, remove the spring retainer from the pedal mounting pin and the pusher shank.
After replacing the device, do not rush to install the master brake cylinder, since before this it is necessary to check and, if necessary, adjust the protrusion of the rod, which we will talk about after considering the VUT repair process.
Video: replacing VUT
Repair of the VAZ 2106 vacuum cleaner
- vice;
- slotted screwdriver;
- small hammer;
- pliers.
- We fix the vacuum booster in a vice in any convenient way, but only so as not to damage it.
- Using a slotted screwdriver and pliers, we flare the halves of the device body.
How to replace the vacuum brake booster on a VAZ 2108-VAZ 21099?
Note! If suddenly your vacuum brake booster fails, then proceed to replace it and buy a new one; we categorically do not recommend repairing your original one, because it is unlikely that anything good will come of it, especially since you will have to buy an additional repair kit anyway, but This is also wasted money and it is not yet known whether you will be able to correctly replace all the worn parts in it or not, then you will have to assemble the vacuum unit in such a way that the air does not bleed out of it and it works perfectly!
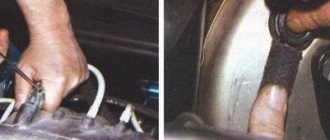
Removal: 1) Before you begin removing the brake booster, check whether the vacuum hose (Indicated by a blue arrow) is connected normally to the check valve (Indicated by a red arrow), be sure to start the car and see if air is leaking from this hose or from the valve ( You just don’t need to disconnect anything, everything is disconnected in the photo, just so you can understand where the valve is located, where the hose is and where this whole system is connected, by the way, the connection location is indicated by a green arrow).
Note! We fully recommend walking along the hose, it is connected to the intake manifold fitting, check everywhere to see if air is leaking from somewhere, otherwise replace the hose or check valve with a new one!
2) After a complete check, proceed to removing the vacuum seal from the car; to do this, first disconnect the wire block indicated by the arrow from the top cover of the brake reservoir and move it to the side.
3) Then, with pliers, move into the car interior and crawl under the place where the pedals are installed, the same pusher that we talked about a little higher will be attached to the brake pedal (or rather, to its bracket), this pusher comes from the vacuum brake booster and when the pedal is squeezed out, the vacuum pump starts working, this pusher will need to be disconnected, to disconnect it, remove the locking bracket with pliers (see photo 1) that secures the finger and then remove the finger from the brake pedal bracket (see photo 2) and you can immediately disconnect pusher
4) After the operations have been completed, you will need to move into the engine compartment again and while there, disconnect the hose that is connected to the check valve (It is attached with a clamp, the check valve is indicated by a blue arrow in the photo) and then unscrew the two nuts (Their approximate location is indicated by red arrows ), which attach the master brake cylinder to the vacuum brake booster and then carefully remove the cylinder from the brake booster, but you don’t need to remove it and the metal brake pipes that are connected to it don’t need to be disconnected either.
5) And finally, unscrew the four nuts that secure the bracket on which the brake booster is located to the engine shield (Two nuts are indicated by arrows), as soon as they are unscrewed, you can slowly remove the booster along with the bracket, if you suddenly want to separate them, then after removal , unscrew the two nuts that secure the bracket to the brake booster and you can separate these two things.
Installation: The new brake booster is installed in the reverse order of removal; if it suddenly turns out that there is no bracket on it, then remove the bracket from the old one by unscrewing the two nuts as we have already said.
Note! You can see a clear example of how a faulty brake booster can affect engine idle speed from the video clip, which we have also attached below:
Repeat the steps described in the section “How to remove the brake master cylinder”. When replacing the vacuum booster, you don’t have to completely unscrew the master brake cylinder, but just disconnect the fittings that are located on the left side and move the brake cylinder to the side. It's up to you.
How to replace a defective vacuum booster on a VAZ 2109: list of actions
The initial task of repair is to disconnect the pedal from the amplifier rod. Dismantling is carried out in the area of the pedal assembly: it is necessary to disconnect the two units connected to each other by a pinned pin using a flat-head screwdriver.
Further work is carried out in the engine compartment:
- disconnect the power supply connector for the brake fluid level sensor;
- dismantle the bracket that secures the hydraulic lines relative to the car frame (unscrew the nut with a head to “10”);
- disconnect the main brake cylinder by unscrewing the two nuts securing it to the VUT using a 17" wrench.
Note. When changing the brake booster, do not disconnect the hydraulic lines from the master cylinder. The lengths of the pipes make it possible to move the unit outside the working area.
After access to VUT is opened, the plan for replacing the vacuum booster of the VAZ 2109 brake system comes into force, including the following measures:
- disconnect the pipe connecting the amplifier chamber to the intake manifold;
- remove the front strut strut (installed additionally);
- unscrew the four nuts that secure the amplifier housing to the body studs (use a set of wrenches + extension + universal joint + head on “13”);
- remove the assembly from the studs and remove it from the engine compartment.
operating principle On the back side of the amplifier (on the drive fork side) a seal is installed and a bracket is attached, through which the unit is connected to four studs on the car frame. The parts must be dismantled: it is enough to unscrew the two fastening nuts with a “17” head and remove the iron structure by moving it towards you. The boot is easily pulled off the stem.
Having mounted the mounting bracket and rubber seal on the new amplifier, you can begin installing the VUT, which proceeds according to the reverse scenario. When installing, you should pay attention to three facts:
- The vacuum booster rod should be connected to the brake pedal immediately after the unit is seated on the mounting studs (before tightening with nuts);
- experienced owners additionally apply sealant between the brake cylinder and the VUT, indicating the imperfection of the sealing elements;
- the VUT rod acting on the main brake cylinder (located on the front side of the housing) may move during transportation or installation (it is necessary to check and, if necessary, install correctly by pressing until it stops).
For your information. An incorrectly installed actuator rod will result in the brakes not working after assembly.
This is interesting: 6 fatal mistakes when changing engine oil
Choice
We will give some recommendations regarding the choice of a new vacuum amplifier.
| Selection criterion | Required parameters |
| Price | The cost of a good vacuum cleaner is now about 2.5 thousand rubles. These are not the most expensive, but not the cheapest Chinese options. Optimal for VAZ 2109 |
| Package | This packaging, used by a genuine manufacturer, is made of corrugated cardboard |
| Label | The label should be clearly legible - the production batch number, the production date of the part and the name of the manufacturer itself |
| vendor code | The vacuum unit corresponding to the technical parameters of the VAZ 2109 has article number 2108-3510010TM |
| Point of sale | You should not buy from market traders. There are many good, trusted spare parts stores in any city. Don’t be shy to ask for certificates, documents for parts |
Choosing wisely
Now there are a lot of fakes on the market. Such parts cost the same as the originals, but last much less.
How does VUT work?
The basic principle of operation of a vacuum brake booster is the difference in pressure in the sectors provided by the valve force. When the device is inactive, the pressure in both sectors is the same - it corresponds to the pressure provided by the vacuum source. But when the driver presses the stop pedal, the follower valve experiences force from the pusher and blocks the connecting channel of both sectors.
But the valve continues to move, and the atmospheric sector interacts with the external environment through the channel. As a result, the pressure does not change in the vacuum sector, but a vacuum occurs in the air sector. The pressure difference in the sectors puts so much pressure on the piston rod of the brake cylinder head that it moves. When braking is completed, the sectors are united again, and the pressure there becomes the same. A return spring acts on the membrane, causing it to return to its original state.
The operation of the “vacuum brake” is directly dependent on the power of pressing the brake lever. Thus, for the mechanism to work better, the driver must still press the brake harder.
Scheme of operation of the brake system with a vacuum brake booster and ABS
In order to improve the performance of the vacuum brake booster, a pneumatic device is installed for braking in emergency situations. One sensor in its design measures the speed of the rod, the other determines the level of vacuum. If there is a lack of vacuum in the compartment, the sensor will report this.
When used, the pads act on the brake discs. The materials of the pad linings are selected very carefully, but despite this, in order to press them to the discs, considerable effort is required, comparable to the pressure on the pedal of a man weighing at least 80 kg. But he will also have to exert considerable force to stop the car, especially since he has to apply pressure with one foot.
The fact is that the power of car brakes is many times higher than the power of the engine. Of course, hydraulics help reduce the pressure on the brake pedal, but still, without additional devices, it continues to remain quite high.
Thus, in Formula 1 racing cars, drivers apply a force exceeding 150 kg to the pedal. Ordinary drivers driving cars on the roads do not have such physical strength.
In this regard, in the early seventies of the 20th century, many passenger cars began to be equipped with VUT. Thanks to this innovation, the required pressure is greatly reduced. It can be reduced even more, but this way the brake pedal will not be able to keep up with transmitting information through the brake pads towards the discs - braking will speed up and the car's controllability will decrease.
Using the vacuum energy generated in the engine intake manifold is the most obvious and effective method of easing the driver’s effort when pressing the brake. But it has one significant drawback related to the peculiarity of its functioning. The efficiency of amplification is directly dependent on the amount of air pressure. The lower the pressure, the lower the degree of amplification - that is, the driver will have to press the vehicle stop pedal harder.
What is it, why, how does it work
VUT for VAZs is a device that is responsible for braking the car. Due to the vacuum, it helps create additional force on the brake pedal. Thus, it simplifies the operation of the braking system - the car wears out less, stops faster, and the driver needs to put in less effort behind the wheel.
But it's not that simple. On VAZ 2110 cars, brake boosters affect engine performance,
Therefore, you need to listen to their serviceability and look much more closely than to the “jamming” of other parts. At idle, the injection on this car is equal to 3-4.5 milliseconds from 7 to 12 kg of air. At the slightest violation of the mixture ratio (air, fuel and evaporation), the engine will stop working evenly and begin to stall. There will be leaks in the cylinders, due to which the spark plugs may fail, the wear rate will increase, which, in turn, will increase fuel consumption and the cash costs of maintaining the machine. And all these problems are caused by air leaks from a faulty vacuum brake booster of the VAZ 2110.
VUT and trucks
In trucks such as Gazelle or UAZ, the VUT is located in the same place (at the rear wall of the engine compartment), so the procedure for replacing it is practically no different from that given above. The only difference is in size: the diameter of the truck’s VUT is 2 cm larger.
As you can see, replacing a VUT with a VAZ 2110 should not cause any particular difficulties. Getting to this unit is easy; you only need to unscrew a few nuts, and everything else can be easily removed by hand. Difficulties for the car owner can arise only at the diagnostic stage. Sometimes it happens that a crack in a VUT hose is so small that it cannot be seen with the naked eye. In this case, all hope lies only in hearing: air leaking into the collector is almost always accompanied by a thin whistle. But to hear it, you will need to get out of the cab and open the hood.
- 5
- 4
- 3
- 2
- 1
How to inspect the serviceability of the vacuum brake booster on a VAZ-2109
Driving without a brake booster is at least dangerous, since the braking distance is structurally calculated taking into account the operation of this unit. If it malfunctions, this indicator significantly worsens, the driver loses control over the behavior of the car, which in many cases leads to traffic accidents.
Therefore, diagnosing and timely replacement of this unit is the responsibility of every conscientious driver.
Even while driving, there is a uniform method for checking functionality:
- If, when moving at any speed, the gas pedal is very tight, there is a clear problem with this particular unit. Failure can be caused either by a design defect in the unit itself (manufacturing defects) or by mechanical damage (failure of operating valves, breakage of one of the diaphragms);
- The deterioration of the braking properties of the car in this case, when the brake booster breaks down, the effect of the brake pedal is necessarily reinforced by a significant deterioration in the braking distance in relation to the working version.
How to remove the vacuum seal on a VAZ 2110
If self-diagnosis suggests a malfunction of the amplifier, then removing the vacuum seal on a VAZ 2110 is a matter of technique. To begin with, you should prepare a metalworking tool. It's good if there is a service kit. In his absence, you need to prepare the keys: three heads: 10 mm, 13 mm and 17 mm, a wrench with an extension, a pair of Phillips and slotted screwdrivers, and pliers.
Then, you can remove the vacuum seal on the VAZ 2110 in the following order:
- We disconnect the negative terminal from the battery (these are the rules of plumbing);
- We unscrew the upper screws that secure the soundproofing material to the engine shield;
- Disconnect the rubber band securing the expansion tank;
- Without disconnecting the connections of the coolant hoses, we move the tank to the side;
- Now it becomes possible to move back the sound insulation;
- Disconnect the terminal from the fluid level sensor on the brake cylinder cover;
- Holding the return valve, pull out the air supply hose from it;
- Next, you need to disconnect the vacuum seal and the brake cylinder. To do this, you need to unscrew the two outer fastening nuts;
- In order not to disconnect the brake pipes, smoothly moves the unscrewed cylinder away from the booster;
- Let's go to the salon. On the shield, along the perimeter of the brake pedal, we find four studs that are secured with nuts. We unscrew them;
- Then we disconnect the finger that connects the pedal and the amplifier pusher rod;
- After this, you can return to the engine compartment and remove the unscrewed unit.
With the amplifier removed, the pedal bracket will remain. It is secured with two nuts. It should be removed and reinstalled on a new vacuum unit for your VAZ 2110. Assembly occurs in the reverse order. After you managed to change the vacuum seal on a VAZ 2110, you do not need to bleed the brakes, because the brake pipes were not disconnected.
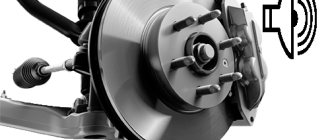
Shorter braking distance means safer driving. The VAZ-2110 will become a safer ride
Russian roads have a bad reputation all over the world.
Of course, an accident can happen in any country, but the quality of the road surface, or rather the lack thereof, creates additional danger for drivers and pedestrians. Therefore, the brakes must be in order in any case, and if you also take into account the dimensions of such cars as the VAZ, this aspect must be monitored very carefully. One of the ways to improve road grip, shorten braking distances, and, therefore, protect yourself and others, is a vacuum brake booster for the VAZ 2110
. In our article we will look at this device in detail.
Brake booster
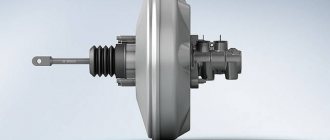
Almost all modern cars are equipped with vacuum brake boosters. They have a fairly simple design, but are very effective and quite reliable.
Purpose
The VUT serves to transmit and increase force from the pedal to the brake master cylinder (MBC). In other words, it simplifies the driver’s actions when braking. Without it, the driver would have to press the pedal with incredible force to force all the working cylinders of the system to function simultaneously.
Device
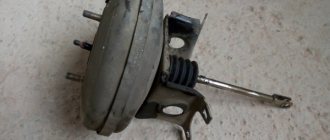
The VUT design consists of:
- housing, which is a sealed metal container;
- check valve;
- plastic diaphragm with rubber cuff and return spring;
- pusher;
- follower valve with rod and piston.
A diaphragm with a cuff is placed in the device body and divides it into two compartments: atmospheric and vacuum. The latter is connected through a one-way (non-return) valve to a source of air vacuum using a rubber hose. In the VAZ 2106, such a source is the intake manifold pipe. It is there that, during operation of the power plant, a vacuum is created, which is transmitted through a hose to the VUT.
The atmospheric compartment, depending on the position of the follow-up valve, can be connected both to the vacuum compartment and to the environment. The valve is moved by a pusher, which is connected to the brake pedal.
The diaphragm is connected to a rod, which is provided to push the master cylinder piston. When it moves forward, the rod presses on the GTZ piston, causing the fluid to be compressed and pumped to the working brake cylinders.
The spring is designed to return the diaphragm to its initial position upon completion of braking.
How it works
The functioning of the “vacuum tank” is ensured by the pressure difference in its chambers. When the car engine is turned off, it is equal to atmospheric pressure. When the power plant is running, the pressure in the chambers is also the same, but there is already a vacuum created there by the movement of the engine pistons.
When the driver presses the pedal, his force is transmitted to the follower valve through the pusher. Having shifted, it closes the channel that connects the compartments of the device. The subsequent stroke of the valve equalizes the pressure in the atmospheric compartment, due to the fact that the atmospheric channel opens. The pressure difference between the compartments causes the diaphragm to bend, compressing the return spring. In this case, the rod of the device presses on the GTZ piston.
The force created by the “vacuum driver” can exceed the driver’s force by 3–5 times. Moreover, it is always directly proportional to the applied.
Location
VUT VAZ 2106 is installed in the engine compartment of the car on the left side of the engine shield. It is secured with four studs on the plate of the brake and clutch pedal bracket. The GTZ is fixed on the body of the “vacuum generator”.
Common breakdowns of VUT VAZ 2106 and their symptoms
Since the vacuum brake booster has a simple mechanical design, it rarely breaks down. But when this happens, it is better not to delay repairs, since driving with a faulty braking system is unsafe.
Breakdowns
Most often, the “vacuum tank” becomes unusable due to:
- violation of the tightness of the hose connecting the inlet pipe of the manifold and the VUT;
- check valve passage;
- rupture of the diaphragm cuff;
- incorrect adjustment of the rod protrusion.
Signs of a faulty VUT
Symptoms that the amplifier is broken may include:
- dips or too tight brake pedal travel;
- self-braking of the car;
- hissing from the amplifier housing;
- reduction in engine speed when braking.
Dips or difficulty moving the brake pedal
With the engine off and the power steering off, the brake pedal should be pressed with great force, and after 5–7 presses it should stop in the upper position. This indicates that the VUT is completely sealed and all valves, as well as the diaphragm, are in working condition. When you start the engine and press the pedal, it should move down with little force. If, when the power unit is not working, it fails, but does not squeeze out when the power unit is running, the amplifier is leaky and, therefore, faulty.
Replacement of VUT
First, remember that repairing the vacuum booster is impossible. This unit is removed and replaced with a new one. In theory and in practice, some do. But at your own responsibility.
Now about the replacement itself.
- Disconnect the brake pedal from the booster rod. The units are connected to each other by a pin. Dismantling is carried out in the area of the pedal assembly and here you will need a simple flat-head screwdriver.
- Let's go and open the hood.
- Disconnect the power supply to the brake fluid level sensor.
- Remove the bracket that holds the hydraulic lines to the frame. A 10mm socket is useful, which is used to unscrew the nut.
- Disconnect the brake master cylinder. To do this, unscrew the 2 nuts holding it to the vacuum unit. Assess the condition of the GTZ. If necessary, replace it too.
- It is not necessary to disconnect the hydraulic lines from the brake cylinder (master). The pipes are quite long, so they can easily be moved to the side so that they do not interfere with the work process.
- Disconnect the pipe that connects the vacuum chamber to the intake manifold.
- Remove the spacer from the front struts.
- Unscrew the 4 nuts that hold the vacuum housing to the car body studs.
- Remove the unit from the studs and pull it out through the engine compartment.
- On the drive fork side, there is a seal with a bracket on the return of the amplifier. He secures the assembly to the frame with 4 studs. They need to be removed. To do this, use a 17mm head to remove 2 nuts, after which the iron structure is removed. Just pull it towards you. Be sure to pull the boot off the stem.
- Install the mounting bracket and a new rubber seal onto the new vacuum booster. Now you can begin full reverse assembly.
Replacing VUT on UAZ vehicles
The amplifier is removed on cars produced by the Ulyanovsk Automobile Plant according to the same principle as on VAZ cars. Let's consider replacing VUT using the example of a UAZ-31519 car:
- first of all, we unscrew the two fastenings of the GTZ to the “vacuum”, usually the cylinder is secured with nuts 17, without disconnecting the brake pipes, we move it to the side;
- under the hood, in the area of the windshield, unscrew the 2 bolts of the VUT amplifier bracket, the standard bolts are 14 mm turnkey;
- in the cabin, at the connection of the rod with the brake pedal, pull out the cotter pin; for this you will need pliers;
- remove the connecting pin;
the two lower nuts of the amplifier bracket are located in the car interior, they are turnkey 17, unscrew this fastener;
- pull off the hose from the fitting of the device, dismantle the VUT;
- disconnect the bracket from the “vacuum” - to do this, unscrew the four nuts (they are 17 mm);
- the check valve is not included with the part, so we move it from the old VUT to the new one;
- We connect the bracket to the new amplifier, carry out the assembly - we install all the parts in their places.
Replacement and cost
In any situation when a breakdown is detected, timely replacement of the entire assembly is necessary. It is possible to correct some shortcomings in the form of replacing the valve, but this procedure may not bring a lasting effect, since the part itself in many cases (if we talk about the VAZ 2109 model) must be replaced due to its advanced age. After installing a new part, be sure to make adjustments.
Breakdowns of vacuum amplifiers do not happen so often with this model, however, due to their age (production of the model was discontinued in 2004), the amplifiers gradually wear out and become unusable over time.
On video of a malfunction of the vacuum booster:
There are many suppliers of parts for VAZ cars on the market. The average price (cost) of a new amplifier is about 2000 rubles.